Mi Smart Compact Projector
User Manual
Read this manual carefully before use, and retain it for future reference.
User Notice
Thank you for choosing the Mi Smart Compact Projector.
Illustrations of product, accessories, and user interface in the user manual are for reference purposes only. Actual product and functions may vary due to product enhancements.
Regulatory Compliance
WEEE
All products bearing this symbol are waste electrical and electronic equipment (WEEE as in directive 2012/19/EU) which should not be mixed with unsorted household waste. Instead, you should protect human health and the environment by handing over your waste equipment to a designated collection point for the recycling of waste electrical and electronic equipment, appointed by the government or local authorities. Correct disposal and recycling will help prevent potential negative consequences to the environment and human health. Please contact the installer or local authorities for more information about the location as well as terms and conditions of such collection points.
CE
Hereby, Fengmi (Beijing) Technology Co., Ltd declares that the radio equipment type Mi Smart Compact Projector is in compliance with Directive 2014/53/EU. The full text of the EU declaration of conformity is available at the following internet address: http://www.mi.com/global/service/support/declaration.html This device is restricted to indoor use when operating in the 5150 to 5350 MHz frequency range.
BT Maximum Transmitter Power : 100mW at 2.4 GHz 2.4835 GHz
Wi-Fi Maximum Transmitter Power : 100mW at 2.4 GHz 2.4835 GHz, 200 mW at 5.15 GHz 5.35 GHz & 5.47 GHz5.725 GHz
The product complies with “RG1 IEC 62471-5:2015”.
Safety Instructions
Before using the product, make sure to carefully read the following safety instructions and safety labels descriptions.
Preventing Electric Shocks and Fire Hazards:
– Only use the provided genuine power adapter.
– Unplug the projector from the electrical outlet during thunderstorms or when it is not being used for a long time, so as to avoid damage caused by a power surge or lightning strike.
– Do not place any flammable objects near this projector so as to avoid fire.
– Do not block any of the vents as this may cause heat build-up inside the projector, and possibly result in a fire.
– Do not block the lens when the projector is turned on. Any object placed close to the lens may get very hot and/or deformed, and may even cause a fire. Safety Precautions:
– Do not place this projector on an unstable platform, stand or table so as to prevent it from falling and causing serious damage or personal injuries.
– Do not look directly into the lens to avoid eye damage as the projector will emit strong light during working.
– Do not attempt to disassemble this projector as there are dangerous high voltage components inside that can cause personal injuries. This projector must only be maintained or repaired by a highly experienced or qualified technician.
– Do not expose this projector to rain or moisture (its operating humidity is 2080%).
– Do not immerse this projector in, nor expose it to water or other liquids. Immediately unplug the projector if any liquid or object got into its housing, and have it checked by a qualified technician before using it again.
– Do not place this projector in any of the following environments:
- In poorly ventilated or narrow spaces.
- Close to a fire alarm.
- Near devices that produce a strong magnetic field.
- In extremely hot, cold or humid environments.
- In direct sunlight.
Safety Label Description
 |
This warning symbol informs the user that this product contains non-insulated voltage sources that can cause an electric shock. Coming into contact with any internal component may result in an electric shock. |
| This symbol informs the user about important handling and maintenance related information. Please read this information carefully to ensure proper use. | |
| This symbol informs the user to be aware of high temperatures. | |
| This symbol informs the user to avoid touching this part. | |
| Transportation Instructions: It is recommended to transport this projector in its original or similar packaging. |
Package Contents
When opening the packaging, check the contents of the box against the list below. If there is anything missing, please contact the seller in time.
| Mi Smart Compact Projector | |
| Remote Control | |
| Power Adapter | |
| User Manual |
![]() Note:
Note:
– The actual contents vary depending on the country (or region) of sale, please refer to the actual product.
– Retain the original packaging for future storage or transportation.
Product Overview
Exterior
Projection Lens
Camera
On/Off Button
Rubber Feet Air Inlet
![]()
Heat Dissipation Vent
Caution
– Do not place any flammable objects near the heat dissipation vent.
– Do not block any of the vents as this may cause heat build-up inside the projector.
– Do not look directly into the lens to avoid eye damage as the projector will emit strong light during working.
Connection Ports
1/4” Female Threaded Tripod Mount
Connection Ports
![]()
- DC IN
– DC in port 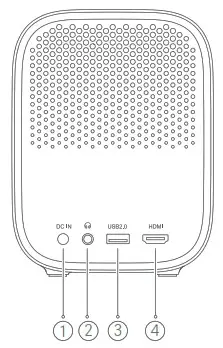
– Headphone port- USB2.0
– Supports the USB 2.0 protocol
– Supports USB to Ethernet adapters - HDMI
– HDMI input port
Power Indicator
![]()
The power indicator (white light) indicates the projector status as follows:
– After plugging in the power adapter, the indicator will blink and then turn off. Press the on/off button to turn on the projector.
– While turning on the projector, the indicator light will blink.
– After loading the system, the indicator light will turn off.
– After turning off the screen, the indicator light will turn on.
– While turning off the projector, the indicator light will blink.
– After shutting down the system, the indicator light will turn off.
Remote Control
![]()
![]() Note:
Note:
– The remote uses two AAA batteries.
– Pay attention to the positive and negative poles when installing batteries in the remote control.
– When battery leaks, immediately wipe away any fluid with a dry cloth and replace the batteries with new ones.
– Dispose of used batteries according to local waste disposal rules and regulations of the country or area you live in.
Projection Distance and Screen Size
Determine the distance between the projector and the wall or screen according to the desired screen size.
| Screen Dimensions (SD) | Projection Distance (D) | Relative Height (H) |
| 60″ | 159.8 cm | 11.1 cm |
| 80″ | 213.5 cm | 11.1 cm |
| 100″ | 267.3 cm | 11.1 cm |
| 120″ | 321 cm | 11.1 cm |
Screen Dimensions (SD): The diagonal size of the projection screen (in inches).
Projection Distance (D): The distance between the projector and the wall or screen (in cm).
Relative Height (H): The distance from the bottom of the projector to the bottom edge of the projected image (in cm).
![]() Note:
Note:
The dimensions in the table above are for reference only, they are approximate and may slightly differ from the actual values. 12
Quick Start Guide
Pairing the Remote
![]() After installing the batteries in the remote control, press the OK button to start pairing.
After installing the batteries in the remote control, press the OK button to start pairing.
![]() Point the remote at the bottom right corner of the projector, then simultaneously press and hold the return and the app button. Once you hear a beep, it indicates that the pairing process has started. Release the buttons and wait for the process to complete.
Point the remote at the bottom right corner of the projector, then simultaneously press and hold the return and the app button. Once you hear a beep, it indicates that the pairing process has started. Release the buttons and wait for the process to complete.
![]() “Remote paired successfully” will appear on the projection screen to indicate the remote was paired with the projector successfully.
“Remote paired successfully” will appear on the projection screen to indicate the remote was paired with the projector successfully.
Note: Keep the remote control within 20 cm of the projector during the pairing process.
Auto Focus
Go to Settings > Image > Focus. Auto focus will complete automatically in about 10 seconds. Afterwards, press the left and right button on the remote control to manually fine tune.
When the projector does not focus after moving its position, there are two possible causes: 1. Auto Focus in not enabled. Go to Settings > Projector > Auto Focus to enable it. 2. The projector’s internal sensor was not triggered when the projector was moved. Simply wiggle the projector to trigger its sensor or manually focus the projector.
![]()
Keystone Correction
Go to Settings > Image > Keystone Correction. Use the left and right buttons to select Coarse Tune, Fine Tune, or Reset. Use the up and down buttons to adjust the screen shape.
![]()
Bluetooth Speakers
The projector has two high-quality built-in speakers with a total output of 10 W. These speakers can be used as stand-alone Bluetooth speakers.
![]()
Note: This projector can also be connected to other Bluetooth devices, such as headsets, speakers, game controllers, and keyboards. When connecting to a Bluetooth speaker or headset, Bluetooth audio needs to be set to output.
Smart Temperature Control
The LED light source and motherboard temperature are monitored by the projector’s system and the fan speed is automatically adjusted based on the temperature detected by the sensor. When the projector’s temperature gets too hot, an on-screen warning will appear. When the projector’s temperature exceeds the limit, an on-screen warning will appear, and the projector will turn off automatically.
Routine Maintenance
Heat Dissipation Requirements
![]()
Cleaning and Maintenance
Note: Do not place any objects within 20 cm of the projector’s air vents, as this will affect the heat dissipation effect.
Turn off and unplug the projector before cleaning. Gently wipe the projector’s housing and lens with a suitable cleaning cloth, periodically. Do not use any abrasive cleaning products, solvents, chemicals, or other rough objects so as to avoid scratches or corrosion.
![]() Note:
Note:
– This projector is not water resistant. Do not allow any liquid to get into the projector’s power indicator, air vents, connection ports, and speaker grilles.
– Only use a cleaning cloth that is suitable for cleaning lenses.
Product Certifications
![]()
HIGH-DEFINITION MULTIMEDIA INTERFACE
The terms HDMI, HDMI High-Definition Multimedia Interface, and the HDMI Logo are trademarks or registered trademarks of HDMI Licensing Administrator, Inc.
![]()
![]()
For DTS patents, see http://patents.dts.com. Manufactured under license from DTS Licensing Limited. DTS, the Symbol, DTS and the Symbol together, DTS-HD, and the DTS-HD logo are registered trademarks and/or trademarks of DTS, Inc. in the United States and/or other countries. © DTS, Inc. All Rights Reserved.
![]()
Manufactured under license from Dolby Laboratories. Dolby, Dolby Audio, and the double-D symbol are trademarks of Dolby Laboratories.
![]()
Model: M055MGN Net Weight: 1.3 kg
![]()
Color: White
Item Dimensions: 115 × 150 × 150 mm
![]()
Input: 19 V 3.42 A
Manufactured for: Xiaomi Communications Co., Ltd.
Manufactured by: Fengmi (Beijing) Technology Co., Ltd. (a Mi Ecosystem company)
Address: 301, 3F, Building 3, No.10 Yard, Barracks South Street, Renhe Town, Shunyi District, Beijing, China For further information, please go to www.mi.com
Importer:
Beryko s.r.o.
Na Roudné 1162/76, 301 00 Plze
www.beryko.cz