![]()
Midland – WR120B/WR120EZ – NOAA Emergency Weather Alert Radio
Midland – WR120B/WR120EZ – NOAA Emergency Weather Alert Radio
Specifications
- DIMENSIONS: 1 x 2 x 5.3 inches
- WEIGHT: 1 pounds
- DISPLAY TYPE: LCD
- SIREN ALARM: 90dB
- NUMBER OF ALERTS: 80+
- BRAND: Midland
Introduction
The Midland WR120B is a weather alert radio that provides early warning against the changing and harsh weather condition. It comes with the ability to be programmed to up to 25 locations. The weather radio has the ability to alert over 80 weather and emergency alerts. It can be customized to over 80+ emergency alerts. It features a built-in alarm clock along with emergency power back up. Another prominent feature of the radio is that it has trilingual display including English, Spanish and French.
Quick Start Instructions
- Set the ON/OFF switch located on the right side of the radio to the ON position.
- Pull out the antenna and extend to its full length.
- Insert 3 AA batteries (not included).
- Plug the AC Adapter into the POWER jack on the back of the radio and the other end into a standard outlet.
- Follow the prompts on the display screen using up and down to move through the options and SELECT to choose the desired option.
- The radio will first display WELCOME, and then SET LANGUAGE
- To SET LANGUAGE press the SELECT button:
- Choose your language by pressing up or down, then SELECT.
- To SET LOCATION press the SELECT button:
- Press up or down until SINGLE is displayed, then press SELECT.
- To SET COUNTRY press SELECT to program your county for position 01:
- Press up or down to choose your country, then press SELECT.
- Press up or down to choose your state or province, then press SELECT.
- Press up or down to choose your county or area, then press SELECT.
- To SET TIME press the SELECT button:
- Set the time using ► up down and ◄ then press SELECT.
- To SET CHANNEL press the SELECT button:
- Tune the channel to the desired broadcast using up or down
- To SET VOLUME press the VOLUME UP or VOLUME DOWN buttons.
To complete set-up, press the SELECT button.
Welcome
Congratulations on your purchase of the
Midland WR-120 All Hazards Alert Weather Radio with S.A.M.E.
All-Hazards means the radio is the fastest, most reliable means of receiving information on life threatening weather such as tornadoes, hurricanes, floods, ice storms as well as civil emergencies such as Amber alerts, hazardous explosions, fires and chemical spills. This information is broadcast 24 hours a day, 7 days a week so you can stay informed no matter what time of day it is.
In addition to all hazards, the WR-120 also has S.A.M.E. technology (Specific Area Message Encoding). This gives you the option of screening out unwanted broadcasts and receiving alerts only specifically targeted to the area in which you live.
Midland is proud to say the WR-120 is Public Alert Certified – meaning it has been tested and approved to meet the Consumer Electronics Association standards of reliability and quality as a product carrying public safety warnings. Therefore it is a quality piece of electronic equipment, skillfully constructed with the finest components and is designed for reliable and trouble-free performance for years to come. For more information about S.A.M.E. Codes please visit our website at www.midlandusa.com
S.A.M.E. (Specific Area Message Encoding) Codes
For USA:
- The National Weather Service Toll-Free Number
- 1-888-NWS-SAME (1-888-697-7263)
- National Weather Service Website
www.nws.noaa.gov/nwr/indexnw.htm
For Canada
- Environment Canada’s Meteorological Service Number 1-877-789-7733 (Canada Only)
- Environment Canada’s Meteorological Service
- Midland Radio Corporation website www.midlandusa.com
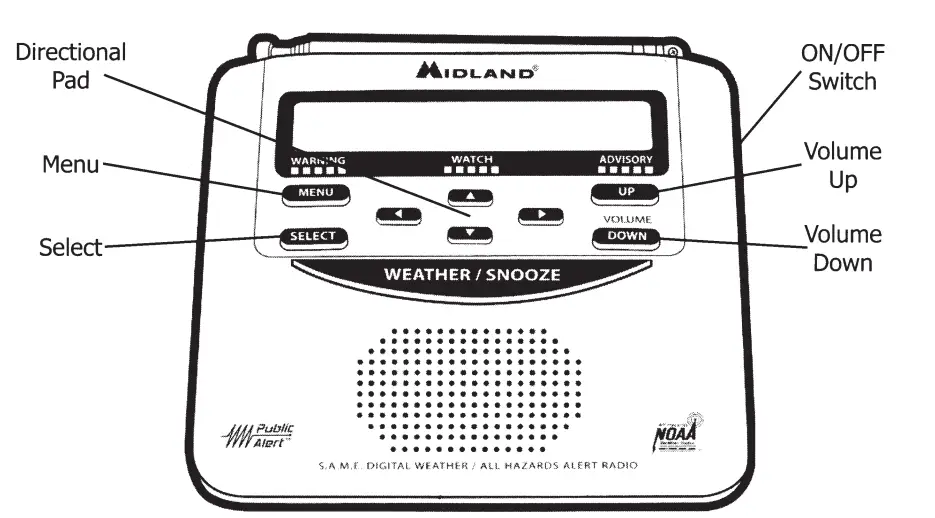
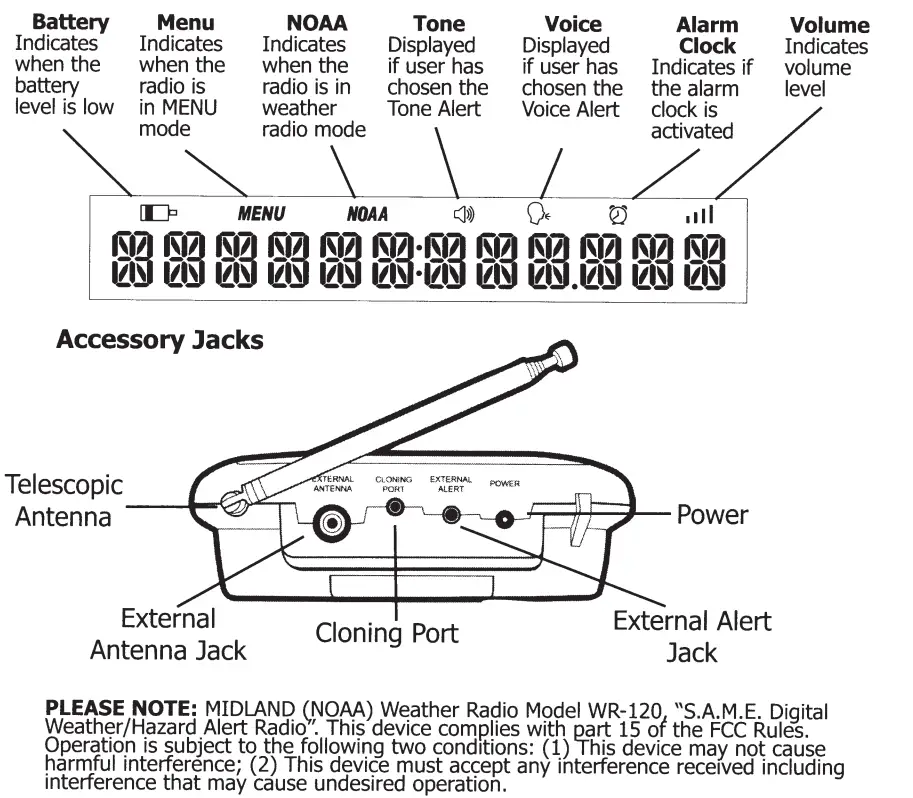
Getting to know your Weather Radio
WR-120 Features
Icons on the Display
Setting up your Weather Radio
Set Time
- Press MENU to open menu options.
- Press up to scroll through menu to SET TIME.
- Press SELECT (hour option will begin flashing).
- Press up until current hour is displayed.
(Note: AM/PM changes as you scroll through the hours.)
- Press ► to save current hour and advance to minute settings.
- Program both minute digits the same way.
- Press SELECT to store the current time.
- Press MENU to exit menu mode.
Set Alarm
- Press MENU to open menu options.
- Press up to scroll through menu to SET ALARM, then press SELECT.
- Press up to display ON. Press SELECT.
- Press up until the hour you want is displayed.
(Note: AM/PM changes as you scroll through the hours.)
- Press ►to save alarm hour and advance to alarm minutes. Program both minute digits the same way.
- Press SELECT to save the alarm time.
- Press MENU to exit menu mode.
To temporarily silence the sleep alarm, press the WEATHER/ SNOOZE button. This will advance the alarm time by 8 minutes. To silence the alarm for the remainder of the day, press the MENU button.
Set Language
- Press MENU to open menu options.
- Press up to scroll through menu to SET LANGUAGE then press SELECT.
- Press up to choose “ENGLISH”, “ESPANOL” or “FRANCAIS” then press SELECT.
- Press MENU to exit menu mode.
Programming the radio for your area
Your WR-120 All Hazards Weather Alert Radio comes preprogrammed
to receive weather and hazard alert transmissions for all S.A.M.E. codes within range of the transmitter of the selected channel. Follow these simple instructions to program your radio to receive alerts just for your county.
“Single” County (S.A.M.E.) Code
- Press MENU to open menu options.
- Press _. to scroll through menu to SET LOCATION, then press SELECT.
- Press _. to SINGLE then press SELECT.
- 01 EMPTY will be displayed. Press SELECT.
- Press • or T to select the desired country then press SELECT.
- Press • or T to select the desired state/province then press SELECT.
- Press • or T to select the desired location then press SELECT.
- Press MENU to exit menu mode.
“Multiple” County Code:
For multiple counties, follow the above instructions. At step 3, press • until MULTIPLE is displayed. The “NEARBY” counties will come up automatically to make selection easy. You can program up to 25 different location codes.
Note: To manually enter a FIPS code, press ► while # # LOCATION is displayed. However, selecting a NEARBY will be unavailable. NEARBY locations are based on weather transmitter coverage area, not a geographical location.
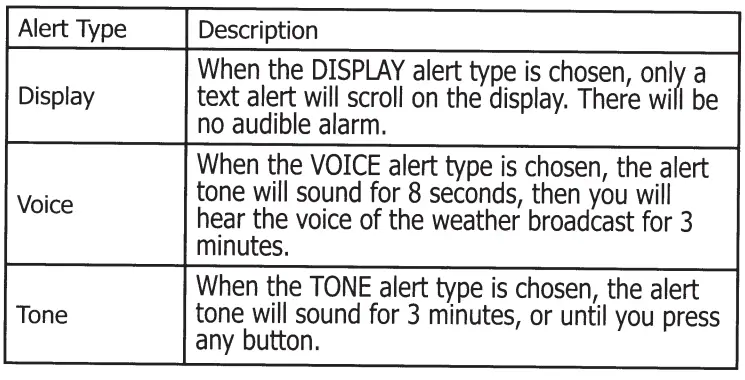
Set Alert Type (Display, Voice or Tone)
- Press MENU to open menu options.
- Press up to scroll through menu to ALERT TYPE, then press SELECT.
- Press up to choose VOICE, TONE or DISPLAY then press SELECT.
- Press MENU to exit menu mode.
Reviewing Recent Alerts
The WR-120 All Hazards Weather Alert Radio can store up to 10 different Weather/Hazard alerts. You can review all alerts still in effect by pressing • to scroll through the active alert memory on your weather radio. A double beep indicates the end of the list. “NO MESSAGE” will be displayed if no alerts are active.
Alert Test
- Press MENU to open menu options.
- Press up to scroll through menu to ALERT TEST.
- Press SELECT to sound the alert siren.
- Press MENU or SNOOZE to silence the siren then press MENU exit menu mode.
Note: Ensure ON/OFF switch is in the ON position.
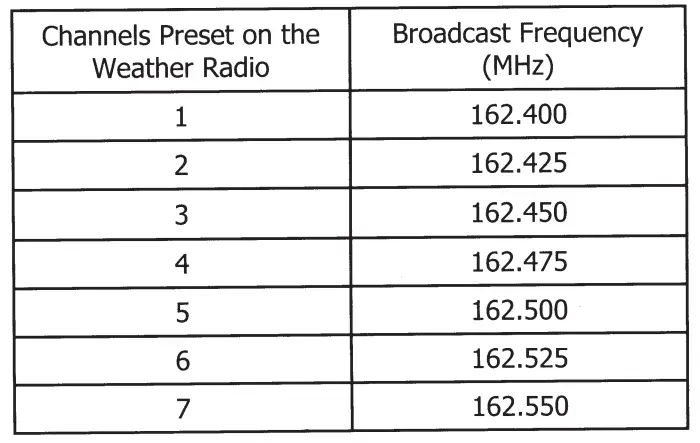
Set Channel/Volume
- Press MENU to open menu options.
- Press up to scroll through menu to SET CHANNEL then press SELECT.
- *Tune the channel to the desired broadcast by using up or down
Find the channel for your area by visiting http://www.nws.noaa.gov/nwr/nwrbro.htm and reviewing the corresponding frequency and channel for your area using the chart below. - **Adjust the volume to a comfortable level by using VOLUME UP or VOLUME DOWN.
- Press MENU to exit menu mode.
Press the ► button scan to the next channel available channel Ensure ON/OFF switch is in the ON position
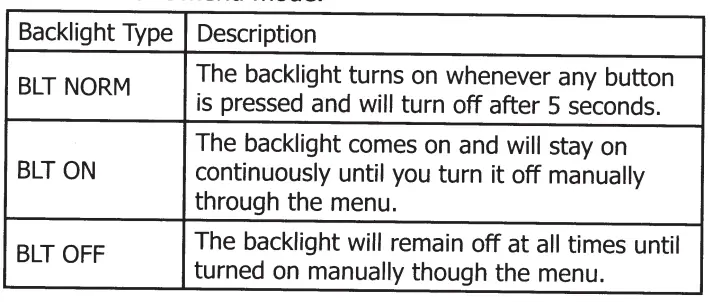
Backlight
- Press MENU to open menu options.
- Press up to scroll through menu to BACKLIGHT, then press SELECT.
- Press up to choose BLT NORM, BLT ON, BLT OFF then press SELECT.
- Press MENU to exit menu mode.
Button Beeps
- Press MENU to open menu options.
- Press up to scroll through menu to BUTTON BEEPS, then press SELECT.
- Press up to choose ON or OFF then press SELECT.
- Press MENU to exit menu mode.
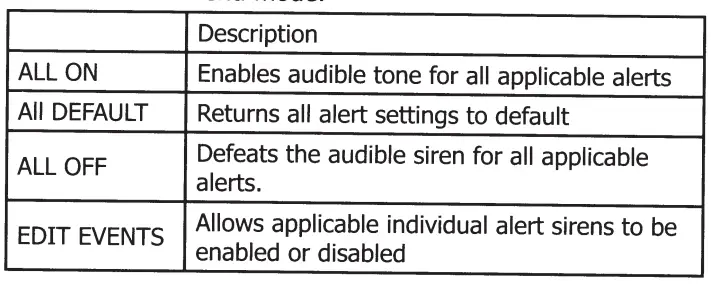
Set Events
- Press MENU to open menu options.
- Press • to scroll through menu to SET EVENTS, then press SELECT.
- Press • to scroll through the options ALL ON, ALL OFF, ALL DEFAULT, EDIT EVENTS then press SELECT.
- Press MENU to exit menu mode.
Edit Events
- Press MENU to open menu options.
- Press • to scroll through menu to SET EVENTS, then press SELECT.
- Press • to scroll to EDIT EVENTS then press SELECT.
- Press • to choose the desired alert then press SELECT.
- Press • to toggle ON/OFF the audible notification for the selected alert.
- Press MENU to exit menu mode.
*For a complete list of editable events, please visit our website at www.midlandusa.com
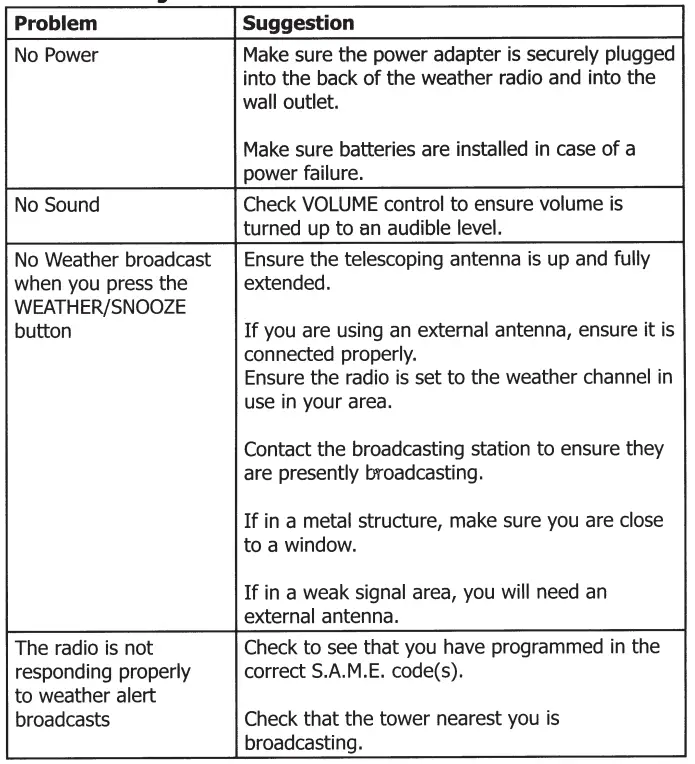
Troubleshooting
For Technical Support Contact: Midland Radio Corporation 5900 Parretta Drive
Kansas City, Missouri 64120 Phone: (816) 241-8500 Fax: (816) 241-5713
E-mail: [email protected] Web site: www.midlandusa.com
Reception
Typical broadcasts are within reception distance of 25-40 miles of the weather broadcast station. Location, conditions of weather and terrain effect the reception. If you find reception is not good in your area, try different locations in your home or office to find a spot of improved reception.
NOTE: Placement near a window usually improves reception.
If a weather broadcast is not heard on any of the 7 channels, contact your local weather office and verify that the closest station is on air and the channel frequencies you are using are correct.
NOTE: If you live in a metal structure or in a “fringe” area, you may need an external antenna to improve reception.
Test Signals Broadcast
All Weather Service stations periodically transmit test signals. You can find out when your local station broadcasts test signals by calling the NOAA National Weather Service Forecast Office (listed under “Weather” in the Federal Government section of the telephone book).
In Canada these tests are performed every Wednesday at 12:00 noon.
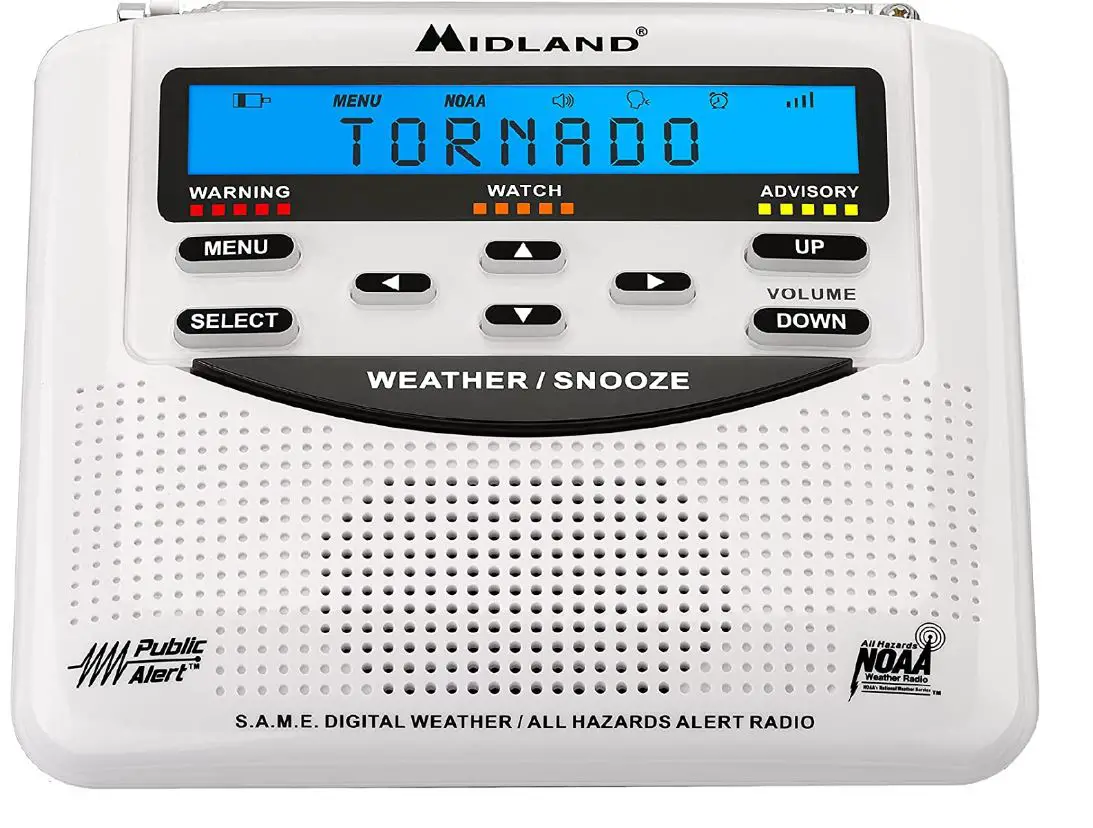
During a test, the yellow advisory LED will light up and the “Weekly Test” or “Monthly Test” message will be visible on the display. While disabled in the menu, the radio will not sound an audible alert tone to avoid giving the impression of an actual alarm. The visual response to the test is confirmation that your radio is working properly.
If an alert is not received within 10 days, CHECK RECEPTION will be displayed along with an audible beep repeating every 10 minutes. This notification is automatically removed once an alert is received. To manually clear it, you must reset the power by removing the batteries and power adapter for 10 seconds. After the ten seconds have passed, re-insert batteries and plug back in. Even without power for this short amount of time, your S.A.M.E. codes will remain programmed as before. You will, however, need to re-set the time and any alarms you had previously programmed into the radio.
Batteries provide approximately 5 hours of emergency power or 75 hours of standby power for the radio in case of a power outage.
To reset the radio to the factory defaults, press and hold the WEATHER/ SNOOZE button while powering on the unit.
One Year Limited Warranty:
MIDLAND Radio Corporation will repair or replace, at its option without charge, your WR-120 All Hazards Alert Weather Radio which fails due to a defect in material or workmanship within ONE YEAR following the initial consumer purchase. This warranty does not include any antennas, which may be a part of (or included with) the product under warranty, or the cost of labor for removal or re-installation of the product in a vehicle or other mounting. Performance of any obligation under this warranty may be obtained by returning the product under warranty, freight prepaid, along with a copy of the original sales receipt to Midland Radio Corporation at the address provided below. This warranty gives you specific legal rights, and you may also have other rights, which vary from state to state.
NOTE: The above warranty applies only to merchandise purchased in the United States of America or any of the territories or possessions thereof, or from a U.S. Military exchange. For warranty coverage on merchandise purchased elsewhere ask your dealer.
Service
If your Midland Weather Radio fails to operate properly, check the “Troubleshooting” section in this manual before returning it for service. If necessary, return as follows:
- Pack the unit in its original box and packing. Then pack the original box in a suitable shipping carton. Caution: Improper packing may result in damage during shipment.
- Include the following:
- Full description of any problems
- Daytime telephone number, name & address
- For warranty service include a photocopy of the bill of sale from an authorized dealer or other proof of purchase showing the date of sale.
- You do not need to return accessory items (AC/DC Adapter, Batteries, Owner’s Guide) unless they might be directly related to the problem.
- A flat rate of $25.00 will apply to repairs not covered by warranty or units that are over one year old. Send only cashier’s check, money order or Master Card or Visa card number.
Midland Radio Corporation
- 5900 Parretta Drive
- Kansas City, Missouri 64120
- Phone: (816) 241-8500
- Fax: (816) 241-5713
- E-mail: [email protected]
- Website: www.midlandusa.com
DOWNLOAD RESOURCES
https://manualsbrain.com/en/manuals/1931711/?page=2
FREQUENTLY ASKED QUESTIONS
Can you receive regular AM/FM stations on this unit?
No, you can’t receiver regular AM/FM stations on this unit.
Why is my Midland weather radio beeping?
The Midland WR-120 desktop NOAA weather radio knows it is supposed to receive a weekly test from the National Weather Service every seven days. If the radio goes for ten days without receiving a test, it gives out one audible beep every ten minutes.
How do I stop my weather radio from beeping?
SOLUTION: To cancel the beeping, unplug the radio from the wall, turn the radio over, and remove one battery. Replace the battery and plug the radio back in.
How does NOAA radio work?
NOAA Weather Radio is a nationwide network of radio stations broadcasting continuous weather information directly from National Weather Service (NWS) offices across the country. The broadcasts include warnings, watches, forecasts, current weather observations, and other hazard information, 24 hours a day.
Can I use the Midland WR120B in a mobile vehicle?
Yes, you can. Just make sure to use the suction cup mount to keep it in place.
What is the best way to mount this weather radio?
The best way to mount this weather radio is by using the suction cup mount that comes with it.
Is a weather radio the same as an emergency radio?
A weather alert radio automatically responds when it receives an emergency alert, even if you aren’t listening to it. To receive alerts, a weather band radio must be turned on, like when you’re listening to music, and tuned to the local weather station.
How do I set the time and date on my AcuRite weather station?
Set Time and Date on LCD Indoor Display
To access the SET MODE, press and hold the “gear” or “SET” button for 10 seconds.
Use the “+”/”-” or “UP”/”DOWN” arrow buttons to adjust the currently flashing setting until the desired value is displayed.
What kind of batteries does an Acurite weather station take?
Be sure to choose the same channel that the A-B-C switch on the display is set to. STEP 3: Insert 4 AA batteries into the sensor, following the polarity (+/-) diagram in the battery compartment DO NOT use heavy duty or rechargeable batteries.
Can you use rechargeable batteries in AcuRite weather station?
Rechargeable batteries are not recommended for use with AcuRite products because they may cause performance irregularities due to the voltage instability of these types of batteries. Mixing different battery types (brands, old/new, etc.) is not recommended.
Why is my atomic clock not updating?
If the signal is not being received: Try powering down the clock (unplug it or remove the batteries), then turn it on again to see if it synchronizes. If the clock uses batteries, check them and replace if necessary. If the radio controlled clock is a desk top unit, try rotating it 90 degrees.
What is the main disadvantage of using radio atomic clocks?
Distance and Accuracy
The method by which atomic clocks work has an inherent limitation – the time it takes for the radio signal to reach the clock. The signal gives the time at the point the signal left the station, but the actual time at which it reaches your clock will be slightly later.
VIDEO
Midland – WR120B/WR120EZ – NOAA Emergency Weather Alert Radio
www://midlandusa.com/