OPERATOR’S MANUAL
Cat. No. / No de cat.
MXF002
MX FUEL™ CARRY-ON ™ 3600W/1800W POWER SUPPLY
WARNING To reduce the risk of injury, the user must read and understand the operator’s manual.
IMPORTANT SAFETY INSTRUCTIONS
WARNING Read all safety warnings and all instructions. Failure to follow the warnings and instructions may result in electric shock, fire, and/or serious injury. Save all warnings and instructions for future reference.
WORK AREA SAFETY
- To reduce the risk of injury, close supervision is necessary when an appliance is used near children.
ELECTRICAL SAFETY
- Power cord plugs must match the outlet. Never modify the plug in any way. Do not use any adapter plugs with earthed (grounded) power tools. Unmodified plugs and matching outlets will reduce the risk of electric shock.
- Avoid body contact with earthed or grounded surfaces, such as pipes, radiators, ranges, and refrigerators. There is an increased risk of electric shock if your body is earthed or grounded.
- To reduce the risk of electric shock, do not put equipment in water or other liquid. Do not place or store appliances where they can fall or be pulled into a tub or sink.
- Do not abuse the cord. Never use the cord for carrying, pulling, or unplugging the power tool. Keep cord away from heat, oil, sharp edges, or moving parts.
- Arrange cords carefully to avoid hazardous environments. Tripping or snagging on cords can cause injury and product damage. Do not allow cords to run through puddles or across wet ground.
- Do not unplug by pulling on the cord. To unplug, grasp the plug, not the cord.
- Unplug the cord from the outlet when not in use and before servicing or cleaning.
- Always use a suitable extension cord to reduce the risk of electric shock.
- If operating equipment in a damp location is unavoidable, use a ground fault circuit interrupter (GFCI) protected supply.
The use of a GFCI reduces the risk of electric shock.
PERSONAL SAFETY
- Do not overreach. Keep proper footing and balance at all times. This enables better control of the power supply in unexpected situations.
- Do not use a ladder or unstable support. Stable footing on a solid surface enables better control of the power supply in unexpected situations.
BATTERY TOOL USE AND CARE
- Recharge only with the charger specified by the manufacturer. A charger suitable for one type of battery pack may create a risk of fire when used with another battery pack.
- Use power supply only with specifically designated battery packs. Use of any other battery packs may create a risk of injury and fire.
- Do not short circuit. A short-circuited battery pack may cause fire, personal injury, and product damage. A battery pack will short circuit if a metal object makes a connection between the positive and negative contacts on the battery pack. Do not place a battery pack near anything that may cause a short circuit, such as coins, keys, or nails in your pocket.
- Do not allow fluids to flow into the battery pack. Corrosive or conductive fluids, such as seawater, certain industrial chemicals, bleach or bleach-containing products, etc., can cause a short circuit.
- Under abusive conditions, liquid may be ejected from the battery; avoid contact. If contact accidentally occurs, flush with water. If liquid contacts eyes, additionally seek medical help. Liquid ejected from the battery may cause irritation or burns.
- Do not use a battery pack or equipment that is damaged or modified. Damaged or modified batteries may exhibit unpredictable behavior resulting in fire, explosion, or risk of injury.
- Do not expose a battery pack or equipment to fire or excessive temperature. Exposure to fire or temperature above 265°F (130°C) may cause an explosion.
- Follow all charging instructions and do not charge the battery pack or equipment outside the temperature range specified in the instructions. Charging improperly or at temperatures outside the specified range may damage the battery and increase the risk of fire.
CHARGER USE AND CARE
- Caution – To reduce the risk of injury, charge MILWAUKEE Lithium-Ion packs only in their MILWAUKEE Lithium-Ion charger. Other types of batteries may burst to cause personal injury and damage. Do not wire a battery pack to a power supply plug or car cigarette lighter. Batteries will be permanently disabled or damaged.
- Charge only MILWAUKEE MX™ Lithium-Ion packs. Other types of batteries may burst to cause personal injury or damage.
- Avoid dangerous environments. Do not charge the battery pack in the rain, snow, damp or wet locations. Do not use a battery pack or charger in the presence of explosive atmospheres (gaseous fumes, dust, or flammable materials) because sparks may be generated when inserting or removing the battery pack, possibly causing a fire.
- Charge in a well-ventilated area. Do not block charger vents. Keep them clear to allow proper ventilation. Do not allow smoking or open flames near a charging battery pack. Vented gases may explode.
- Maintain charger cord. When unplugging the charger, pull the plug rather than the cord to reduce the risk of damage to the electrical plug and cord. Never carry a charger by its cord. Keep cord from heat, oil, and sharp edges. Make sure the cord will not be stepped on, tripped over, or subjected to damage or stress. Do not use the charger with a damaged cord or plug. Have a damaged charger replaced immediately.
- Use only recommended attachments. Use of an attachment not recommended or sold by the battery charger or battery pack manufacturer may result in a risk of fire, electric shock, or personal injury.
- Unplug the charger when not in use. Remove battery packs from unplugged chargers.
- To reduce the risk of electric shock, always unplug the charger before cleaning or maintenance. Do not allow water to flow into the plug. Use a Ground Fault Circuit Interrupter (GFCI) to reduce shock hazards.
- Store your battery and charger in a cool, dry place. Do not store battery packs where temperatures may exceed 120°F (50°C) such as in direct sunlight, a vehicle, or a metal building during the summer.
SERVICE
- Has your power supply been serviced by a qualified repair person using only identical replacement parts? This will ensure that the safety of the power supply is maintained.
- Never service damaged battery packs. Service of battery packs should only be performed by the manufacturer or authorized service providers.
SPECIFIC SAFETY RULES
- This equipment has arcing or sparking parts which should not be exposed to flammable vapors. Locate equipment at least 18″ (457 mm) above the floor when used in a repair facility.
- Do not expose to rain.
- For indoor use or temporary outdoor use. Exercise reasonable care when using in wet conditions.
- Connect only to properly grounded outlets.
- Do not use if the cord or batteries are damaged in any way.
- Use proper extension cord. Keep cords dry and off the ground; use a GFCI protected circuit while charging.
- Chemical Burn Hazard. Keep coin cell batteries away from children.
- Store indoors.
- Do not operate multiple power supplies in parallel.
- Operating this power supply less than 3′ (1 m) from building or other obstruction can cause overheating and damage to the power supply. For proper cooling, allow at least 3′ (1 m) of empty space above and around the power supply.
- Do not connect power supply output to a building’s electrical system.
- The power supply ground terminal is connected to the ground terminals of each receptacle. Before using the ground terminal, consult a qualified electrician, electrical inspector, or local agency having jurisdiction for local codes or ordinances that apply to the intended use of the generator.
- The power supply is isolated from the frame and from the AC receptacle ground pin.
- Electrical devices that require a grounded receptacle pin connection will not function if the receptacle ground pin is not functional.
- Do not exceed the load rating of the power supply. Be mindful of the individual and accumulative electrical load for all attachments. Exceeding the load capacity of the power supply could result in overheating, fire, electrical shock, or injury.
- Do not overload the power supply’s capacity. Exceeding the power supply’s wattage/amperage capacity may damage the power supply and/or electrical devices connected to it.
- Attachments may require more power consumption than this power supply is capable of providing. Check the attachment’s manual to avoid damage to the attachment or risk of personal injury.
- Always follow all safety rules recommended by the manufacturer of attachments.
- Do not use this power supply to provide power for emergency medical equipment or life support devices.
- Never leave the power supply unattended while in use.
- Know your power supply. Read the operator’s manual carefully. Learn its applications and limitations, as well as the specific potential hazards related to this product. Do not alter or modify the power supply from the original design or function. Misuse and improper handling can cause injury.
- Always use common sense and be cautious when using tools. It is not possible to anticipate every situation that could result in a dangerous outcome. Do not use this tool if you do not understand these operating instructions or you feel the work is beyond your capability; contact Milwaukee Tool or a trained professional for additional information or training.
- Maintain labels and nameplates. These carry important information. If unreadable or missing, contact a MILWAUKEE service facility for a free replacement.
INSTALLATION GROUNDING
DANGER
Improperly connecting the grounding wire can result in the risk of electric shock. Check with a qualified electrician if you are in doubt as to whether the outlet is properly grounded. Do not modify the plug provided with the equipment. Never remove the grounding prong from the plug. Do not use the equipment if the cord or plug is damaged. If damaged, have it repaired by a MILWAUKEE service facility before use. If the plug will not fit the outlet, have a proper outlet installed by a qualified electrician.
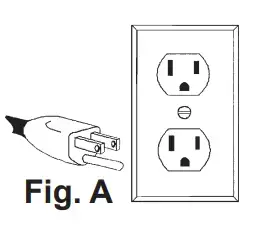
Grounded Tools (Three-Prong Plugs)
Tools marked “Grounding Required” have a three-wire cord and three-prong grounding plug. The plug must be connected to a properly grounded outlet(See Figure A). If the tool should electrically malfunction or break down, grounding provides a low resistance path to carry electricity away from the user, reducing the risk of electric shock. The grounding prong in the plug is connected through the green wire inside the cord to the grounding system in the tool. The green wire in the cord must be the only wire connected to the tool’s grounding system and must never be attached to an electrically”live” terminal. Your tool must be plugged into an appropriate outlet, properly installed, and grounded in accordance with all codes and ordinances. The plug and outlet should look like those in Figure A.
EXTENSION CORDS
Grounded tools require a three-wire extension cord. Double insulated tools can use either a two or three-wire extension cord. As the distance from the supply outlet increases, you must use a heavier gauge extension cord. Using extension cords with inadequately sized wire causes a serious drop in voltage, resulting in loss of power and possible tool damage. Refer to the table shown to determine the required minimum wire size. The smaller the gauge number of the wire, the greater the capacity of the cord. For example, a 14 gauge cord can carry a higher current than a 16 gauge cord. When using more than one extension cord to make up the total length, be sure each cord contains at least the minimum wire size required. If you are using one extension cord for more than one tool, add the nameplate amperes and use the sum to determine the required minimum wire size.
Guidelines for Using Extension Cords
- If you are using an extension cord outdoors, be sure it is marked with the suffix “W-A” (“W” in Canada) to indicate that it is acceptable for outdoor use.
- Be sure your extension cord is properly wired and in good electrical condition. Always replace a damaged extension cord or have it repaired by a qualified person before using it.
- Protect your extension cords from sharp objects, excessive heat, and damp or wet areas.
| Recommended Minimum Wire Gauge For Extension Cords* | |||||
| Nameplate Amps | Extension Cord Length | ||||
| 25′ | 50’ | 75’ | 100’ | 150’ | |
| 0 – 2.0 2.1 – 3.4 3.5 – 5.0 5.1 – 7.0 7.1 – 12.0 12.1 – 16.0 16.1 – 20.0 |
18 18 18 18 16 14 12 |
18 18 18 16 14 12 10 |
18 18 16 14 12 10 — |
18 16 14 12 10 — — |
16 14 12 12 — — — |
* Based on limiting the line voltage drop to five volts at 150% of the rated amperes.
READ AND SAVE ALL INSTRUCTIONS FOR FUTURE USE.
SPECIFICATIONS
Cat. No. ……………………………………………..MXF002
Battery Type …………………………………. MX FUEL™
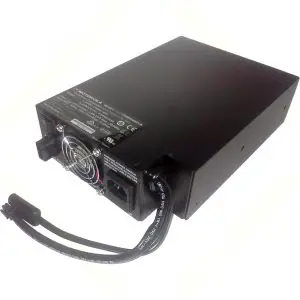
Charger Type………………………………… MX FUEL™
Rated Input Voltage …………………………… 120 V AC
Rated Input Amps ……………………………………..3.9 A
Rated Output Voltage (Charger) …………….72 V DC
Rated Output Amps (Charger) ……………… 4.5 A DC
Rated Output (Receptacle)
Peak Watts ………………………………………. 3600 W
Continuous Watts ……………………………… 1800 W
Voltage……………………………………………….. 120 V
Rated Frequency …………………………………… 60 Hz
Recommended Ambient
Charging Temperature ………………..40°F to 105°F (5°C to 40°C)
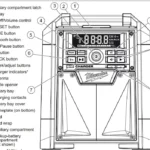
FUNCTIONAL DESCRIPTION
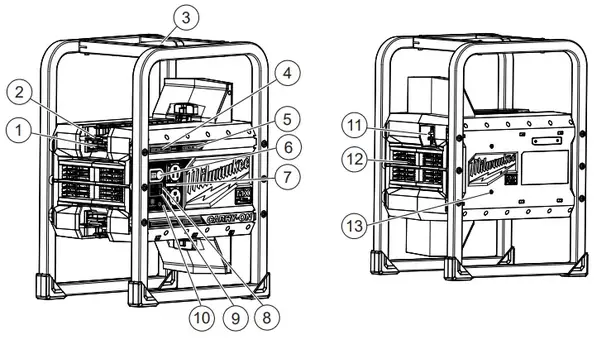
- Battery latch lever
- Battery lock ring
- Carry handle
- Fuel gauge
- Battery charging status/charger indicator
- Arm button
- AC outlets
- Overload indicator
- Overheat indicator
- Grounding terminal
- AC input
- Fan
- M12™/M18™charger screw mounts
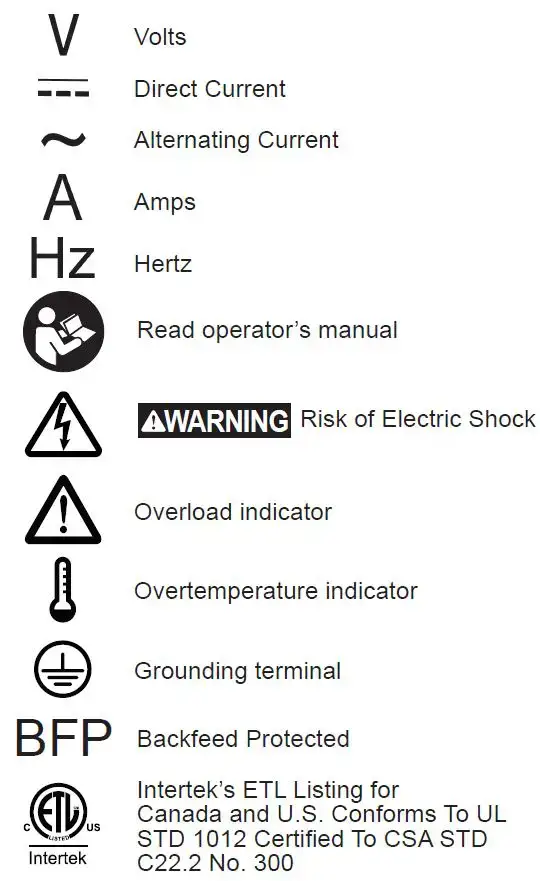
SYMBOLOGY
ASSEMBLY
WARNING
Recharge only with the charger specified for the battery. For specific charging instructions, read the operator’s manual supplied with your charger and battery.
Removing/Inserting the Battery
To remove the battery, push the battery latch lock to the side and squeeze the battery latch lever. Pull the battery pack away from the machine. To insert the battery, slide the pack into the body of the machine. Make sure it latches securely into place
GENERAL OPERATION
Power Supply Capacity
Make sure the power supply can supply enough continuous (running) and surge (starting) watts for the items being powered at the same time.
- Select the items to be powered at the same time.
- Total the continuous (running) watts of these items.
This is the amount of power the power supply must produce to keep the items running. See wattage reference chart. - Estimate how many surge (starting) watts will be needed. Surge wattage is the short burst of power needed to start electric motor-driven tools or appliances such as a circular saw. Because not all motors start at the same time, total surge watts can be estimated by adding only the item(s) with the highest additional surge watts to the total rated watts from step 2.
Power Management
To prolong the life of the power supply and attached devices, it is important to take care when adding electrical loads to the power supply. There should be nothing connected to the power supply outlets before starting the machine. The correct and safe way to manage power supply power is to sequentially add loads, as follows:
- With nothing connected to the power supply, start the machine (see “Arming the Machine”).
- Plugin and turn on the first load, preferably the largest load.
- Permit the power supply output to stabilize (power supply runs smoothly and the attached device operates properly).
- Plugin and turn on the next load.
- Again, permit the power supply to stabilize.
- Never add more loads than the power supply capacity. Take special care to consider surge loads in power supply capacity as previously described.
| Application/ Equipment | Estimated Watts* | Estimated Starting Watts* |
| Job Site | ||
| Electric Drill – 3/8″ | 600 | 1000 |
| Work Light | 1000 | 1000 |
| Reciprocating Saw | 960 | 1920 |
| Circular Saw – 7-1/4″ | 1400 | 2300 |
| Miter Saw – 10″ | 1900 | 3379 |
| Air Compressor – 1/4 HP | 970 | 1600 |
| Airless Sprayer – 1/3 HP | 600 | 1200 |
| Radio | 50 | 50 |
| M18TM Rapid Charger | 330 | 330 |
| Emergency/Home Standby | ||
| Lights (qty. 4 x 75 W) | 300 | 300 |
| Microwave | 1000 | 1000 |
| 46″ Flat Panel Television | 190 | 190 |
| Satellite Receiver | 250 | 250 |
| Portable Fan | 40 | 120 |
| Heater | 1300 | 1300 |
| Laptop | 250 | 250 |
| *Wattages listed are approximate. Check tool or appliance for actual wattage. |
||
Arming the Machine
MX FUEL™ machines must be armed prior to use.
Even with the battery pack inserted, functions will not operate until the machine is armed.
To arm the machine:
- Insert the battery pack.
- Press the Arm button. The MX FUEL™ icon will light and the LEDs are now operational.
NOTE: The internal fan will operate whenever the machine is in use. - After 60 minutes of inactivity (no current being drawn), the machine will enter sleep mode. The MX FUEL™ icon will go off and the LEDs are nonoperational.
- Press the Arm button to reactivate the machine.
- Press and hold the ARM button for 2 seconds to unarm (turn off) the machine. The MX FUEL™ icon will go off.
NOTE: The internal fan will continue to operate for a short time after the machine has been turned off.
Onboard Fuel Gauge LEDs and Alert Tones
Onboard Fuel Gauge LEDs display real-time battery levels for their respective MX battery. When the machine detects a low battery condition, a dead battery, an overload, or overtemp condition, the user will be alerted with an audible tone(s). Investigate the root cause of the tone(s) to continue use.
Overload and Overtemperature Conditions
When an overload or temperature condition occurs, the machine will produce a unique tone and the respective icon will light. Take the appropriate action, such as turning off or reducing the load on the machine, or allowing the machine to rest (cool down) before continuing use.
ONE-KEY™
To learn more about the ONE-KEY™ functionality for this tool, please refer to the quick reference included with this product or go to milwaukeetool.com/One-Key. To download the ONE-KEY™ app, visit the App Store or Google Play from your smart device.
| ONE-KEY™ Indicator | |
| Solid Blue | Wireless mode is active and ready to be configured via the ONE-KEY™ app. |
| Blinking Blue | The tool is actively communicating with the ONE-KEYTM app. |
| Blinking Red | The tool is in security lockout and can be unlocked by the owner via the ONE-KEYTM app. |
CHARGER OPERATION
WARNING Charge only MILWAUKEE MX™ Lithium-Ion batteries in this MILWAUKEE Lithium-Ion charger. Other types of batteries may cause personal injury and damage.
When to Charge the Battery Pack
Remove the battery pack from the tool for charging when convenient for you and your job. MILWAUKEE batteries do not develop a “memory” when charged after only a partial discharge. It is not necessary to run down the battery pack before placing it on the charger.
- Use the Fuel Gauge to determine when to charge your MILWAUKEE Lithium-Ion battery pack.
- You can “Top-Off” your battery pack’s charge before starting a big job or a long day of use.
- The only time it is necessary to charge the MILWAUKEE Lithium-Ion battery pack is when the battery pack has reached the end of its charge. To signal the end of charge, power to the tool will drop quickly, allowing you just enough power to finish making a cut, drilling a hole, or driving a fastener. Charge the battery pack as needed.
How to Charge the Battery Pack
Align the battery pack with the bay and slide the battery pack into the charger as far as possible. The red light will come on, either flashing quickly (battery pack or charger is too hot or cold), flashing slowly (communication between pack and charger), or continuously (the pack is charging).
- When a battery pack is inserted into the charger, the LEDs will indicate the following:
 Continuous red: Charging
 Continuous green light: Charging is complete
 Flashing red: Battery is too hot/cold Charging will begin when the battery reaches the correct charging temperature
 Flashing red/green: Damaged or faulty battery pack
- The next battery pack inserted in the charger will begin charging when the previous pack is fully charged.
- A fully discharged battery pack with an internal temperature in the normal range will charge in about 45 to 90 minutes, depending on the battery pack and internal temperature of the charger.
- Heavily cycled batteries may take longer to charge completely.
- The fuel gauge lights are displayed as the pack is being charged, indicating how fully charged the pack is. The fuel gauge will turn off when charging is complete.
- After charging is complete, the continuous green light will come on.
- The charger will keep the battery pack fully charged if it is left on the charger. The light indicator will be the same as normal charging.
- If the light indicator flashes red and green, check that the battery pack is fully seated in the bay. Remove the battery pack and reinsert. If the light continues to flash red and green, remove pack(s) and unplug the charger for at least 2 minutes. After 2 minutes, plug the charger back in and insert the pack. If the problem persists, contact a MILWAUKEE service facility.
- If the light indicator does not come on, check that the battery pack is fully seated in the bay. Remove the battery pack and reinsert. If the light indicator still does not come on, remove pack(s) and unplug the charger for at least 2 minutes. After 2 minutes, plug the charger back in and insert the pack. If after these attempts the light indicator still does not come on, contact a MILWAUKEE service facility.
Charging a Hot or Cold Battery Pack
The Red Flashing Indicator light on the charger indicates that the battery pack temperature is outside the charging range. Once the battery pack is within the acceptable range, normal charging will take place and the red light will be continuous. Hot or cold batteries may take longer to charge.
| Lithium-Ion Charging Status | ||
| Battery Pack Temperature |
Red Charger Indicator Light |
Charging Status |
| Too Hot Normal Range Too Cold |
Fast Flashing Continuous Fast Flashing |
Not charging Normal charging Not charging |
MAINTENANCE
WARNING To reduce the risk of injury, always unplug the tool and charger and remove the battery pack from the charger or tool before performing any maintenance. Never disassemble the tool, battery pack, or charger. Contact a MILWAUKEE service facility for ALL repairs. To reduce the risk of fire, personal injury, and product damage due to a short circuit, never immerse your tool, battery pack, or charger in fluid or allow fluid to flow inside them. Corrosive or conductive fluids, such as seawater, certain industrial chemicals, bleach or bleach-containing products, etc., can cause a short circuit.
Maintain Power Supply
Keep your power supply in good repair by adopting a regular maintenance program. If the power supply does not work properly, return the power supply to a MILWAUKEE service facility for repairs.
ONE-KEY™

WARNING Chemical Burn Hazard. This device contains a lithium button/coin cell battery. A new or used battery can cause severe internal burns and lead to death in as little as 2 hours if swallowed or enters the body. Always secure the battery cover. If it does not close securely, stop using the device, remove the batteries, and keep it away from children. If you think batteries may have been swallowed or entered the body, seek immediate medical attention.
Internal Battery
An internal battery is used to facilitate full ONE-KEY™ functionality.
To replace the battery:
1. Remove the battery pack(s) and all extension cord connections.
2. Open the battery door. Remove the cap screw inside and twist the cap a quarter turn.
3. Remove the old battery. WARNING! Always keep batteries away from children and dispose of them properly; new and used batteries can cause injury.
4. Insert the new battery (Cat. No. 50-11-0025).
Always use MILWAUKEE replacement batteries; others may not be rated for high temperatures.
5. Replace the cap and screw. Close the battery door.
WARNING
To reduce the risk of personal injury and damage, never immerse your tool, battery pack, or charger in liquid or allow a liquid to flow inside them.
Cleaning
Clean dust and debris from vents. Keep handles clean, dry, and free of oil or grease. Use only mild soap and a damp cloth to clean, since certain cleaning agents and solvents are harmful to plastics and other insulated parts. Do not use sprays or solvents. Some of these include gasoline, turpentine, lacquer thinner, paint thinner, chlorinated cleaning solvents, ammonia, and household detergents containing ammonia. Never use flammable or combustible solvents around tools.
Repairs
For repairs, return the tool, battery pack, and charger to the nearest authorized service center.
ACCESSORIES
WARNING
Use only recommended accessories. Others may be hazardous.
For a complete listing of accessories, go online to www.milwaukeetool.com or contact a distributor.
SERVICE – UNITED STATES
1-800-SAWDUST (1.800.729.3878)
Monday-Friday, 7:00 AM – 6:30 PM CST or visit www.milwaukeetool.com
Contact Corporate After Sales Service Technical Support with technical, service/repair, or warranty questions.
Email: [email protected]
Become a Heavy Duty Club Member at www.milwaukeetool.com to receive important notifications regarding your tool purchases.
SERVICE – CANADA
Milwaukee Tool (Canada) Ltd
1.800.268.4015
Monday-Friday, 7:00 AM – 4:30 PM CST
or visit www.milwaukeetool.ca
LIMITED WARRANTY USA and CANADA
Every MILWAUKEE MX FUEL™ Product, battery pack, and charger are warranted to the original purchaser only to be free from defects in material and workmanship. Subject to certain exceptions, MILWAUKEE will repair or replace an MX FUEL™ product, battery pack, or charger which, after examination, is determined by MILWAUKEE to be defective in material or workmanship for a period of two (2) years after the date of purchase. Return of the MX FUEL™ product, battery pack, or charger to a MILWAUKEE factory Service Center location or MILWAUKEE Authorized Service Station, freight prepaid and insured, is required. For the proper shipping procedure of battery packs, contact 1.800.SAWDUST (1.800.729.3878), or go to www.milwaukeetool.com. A copy of the proof of purchase should be included with the returned product. This warranty does not apply to damage that MILWAUKEE determines to be from repairs made or attempted by anyone other than MILWAUKEE authorized personnel, misuse, alterations, abuse, normal wear and tear, lack of maintenance, or accidents.
Normal Wear: Many MX FUEL™ products need periodic parts replacement and service to achieve the best performance. This warranty does not cover repair when normal use has exhausted the life of a part including, but not limited to, assist & drive belts, pulleys, blade flanges, vacuum gaskets, tool-free handles, set pins, skis, drive couplers, rubber boots, auto-feed, stabilize blocks, wheels, carrier wheels, cords, o-rings, seals, bumpers, driver blades, pistons, strikers, lifters, tool holder, and bumper cover washers. Warranty Registration is not necessary to obtain the applicable warranty on a MX FUEL™ product, battery pack, or charger.
ACCEPTANCE OF THE EXCLUSIVE REPAIR AND REPLACEMENT REMEDIES DESCRIBED HEREIN IS A CONDITION OF THE CONTRACT FOR THE PURCHASE OF EVERY MILWAUKEE PRODUCT. IF YOU DO NOT AGREE TO THIS CONDITION, YOU SHOULD NOT PURCHASE THE PRODUCT. IN NO EVENT SHALL MILWAUKEE BE LIABLE FOR ANY INCIDENTAL, SPECIAL, CONSEQUENTIAL, OR PUNITIVE DAMAGES, OR FOR ANY COSTS, ATTORNEY FEES, EXPENSES, LOSSES, OR DELAYS ALLEGED TO BE AS A CONSEQUENCE OF ANY DAMAGE TO, FAILURE OF, OR DEFECT IN ANY PRODUCT INCLUDING, BUT NOT LIMITED TO, ANY CLAIMS FOR LOSS OF PROFITS. SOME STATES DO NOT ALLOW THE EXCLUSION OR LIMITATION OF INCIDENTAL OR CONSEQUENTIAL DAMAGES, SO THE ABOVE LIMITATION OR EXCLUSION MAY NOT APPLY TO YOU. THIS WARRANTY IS EXCLUSIVE AND IN LIEU OF ALL OTHER EXPRESS WARRANTIES, WRITTEN OR ORAL. TO THE EXTENT PERMITTED BY LAW, MILWAUKEE DISCLAIMS ANY IMPLIED WARRANTIES, INCLUDING WITHOUT LIMITATION ANY IMPLIED WARRANTY OF MERCHANTABILITY OR FITNESS FOR A PARTICULAR USE OR PURPOSE; TO THE EXTENT SUCH DISCLAIMER IS NOT PERMITTED BY LAW, SUCH IMPLIED WARRANTIES ARE LIMITED TO THE DURATION OF THE APPLICABLE EXPRESS WARRANTY AS DESCRIBED ABOVE. SOME STATES DO NOT ALLOW LIMITATIONS ON HOW LONG AN IMPLIED WARRANTY LASTS, SO THE ABOVE LIMITATION MAY NOT APPLY TO YOU, THIS WARRANTY GIVES YOU SPECIFIC LEGAL RIGHTS, AND YOU MAY ALSO HAVE OTHER RIGHTS WHICH VARY FROM STATE TO STATE.
This warranty applies to products sold in the U.S.A. and Canada only. Please consult the ‘Service Center Search’ in the Parts & Service section of MILWAUKEE’s website www.milwaukeetool.com or call 1.800. SAWDUST (1.800.729.3878) to locate your nearest service facility for warranty and non-warranty service on an MX FUEL™ product, battery pack, or charger.
LIMITED WARRANTY – MEXICO, CENTRAL AMERICA and CARIBEAN
ELECTRONIC INDUSTRIES’ warranty is for 2 years since the original purchase date.
This warranty card covers any defect in material and workmanship on this Product.
To make this warranty valid, present this warranty card, sealed/ stamped by the distributor or store where you purchased the product, to the Authorized Service Center (ASC). Or, if this card has not been sealed/stamped, present the original proof of purchase to the ASC. Call 55 4160-3547 to find the nearest ASC, for service, parts, accessories, or components.
Procedure to make this warranty valid
Take the product to the ASC, along with the warranty card sealed/ stamped by the distributor or store where you purchased the product, and any faulty piece or component will be replaced without cost for you. We will cover all freight costs relative to this warranty process.
Exceptions
This warranty is not valid in the following situations
a) When the product is used in a different manner from the end-user guide or instruction manual.
b) When the conditions of use are not normal.
c) When the product was modified or repaired by people not authorized by TECHTRONIC INDUSTRIES.
Note: If the cord set is damaged, it should be replaced by an Authorized Service Center to avoid electric risks. SERVICE AND ATTENTION CENTER Call to 55 4160-3547 IMPORTED AND COMMERCIALIZED BY TECHTRONIC INDUSTRIES MEXICO, S.A. DE C.V. Miguel de Cervantes Saavedra No.301 Piso 5, Torre Norte 11520 Colonia Ampliación Granada Miguel Hidalgo, Ciudad de Mexico, Mexico
Model: —————————————————————–
Date of Purchase: —————————————————
Distributor or Store Stamp:—————————————-
MILWAUKEE TOOL
13135 West Lisbon Road
Brookfield, WI 53005 USA
58140207d1
01609000101Q-01(A)
05/20
Printed in China