 Model No: 011-3009-8
12 V BATTERY
TESTER
INSTRUCTION MANUAL
 IMPORTANT:
This manual contains important safety and operating instructions.
Read all instructions and follow them when using this product.
 DO NOT RETURN THIS PRODUCT TO THE STORE!
QUESTIONS? CALL CUSTOMER SERVICE AT: 1-888-942-6686
model no. 11-3009-8 contact us at 1-888-942-6686
SAFETY INFORMATION
This manual will show you how to use your tester safely and effectively. Please read, understand and follow these instructions and precautions carefully. This manual contains important safety and operating instructions.
| Abbreviations and Acronyms | |
| V | Volt |
| CCA | Cold Cranking Amps |
| DC | Direct Current |
WORKING IN THE VICINITY OF A LEAD-ACID BATTERY IS DANGEROUS. BATTERIES GENERATE EXPLOSIVE GASES DURING NORMAL OPERATION. FOR THIS REASON, IT IS IMPORTANT THAT YOU FOLLOW THESE INSTRUCTIONS EACH TIME YOU USE THE TESTER.
WARNING: READ AND UNDERSTAND ALL INSTRUCTIONS BEFORE USE. Failure to follow all instructions listed below may result in electric shock, fire and/or serious injury.
- Use the tester in a well-ventilated area.
- This tester is not intended for use by
- Do not expose the tester to rain or
- Do not operate the tester if it has received a sharp blow, been dropped or otherwise damaged in any way; take it to a qualified service person.
- Inspect the battery for a cracked or broken case or cover. If the battery is damaged, do not use the tester.
- Do not disassemble the tester; take it to a qualified service person when service or repair is required. Incorrect reassembly may result in a risk of fire or electric shock.
- Follow these instructions and those published by the battery manufacturer and the manufacturer of any equipment you intend to use in the vicinity of the battery. Review the cautionary markings on these products and on the engine.
PERSONAL SAFETY PRECAUTIONS
WARNING: Battery acid may cause severe injury to eyes; always wear CSA- or ANSI-approved safety goggles. Avoid touching eyes while working with or near a battery. In case of accidental contact, rinse eyes with clean water for at least 5 minutes and seek immediate medical attention.
- Always wear complete eye and clothing protection when working near lead-acid Always have someone nearby for help.
- Have plenty of freshwater, soap and baking soda nearby in case battery acid contacts your eyes, skin or clothing. Wash immediately with soap and water and seek medical attention.
- Neutralize any acid spills thoroughly with baking soda before attempting to clean up.
- Remove all personal metal items from your body, such as rings, bracelets, necklaces and watches. A lead-acid battery can produce a short-circuit current high enough to weld a ring to metal, causing a severe burn.
- Never smoke or allow a spark or flame in the vicinity of the battery or engine.
- Be extra cautious to reduce risk of dropping a metal tool onto the battery. It might cause a spark, or short-circuit the battery and/or other electrical parts and possibly result in an explosion.
- When placing the battery tester in the vehicle (on the frame, engine or fender), take special care to ensure the metal housing of the battery tester does not come in contact with either terminal of the battery or other electrical connections.
- When in use, ensure the red clamp is connected to the positive (POS, +) terminal of the battery and the black clamp is connected to the negative (NEG, -) terminal of the Reversing the clamp connections to the battery for a prolonged period may damage the tester
- Do NOT touch the cooling vents on the battery tester during or immediately after testing the battery. The housing gets hot during use.
- Do NOT connect the battery tester to a battery that is being charged.
PREPARING TO TEST
- Be sure area around battery is well ventilated while the battery is being tested.
- Clean battery terminals. Be careful to keep corrosion from coming in contact with
- If the battery is not sealed and maintenance-free, add distilled water in each cell until battery acid reaches level specified by the battery manufacturer. This helps purge excessive gas from cells. Do not overfill.
- If necessary to remove the battery from the vehicle for testing, always remove the grounded terminal from the battery first. Make sure all accessories in the vehicle are off so as not to cause an arc.
OPERATION INSTRUCTIONS
For use with 12 V lead-acid batteries only.
CAUTION! Undercharged lead-acid batteries will freeze during cold weather. NEVER TEST OR CHARGE A FROZEN BATTERY. Suggested operational range 32°F (0°C) to 122°F (50°C) ambient air temperature.
BATTERY LOAD TEST
NOTE: Testing a discharged battery will yield inaccurate results. Before testing, the battery should be fully charged and allowed to rest 30 minutes to remove surface charge.
- Turn off the ignition and ensure all accessories are in the “OFF” position to ensure there are no loads being drawn from the battery.
- Connect the red clamp to the positive (POS, P, +) battery terminal.
- Connect the black clamp to the negative (NEG, N, -) battery terminal.
- The digital display will show the open-circuit voltage of the battery. NOTE: If the display is blank, see Troubleshooting.
- Confirm the CCA rating of the battery to be tested. Round down to the nearest 100 (e.g., round 650 CCA to 600). NOTE: If CCA rating is not shown on the battery, use the following estimates:
| GAS | DIESEL | ||||
| L4 | V6 | V8 | L4 | V6 | V8 |
| 400 CCA | 600 CCA | 700 CCA | 500 CCA | 700 CCA | 1000 CCA |
NOTE: A battery will test lower in cold temperature than in warm temperature. For more accurate results when testing in temperatures <4°C, multiply CCA rating by 0.6 (e.g., 800 CCA rating x 0.6 = 500 test CCA).
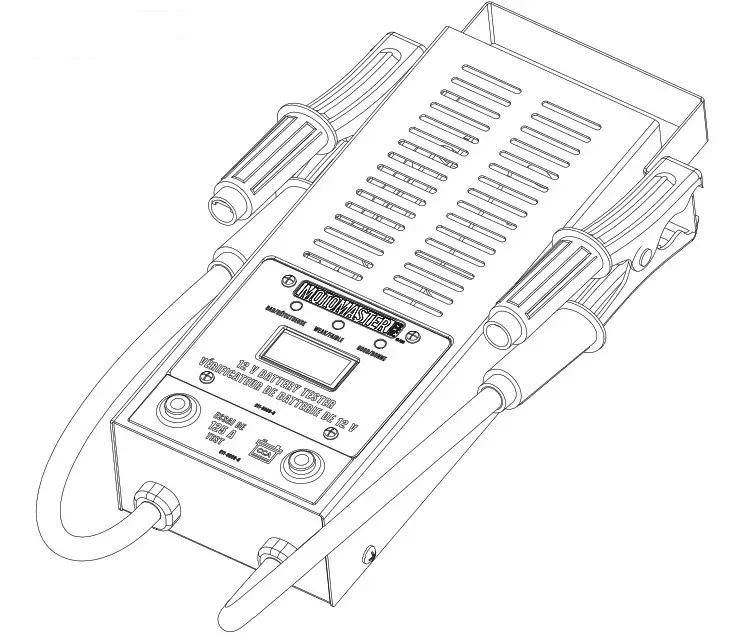
- Press the CCA button repeatedly to set the CCA test value. Each press will change the display in 100 CCA increments from 300 — 1000 (999) CCA.
- Press and release the 125A TEST Tester will beep to signal the start of the test. The load will be applied for up to 10 seconds during which time the digital display will show battery voltage while under load.
- Another beep will signal when the test is complete. Assess test results as follows:

CHARGING SYSTEM
CAUTION: DO NOT press the 125A TEST button during this test
- Connect the red clamp to the positive (POS, P, +) battery
- Connect the black clamp to the negative (NEG, N, -) battery terminal.
- The digital display will show the open-circuit voltage of the battery. NOTE: If the display is blank, see Troubleshooting.
- Start the engine and let it run until it reaches normal operating temperature.
- Turn off all lights and accessories, then rev the engine to approximately 1500 RPM.
- Read the voltage on the display and assess the test as follows:
| DISPLAY | RESULT |
| Voltage Reading < 13.5V | Charging voltage is low – Check for poor/loose connections, wiring, and/or a faulty alternator. |
| 13.5V≥ Voltage≤ Reading 15V | Charging system is good. |
| Voltage Reading > 15V | Charging voltage is high—check for a faulty regulator. |
- Remove clamps from battery.
STARTER SYSTEM TEST
CAUTION: DO NOT press the USA TEST button during this test
- Connect the red clamp to the positive (POS, P, +) battery terminal.
- Connect the black clamp to the negative (NEG, N, -) battery terminal.
- The digital display will show the open-circuit voltage of the battery. NOTE: If display is blank, see Troubleshooting.
- Perform a Load Test — see BATTERY LOAD TEST Note: Proceed to next step only if the battery is good. If the test results in a weak or bad battery, testing the starter will not work.
- Using the load voltage obtained above, find the corresponding minimum cranking voltage on the table below.
| LOAD VOLTAGE | 10.4 | 10.6 | 10.8 | 11.0 | 11.2 | 11.4 | 11.6 | 11.8 |
| MIN CRANK VOLTAGE | 9.7 | 10.0 | 10.3 | 10.6 | 10.9 | 11.2 | 11.4 | 11.6 |
Note: For engines, less than 300 CID (–5.0 L), use the next to lower minimum cranking volts on the table. For example, if the load voltage is 11 Volts, use 10.3 V instead of 10.6 V.
- Disable the ignition so that the engine will not start (refer to vehicle’s manual).
- Have an assistant crank the engine. Note the voltage reading on the display during
- Use the cranking voltage from the step above and the minimum crank voltage obtained from step 5 to assess the test as follows:
DISPLAY RESULT Cranking Voltage < Min Crank Voltage Starting system is weak — Check for poor/loose connections, a failing starter, and/or a battery of insufficient size for the motor. Cranking Voltage > Min Crank Voltage The starting system is good - Remove clamps from battery.
TROUBLESHOOTING
| PROBLEM | POSSIBLE CAUSE | SOLUTION |
| Display shows an “L” during the load test. | Load Voltage is below 7 Volts during the battery load test. | Charge and re-test battery. If the result is the same, the battery is bad and should be replaced. |
| Display shows an “H” during the load test. | Load Voltage is above 15 Volts during the battery load test. | Make sure the battery voltage is 12V. If the result is the same, the battery is bad and should be replaced. |
| Display shows “Er 1” during the load test. |
Battery tester or relay may be defective. | Re-check all connections are correct. If the result is the same, the battery tester is defective and should be replaced. |
| Display shows “Er 2” during the load test. |
Battery tester or relay may be defective. | Disconnect the battery tester; it should be replaced. |
| All 3 LEDs are on after testing. | Battery is < 12V before testing or < 7V under load. | Ensure the battery is 12V.
Charge and re-test battery. If the result is the same, the battery is bad and should be replaced. |
| The display is blank. | The tester is not connected to a battery OR the voltage of the tested battery is too low for the tester to read. | Clean terminals and rock clamps back and forth to ensure proper connection to the battery. If the display screen is still blank, recharge and retests the battery. If the same issue persists, replace the battery. |
TECHNICAL SPECIFICATIONS
| Battery Load Test | 12 V |
| Charging System Test | 12 V |
| Starting System Test | 12 V |
| Load test capacity | 125 AMPs; 300-1000 cold-cranking AMPs |
| Display meter | Digital, 0-16 volts DC (maximum) |
| Test cycle | 10 seconds per test with 1-minute cool down; 3 tests in 5 minutes |
| Battery cable / clamps | 16 3/4″ (42.5 cm); copper-plated clamps |
| Overall dimensions | 12 3/4 x 6 x 3″ (32.4 x 15.2 x 7.6 cm) |
| Testing Voltage Range | 7-15 V DC |
MAINTENANCE AND CARE
- Periodically re-check all nuts, bolts and screws for tightness.
- Store in a clean and dry location.
- Clean the outside of the unit with a damp cloth. Never use solvents to clean any part of this tool. Use compressed air to blow out debris from the load vents.
- After each use, clean the cable clamps of any possible battery electrolyte. Apply a thin coat of silicone grease to prevent corrosion.
WARRANTY
This MotoMaster product carries a one (1) year limited warranty against defects in workmanship and materials. At its discretion, MotoMaster Canada agrees to have any defective part(s) repaired or replaced free of charge, within the stated warranty period, when returned by the original purchaser with proof of purchase. This product is not guaranteed against wear or breakage due to misuse and/ or abuse.
