X-6000 SERIES CELLULAR GAME CAMERA INSTRUCTION MANUAL
IMPORTANT! READ BEFORE YOU START:
-
-
-
-
-
-
-
- We recommend that you go through the entire set up process at home to ensure your camera is operating as expected and images are transmitting prior to taking to the field for use.
-
-
-
-
-
-
- You must have an ACTIVE Moultrie Mobile account to operate camera and retrieve images. Log on to MoultrieMobile.com to set up an account or use the free Moultrie Mobile app. Plan purchased from Moultrie at time of activation.
- 12 AA batteries and a compatible SD card are required; we recommend an 8GB or smaller Class 10 SD card.
NOTE: See page 3 for important battery information. - Each time you insert an SD card, be sure to format the SD card in your camera to ensure it will work properly. See page 5 for instructions on how to format SD card.
- 4G LTE coverage is required. Go to MoultrieMobile.com to verify coverage in your location.
Please register your camera at www.MoultrieFeeders.com/warranty to activate your warranty.
1. ACCOUNT SET UP AND CAMERA ACTIVATION

SET UP MOULTRIE MOBILE ACCOUNT (Skip this step if already a Moultrie Mobile customer)
Go to MoultrieMobile.com and click REGISTER NEW ACCOUNT or go to the Moultrie Mobile app and click SIGN UP to get started.
IMPORTANT: After submitting your registration, you will receive an email. You will not be able to log in to your account until you have confirmed your registration through this email. Please check your spam, clutter or junk folders for this email.
- Log-on to your Moultrie Mobile account via app or website.
- From the MY ACCOUNT section, select “Activate Device” and follow the on-screen instructions.
— The Serial Number and Modem ID can be found on the sticker inside of the camera above the battery compartment.
— If activating mid-billing cycle, the amount owed at activation as well as the number of pictures purchased will be prorated. The next billing cycle will reflect full monthly payment and number of pictures for the plan chosen. - Click PURCHASE to complete activation of camera.
NOTE: It can take several hours for the device to become active on the cell provider’s network. During this time, the device will not be able to connect to the server. Please keep trying. If after 24 hours your device has not successfully connected to the server, please contact customer service by visiting the “Support” section from the Moultrie Mobile website or app.
2
2. INSTALL BATTERIES
Open camera housing and install 12 AA batteries.
Important Battery Information
- Only use alkaline or lithium batteries. We recommend the use of Moultrie alkaline batteries or Energizer™ lithium batteries for optimum performance.
- Do not mix old and new batteries. Always replace ALL the batteries at the same time.
- Do not mix different brands of batteries or alkaline and lithium batteries.
- When the camera is not in use, please remove the batteries.
- DO NOT USE RECHARGEABLE BATTERIES.
- Be sure batteries are inserted correctly into the battery compartment before powering on the device.
Note: When using lithium batteries, the Moultrie Mobile system may report near full capacity and then quickly drop to indicate low voltage within a short period. This is due to the properties of lithium batteries and is expected behavior.
Note: Internal batteries are required when using an external battery source.
3
3. INSTALL SD CARD

Locate SD card slot on side of camera and insert SD card. Make sure to format the SD card in the camera to ensure proper operation. See page 5 for formatting instructions.
Important SD Card Information
- We recommend that you use an 8GB or smaller Class 10 SD card.
- Do NOT use micro SD cards, SDXC or cards designated as “turbo”, “ultra”, or “super speed”, as the speed required by these cards to operate may cause instability in the cameras.
- We recommend that you have one dedicated SD card for each camera.
- Avoid swapping SD cards between cameras or other digital devices.
- Always format your SD card in the camera before each use.
4
4. FORMAT SD CARD
Power camera on by sliding ON/OFF SWITCH to the ON position.
Anytime the camera’s power switch is flipped from the OFF to ON position, there is a 60-second delay to allow time to format the SD card. Please follow the steps below:
- Press and hold the FORMAT SD CARD button until the SD CARD LED blinks yellow.
- Once the card is formatted, the SD CARD LED will turn solid green indicating success.
- If the SD card LED turns solid red, the SD card was not formatted. Repeat the process until SD card LED is solid green. If the SD card LED does not turn green, try another card.
NOTE: You must format the SD card each time a card is inserted using the above steps.
FORMAT SD CARD VIA APP/WEBSITE

After you’ve completed the initial setup steps above, you will then have the option to format your SD card from the Moultrie Mobile app or website under your Camera Settings. When you elect to format your SD card from the app or website, it will format the next time the camera checks in with Moultrie Mobile.
5
5. LED COLOR DEFINITIONS AND SOLUTIONS
Only LEDs illuminate. If switch or buttons appear to be illuminated, it is due to illumination from surrounding LEDs.

- The BATTERY and SD CARD LEDs will illuminate to show status. Green BATTERY LED indicates power is full and green SD CARD LED indicates card is good. The LED indicators can also be yellow or red. Refer to the table on page 7 for color definitions.
- SIGNAL LED will flash yellow while acquiring signal and turn to solid green if signal is good, yellow if signal is ok, and red if signal is bad.
- SERVER LED will flash yellow while connecting to Moultrie Mobile and turn green when connected. This could take some time, be patient.
Note: To display the status of the Signal, Battery, SD card or Server, you can briefly press CONNECT/STATUS button. Camera will attempt connection to Moultrie Mobile and display LED status.
6
| GREEN | YELLOW | RED | |
| SIGNAL | Good signal | Weak signal | No signal |
| Move camera | |||
| BATTERY | 50% to 100% | 11-49% | 0-10% |
| Replace batteries | |||
| SD CARD | Good card | Card full / Locked | Bad / No card |
| Format/Erase/Unlock or Replace card | |||
| SERVER | Connected | Connecting… | Can’t connect |

Note: The SIGNAL and SERVER LED’s will flash yellow indicating the camera is connecting to Moultrie Mobile. Once the LEDs stop flashing, the illuminated color will reflect connection status.
7
6. TRANSMIT TEST IMAGE

• Press and hold CONNECT/STATUS button for minimum of 5 seconds.
— Status LEDs will illuminate to display status, refer to table on page 7 for color definitions.
— SIGNAL and SERVER LEDs will flash yellow until connection is established, then illuminate to indicate status. See table on page 7 for color definitions.
• Test image is taken and successfully transmitted once the server LED illuminates green and then all LEDs turn off.

We strongly recommend you confirm receipt of test picture by logging in to your Moultrie Mobile account via the app or website.
MANUALLY TRANSMIT IMAGES

You have the option to transmit any photos captured since the last connection by briefly pressing and realeasing the CONNECT/STATUS button. Once the transmission is complete, all LEDs will turn off.
Note: Upload frequency setting is not affected by manual image transmission.
8
7. CAMERA SETTINGS

Once you have successfully taken and transmitted a test image, go to the website or app to update your camera settings.
Changing settings:
- Go to the “Devices” tab on the Moultrie Mobile website or “Cameras” tab on the app.
- Select “View Cameras” for a list of cameras on account. Select desired camera for update.
- Choose “Camera Settings” on the website or “Edit Settings” on the app. Update camera settings as well as desired upload frequency and press SAVE.
Note: There are icons next to each setting that when clicked will display descriptions and useful tips.
Note: This camera can be set to record video, but video will not transmit to Moultrie Mobile. The video will remain on the SD card.
Important: After camera settings are selected and saved, the settings will be changed on the camera the next time the camera connects to Moultrie Mobile. To manually connect, press the CONNECT/STATUS button to connect to Moultrie Mobile and update settings immediately.
Confirm status of camera using the LED indicators before leaving your camera.
9
8. UPDATING YOUR FIRMWARE
 The XA-6000 / XV-6000 is designed to perform firmware updates automatically.
In the event you need to perform a manual camera firmware update, please follow the below instructions:
UPDATE FIRMWARE MANUALLY
Important: To install firmware manually you must first download the firmware to a clean SD card. Go to MoultrieFeeders.com/firmware-faq for a complete list of firmware and instructions on how to download firmware to an SD card.
- Insert the SD card containing firmware into the SD card slot.
- With camera OFF and no LEDs illuminated, press and hold CONNECT/STATUS button while sliding ON/OFF switch to the ON position.
- Firmware begins updating when all LEDs begin to chase yellow.
- Firmware update successful when, all LED’s turn off, camera reboots, attempts connection to Moultrie Mobile, all LEDs’ turn off.
- Firmware update is unsuccessful if all LEDs turn solid red for 10 seconds and then all LEDs turn off. Please try again.
10
9. MOUNTING CAMERA
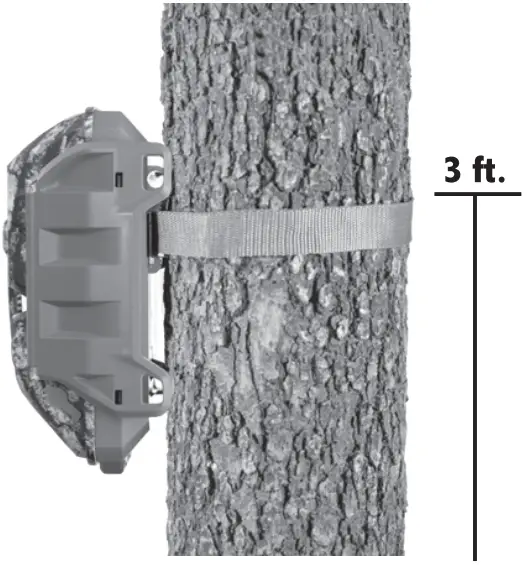
Thread mounting strap through slots on back of camera case.
Mount camera to a tree or pole approximately three (3) feet from ground. You may need to adjust for uneven terrain.
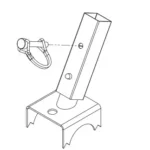
For added security, you can attach the camera to a tree with a Master Lock Python™ cable locking system or Moultrie Security Box. Cameras are also equipped with 1/4″-20 inserts for use with Moultrie EZ Tree Mount or Camera Stake accessories, Visit MoultrieFeeders.com to view and purchase mounting accessories.
Tips for Best Photos:
Face the camera North or South to avoid overexposure from the sun.
Clear brush away from the front of the camera to avoid false-movement triggers.
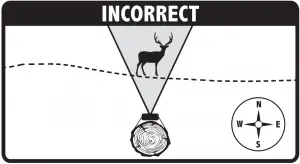
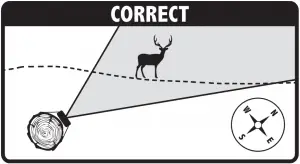
When covering a game trail, face camera looking down the trail instead of directly at it (see graphics).
11
![]() FCC Statements XV-6000 MCG-13478 XA-6000 MCG-13479
FCC Statements XV-6000 MCG-13478 XA-6000 MCG-13479
Note: Changes and modifications not expressly approved by the party responsible could void the user’s authority to operate this device.
This device complies with Part 15 of the FCC Rules. Operation is subject to the following two conditions: (1) This device may not cause harmful interference, and (2) this device must accept any interference received, including interference that may cause undesired operation.
NOTE: THE MANUFACTURER IS NOT RESPONSIBLE FOR ANY RADIO OR TV INTERFERENCE CAUSED BY UNAUTHORIZED MODIFICATIONS TO THIS EQUIPMENT. SUCH MODIFICATIONS COULD VOID THE USER’S AUTHORITY TO OPERATE THE EQUIPMENT.
NOTE: This device complies with the limits for a Class B digital device, pursuant to Part 15 of the FCC Rules. These limits are designed to provide reasonable protection against harmful interference in a residential installation. This device generates, uses, and can radiate radio frequency energy and, if not installed and used in accordance with the instructions, may cause harmful interference to radio communications. However, there is no guarantee that interference will not occur in a particular installation.
If this device does cause harmful interference to radio or television reception, which can be determined by turning the equipment off and on, the user is encouraged to try to correct the interference by one or more of the following measures:
Reorient or relocate the receiving antenna.
Increase the separation between the equipment and receiver.
Connect the equipment into an outlet on a circuit different from that to which the receiver is connected.
Consult the dealer or an experienced radio/TV technician for help.
Moultrie Limited Warranty
This product has been thoroughly tested and inspected before shipment. It is guaranteed from defects in material and workmanship from the date of purchase for 2 years. Under this limited guarantee we agree to replace or repair free of charge any part or parts which have been found to be defective in original material or workmanship. Should you require warranty service, visit the support section in the Moultrie Mobile app or at MoultrieMobile.com to contact a technician. Physical damage, alterations or tampering with the equipment is not covered under warranty and will invalidate your warranty.
For questions go to the “Support” section of MoultrieMobile.com or the Moultrie Mobile app.
PRADCO Outdoor Brands • 3280 Highway 31, Ste. B • Calera, AL 35040
11152019