
Owner’s Manual
Push to Close™ Gate

KEEP FOR FUTURE REFERENCE
Please read the instructions carefully before installing this gate. For additional help, installation videos are
available at www.munchkin.com
Important Information
INTRODUCTION
Thank you for choosing a Munchkin safety gate to help protect your family.
Please inspect your gate immediately. If you see any damage, do not attempt installation. Check page 20 of this manual for information on damaged products.
Assemble the gate away from small children. Some of the parts may present a choking hazard when loose.
DISCLAIMERS
Any misuse, abuse, abnormal use, excessive wear and tear, improper assembly, negligence, environmental exposure, accident or alteration of the gate, as well as removal or alteration of its serial number, invalidates any and all claims against the manufacturer. Any damage to property during installation is the sole responsibility of the end-user.

- Children have died or been seriously injured when gates are not securely installed.
- ALWAYS install and use gates as directed using all required parts.
- STOP using when a child can climb over or dislodge the gate.
- Use only with locking mechanism securely engaged.
- NEVER use a gate to keep the child away from pool.
- Install according to manufacturer’s instructions.
- Intend for use with children from 6 months through 24 months.
- This product will not necessarily prevent all accidents. Never leave child unattended.
INCLUDED PARTS
If any parts are missing or damaged, please contact our Customer Satisfaction Team at 1-800-344 -2229.

* Carefully separate templates “A” and “B” at the cut line.

TOOLS NEEDED:

- Drill
- Phillips screwdriver
- Tape measure
- Pencil
- Adhesive tape
Getting Started
STEP 1: IDENTIFY GATE PLACEMENT
GATE IS SUITABLE FOR:
TOP OF STAIRS
If installing the gate at the top of stairs, it MUST be placed on the top landing and only swing away from the stairs.

BOTTOM OF STAIRS
If installing the gate at the bottom of the stairs, we recommend placing it on the floor. If the gate must be placed on the lowest stair, position it toward the front of the step.

HALLWAYS AND DOORWAYS

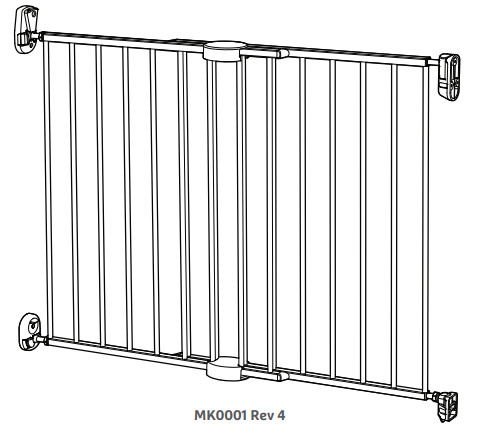
STEP 2: ASSEMBLING GATE PANELS
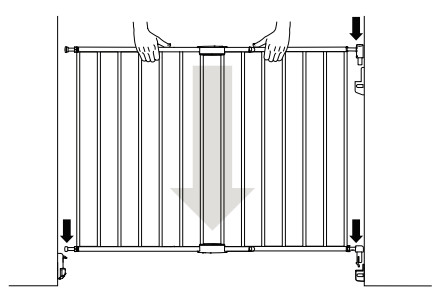
1.Place both hinge panel and catch panel side by side where you intend to install your gate. This gate fits opening 28.5″ to 45″ (72.4cm to 114cm).


PLEASE NOTE: For correct orientation, make sure the text on the panels is upright, and the tapered ends of each panel should slope inward.
How To Install
2. Size to your opening by sliding the hinge panel and catch panel outward towards the wall. For ease of gate installment later, please keep between a 1.5” and 2” (38mm-50mm) gap from the gate panel to the wall.

3.Secure the hinge panel and catch panel together using the upper and lower clamps. If the bars are not lined up, shorten the gate width by sliding panels inwards away from walls to allow room for the clamps.
Use the small screws to attach the top and bottom halves of each clamp together.


TOOLS NEEDED:
- Drill
- Phillips screwdriver
- Adhesive tape
- Hex key
- Pencil
- Wrench
- Cut template along the dotted line to separate template “A” and “B”.
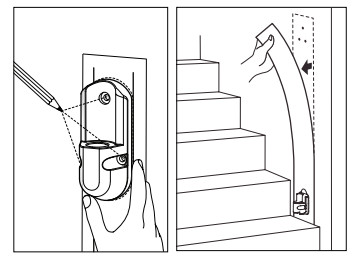
- Decide which side of your opening will be the hinge side (i.e. the side that does NOT open). Next, place template “A” against the wall using tape. Template should be flush to the floor/step.
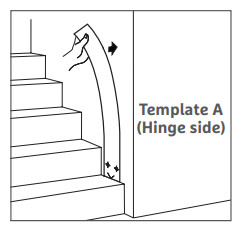
- Mark the screw holes in the cut-out piece with a pencil to create an indentation, then remove the cut-out the piece on the bottom of template “A”.

- Determine whether there is a stud behind the drywall where you will install the lower hinge wall bracket.
Proceed to either 5a or 5b.
PLEASE NOTE: Leave template “A” in place to help align the upper hinge bracket later.


5a. For Drywall Without Stud / Plasterboard:
Drill a 7/32”(5.5mm) hole into the drywall at each pencil mark. Insert a drywall anchor into each hole.
Use a screwdriver or drill to insert the screws through the lower hinge wall bracket into the drywall anchors.


5b. For Drywall with Stud:
Drill a 5/64”(2mm) pilot hole into the stud at each pencil mark (no anchor needed).
Use a screwdriver or drill to insert the screws through the lower hinge wall bracket into the stud.


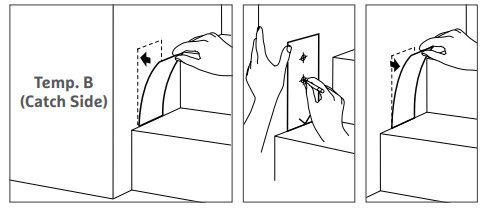
STEP 4: INSTALL LOWER CATCH (WALL BRACKET)
- Place template “B” against the wall with tape, flush to the floor with tape, flush to the floor. Mark the screw holes in the cut-out piece with a pencil to create an indentation, then remove the template.
- Determine whether there is a stud behind the drywall where you will install the lower catch wall bracket.
Proceed to either 3a or 3b.

3a. For Drywall Without Stud / Plasterboard:
Drill a 7/32”(5.5mm) hole into the drywall at the center mark. Insert a drywall anchor. Then, use a screwdriver or drill to insert the screws through the lower catch wall bracket into the drywall anchor.


3b. For Drywall with Stud:
Drill a 5/64”(2mm) pilot hole into the stud at each pencil mark (no anchor needed). Then, use a screwdriver or drill to insert the screws through the lower catch wall bracket into the stud.


STEP 5: SETTING YOUR GATE
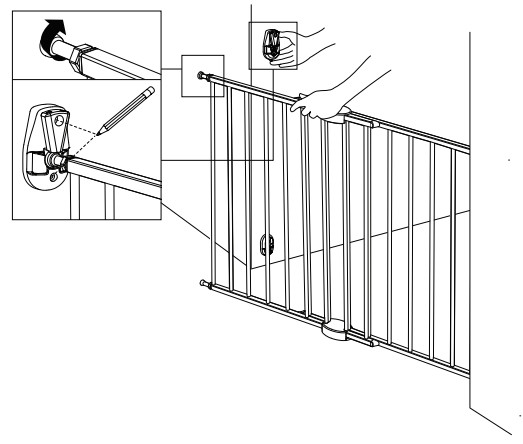
- The gap between the gate to the wall should be less than 2.25” (57mm). If necessary, adjust the lower hinge pin using the wrench to its appropriate length. Then tighten the nut against the tube by using the wrench.
- Next, insert the gate’s lower hinge pin down into the lower hinge bracket on the wall until it clicks.
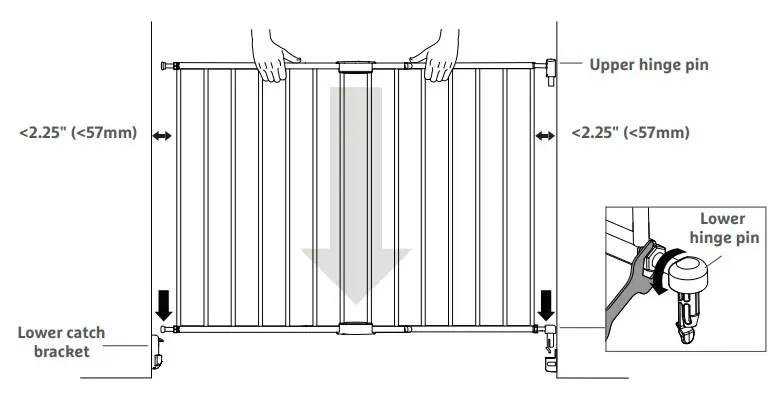
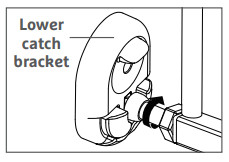
- On the catch side of the gate, loosen the nut around the lower adjustment rod using a wrench. Extend the adjustment rod by turning it clockwise until it is seated in the lower catch bracket on the wall. (The rod should fully depress the bracket’s center button.) Then, tighten the nut against the tube by using the wrench.
- Position the upper hinge pin 1/4” (6.35mm) from the wall. If necessary, extend the hinge pin by inserting
the hex key wrench into the end and turning counterclockwise to create the 1/4” (6.35mm) gap.


STEP 6: INSTALL UPPER HINGE (WALL BRACKET)
- Slide the upper hinge bracket into the upper hinge pin. Hold the bracket against the wall so that it’s directly above the lower hinge.
Use the lines of template “A” as a guide to do this.
Trace the upper hinge bracket’s position with a pencil. Remove the upper hinge bracket and place it aside.
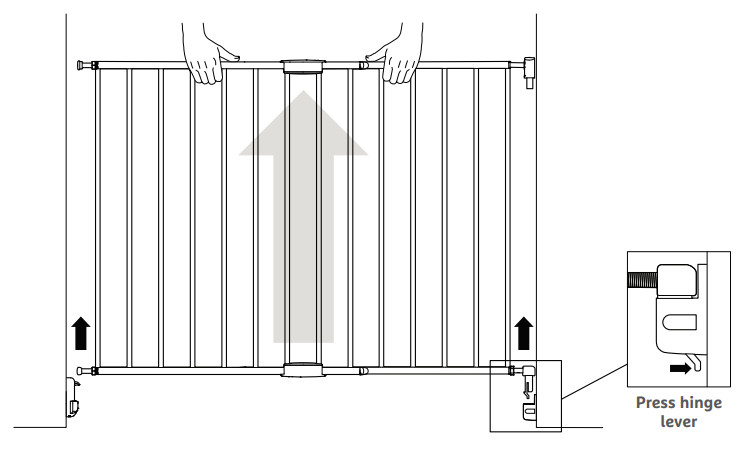
- Release the lower hinge pin by pushing the hinge lever toward the wall. Then lift the gate to remove and place it aside.
- Place again the upper hinge bracket against the pencil lines on the wall and mark the screw holes with a pencil to create an indentation.
Then, remove template “A” from the wall. - Determine whether there is a stud behind the drywall where you will install the upper hinge bracket. Proceed to either 5a or 5b.


5a. For Drywall Without Stud / Plasterboard:
Drill a 7/32”(5.5mm) hole into the drywall at the center mark. Insert a drywall anchor.
Use a screwdriver or drill to insert the screw through the upper hinge wall bracket into the drywall anchor.


5b. For Drywall with Stud:
Drill a 5/64”(2mm) pilot hole into the stud (no anchor needed).
Use a screwdriver or drill to insert the screw through the upper hinge wall bracket into the stud.


STEP 7: INSTALL UPPER CATCH (WALL BRACKET)
- Place the gate back into position, hinge side first. Drop both the upper and lower hinge pins into their
respective brackets at the same time.
- Place the upper catch bracket against the wall. If necessary, loosen the nut and extend the adjustment rod on the upper catch side until it is seated in the bracket. (The rod should press against the bracket’s center button.) Then, mark the screw holes with a pencil to create an indentation.
- Determine whether there is a stud behind the drywall where you will install the upper catch wall bracket. Proceed to either 4a or 4b.


4a. For Drywall Without Stud / Plasterboard:
Drill a 7/32”(5.5mm) hole into the drywall at the center mark. Insert a drywall anchor.
Use a screwdriver or drill to insert the screw through the upper catch wall bracket into the drywall anchor.


4b. For Drywall with Stud:
Drill a 5/64”(2mm) pilot hole into the stud (no anchor needed).
Use a screwdriver or drill to insert the screw through the upper catch wall bracket into the stud.


ADJUSTING BOLT ADJUSTER

- Wrench
- Hex key
Check again that the center button on the upper and lower catch wall brackets are being fully pressed in by the bolt adjuster. If so, use the wrench to firmly tighten the nut.

PLEASE NOTE: The gap between the gate to the wall should be less than 2.25” (57mm).

How to Use
OPENING YOUR GATE
Push the lever on the upper catch bracket to the side with your thumb, then lift the gate out.

CLOSING YOUR GATE
Swing the gate back to its closed position. Simply push the gate door closed until it clicks.
PLEASE NOTE:
Always check that the gate is securely locked on the top and bottom brackets, and never leave your child unattended.
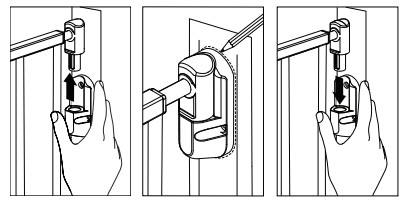
ADJUSTING THE SWING GUARD
The swing guard is located on the lower catch wall bracket.
If the gate is placed at the top or bottom of the stairs, always rotate the swing guard so that the gate can only swing away from the stairs. Choose either 3 o’clock or 9 o’clock position.
If the gate is placed at the hallways or doorways, we recommend rotating the swing guard to 12 o’clock position so the gate can swing in either direction.
Once the swing guard position is set, secure with a screwdriver.
CLEANING YOUR GATE
Use mild soap and wipe with a damp cloth. Be careful NOT to wash or wipe the stickers on the base of the gate.
Removing or damaging the stickers will void the warranty.
Customer Service
ONE-YEAR LIMITED WARRANTY
A. Munchkin, Inc.’s safety gates include a one-year limited warranty from the date of purchase.
POLICY: In the event of a malfunction or defect during the in-warranty period, Munchkin, Inc., at its option, will replace or repair a gate under warranty. Munchkin, Inc.’s limited warranty extends only to the gate’s original purchaser.
PROCEDURE: We ask that you contact Munchkin, Inc. to provide all pertinent information relating to any issues you are experiencing with your safety gate. Munchkin, Inc.’s Customer Satisfaction Team can be reached at 1-800-344-2229 Monday through Friday from 8 am to 5 pm (Pacific Time) or by email at [email protected]. The following information, when applicable, is required for all warranty claims:
- Gate Name
- Model Number
- Date Code
- Receipt Copy
This may be faxed, emailed, or sent via mail to Munchkin, Inc. to the attention of Customer Satisfaction.
ATYPICAL ISSUES: For atypical issues that require physical review, Munchkin, Inc. will request that you return your gate to its Quality Assurance department. Munchkin, Inc. will compensate you for shipping costs by providing a complimentary gift equal in value to the expense incurred in shipping the product. Alternatively, Munchkin, Inc. at its option, may issue a UPS call tag in order to expedite receipt of the defective product for review.
B. Conditions that void Munchkin, Inc.’s one-year limited warranty.
POLICY: Munchkin, Inc.’s one-year limited warranty does not cover a defect that has been caused by misuse, abuse, abnormal use, excessive wear and tear, improper assembly, negligence, environmental exposure, alteration, or accident. Important Note: A safety gate that has had its batch code altered or removed invalidates any and all claims against the manufacturer.
C. CONSUMER REIMBURSEMENT: Munchkin, Inc. does not provide refunds as a remedy for defective or nonconforming safety gates. Nor does Munchkin, Inc. offer cashback for returned products purchased through any of Munchkin, Inc’s safety gate websites. Exception: Munchkin, Inc. will provide a cashback refund on purchases made through any of Munchkin, Inc.’s safety gate websites ONLY if there was a processing or shipping error made by Munchkin, Inc. Contact Customer Satisfaction Team with any questions at 1-800-344-2229.
CONTACT US
If you have any questions about installing your gate, or if you wish to provide comments about this product, feel free to contact our Customer Satisfaction Team at 1-800-344-2229 (M-F from 8:00 am-5:00 pm PST) or visit our website at www.munchkin.com