
BARISTA
User manual
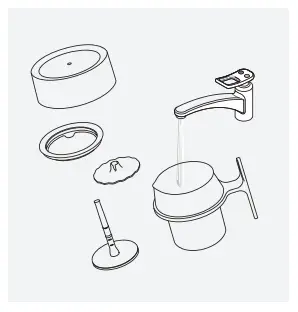
Overview
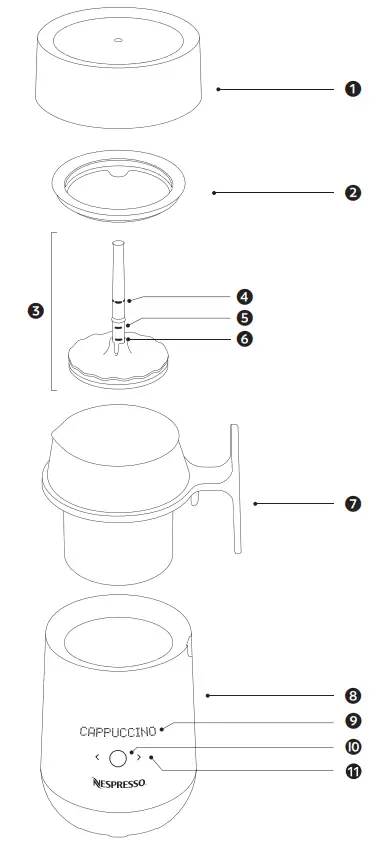
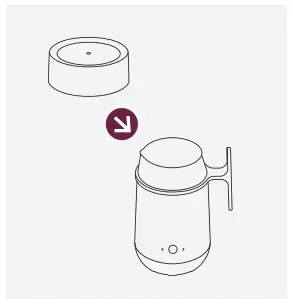
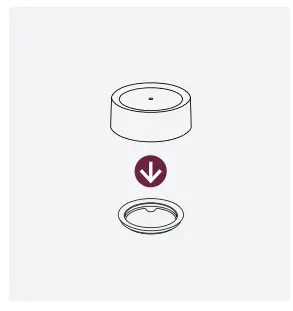
- Jug Lid (dishwasher safe)
- Rubber Seal (dishwasher safe)
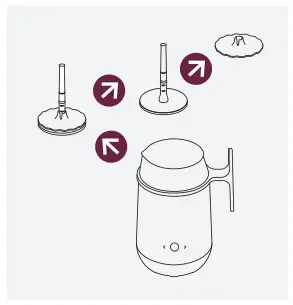
- Whisk for all preparations (2 parts, dishwasher safe)
- MAX level indicator (250 ml / 8.45 fl oz.)
- INTERMEDIATE level indicator (150 ml / 5.07 fl oz.)
- MIN level indicator (100 ml / 3.38 fl oz.)
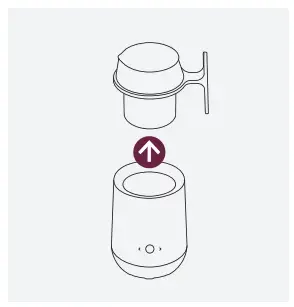
- Jug (dishwasher safe)
- Powerbase
- Device instruction Screen
- START / STOP Button
- Navigation Arrows (touch interface)
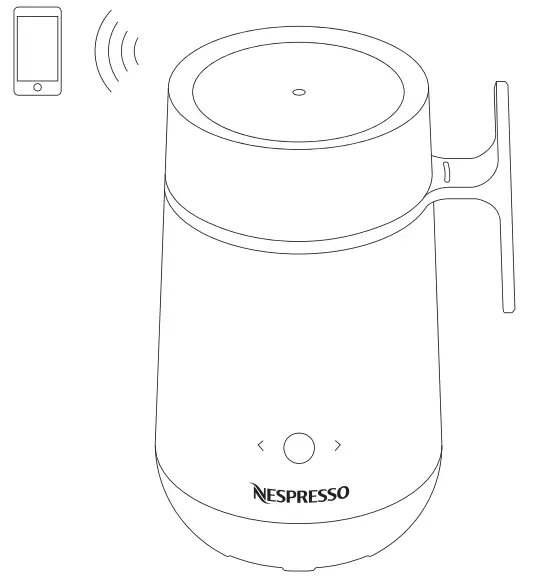
Barista
The Nespresso Barista is an invitation to discover a wide world of recipe possibilities. Prepare anything from refreshing iced coffees to elaborate Latte Art at home. With its touch screen and connected app, navigating through the recipes becomes surprisingly easy. Thanks to the connectivity, you’ll be able to discover new recipes via the App.
Important safeguards
CAUTION / WARNING
ELECTRICAL DANGER
DISCONNECT DAMAGED SUPPLY CORD
CAUTION HOT SURFACE
MAGNETS INSIDE
NO FERROMAGNETIC TOOLS OR MATERIALS
CAUTION STRONG MAGNETIC FIELD
CAUTION: The instructions are part of the appliance. Read and follow all instructions to avoid possible harm and damage. Save these instructions and pass them on to any subsequent owner.
When using electrical appliances, basic safety precautions should always be followed, including the following:
- Read all Instructions.
- Do not touch hot surfaces. Use handles or knobs.
- To protect against fire, electric shock, and injury to persons do not immerse cord, plugs, or base in water or other liquid.
- Close supervision is necessary when any appliance is used by or near children.
- Unplug from outlet when not in use and before cleaning. Allow cooling before putting on or taking off parts, and before cleaning the appliance.
- Do not operate any appliance with a damaged cord or plug or after the appliance malfunctions, or has been damaged in any manner. Return appliance to the nearest authorized service facility for examination, repair, or adjustment.
- The use of accessory attachments not recommended by the appliance manufacturer may result in fire, electric shock or injury to persons.
- Do not use outdoors.
- Do not let the cord hang over the edge of the table or counter, or touch hot surfaces.
- Do not place on or near a hot gas or electric burner, or in a heated oven.
- Always attach the plug to the appliance first, then plug the cord into the wall outlet. To disconnect, turn any control to “off”, then remove the plug from the wall outlet.
- Do not use appliances other than intended use.
Specific Appliances
- Make sure to always close the lid before starting the recipe on the device.
- Scalding may occur if the lid is removed during the brewing cycles.
Important safeguards
Avoid the risk of fatal electrical shock and fire
- Only plug the power base into a suitable, grounded power socket. Make sure that the voltage of the power source is the same as that specified on the rating plate.
- Unplug from outlet when not in use and before cleaning. Allow cooling before putting on or taking off parts, and before cleaning the appliance.
- Plug the cord into the wall outlet. To disconnect, switch off, then remove the plug from the wall outlet.
- Do not pull the cable over sharp edges, clamp it or allow it to hang down.
- If the supply cord or the plug are damaged, they must be replaced by the manufacturer, its service agent, or similarly qualified persons.
- Disconnect the power base from the power socket, when not in use for long periods. Disconnect by pulling out the plug and not pulling the cable itself, as this may damage the cable.
- Never immerse the power base of the appliance in water or other liquids. Electricity and water together can cause a fatal electric shock.
- To protect against fire, electric shock, and injury to persons do not immerse the cord, plugs, or the device base in water or other liquid.
- Disconnect the device from the mains before the appliance is cleaned, and ensure that the inlet is dried before the appliance is used again.
- The appliance is only to be used with the jug provided.
- Short power-supply cords reduce risks resulting from becoming entangled in or tripping over a long cord.
- Longer (or detachable) cords may be used if care is exercised in their use, and:
1) the marked electrical rating is at least as great as the electrical rating of the appliance
2) a grounding-type 3wire cord is used
3) cord(s) is arranged so that it will not drape over the countertop or tabletop, where it can be pulled on or tripped over by anyone. - If an extension lead is required, use only a grounded cable with a conductor cross-section of at least 1.5 mm2 / 0.06 in2.
- The Barista jug is dishwasher safe, but cannot be washed at a temperature higher than 70° C / 158 F.
- Magnets inside.
- Hot elements after heating: jug, use handle.
- The hot surface under jug: risk of damaging of the table (wood, plastic) or surface when put.
- Don’t use without lid, risk of hot beverage projection and don’t remove the lid during appliance working.
- Don’t put your fingers or foreign body during preparation: rotating parts, risk of injury.
- Don’t fill the jug with more liquid than max level, risk of overflowing.
- Don’t close the opening (cooling air circulation) under the device: risk of overheating.
- Don’t block fan (under device): risk of overheating.
Avoid possible harm when operating the appliance
- Never leave the appliance unattended during operation. Keep it out of the reach of children. The appliance is only for use by persons who have sufficient experience and knowledge and are physical, sensory, and mentally able to operate the machine safely in accordance with these instructions.
- The appliance is intended to prepare beverages according to these instructions.
- This appliance is intended to be used in households.
- Except for US and Canada, this appliance is intended to be used in similar applications such as staff kitchen areas in shops, offices, farmhouses, and other working environments.
- This appliance can be used by children 8 years old and older, as well as persons with reduced physical, sensory, mental capabilities or lack of experience, only if they have been given supervision and instruction concerning the use of the appliance in a safe way and understand the hazards involved. Children shall not play with the appliance. · Cleaning and user maintenance shall not be made by children unless they are older than 8 and supervised. Keep the appliance and its cord out of reach of children under the age of 8 years old.
- Do not use the appliance if damaged. A damaged appliance can cause electric shocks, burns, and fire.
- Only use the appliance with the power base provided.
- Do not touch hot surfaces. Use handles.
- Do not operate any appliance with a damaged cord or plug in the appliance if it has malfunctioned, dropped, or is damaged in any manner. Return appliance to the nearest authorized service facility for examination, repair, or electrical or mechanical adjustment.
- Do not use outdoors.
- Do not use the appliance for anything other than its intended use.
- Scalding may occur if the lid is removed during the recipe preparation.
- Extreme caution must be used when moving an appliance containing hot liquids.
- Avoid contact with moving parts.
- The use of accessory attachments not recommended by the appliance may result in fire, electric shock, or injury to persons.
- The appliance is intended to prepare beverages according to these instructions. It is for use in private households. No liability is accepted for any other purposes, faulty
Important safeguards
operations or nonprofessional repairs. Guaranteed services are also excluded in such cases.
- To avoid hazards, never place the appliance on or beside hot surfaces, for example, radiators, stovetops, gas burners, or similar.
- Don’t pour liquid into the power base.
- Only use the appliance with the power base provided.
- Ensure correct placement of the jug inside of the base before use.
- Cleaning: disassemble the whisk disk of the whisk for complete cleaning.
- In case of start of a recipe without liquid, sides of jug could become hot, use the handle.
- Use only ingredients mentioned in the recipe booklet and App.
- Use the device only on a flat horizontal surface.
Disposal
 Your appliance contains materials that can be recovered or recycled. The separation of the remaining waste products into different types facilitates the recycling of raw materials. You can obtain information on disposal from your local authority.
SAVE THESE INSTRUCTIONS
Get the App
 |
Download the Nespresso App. If you have it already, we recommend updating the App to the latest version. |
 |
Launch the App on your smartphone or tablet. |
 |
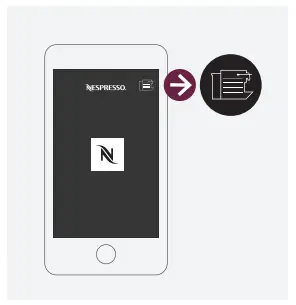
From the Nespresso app homepage, click on the Machine icon. |
Nespresso Barista is compatible with: IOS (iPhone + iPad), Android.
Pairing
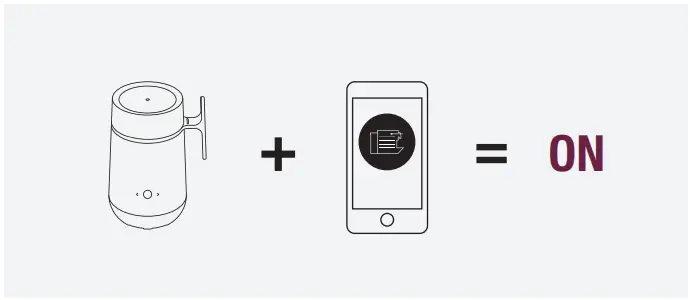
- Please make sure that:
– Your Barista is turned on.
– Your mobile device has Bluetooth® turned ON.
– You are close to your Barista while pairing. - Follow pairing instructions on the App. When the pairing is completed, the Barista icon will appear on the screen. The pairing takes approximately 30-40 seconds.
- You can add, remove and reorganize your recipes on your Barista via your mobile phone by following the mini-tutorial on the app.
Connectivity functions
– Recipes management: navigate through the recipes and personalize your Barista
– Recipes step by step: step by step instructions for each recipe
– Recipes discovery: discover a wide world of recipe possibilities
– Machine status: check machine status
– Alarms: check error messages
Preparation
Milk recipe (hot and cold)
WARNING: Risk of electrical shock and fire! Make sure the underside of the milk device’s power base and the area underneath the power base is dry.
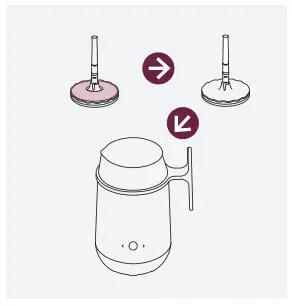
CAUTION: Always ensure the whisk is firmly inserted into the jug before adding liquid. Make sure the lid and seal are firmly in place before starting the preparation.
TIPS: For optimal milk froth, use cold semi-skimmed cow milk at refrigerated temperature (about 4 °C – 6 °C / 39.2 F – 42.8 F). To guarantee hygiene conditions, use heat-treated milk (pasteurized), refrigerated & freshly opened only. Milk that has been frozen will not froth. To ensure hygienic conditions and proper maintenance of the equipment, it is highly recommended to not use special enriched milk, powdered reconstituted milk nor flavoured milk.
- Remove the warning label on the whisk before use. Clean before the first use and after each use according to the cleaning instructions. Place the whisk in the jug.
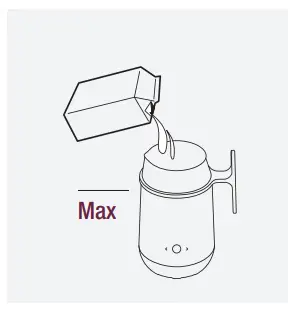
- Fill jug according to level specified in the recipe instructions (in the recipe book or in the app).
To avoid overflow please note that:
• The maximum capacity of the jug for hot milk, without any froth is 250 ml / 8.45 fl oz. This corresponds to the max level on the whisk.
• The maximum capacity of the jug for a recipe with milk froth is 100 ml / 5.07 fl oz. This corresponds to the main level on the whisk.
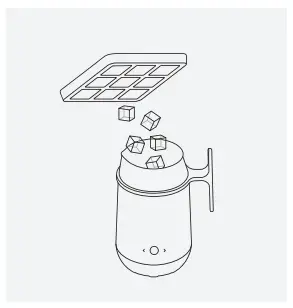
 Iced Recipes
For Iced Recipes, add the ice cubes directly to the device.
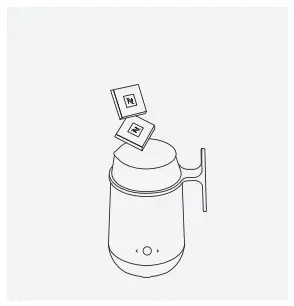
 Chocolate recipe
For chocolate-based recipes, add the chocolate squares directly to the device.
- Put the lid on the device. Make sure the jug is dry before you put it in the power base. Always make sure the whisk is in place before adding the ingredients.
- Choose your recipe preparation via the dedicated App or by pressing the device button to start. Via the arrows, navigate left or right to select the desired recipe. You can also connect via the application to select and view the recipes instructions. There will be an animation on the screen during preparation and become steady on when the preparation is ready.
- Pour the required amount of cold fresh milk into the jug and cover with a jug lid. Always use cold milk and fill the jug between MIN and MAX level markings. To avoid any scratches, use only a non-metal spoon to collect the foam in the jug. For hot and cold milk froth, preparation takes approx. 80 sec. For hot milk, preparation takes approx. 150 sec. Preparation can be stopped at any time by pressing the button or removing the device from the power base.
 NOTE: Do not remove jug during preparation. To stop operation at any time, press the START / STOP button once.
 CAUTION: The surface of the jug will be hot during and after recipe preparation. Do not place the hot jug on the heat-sensitive surfaces. Take the hot jug only by the handle.
 - The device turns off automatically after 3 minutes of non-use and the display will shut down. Press any arrows buttons to switch the device ON again, the display will start again. To turn off your device before the auto-off, press and hold the main button for 5 seconds.
NOTE: Never operate the appliance without the minimum
level of liquid in the jug. For optimum frothing results, do not
exceed the MAX indicator inside the jug.
NOTE: When pouring your recipe, make sure to hold the
whisk (or remove it) before pouring your recipe.
Tips when using your device
- Always use cold and fresh milk (4 °C – 6 °C / 39.2 F – 42.8 F).
- Always respect the recommended milk quantity indicated in the recipe.
- Never exceed the MAX marking inside the jug.
- Before pouring the recipe, swirl the frothed milk in a circular motion.
- Frothed milk that is not used immediately should not be reheated.
- Ensure the jug and whisk are clean before use.
- Suitable liquids: cow milk (Fresh or UHT, full cream, low fat, skim) and any vegetable milk (milk froth is not guaranteed with this milk).
- The milk froth volume depends on the kind of milk that is used and its temperature.
- Suitable Ingredients: chocolate, chocolate flakes, honey, syrup, flavoured powders, sugar, ice cubes.
- Before preparing cold recipes, make sure the jug is cold or quickly cool it down under cold water or with ice.
- Do not use any enriched or special enriched milk or liquid products on the equipment.
- This equipment is specific for milk, not to use other products, therefore not fit for lactose intolerants or milk allergics.
How to access the hidden menu
Press simultaneously the 2 arrows for 3 seconds.
- Language: choose your language by navigating via the arrows and confirm with the center button.
- Reset: Press the center button to confirm factory reset.
- Bluetooth®: to activate or deactivate the Bluetooth® mode.
- Exit: to exit the hidden menu.
Cleaning instructions
Clean directly after every use
 CAUTION: Ensure the jug is cold before removing it from the power base. Or, if removing with care, rinse with cold water immediately to cool down the jug and
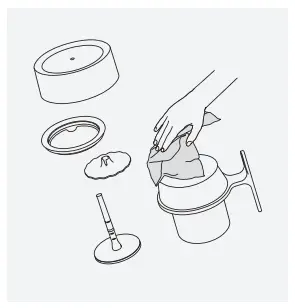
avoid burning risks. / In case the power base needs to be cleaned unplug it first and use only a damp cloth. Make sure the connector is dry before operation. Do not immerse the power base in water neither put it in the dishwasher. / Do not place directly over the dishwasher pin as it may cause damage to the inner surface. / If the bottom part of the jug is wet, dry it before putting it back in contact with the power base station. / Only use non-abrasive cleaning materials. Do not use abrasives, sharp objects, brushes: risk of scratches and harm to the jug surface.
 |
Unplug the power cord from the power outlet before cleaning. |
 |
Remove the whisk. For optimal cleaning, make sure to disassemble both parts of the whisk. |
 |
Wait for the jug to cool down and remove the milk jug from the power base. |
 |
Remove silicon seal from the lid. Dissemble all parts of the whisk, by gently turning the upper whisk part to remove it. |
 |
Hand washing: wash inner jug, seat, lid, and whisk with detergent and rinse with warm/hot water. Do not use abrasive material that might damage the surface of the equipment. Make sure to remove the warning label before cleaning the whisk. |
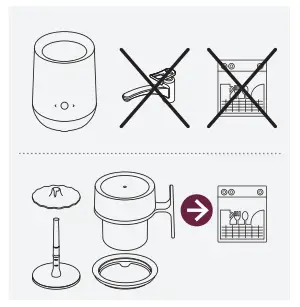 |
Dishwashing: put all parts except the power base in the dishwasher at a maximum of 70°C / 158 F. |
 |
Dry all device parts with a fresh and clean towel, cloth, or paper and reassemble all parts. |
NOTE: Only the jug, jug lid, lid seal, and whisk can be washed in the dishwasher.
Troubleshooting
| The pairing has not succeeded. | – Check that the Bluetooth® on the smartphone or tablet is activated.
– Check the compatibility of your smartphone or tablet with the machine (see page 9). – Ensure the smartphone or tablet is placed next to the machine (max distance 20 cm) during the pairing. – Make sure to not turn ON any microwave close to the machine during pairing. If you want to unpair your machine, via the App. – Go on the App “Name”, click on “Machine status”, then click on “Unpair this machine”. – Click on “unpair this device” to confirm the unpairing. – Note: In case of an unpairing, all the setups and specifications will be lost and the machine will be reset to factory settings. |
| No light on and no message. | – Check if the device is plugged, press any button if nothing happens call Nespresso. |
| Quality of milk froth not up to
standard. |
– For optimal milk froth, use cold cow milk or semi-skimmed cow milk at refrigerated temperature
(about 4 °C – 6 °C / 39.2 F – 42.8 F). To guarantee hygiene conditions, use heat-treated milk (pasteurized), refrigerated & freshly opened only, and 0% milk for Café viennois. Milk that has been frozen will not froth. – Be sure Barista and the whisk are clean. – It is highly recommended to not use special enriched milk, powdered reconstituted milk nor flavored milk. – Jug has to be really cold for the optimal recipe (after the hot recipe, please cool down until ambient temperature +/- 25 °C / 77 F). |
| Milk overflows. | – Ensure that the jug is well placed on the power base.
– Check the correct position of the lid. – Quantity of milk has to be between MIN level and MAX level. |
| Display Message | |
| “Call Nespresso” and Error code (E01 to E34) | – Device needs to be repaired, please call Nespresso and mention the error code:
E01 to E34, phone number available on Nespresso website. |
| “Replace Jug” | – Check if the jug is present and in a good position. If not replace the jug in a good position.
– Check if the whisk is present and in a good position. If not place whisks with whisk disk weel positioned in a good position. |
| “Add milk” | – There is or not enough milk inside the jug. |
| “Restart recipe” | – Restart recipe, if persist unplug wait for 3 mn and replug, if persist call Nespresso. |
| “Whisk removed, decoupled
or jumped” |
– Whisk decoupling: the machine could vibrate and make noise, no risk for device or consumer; ingredient is probably too dense.
– Check if standard ingredients (see recipes). – If a too thick ingredient, add 10-20 ml / 0.33 – 0.67 fl oz of water. |
| “Empty and restart” | – Whisk or motor is blocked, preparation is too thick, please empty, refill and restart. |
| “Replug” | – Please unplug and plug again to reinitialize the device. |
| “Empty and replace whisk” | – Whisk or motor is blocked, preparation is too thick, please empty, refill and restart. |
| “Cooling down. please wait…” | – One component of the device is too hot, please wait, the device cools down and restart. |
Specifications
| BARISTA W10 / W11 | ||
 |
US/CA: 120 V, 60 Hz, 660 W AR: 220-240 V, 50/60 Hz, 480-560 W CL: 220-240 V, 50/60 Hz, 480-560 W MX: 127 V, 60 Hz, 660 W |
BR: 127 V, 60 Hz, 610 W BR3: 220 V, 60 Hz, 480 W CO: 120 V, 60 Hz, 660 W |
| Frequency | 2.402 GHz – 2.480 GHz Max Transmit Power 4dBm |
|
 |
~ 1.7 kg / 3 lbs | |
 |
||
Warranty
Nespresso warrants this product against defects in materials and workmanship for a period of one year from the date of purchase. During this period, Nespresso will either repair or replace, at its discretion, any defective product at no charge to the owner. Replacement products or repaired parts will be guaranteed for only the unexpired portion of the original warranty or six months, whichever is greater.
This limited warranty does not apply to any defect resulting from accident, misuse, improper maintenance, or normal wear and tear. Except to the extent allowed by applicable law, the terms of this limited warranty do not exclude, restrict or modify, and are in addition to, the mandatory statutory rights applicable to the sale of the product to you.
If you believe your product is defective, contact Nespresso for instructions on where to send or take it for repair.
Please visit our website at www.nespresso.com to discover more about Nespresso.
BARISTA W10 / W11
Version 2.0 – November 2019
For Nespresso – Recipe Visit: https://appliance.recipes/category/nespresso