![]()
Blender & Soup Maker
HB150UK Series
INSTRUCTIONS

THANK YOU
for purchasing the Ninja® Foodi® Blender & Soup Maker

REGISTER YOUR PURCHASE
![]()
![]()
RECORD THIS INFORMATION
Model Number:____________________________________
Serial Number:_____________________________________
Date of Purchase:___________________________________
(Keep receipt)
Store of Purchase:___________________________________
TECHNICAL SPECIFICATIONS
Voltage: 220-240V~ 50-60Hz
Watts:1000W
PLEASE READ CAREFULLY AND KEEP FOR FUTURE REFERENCE
These instructions are designed to help you get a complete understanding of your new Ninja® Blender & Soup Maker
GUARANTEE: This product is unconditionally guaranteed for one year against all defects of workmanship and materials. This guarantee does not affect your statutory rights. If this product proves unsatisfactory please contact our customer service department.

This marking indicates that this product should not be disposed with other household wastes throughout the EU. To prevent possible harm to the environment or human health from uncontrolled waste disposal, recycle it responsibly to promote the sustainable reuse of material sources. To return your used device, please use the return and collection systems or contact the retailer where this product was purchased. They can take this product for environmental safe recycling.
IMPORTANT SAFETY INSTRUCTIONS
PLEASE READ CAREFULLY BEFORE USE · FOR HOUSEHOLD USE ONLY
![]()
To reduce the risk of injury, fire, electrical shock or property damage, basic safety precautions must always be followed, including the following numbered warnings and subsequent instructions
Extreme caution must be used when moving an appliance containing hot oil or other hot liquids
Do not use appliance for other than intended use
- Read all instructions prior to using the appliance and its accessories.
- Carefully observe and practice all warnings and instructions. This unit contains electrical connections, moving parts, and heating elements that potentially present risk to the user.
- Take your time and exercise care during unpacking and appliance setup.
- Take inventory of all contents to ensure you have all parts needed to properly and safely operate your appliance.
- Blades are sharp. Handle carefully.
- Turn the appliance OFF, then unplug the appliance from the socket when not in use, before assembling or disassembling parts, and before cleaning. To unplug, grasp the plug by the body and pull from the socket. NEVER unplug by grasping and pulling the flexible cord.
- Wash all parts that may contact food before use. Follow washing instructions covered in this instruction manual.
- To protect against the risk of electric shock, DO NOT submerge the appliance or allow the power cord to contact any form of liquid.
- DO NOT use this appliance outdoors. It is designed for indoor household use only.
- DO NOT operate any appliance with a damaged cord or plug, or after the appliance malfunctions or is dropped or damaged in any manner. This appliance has no user-serviceable parts. If damaged, contact SharkNinja for servicing.
- This appliance has important markings on the plug blade. The entire supply cord is not suitable for replacement. If damaged, please contact SharkNinja for service.
- Extension cords should not be used with this appliance.
- DO NOT allow children to operate this appliance or use as a toy. Close supervision is necessary when any appliance is used near children.
- This appliance is not intended to be used by people with reduced physical, sensory, or mental capabilities, or lack of experience and knowledge, unless they have been given supervision or instruction concerning use of the appliance by a person responsible for their safety.
- Cleaning and user maintenance shall not be carried out by children.
- Keep the appliance and its cord out of reach of children.
- Before each use, inspect blade assemblies for damage. If a blade is bent or damage is suspected, contact SharkNinja to arrange for replacement.
- DO NOT attempt to sharpen blades.
- DO NOT let cord hang over edge of table or worktop or touch hot surfaces.
- DO NOT allow the unit or the cord to contact hot surfaces, including stoves and other heating appliances.
- DO NOT place on or near a hot gas or electric burner or in a heated oven.
- ALWAYS use the appliance on a dry and level surface.
- Keep hands, hair, and clothing out of the container when loading and operating.
- ONLY use attachments and accessories that are provided with the product or are recommended by SharkNinja. The use of attachments, including canning jars, not recommended or sold by SharkNinja may cause fire, electric shock, or injury.
- The appliance is only to be used with the stand provided.
- During operation and handling of the appliance, avoid contact with moving parts.
- DO NOT operate the appliance with an empty container.
- DO NOT fill containers past the max fill or max liquid lines.
- DO NOT microwave any containers or accessories provided with the appliance.
- Before operation, ensure all utensils are removed from containers. Failure to remove utensils can cause containers to shatter and potentially result in personal injury and property damage.
- Keep hands and utensils out of container while blending to reduce the risk of severe injury to persons or damage to the blender. A rubber scraper or spatula may be used but must be used ONLY when the blender is not running.
- NEVER operate the appliance without lids and caps in place. DO NOT attempt to defeat the interlock mechanism. Ensure the container and lid are properly installed before operation.
- DO NOT expose the containers and accessories to extreme temperature changes. They may experience damage.
- NEVER leave the appliance unattended while in use.
- ALWAYS operate blender with cover in place.
- Be careful if hot liquid is poured into the blender as it can be ejected out of the appliance due to a sudden streaming.
- Allow to cool before assembling or disassembling parts and before cleaning appliance.
- DO NOT grasp the sides of the pitcher after hot blending or cooking. The surface of the pitcher is hot during and after operation. Surfaces are hot during and after operation. To prevent burns or personal injury, ALWAYS use protective hot pads or insulated oven mitts and use available handles and knobs.
- If you find unmixed ingredients sticking to the sides of the pitcher, stop the appliance, remove the lid, and use a rubber scraper or spatula to dislodge ingredients. NEVER insert your hands into the pitcher, as you may contact one of the blades and experience a laceration.
- DO NOT attempt to remove the container and lid from the motor base while the motor is still spinning. Allow the appliance to come to a complete stop before removing the lid and pitcher.
- If the appliance overheats, a thermal switch will activate and temporarily disable the motor. To reset, unplug the appliance and allow it to cool for approximately 15 minutes before using again.
- The maximum wattage rating for this appliance is based on the configuration of the high speed bottom blade and glass pitcher blender. Other configurations may draw less power or current.
- Turn off the appliance and unplug the motor base before cleaning.
SAVE THESE INSTRUCTIONS
| Indicates to read and review instructions to understand operation and use of product. | |
| Indicates the presence of a hazard that can cause personal injury, death or substantial property damage if the warning included with this symbol is ignored. | |
| Take care to avoid contact with hot surface. Always use hand protection to avoid burns. | |
| For indoor and household use only. |
PARTS

A Jug Lid with Removable Centre Cap
B 1.7L Glass Jug with Built-in Heating Element
C Motor Base (power cord not shown)
D Tamper E Cleaning Brush
FEATURES

![]()
AUTO-iQ® PROGRAMS:
Features intelligent programs that combine unique pulsing, blending, pausing, and heating patterns that do the work for you.
SMOOTHIE
Combine your favourite fresh or frozen ingredients, liquids and powders.
DESSERT
Use your favourite frozen fruit and dairy to make sorbets and frozen treats.
FROZEN DRINK
Crush ice and frozen fruit into restaurant style frozen drinks.
MILKSHAK
E Blend milks and your favourite flavours for a frothy milkshake.
SMOOTH SOUP
Cook and blend your favourite smooth soups.
CHUNKY SOUP
Create homemade soup with more texture.
JAM
Make your own fruit jams with texture or strain afterwards for a smooth result.
SAUCE
Create sweet or savoury sauces and fondues.
CHOP Quickly chop up ingredients before making soups, sauces and dips.
SAUTE
Unlock more flavour by quickly cooking onions, garlic, spices and more before making a homemade soup, sauce or dip.
MANUAL SETTINGS:
BLEND
Select BLEND then choose your speed setting. LOW, MED and HIGH will run for 60 seconds or until manually stopped.
COOK
Select COOK, then choose either LOW, MED or HIGH temperature. The setting will run for 60 minutes or until manually stopped.
OTHER FEATURES:
![]()
Use to turn the unit on or off.
CLEAN
Combines heat and rapid pulses to remove stuck-on messes.
HEAT ON
Light will turn on when you have selected a program or function that uses heat.
KEEP WARM
Light will turn on after cooking and the unit will keep contents warm for up to 60 minutes.
BEFORE FIRST USE
IMPORTANT: Review all warnings located at the beginning of this manual before proceeding.
- Remove all packaging material and labels from the appliance. Separate all parts from each other.
- Wash the jug, lid, and accessories in warm, soapy water using a dishwashing utensil with a handle to avoid direct contact with the blades. DO NOT submerge the jug when washing.
- Thoroughly rinse and air-dry all parts
NOTE: Follow cleaning instructions on page 12 very carefully. NOTE: DO NOT submerge the jug when washing.
HANDLING THE BLENDER JUG
LIFTING AND POURING FROM THE JUG


DO NOT grasp the sides of the jug after hot blending or cooking. The surface of the jug is hot during and after operation. Surfaces are hot during and after operation. To prevent burns or personal injury, ALWAYS use protective hot pads or insulated oven mitts and use available handles and knobs.

GETTING STARTED WITH YOUR BLENDER and SOUP MAKER
IMPORTANT: Review all warnings before proceeding.
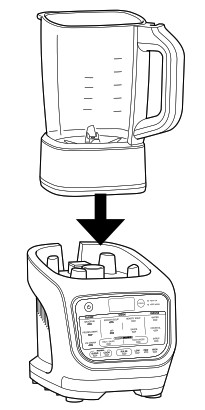
ASSEMBLY
- Plug in motor base and place on a clean, dry, level surface such as a worktop or table.
- Lower the jug onto the motor base, aligning the handle to the arrow on the front right corner of the base.
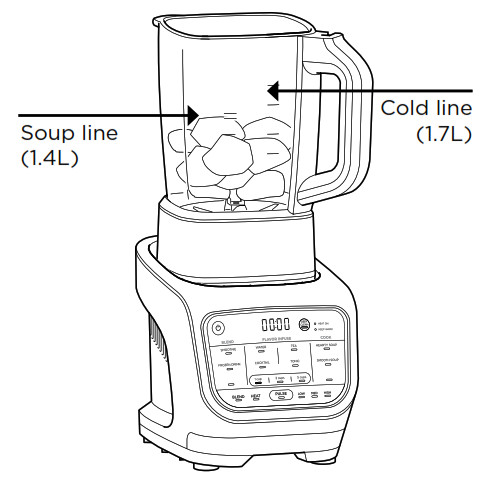
- Add ingredients, making sure not to exceed the max fill lines on the side of the jug. In COOK modes, DO NOT exceed the level labelled HOT in BLEND mode, DO NOT exceed the level labelled COLD.
- To install the lid on the lid on the jug, place the lid tab to the right of the handle. Press the lid down until it is secure. Rotate the tab clockwise so the arrow on the lid tab aligns with the arrow on the jug handle.
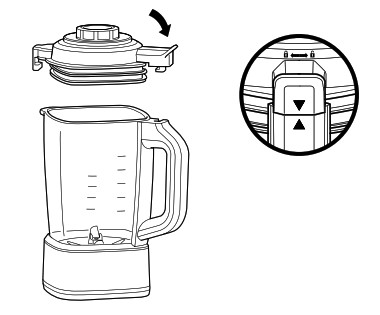
- Secure the centre cap by placing it down into the lid and twisting clockwise until it clicks into place.

- To remove the lid from the jug, rotate the lid anti-clockwise out of the lock position and lift up.
NOTE: After heated programs, steam may release as the lid is removed. Keep hands on the outer tabs and lift directly up.


AUTO-IQ® PROGRAMS

- To begin, press the Power button.
- Press the program of your choice from the BLEND, COOK or PRE-COOK sections.
- The Heat On light will turn on if the selected program uses heat.
TIP: When making thicker recipes such as ice creams and dips, use the tamper to push ingredients towars the blades. Tamper should only be used when lid is attached to jug. Remove center cap and replace with tamper.
NOTE: The unit will beep 3 times to alert you the that the program is going to stir ingredients. Make sure center cap is secure during use.
MANUAL BLEND

speeds give you ultimate control over your blend.
- To begin, press the Power button.
- Choose BLEND to unlock speed options.
- Select LOW, MED, HIGH, or PULSE to begin blending.
NOTE: The Pulse setting will run only when the PULSE button is pressed.
MANUAL COOK Manual Cook settings puts the control in your hands.
- To begin, press the Power button.
- Choose COOK to unlock temperature options.
- Select LOW, MED, or HIGH to begin cooking.
- Timer will count up to 60 seconds or until manually stopped.
NOTE: You can press PULSE during Manual Cook mode to gently stir ingredients.
NOTE: For best results, quickly PULSE ingredients periodically during cooking to distribute heat and promote even cooking.
CARE and MAINTENANCE
CLEANING
Wait for all parts to cool before cleaning. Separate all parts.
Hand-Washing
Wash the jug, lid, and tamper with warm, soapy water. Use the included cleaning brush to avoid direct contact with the blades.
NOTE: DO NOT submerge the blender jug. Submerging will damage the integrated heating element.
Dishwasher
The lid, centre cap, and tamper are dishwasher safe.
NOTE: DO NOT wash the blender jug in the dishwasher. Dishwashing will damage the integrated heating element.
Motor Base
Press the power button to turn off the unit, then unplug the motor base. Wipe motor base with a clean, damp cloth.
CLEAN
A combination of heat and rapid pulses easily removes residue from the nonstick coating in minutes
- Fill jug with 700ml of water and 2 small drops of washing-up liquid.
- Place the lid on the jug and ensure it is properly closed.
- Press CLEAN.
- When the program is complete, discard the water and thoroughly rinse the jug.
TIPS FOR BEST CLEANING RESULTS:
- Give the jug a quick rinse before running the CLEAN program.
- Run the CLEAN program immediately after use.
STORING
Store the unit upright with the lid secured on the jug.
NOTE: DO NOT stack items on top of the unit. Store any remaining attachments alongside the unit or in a cabinet where they will not be damaged or create a hazard.
RESETTING THE MOTOR
This unit features a unique safety system that prevents damage to the motor by temporarily disabling the motor if it begins to overheat. Should this occur, follow the reset procedure below.
- Unplug the unit from the socket.
- Allow the unit to cool for approximately 15 minutes before using.
IMPORTANT: Ensure that maximum capacities are not exceeded. This is the most typical cause of appliance overload.
ORDERING REPLACEMENT PARTS
To order additional parts and attachments, visit ninjakitchen.co.uk
ERROR MESSAGES
DISPLAY SCREEN MESSAGES
“Lid”
The lid is not assembled correctly. Be sure the lid is on the jug and locked in place before running a program.
“JAr”
The jug is properly attached to the base. Be sure the jug is secured in the base before selecting a program.
“—” Blinking
You are attempting to run a program too many times in a row. For your safety, certain programs may be run only 2 consecutive times.
NOTE: DO NOT attempt to remove the jug while the blender is running. Wait for the blades to stop spinning before removing the jug.
ERROR MESSAGES
“E01” or “E02”
Remove and reinstall the jug. If that does not solve the issue, contact Customer Service. So we may better assist you, please register your product online at registeryourninja.com and have the product on hand when you call.
TROUBLESHOOTING GUIDE
![]()
Unit doesn’t turn on
- Make sure unit is plugged in.
- Display will light up with usable programs once connected to power. Jug and lid must be engaged to select a program.
Lid is stuck on jug
- The lid is removed by rotating from the handle anti-clockwise and then lifting up.
My jug will not assemble to the base
- Make sure the Ninja® logo is facing forwards before placing the jug directly onto the blender base. If the jug is still not fully attached, rotate the metal coupling under the jug to help align it to the base.
Cannot change time or temperature settings on Auto-iQ® programs
- All programs were developed by culinary experts to deliver the perfect balance of heating, stirring, and blending patterns to give perfect results, so you do not have to set the time or temperature.
- To select a specific temperature, use the Manual COOK setting instead of an Auto-iQ program.
Program has paused
- If the lid was removed while running a program or while in a Manual mode, the cooking or blending function will pause. Replace the lid and push the program button again to continue from where the time left off.
Why does the blender sometimes count up and other times count down?
- Auto-iQ programs are timed to finish on their own when they are complete, so the clock counts down until the program has finished. When using Manual modes, the clock will count up from 0 until the auto-shutoff time is reached or the button for the current setting is pressed again.
Jug still has residue after running the CLEAN program
- Try running the CLEAN program a second time. You may also hand-wash the jug using the included cleaning brush, which is specifically designed to clean those hard-to-reach areas.
The control panel returns to home display
- The control panel is designed to return to standby mode when left inactive for 3 minutes. If you have taken longer than 3 minutes to choose a function, or if the program has finished, the unit will return to standby mode.
Why does the unit beep during Auto-iQ Programs?
- We’ve incorporated a stir alert within all Auto-iQ programs to let you know the unit is about to stir. The alert is 3 beeps followed by a 2-second pause before each stir.
NOTES
________________________________________________________________________________________________
VISIT US ONLINE AT: ninjakitchen.co.uk Or follow us on any of our social media pages:
![]()
@ninjakitchenuk
Euro-Pro Europe Limited
3150 Century Way
Thorpe Park
Leeds, LS15 8ZB
ninjakitchen.co.uk
Illustrations may differ from actual product. We are constantly striving to improve our products, therefore the specifications contained herein are subject to change without notice.
AUTO-IQ, FOODI and NINJA are registered trademarks of SharkNinja Operating LLC.
© 2020 SharkNinja Operating LLC
HB150UKIBMP200619Mv1
PRINTED IN CHINA