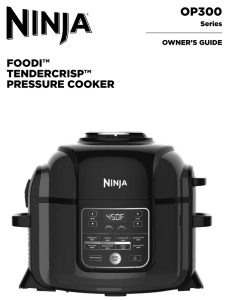
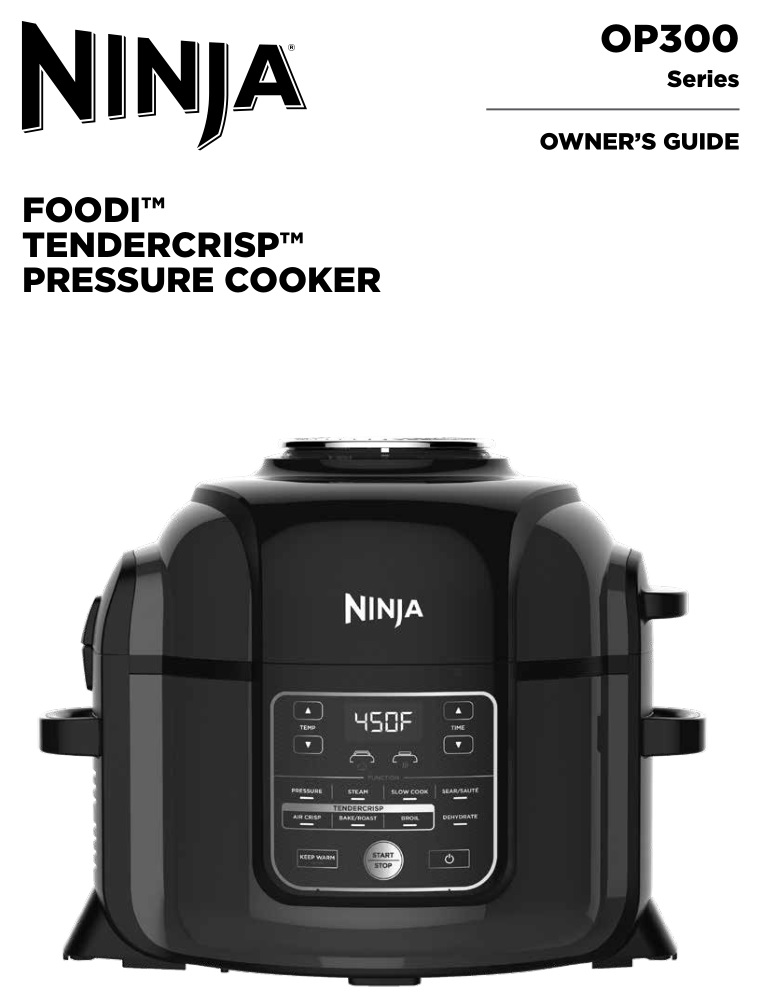
Ninja OP300 Foodi Tendercrisp Pressure
Cooker Owner's Guide
THANK YOU
for purchasing the Ninja® Foodi™ TenderCrisp™ Pressure Cooker

REGISTER YOUR PURCHASE
registeryourninja.com
Scan QR code using mobile device
RECORD THIS INFORMATION
Model Number: __________________________
Serial Number: ___________________________
Date of Purchase: _________________________
(Keep receipt)
Store of Purchase: _________________________
TECHNICAL SPECIFICATIONS
Voltage: 120V, 60Hz
Watts: 1460W
TIP: You can find the model and serial numbers on the QR code label located on the back of the unit by the power cord.
IMPORTANT SAFEGUARDS
HOUSEHOLD USE ONLY • READ ALL INSTRUCTIONS BEFORE USE
Read all instructions before using your Ninja® Foodi™ TenderCrisp™ Pressure Cooker .
When using electrical appliances, basic safety precautions should always be followed, including the following:

WARNING
- DO NOT use an extension cord. A short power-supply cord is used to reduce the risk of children grabbing the cord or becoming entangled and to reduce the risk of people tripping over a longer cord.
- To reduce the risk of electric shock, cook only in the pot provided or in a container recommended by SharkNinja placed in the provided pot. DO NOT use the appliance without the removable cooking pot installed.
- To eliminate a choking hazard for young children, remove and discard the protective cover fitted on the power plug of this appliance.
- ALWAYS ensure the appliance is properly assembled before use.
- DO NOT touch hot surfaces. Appliance surfaces are hot during and after operation. To prevent burns or personal injury, ALWAYS use protective hot pads or insulated oven mitts and use available handles and knobs.
- Intended for countertop use only. Ensure the surface is level, clean, and dry.
- DO NOT place appliance on or near a hot gas or electric burner or in a heated oven.
- This appliance cooks under pressure. Improper use may result in scalding injury. Make certain unit is properly closed before operating. See Operating Instructions.
- To protect against electrical shock do not immerse cord, plugs, cooker base, or crisping lid in water or other liquid. DO NOT rinse these parts under the tap.
- DO NOT cover the pressure valves.
- Unplug from outlet when not in use and before cleaning. Allow to cool before putting on or taking off parts.
- Extreme caution must be used when the cooker contains hot oil, hot food, or hot liquids, or if the cooker is under pressure. Improper use, including moving the cooker, may result in personal injury. When using this appliance to pressure cook, ensure the lid is properly assembled and locked into position before use.
- DO NOT move the appliance when in use.
- Only use the side handles to carry or move the appliance.
- Removable cooking pot can be extremely heavy when full of ingredients. Care should be taken when lifting pot from cooker base.
- DO NOT place food or liquid directly into the unit without the pot installed. Only the removable cooking pot is designed to contain food or liquid.
- To prevent risk of explosion and injury, use only SharkNinja silicone rings. DO NOT use if torn or damaged.
- Before placing removable cooking pot into the cooker base, ensure pot and base are dry by wiping with a soft cloth.
- DO NOT sauté or fry with oil while pressure cooking.
- NEVER use SLOW COOK setting without food and liquids in the removable cooking pot.
- DO NOT use this appliance for deep frying.
- DO NOT exceed the cooking pot’s PRESSURE MAX fill level when pressure cooking. Overfilling may cause personal injury or property damage or affect the safe use of the appliance.
- When pressure cooking foods that expand (such as dried vegetables, beans, grains, rice, etc.) DO NOT fill pot more than halfway, or as otherwise instructed in a Ninja® Foodi™ recipe.
- ALWAYS follow the maximum and minimum quantities of liquid as stated in instructions and recipes.
- Foods such as applesauce, cranberries, pearl barley, oatmeal or other cereals, split peas, noodles, macaroni, rhubarb, or spaghetti can foam, froth, and splutter when pressure cooked, clogging the pressure release valve. These and similar expanding foods (such as dried vegetables, beans, grains, and rice) should not be cooked in a pressure cooker, except if following a Ninja Foodi recipe.
- Before use, ALWAYS check pressure release valve and red float valve for clogging or obstruction, and clean them if
necessary. Check to make sure the red float valve on the pressure lid moves freely. - DO NOT attempt to open the lid during or after pressure cooking until all internal pressure has been released through the pressure release valve and the unit has cooled slightly. If the lid will not turn to unlock, this indicates the appliance is still under pressure—DO NOT force lid open. Any pressure remaining can be hazardous. Let unit naturally release pressure or turn the Pressure Release Valve to the VENT position to release steam. Take care to avoid contact with the releasing steam to avoid burns or injury. When the steam is completely released, the red float valve will be in the lower position allowing the lid to be removed.
- ALWAYS keep hands, face, and other body parts away from the pressure release valve prior to or during pressure release. Additional steam may escape when opening the pressure lid.
- DO NOT use a damaged removable cooking pot, silicone ring, or lid. Replace before using.
- ALWAYS ensure silicone ring is installed and lid is properly closed before operating.
- Close adult supervision is necessary when this appliance is near children.
- Regularly inspect the appliance and power cord. DO NOT use the appliance if there is damage to the power cord or plug. If the appliance malfunctions or has been damaged in any way, immediately stop use and call Customer Service. Return the appliance to SharkNinja Operating LLC for examination, repair, or adjustment.
- The use of attachments or accessories not recommended or sold by SharkNinja may cause fire, electric shock, or injury.
- This appliance is for household use only. DO NOT use this appliance for anything other than its intended use. DO NOT use in moving vehicles or boats. DO NOT use outdoors. Misuse may cause injury.
- To avoid contact with scalding steam, DO NOT put your hand directly over the pressure release valve.
- To avoid risk of scalding or cooker malfunctioning, make sure silicone seal is cleaned and properly attached to lid before cooking.
- When removable cooking pot is empty, DO NOT heat it for more than 10 minutes, as doing so may damage the cooking surface.
- Caution should be used when searing meats and sautéing in hot oil. Keep hands and face away from the removable cooking pot, especially when adding new ingredients, as hot oil may splatter.
- Use caution when opening the lid. Steam escapes as soon as the lid is opened. NEVER place your face or hands over the unit when removing the lid. ALWAYS use oven mitts when handling the hot removable cooking pot.
- DO NOT use this unit to cook instant rice.
- When using SLOW COOK or SEAR/SAUTÉ settings with the pressure lid closed, ALWAYS keep the pressure release valve in the VENT position. If the lid is locked and the pressure release valve is in the SEAL position, an audible alarm
will sound. “VENT” error code will appear on LED display to signal the need to turn the pressure release valve to the VENT position. - When using the PRESSURE COOK setting, ALWAYS keep the pressure lid locked and the pressure release valve turned counterclockwise to the SEAL position.
- DO NOT use abrasive cleaners, steel wool, or scouring pads to clean the cooker.
- Spilled food can cause serious burns. Keep appliance and cord away from children. NEVER drape cord over edge of counter. NEVER use outlet below counter. NEVER use with an extension cord.
- To prevent food contact with the heating elements, DO NOT overfill the Cook & Crisp™ Basket.
- DO NOT cover the air intake vent or air outlet vent while crisping lid is closed. Doing so will prevent even cooking and may damage the unit or cause it to overheat.
- When unit is in operation, hot steam is released through the air outlet vent. Place unit so vent is not directed toward the power cord, outlets, or other appliances. Keep your hands and face at a safe distance from vent.
- The cooking pot, Cook & Crisp™ Basket, and reversible rack become extremely hot during the cooking process. Avoid hot steam and air while removing the cooking pot and Cook & Crisp Basket from the appliance, and ALWAYS place them on a heat- resistant surface after removing. DO NOT touch accessories during or immediately after cooking.
- NEVER connect this appliance to an external timer switch or separate remote-control system.
- Should the unit emit black smoke, unplug immediately and wait for smoking to stop before removing the cooking pot and Cook & Crisp Basket.
- Let the appliance cool for approximately 30 minutes before handling, cleaning, or storing.
- To avoid possible steam damage, place the unit away from walls and cabinets during use.
- When using this appliance, provide adequate space above and on all sides for air circulation.
- DO NOT use the cooking pot, Cook & Crisp Basket, reversible rack, or any other accessories in a microwave, toaster oven, convection oven, or conventional oven or on a ceramic cooktop, electric coil, gas burner range, or outdoor grill.
- Make sure the unit is clean before using. Please refer to the Cleaning & Maintenance section for regular maintenance of the appliance. Return the appliance to SharkNinja Operating LLC for any other servicing.
- DO NOT let the power cord touch hot surfaces.
- Use extreme caution when removing the pressure lid after cooking. Serious burns can result from the steam inside. ALWAYS lift and tilt the lid away from you when removing.
- Outlet voltages can vary, affecting the performance of your product. To prevent possible illness, use a thermometer to check that your food is cooked to the temperatures recommended by the Food and Drug Administration.
- Use extreme caution when closing the crisping lid, taking care that nothing is caught in or pinched by the hinge.
- DO NOT tamper with, disassemble, or otherwise remove the red float valve or pressure release assembly.
- To disconnect, turn any control to “off”, then remove plug from wall outlet.
SAVE THESE INSTRUCTIONS
PARTS and ACCESSORIES
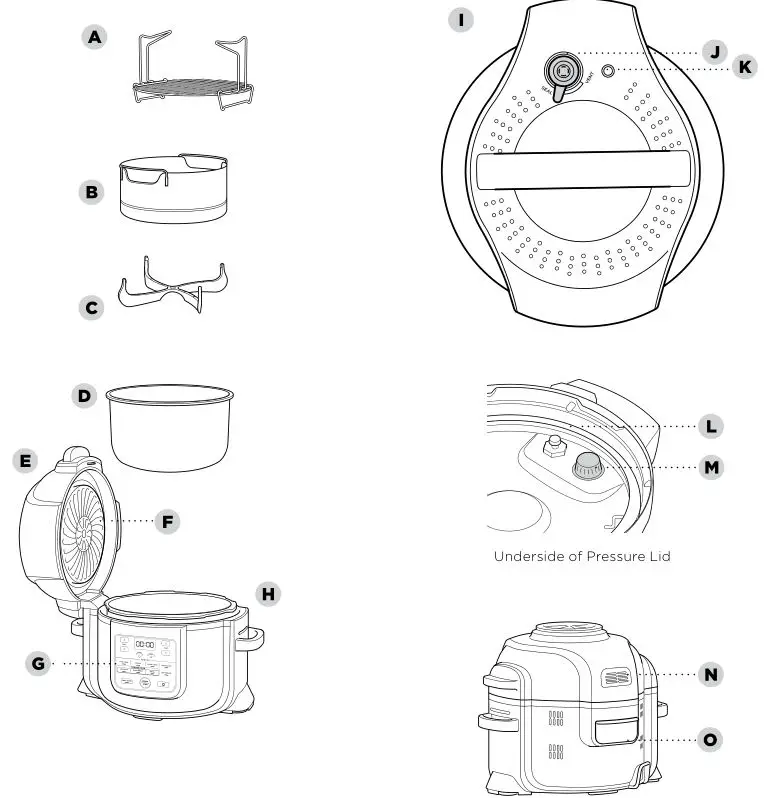
PARTS
A Reversible Rack
B Cook & Crisp™ Basket
C Detachable Diffuser
D 6.5-Quart Removable Cooking Pot
E Crisping Lid
F Heat Shield
G Control Panel
H Cooker Base
I Pressure Lid
J Pressure Release Valve
K Red Float Valve
L Silicone Ring
M Anti-Clog Cap
N Air Outlet Vent
O Condensation Collector
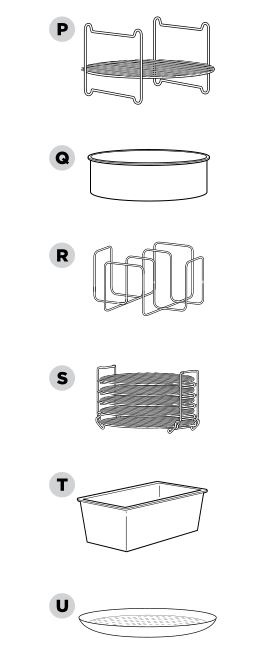
ACCESSORIES (SOLD SEPARATELY)
P Cook & Crisp™ Layered Insert
Q Multi-Purpose Pan
R Roasting Rack Insert
S Dehydrating Rack
T Loaf Pan
U Crisper Pan
USING THE CONTROL PANEL
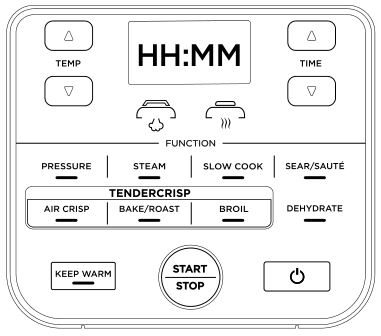
NOTE: Control panel may differ per model.
FUNCTION BUTTONS
PRESSURE: Use to cook food quickly while maintaining tenderness.
STEAM: Use to gently cook delicate foods at a high temperature.
SLOW COOK: Cook your food at a lower temperature for longer periods of time.
SEAR/SAUTÉ: To use the unit as a stovetop for browning meats, sautéing veggies, simmering sauces, and more.
AIR CRISP: To use the unit as an air fryer to give foods crispiness and crunch with little to no oil.
BAKE/ROAST: To use the unit as an oven for tender meats, baked treats, and more.
BROIL: Use to caramelize and brown your food.
DEHYDRATE: Dehydrate meats, fruits, and vegetables for healthy snacks.
NOTE: The DEHYDRATE function is not included on all models.
OPERATING BUTTONS
TEMP arrows: Use the up and down TEMP arrows to adjust the cook temperature and/or pressure level.
TIME arrows: Use the up and down TIME arrows to adjust the cook time.
NOTE: While cooking, to adjust temp or time, use the up and down arrows. The unit will then resume at those settings.
START/STOP button: Press the START/STOP button after selecting your temperature (or pressure) and time to start cooking. Pressing this button while the unit is cooking will stop the function.
KEEP WARM button: After pressure cooking, steaming, or slow cooking, the unit will automatically switch to Keep Warm
mode and start counting up. Keep Warm will stay on for 12 hours, or you may press KEEP WARM to turn it off. Keep Warm mode is not intended to warm food from a cold state but to keep it warm at a food- safe temperature.
POWER button: The Power button shuts the unit off and stops all cooking modes.
STANDBY MODE
After 10 minutes with no interaction with the control panel, the unit will enter standby mode.
BEFORE FIRST USE
- Remove and discard any packaging material, promotional labels, and tape from the unit.
- Remove all accessories from the package and read this manual carefully. Please pay particular attention to operational instructions, warnings, and important safeguards to avoid any injury or property damage.
- Wash the pressure lid, silicone ring, removable cooking pot, Cook & Crisp™ Basket, reversible rack, and condensation collector in hot, soapy water, then rinse and dry thoroughly. NEVER clean the cooker base or pressure lid in the dishwasher. Inspect the pressure lid to ensure there is no debris blocking the valves.
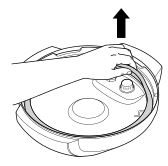
- The silicone ring is reversible and can be inserted in either direction. Insert the silicone ring around the outer edge of the silicone ring rack on the underside of the lid. Ensure it is fully inserted and lies flat under the silicone ring rack.
INSTALLING THE CONDENSATION COLLECTOR
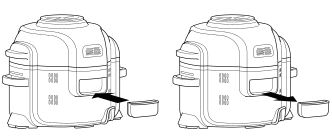
To install the condensation collector, slide it into the slot on the cooker base. Slide it out to remove it for hand-washing after each use.
NOTE: Prior to each use, make sure the silicone ring is well seated in the silicone ring rack and the anti-clog cap is mounted properly on the pressure release valve.
REMOVING and REINSTALLING THE ANTI-CLOG CAP
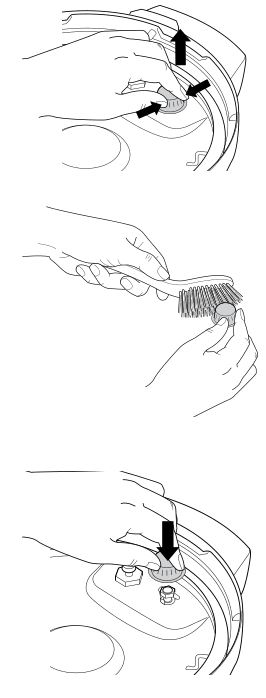
Make sure your anti-clog cap is in the correct position before using the pressure lid. The anti-clog cap protects the inner valve of the pressure lid from clogging and protects users from potential food splatters. It should be cleaned after every use with a cleaning brush. To remove it, squeeze and pull upward. To reinstall, position it in place and press down.
USING YOUR FOODI™ TENDERCRISP™ PRESSURE COOKER
DROP THE TOP
The two lids allow you to seamlessly transition between all your favorite cooking methods. Use the pressure lid to tenderize, then use the crisping lid to crisp up your food.
USING THE CRISPING LID
The crisping lid is affixed to the unit by a hinge and features an easy-open design. The lid can be opened during any convection cooking function so you can check on and access the ingredients. When the lid is opened, cooking will stop, the timer will pause, and the heating element in the lid will turn off. When the lid is closed, cooking will begin again and the timer will resume counting down.
USING THE COOKING FUNCTIONS WITH THE CRISPING LID
To turn on the unit, plug the power cord into a wall outlet, then press the Power button.
Air Crisp
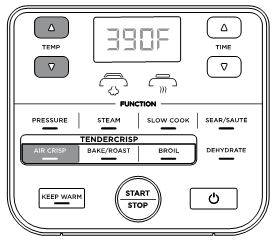
- Press the AIR CRISP button. The default temperature setting will display. Use the up and down TEMP arrows to choose a temperature between 300°F and 400°F.
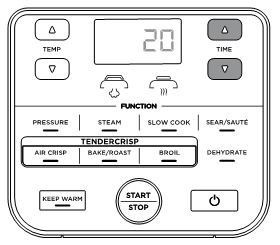
- Use the up and down TIME arrows to set the cook time in minute increments up to 1 hour.
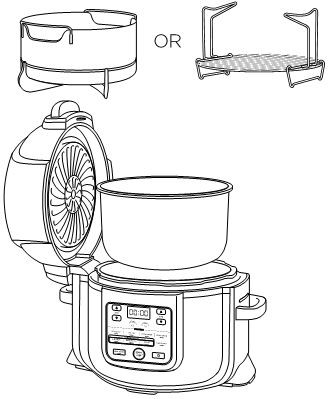
- With the pot installed, place either the Cook & Crisp™ Basket or reversible rack in the pot. Basket should have diffuser attached.
- Add ingredients to the Cook & Crisp™ Basket or reversible rack. Close the lid and press the START/STOP button to begin cooking.
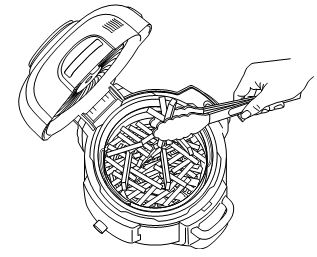
- During cooking, you can open the lid and lift out the basket to shake or toss ingredients for even browning, if needed. When done, lower basket back into pot and close lid. Cooking will automatically resume after lid is closed.
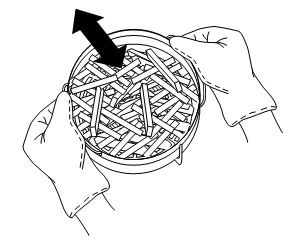
- When cook time is complete, the unit will beep.
Bake/Roast
- Press the BAKE/ROAST button. The default temperature setting will display. Use the up and down TEMP arrows to choose a temperature between 250°F and 400°F.
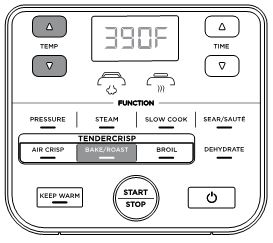
- Use the up and down TIME arrows to set the cook time in minute increments up to 4 hours. After 1 hour, you may increase the time in 5-minute increments up to 4 hours.

NOTE: It is recommended to let the unit preheat for 5 minutes before adding ingredients. If preheating, before step 3, close the lid, and press the START/STOP button to begin. - Add ingredients, along with any accessories called for in your recipe, to the pot. Close the lid and press the START/STOP button to begin cooking.
- When cook time is complete, the unit will beep.
Broil
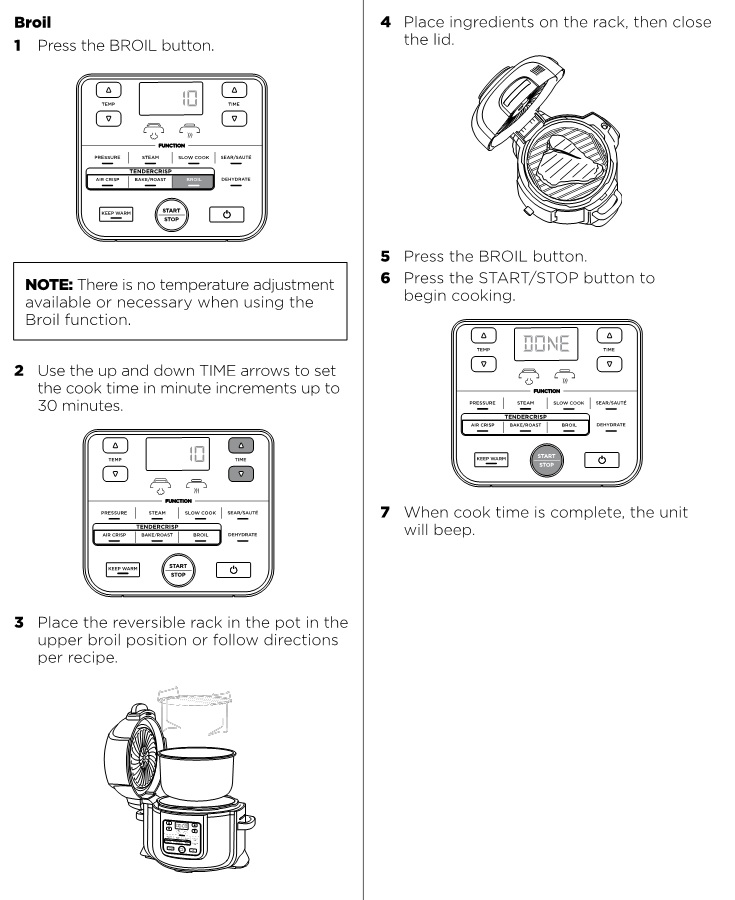
Dehydrate
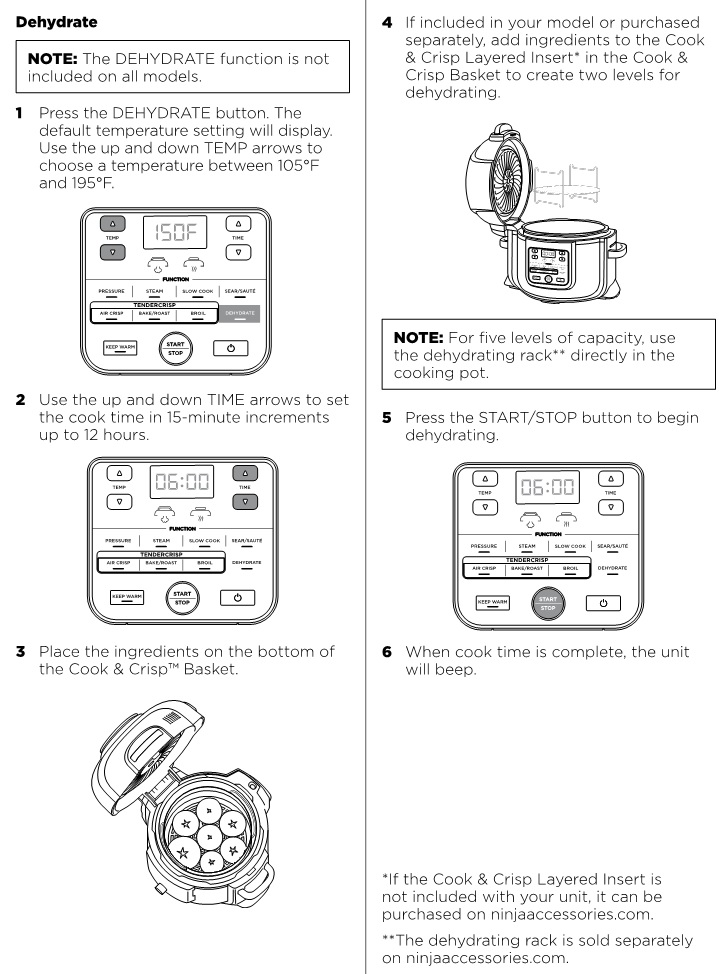
FAMILIARIZING YOURSELF WITH PRESSURE COOKING
NATURAL PRESSURE RELEASE VS . QUICK PRESSURE RELEASE
Natural Pressure Release: When pressure cooking is complete, steam will naturally release from the unit as it cools down. This can take up to 20 minutes or more, depending on the amount of liquid and food in the pot. During this time, the unit will switch to Keep Warm mode. Press the KEEP WARM button if you would like to turn Keep Warm mode off. When natural pressure release is complete, the red float valve will drop down.
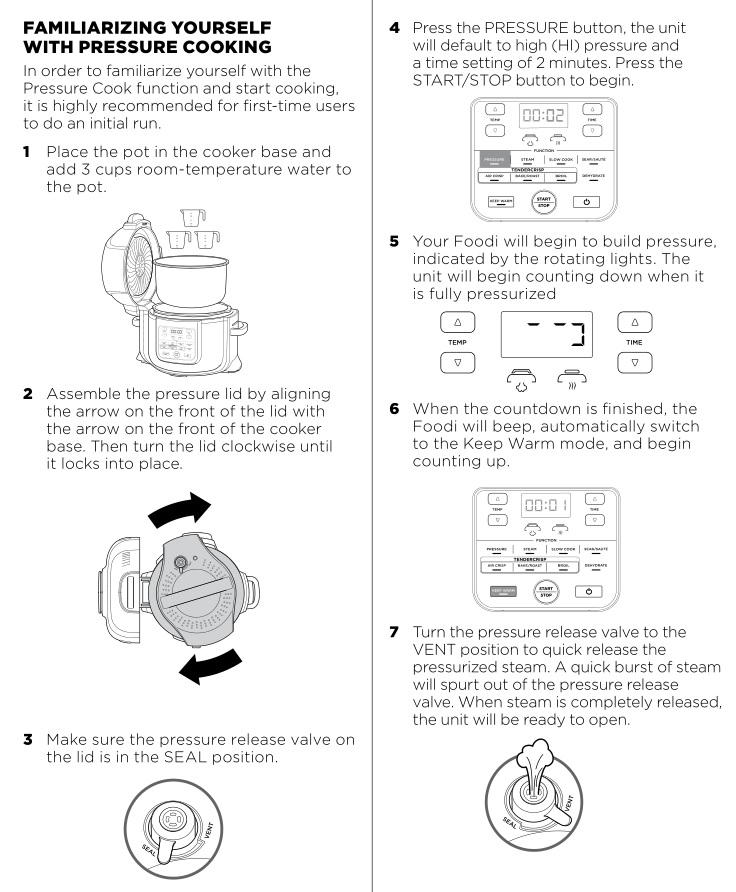
Quick Pressure Release: Use ONLY if your recipe calls for it. When pressure cooking is complete and the KEEP WARM light is on, turn the pressure release valve to the VENT position to instantly release pressure through the valve. Even after releasing pressure naturally or using the pressure release valve, some steam will remain in the unit and will escape when the lid is opened. Lift and tilt it away from you, making sure no condensation drips into the cooker base.
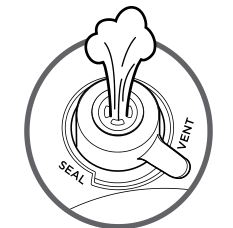
NOTE: At any time during the natural release process, you can switch to quick release by turning the pressure release valve to the VENT position.
PRESSURIZING
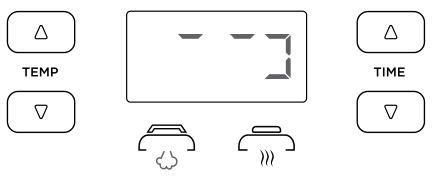
As pressure builds in the unit, the control panel will display rotating lights. Pressurizing time varies, depending on the amount of ingredients and liquid in the pot. As the unit pressurizes, the lid will lock as a safety measure, and it will not unlock until pressure is released. Once the unit has reached full pressure, the lid pressure icon light will glow steadily. The pressure cooking cycle will begin and the timer will start counting down.
INSTALLING and REMOVING THE PRESSURE LID
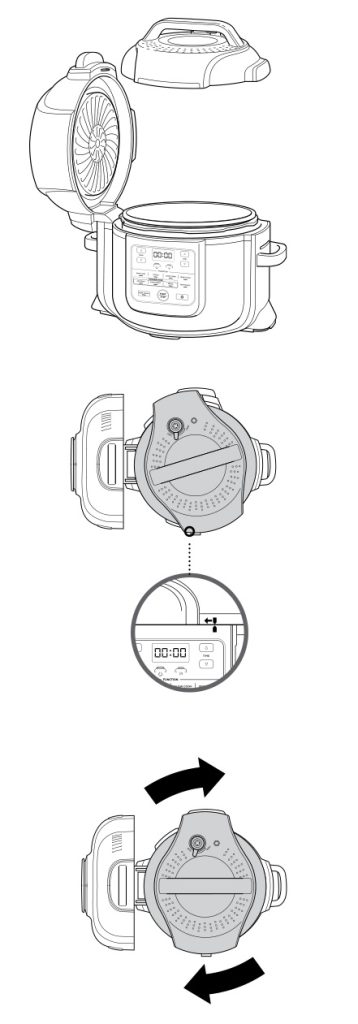
Place the pressure lid on top of the unit with the on the lid and the on the base lined up evenly. Turn the lid clockwise until it locks in place.
To unlock the pressure lid, turn it counterclockwise. Lift it up and away from you, as some steam will remain in the unit and escape when the lid is opened.
NOTE: The pressure lid will not unlock until the unit is completely depressurized.
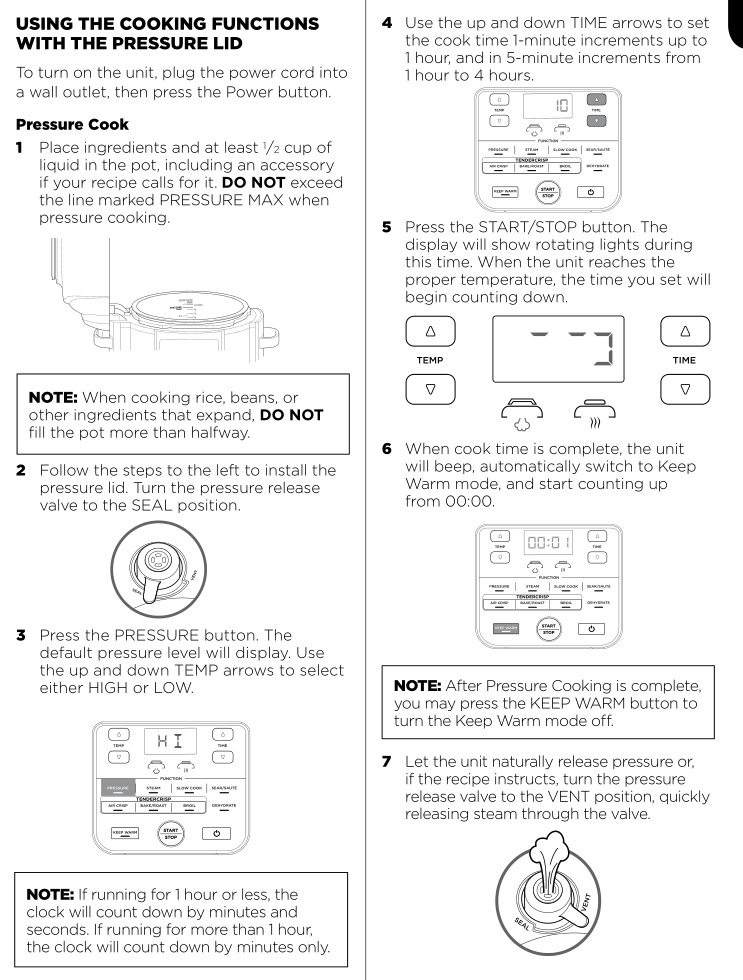
USING THE COOKING FUNCTIONS WITH THE PRESSURE LID
To turn on the unit, plug the power cord into a wall outlet, then press the Power button.
Pressure Cook
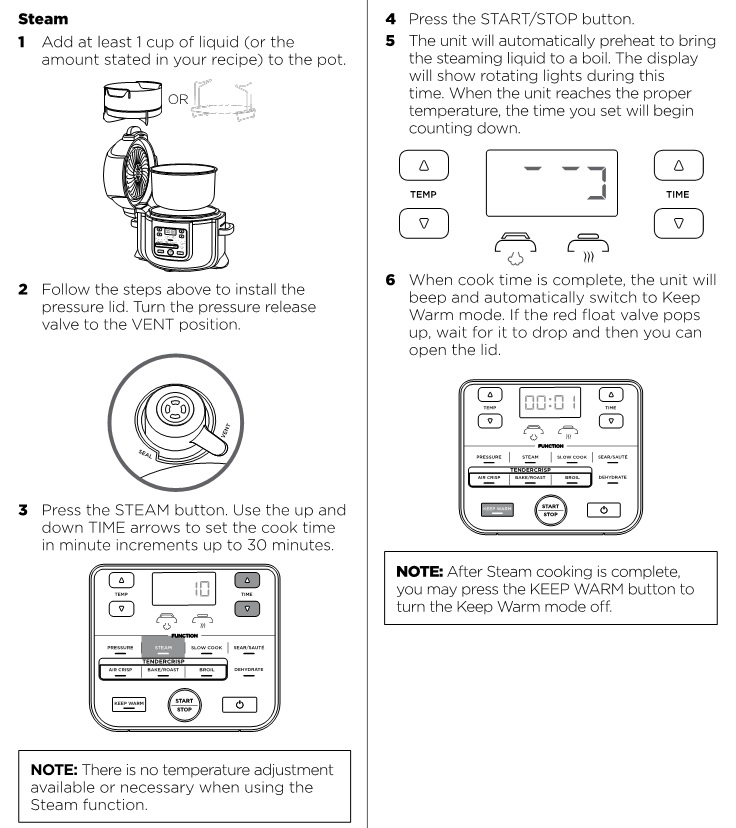
Steam
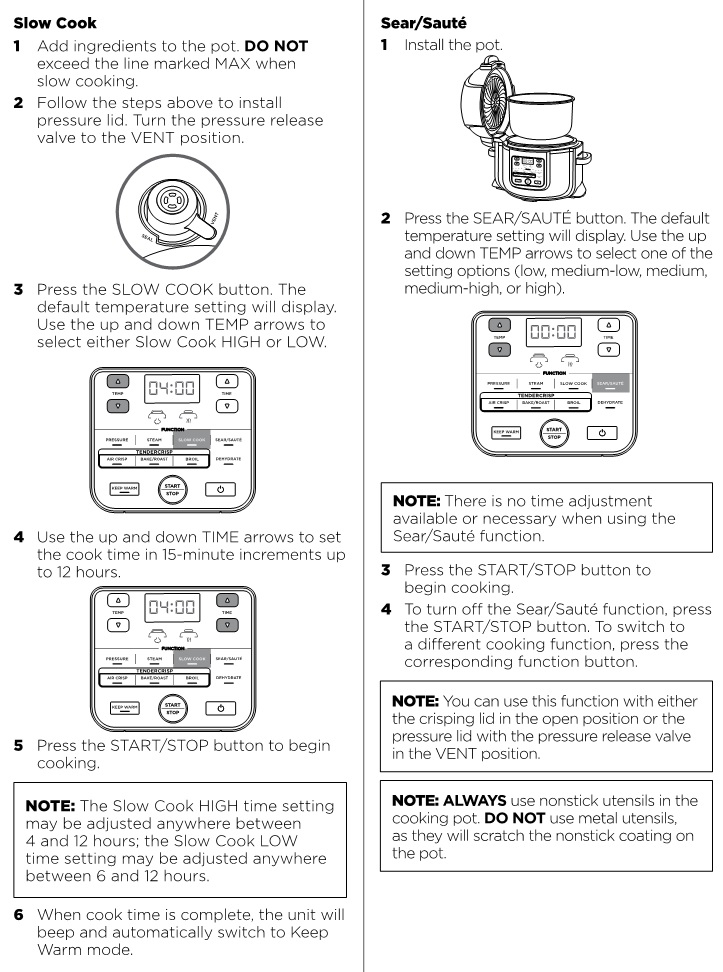
Slow Cook
ACCESSORIES FOR PURCHASE
We offer a suite of accessories custom made for your Ninja® Foodi™ TenderCrisp™ Pressure Cooker. Visit ninjaaccessories.com to expand your capabilities and take your cooking to the next level.
Multi-Purpose Pan

- With this pan, you can create bubbly casseroles, dips, and sweet and savory pies, or bake a fluffy, moist cake with a golden top for dessert.
- Dimensions: 8.75″ D x 2.5″ H
Roasting Rack Insert
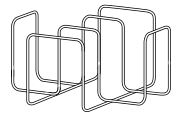
- Use this rack in the Cook & Crisp™ Basket to crisp up shells on Taco Tuesday, roast a rack of ribs on BBQ Sunday, or evenly toast garlic bread on pasta night.
Cook & Crisp™ Layered Insert
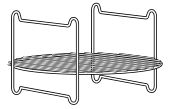
- Increases the capacity of the Cook & Crisp Basket so you can create layered meals and do basic dehydrating.
- Keep multiple foods separated while you cook them. Reheat slices of pizza, and cook frozen French fries, chicken nuggets, hamburgers, and more.
Dehydrating Rack
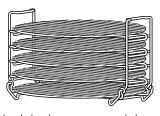
- Five stackable layers enable you to dehydrate fruits and meats or make crispy kale and vegetable chips.
Crisper Pan

- Perforated with holes for improved airflow, this pan is great for crisping and reheating pizzas, quesadillas, and vegetables.
- Dimensions: 9″ D x 0.75″ H
Loaf Pan

- Our specially designed pan is the perfectly sized baking accessory for bread mixes like banana and zucchini.
- Dimensions: 8.25″ x 4.25″ x 3.5″
Extra Pack of Silicone Rings

- 2-pack silicone ring set helps keep flavors separate—use one when cooking savory foods and the other when cooking sweet foods.
CLEANING and MAINTENANCE
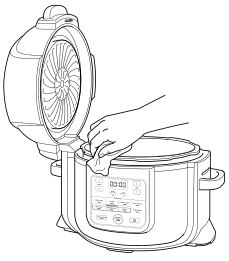
Cleaning: Dishwasher and Hand-Washing
The unit should be cleaned thoroughly after every use.
- Unplug the unit from the wall outlet before cleaning.
- NEVER put the cooker base in the dishwasher, or immerse it in water or any other liquid.
- To clean the cooker base and the control panel, wipe them clean with a damp cloth.
- The cooking pot, silicone ring, reversible rack, Cook & Crisp™ Basket, and detachable diffuser can be washed in the dishwasher.
- The pressure lid, including the pressure release valve and anti-clog cap, can be washed with water and dish soap. DO NOT wash the pressure lid or any of its components in the dishwasher, and DO NOT take apart the pressure release valve or red float valve assembly.
- To clean the crisping lid, wipe it down with a wet cloth or paper towel after the heat shield cools.
- If food residue is stuck on the cooking pot, reversible rack, or Cook & Crisp Basket, fill the pot with water and allow to soak before cleaning. DO NOT use scouring pads. If scrubbing is necessary, use a non-abrasive cleanser or liquid dish soap with a nylon pad or brush.
- Air-dry all parts after each use.
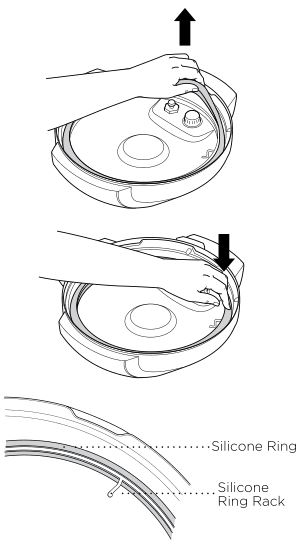
Removing and Reinstalling the Silicone Ring
To remove the silicone ring, pull it outward, section by section, from the silicone ring rack. The ring can be installed with either side facing up. To reinstall, press it down into the rack section by section.
After use, remove any food debris from the silicone ring and anti-clog cap.
Keep the silicone ring clean to avoid odor .
Washing it in warm, soapy water or in the dishwasher can remove odor. However, it is normal for it to absorb the smell of certain acidic foods. It is recommended to have more than one silicone ring on hand. You can purchase additional silicone rings on ninjaaccessories.com.
NEVER pull out the silicone ring with excessive force, as that may deform it and the rack and affect the pressure-sealing function. A silicone ring with cracks, cuts, or other damage should be replaced immediately.
TROUBLESHOOTING GUIDE
Why is my unit taking so long to come to pressure? How long does it take to come to pressure?
• Cooking times may vary based on the selected temperature, current temperature of the cooking pot, and temperature or quantity of the ingredients.
• Check to make sure your silicone ring is fully seated and flush against the lid. If installed correctly, you should be able to tug lightly on the ring to rotate it.
• Check that the pressure lid is fully locked, and the pressure release valve is in the SEAL position when pressure cooking.
Why is the time counting down so slowly?
• You may have set hours rather than minutes. When setting time, the display will show HH:MM and the time will increase/decrease in minute increments.
How can I tell when the unit is pressurizing?
• The rotating lights will display on the screen to indicate the unit is building pressure.
Lights are rotating on the display screen when using the Pressure or Steam function .
• This indicates the unit is building pressure or preheating when using STEAM or PRESSURE. When the unit has finished building pressure, your set cook time will begin counting down.
Why can’t I take the pressure lid off?
• As a safety feature, the pressure lid will not unlock until the unit is completely depressurized. To release pressure, turn the pressure release valve to the VENT position to quick release the pressurized steam. A quick burst of steam will spurt out of the pressure release valve. When the steam is completely released, the unit will be ready to open. Turn the pressure lid counterclockwise, then lift it up and away from you.
Is the pressure release valve supposed to be loose?
• Yes. The pressure release valve’s loose fit is intentional; it enables a quick and easy transition between SEAL and VENT and helps regulate pressure by releasing small amounts of steam during cooking to ensure great results. Please make sure it is turned as far as possible toward the SEAL position when pressure cooking and as far as possible toward the VENT position when quick releasing.
The unit is hissing and not reaching pressure .
• Make sure the pressure release valve is turned to the SEAL position. If you’ve done this and still hear a loud hissing noise, it may indicate your silicone seal is not fully in place. Press START/STOP to stop cooking, VENT as necessary, and remove the pressure lid. Press down on the silicone ring, ensuring it is fully inserted and lies flat under the ring rack. Once fully installed, you should be able to tug lightly on the ring to rotate it.
The unit is counting up rather than down .
• The cooking cycle is complete and the unit is in Keep Warm mode.
How long does the unit take to depressurize?
• Quick release is about 2 minutes or less. Natural release can take up to 20 minutes or more, depending on the type of food and/or the amount of ingredients in the pot.
“POT” error message appears on display screen .
• Cooking pot is not inside the cooker base. Cooking pot is required for all functions.
“LID” error message appears on display screen and lid icon flashes .
• The incorrect lid is installed for your desired cooking function. Place the pressure lid on the unit if you want to use the Pressure, Slow Cook, Steam, Sear/Sauté, or Keep Warm functions and ensure it is in the closed position.
“SHUT” error message appears on display screen .
• The crisping lid is open and needs to be closed for the selected function to start.
“VENT” error message appears on display screen .
• When set to Slow Cook or Sear/Sauté, and the unit senses pressure building up, this message indicates the pressure release valve is in the SEAL position.
• Turn the pressure release valve to the VENT position and leave it there for the remainder of the cooking function.
• If you do not turn the pressure release valve to the VENT position within 5 minutes, the program will cancel and the unit will shut off.
“WATR” error message appears on display screen when using the Steam function .
• The water level is too low. Add more water to the unit for the function to continue.
“WATR” error message appears on display screen when using the Pressure function .
• Add more liquid to the cooking pot before restarting the pressure cook cycle.
• Make sure the pressure release valve is in the SEAL position.
• Make sure the silicone ring is installed correctly.
“HOT” error message appears on display screen .
• This indicates the unit has overheated. Let the unit cool down.
• Once unit has cooled down, ensure there is no food caked on the bottom of the pot and there is enough liquid in the pot for the recipe you are preparing.
“ERR1,” “ERR2,” “ERR3,” “ERR4,” “ERR5,” “ERR6 .”
• The unit is not functioning properly. Please contact Customer Service at 1-877-646-5288.
HELPFUL TIPS
- For consistent browning, make sure ingredients are arranged in an even layer on the bottom of the cooking pot with no overlapping. If ingredients are overlapping, make sure to shake half way through the set cook time.
- For smaller ingredients that could fall through the reversible rack, we recommend first wrapping them in a parchment paper or foil pouch.
- When switching from pressure cooking to using the crisping lid it is recommended to empty the pot of any remaining liquid for best crisping results.
- Press and hold down the Time Up or Down arrows to move faster through the display to get to your desired time.
- Use the Keep Warm mode to keep food at a warm, food-safe temperature after cooking. To prevent food from drying out, we recommend keeping the lid closed and using this function just before serving. To reheat food, use the Air Crisp function.
- To have your unit build pressure quicker, set it to SEAR/SAUTÉ HIGH. Once ready to pressure cook, press the PRESSURE button and continue as you normally would.

ONE (1) YEAR LIMITED WARRANTY
The 1-Year Limited Warranty applies to purchases made from authorized retailers of SharkNinja Operating LLC. Warranty coverage applies to the original owner and to the original product only and is not transferable.
SharkNinja warrants that the unit shall be free from defects in material and workmanship for a period of 1 year from the date of purchase when it is used under normal household conditions and maintained according to the requirements outlined in this instruction manual, subject to the following conditions and exclusions.
What is covered by my warranty?
- The original unit and/or non-wearable components deemed defective, in SharkNinja’s sole discretion, will be repaired or replaced for up to 1 year from the original purchase date.
- In the rare event that a replacement unit is issued, the warranty coverage ends 6 months after the receipt date of the replacement unit or the remainder of the existing warranty, whichever is greater. If the unit is replaced, SharkNinja reserves the right to replace the unit with one of equal or greater value.
What is not covered by my warranty?
Our Customer Service and Product Specialists are available to provide all the warranty service options available to you, including the possibility of upgrading to our VIP Warranty Service Options for select product categories.
- Normal wear and tear of wearable parts (including removable pot, silicone ring, lids, racks, and baskets.) that require regular maintenance and/or replacement to ensure the proper functioning of your unit, are not covered by your warranty.
- Any unit that has been tampered with or used for commercial purposes.
- SharkNinja will cover the cost for the customer to send the unit to us for repair or replacement. A fee of $19.95 for return shipping costs will be charged at the time of return shipment of the repaired or replacement unit.
- Damage caused by misuse, abuse, or negligent handling, or damage due to mishandling in transit.
- Consequential and incidental damages.
- Defects caused by or resulting from damages from shipping or from repairs, service, or alteration to the product or any of its parts that have been performed by a repair person not authorized by SharkNinja.
- Products purchased, used, or operated outside of North America.
Problems with your unit/How to get service:
If your appliance fails to operate properly while in use under normal household conditions within the warranty period, visit ninjakitchen.com for product care/maintenance self-help. Our Customer Service and Product Specialists are also available at 1-877-646-5288 to assist with product support and warranty service options.
How to initiate a warranty claim:
You can call 1-877-646-5288 to have a Customer Service Specialist assist you. Please note, you must call 1-877-646-5288 to initiate a warranty claim. Return and packing instruction information will be provided at that time.
For Customer Service hours, visit ninjakitchen.com.
Replacement parts are available for purchase at ninjaaccessories.com. For more information on what are classified as wearable and non-wearable parts, visit ninjakitchen.com/warranty.
This warranty gives you specific legal rights, and you may also have other rights that vary from state to state.
Some states do not permit the exclusion or limitation of incidental or consequential damages, so the above may not apply to you.
SharkNinja Operating LLC
US: Needham, MA 02494
1-877-646-5288
ninjakitchen.com
Illustrations may differ from actual product. We are constantly striving to improve our products, therefore the specifications contained herein are subject to change without notice.
NINJA is a registered trademark of SharkNinja Operating LLC.
COOK & CRISP, FOODI, and TENDERCRISP are trademarks of SharkNinja Operating LLC.
For SharkNinja U.S. Patent information, visit sharkninja.com/uspatents.
© 2018 SharkNinja Operating LLC
OP300Series_IB_E_MP_180619
PRINTED IN CHINA

