![]()
Wireless Gaming Mouse
Model: 100025011
_____________________
PRODUCT GUIDE
April 24, 2020_V3
System Requirements
- Windows 7/8/10 or newer version, Mac OS 10.5 or newer version
- The Gaming Software is only compatible with Window OS
- Available USB port
What’s in the Box
- Gaming Mouse
- USB Nano Receiver
- USB A to USB C Braided Cable 6 ft / 1.8 m
- User’s manual
- Gaming Software CD
- Quick Start Guide book
Specification
- 2.4GHz Wireless Ambidextrous Gaming Mouse with USB nano receiver (stores in mouse when not in use)
- Rechargeable Lithium-Polymer, 1 charge last 70 hours (LED off)
- Adjustable sensitivity levels: 36 adjustable sensitivity levels from 200 to 7200 DPI (Through Windows-only software) 5 adjustable sensitivity levels: 1600/2400/3200/5600/7200
- 16.8 million LED colors with lighting effects (Windows-only software)
- 1000 HZ report rate
- Side anti-slip rubber grips
- Braided Cable cover for additional durability able to be charged while at rest and at play
- USB plug and play
- Dimension: 4.98 in L x 2.55 in W x 1.52 in H
(12.6 cm L x 6.5 cm W x 3.8 cm H) - Windows and Mac compatible
(The Software is only compatible with Windows OS) - 5V working voltage, ≤250mA working current
Note: Some USB hubs may lower the mouse polling rate, connect your mouse directly into the USB port on your computer will solve this problem
Note: You can use the mouse through 2.4GHz wireless connection or wired connection (you can still charge it while you play)
Functional Introduction
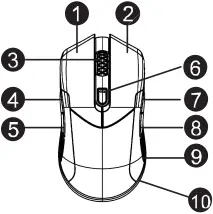
- Left Button
- Right Button
- Scroll Wheel (LED)
- Forward
- Backward
- DPI Switch Button
(Battery / Power Status Indicator) - Forward
- Backward
- Side Anti-Slip Rubber Grips
- LED Side Light Stripe
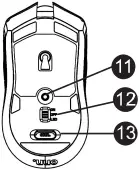
- Connect Button
- Power On (LED Off) / Power OFF / Power On (LED On)
- USB Nano Receive.
Forward
Press this button to view the next page in your Internet browser
Backward
Press this button to view the previous page in your Internet browser
DPI Switch Button
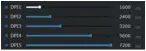
- Without Gaming Software (Default setting): Scroll wheel and LED side light stripe will also change colors 5 sec when adjusting DPI 5 adjustable levels (cycle): 1600 (Green) -> 2400 (Purple)-> 3200 (Yellow) -> 5600 (Red) -> 7200 (Blue)
- With Gaming Software:
36 adjustable sensitivity levels from 100 to 7200 DPI
Power Status Indicator
- Power On: Lights up (green) for 5 sec
- Pairing : Blinks (green)
- Pairing Completed: Lights up (green) for 5 sec
- Low Battery : Blinks (red)
- Charging: Lights up (red)
- Charging Completed: lights up (green)
Installation
Note1: Download the latest software at “www.onn2.tech”
Note 2: The Software CAN ONLY BE ACTIVATED when the DEVICE IS CONNECTED to computer (click this icon to activate it)
Note 3: Newer version will replace older version automatically
Step 1: Connect your receiver to available USB port on your PC
Step 2: Download the software or insert the software CD, disable your anti-virus software, click the “Setup.exe” (onn.exe) file
Step 3: Windows will pop out installation notification, follow the instruction and click “YES” / “Next”
Step 4: Click “Finish” after the installation is completed, reboot your PC and turn on the anti-virus software
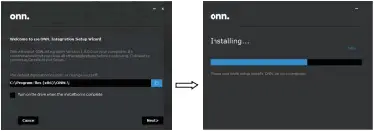
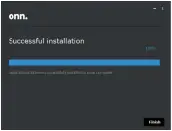
Step 5: When the installation has been completed, then click “Finish”
Step 6: The “onn.” gaming software icon will now appear in the taskbar at the right lower corner, click the icon to activate the software
Game Mode- Smart Center
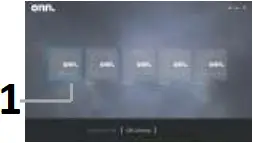 In “Assigned GM” you can save settings of macros, color or sensitivity in up to 5 game modes, from Game1 to Game5
- Blue frame is the current game mode you are using
 Game Mode:
Move your mouse cursor on one of the game modes, a edit icon (button) will pop up, you can edit the setting of the device in configuration page
Click ![]() you can edit the name and image of the game mode
you can edit the name and image of the game mode
Click ![]() you can delete the game mode
you can delete the game mode
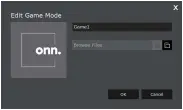 Edit the Game Mode:
You can change the name of each game mode, edit the image and select the files of the application that you want to save
Click on the ![]() to delete the image you set.
to delete the image you set.
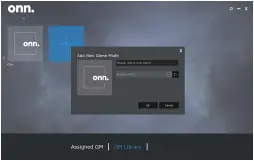
GM Library:
You can create up to 12 sets of Game Mode in GM Library, you can also switch the Game Mode in between “Assigned GM’ and ” GM Library”
Note:
The 5 sets of Game Mode in “Assigned GM” are saved in on-board memory of the mouse, with this memory, you can also use the current Game Mode on another PC that does not has the software
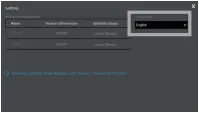 Setting:
You can check the latest version of the software and firmware. Keep the internet connected, make sure you can be notified when the latest version is released
Use the drop-down menu to change languages
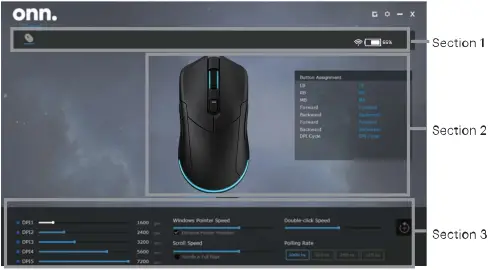
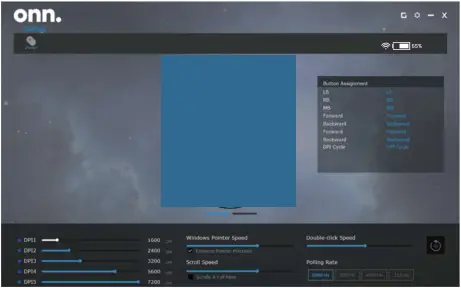
Mouse Configuration
Section 1.
It shows the model moms of the devices
The software can detect and show the devices that can be synchronized (synchronized lighting effects)
Section 2.
Click on each button to set up the functions and macros on the button
A preview window for the settings will pop up when moving your cursor on the button
Section 3.
Setup of DPI, mouse / cursor speed, scroll speed, double click speed and polling rate
 DPI: Dots per inch (DPI) is a measurement of how sensitive a mouse is.
The higher a mouse’s DPI, the farther the cursor on your screen will move when you move the mouse. A mouse with a higher DPI setting detects and reacts to smaller movements. A higher DPI isn’t always better.
In the DPI Setting: Each DPI can be set up from 200 to 7200
Poling Rate/ Report Rate:
The polling rate of a mouse is simply an indication of how many times (per second) a mouse reports its position to the PC. If you’ve got your mouse set to a poling rate of 500Hz, It’s going to be reporting its position 500 times per second, or every two miliseconds
4 levels,125Hz/8ms. 250Hz/4ms, 500Hz/2ms,1000Hz/1ms (Default)
Buttons Settings
In Section 2, click a button to set up the functions and macros in the window below
- Select BUTTON
 MACRO
MACRO  or LIGHTING
- Under BUTTON, you can set different functions on the key, including Standard, Multi media and office
- Under MACRO, you can create and edit macros
- Under LIGHTING, you can adjust the lighting effects
- Click
 to finish the setting
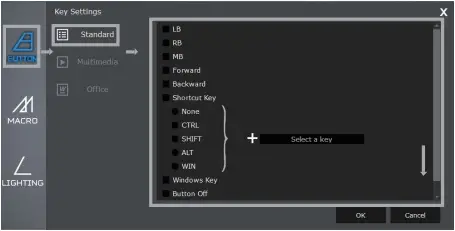
Standard
LB: Mouse, left click
RB: mouse, right click
MB: Mouse, middle click
Forward: Go to the next page in the browser
Backward: Go to the previous page in the browser
Shortcut Key: Set up a combo with CTRL/SHIFT/ALT/WIN + any key
Window Key: Windows start menu
Off: Disable this button
Show Desktop: Minimizes all applications immediately
Multimedia
Media player: Start media player
Play/Pause: Switch between playing and pausing media
Stop: Stop playing the media in the media player
Pre Track: Go to the previous media track
Next Track: Go to the next media track
Volume+: Increase the PC sound volume
Volume-: Decrease the PC sound volume
Mute: Mute (turn off) the computer’s sound
Website: Launch the website page
WWW Refresh: Refresh or reload the page or document window
WWW Stop: Stop the current web page
WWW Back: Go to the previous web page
WWW Forward: Go to the next iweb page
WWW Favorites: Open the Internet Explorer Favorites
My Computer: Open “This PC” the main page of your files
Calculator: Launch Microsoft Calculator
Email: Launch the default e-mail program
Office
Cut: CTRL + X
Copy: CTRL + C
Paste: CTRL + V
Undo: CTRL + Z
Select All: CTRL + A
Find: CTRL + F
New: CTRL+ N
Open: ALT+ Enter, select and open the file
Macro
A macro is a sequence of keystrokes or mouse clicks you wish the button to output, can also assign a specific command or keystroke or mouse click to the button rather than a sequence
Create a Macro
 Step 1:
Click,  you can name it e.g. “MACRO_01”

Delete New Rename
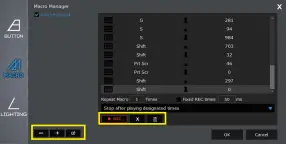
Step 2:
To create a macro command, simply click the ‘REC’ button to start recording all your keystrokes and mouse clicks
After you are done recording the macro commands, click the  ‘STOP’ button to end the session, the macro is now saved in the software

Record Delete Empty
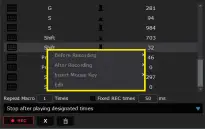 Step 3:
You can adjust a recorded macro, e.g. Macro_01 is recorded with keystrokes S -> R and you want to record and add another macro T -> H, select “Before Recording” Macro_01 will become T -> H -> S -> R select “After Recording” Macro_01 will become S -> R -> T -> H, can also edit or insert a mouse click in Macro_01
Edit Delay
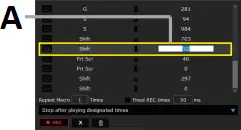 A. Set up the Delay
Enter a number of time (milliseconds)
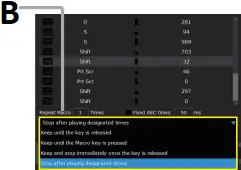 B. How you want to run the macros
- Keep until the button is released: Repeating the macro when you press down the button, stops the macro when you release it
- Keep until the macro button is released: Repeating the macro until you press the button again
- Keep and stop immediately once the button is released: if your macro is keystroke A -> B -> C and you release the button when it is inputting B, then the macro will stop and not input the last C
- Stop after repeat specified times: The times you run the macros
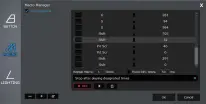 Assigning the macro
Selecting the macro you want and then click the “OK” button
Note: If you want to edit a macro that is already assigned to a particular key or a mouse button, make sure you assign the macro to the desired key or mouse button again alter the editing
Lighting Effect
Drag and select the whole mouse to set up the lighting effect of the mouse
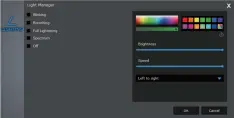 Lighting effect:
Including Blinking
Breathing / Full Lightening
Spectrum/Off
Color Selection:
Select the color you prefer from 16.8 million color options
* Can not change the speed under “Full Lightening”
* Can not change the color under “Spectrum”
Synchronize
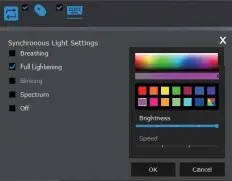 Synchronize color and lighting effects with onn. Gaming Keyboard
Synchronize Lighting effect:
There are 4 lighting effects can be synchronized Breathing / Full Lightening Blinking / Spectrum / Off
Color Selection:
Select the color you prefer from 16.8 million color options
Speed / Brightness:
Adjust the speed of the color changes or the light blinks
Adjust the brightness of the LED
Note Only these models can be synchronized
onn. Gaming Mouse (100004359)
onn. Gaming Mouse (1100027827)
onn. Lightweight Gaming Mouse (100027547)
onn. Wireless Gaming Mouse (100025011)
onn. Mechanical Keyboard (100004357)
Reset To Factory Default:
Click ![]() will clear all your settings and go back to factory default
will clear all your settings and go back to factory default
Online Update
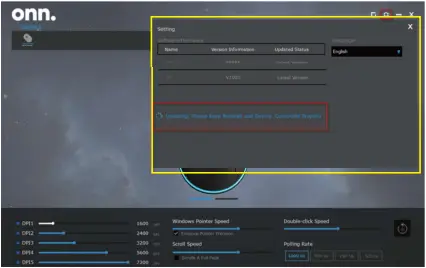
Online Update:
You will see a red exclamation mark on the setting icon when there is a new version of firmware or application is released 
Click the setting icon, it will also show the version of the current firmware and software of all devices connected
Start Update:
Select the device you want to update
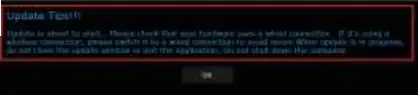
Update Reminding:
Make sure all your devices ere plugged In with the Type C cable and connected to the internet
Federal Communication Commission Interference Statement
This equipment has been tested and found to comply with the limits for a Class B digital device, pursuant to Part 15 of the FCC Rules. These limits are designed to provide reasonable protection against harmful interference in a residential Installation. This equipment generates, uses and can radiate radio frequency energy and, if not installed and used in accordance with the instructions, may cause harmful interference to radio communications. However, there is no guarantee that interference will not occur in a particular installation. If this equipment does cause harmful interference to radio or television reception, which can be determined by turning the equipment off and on, the user is encouraged to try to correct the interference by one of the following measures:
-Reorient or relocate the receiving antenna.
-Increase the separation between the equipment and receiver.
-Connect the equipment into an outlet on a circuit different from that to which the receiver is connected.
-Consult the dealer or an experienced radio/TV technician for help.
This device complies with Part 15 of the FCC Rules. Operation is subject to the following two conditions: (1) This device may not cause harmful interference, and (2) this device must accept any interference received, including interference that may cause undesired operation.
FCC Caution: Any changes or modifications not expressly approved by the party responsible for compliance could void the user’s authority to operate this equipment.
Walmart Inc.,
Bentonville, AR 72716
Need help?
We’re here for you every day from 7 a.m. – 9 p.m. CST.
Give us a call at 1-888-516-2630
 We ‘d love to hear from you.
Scan with your Walmart app and let us know what you think.