![]()
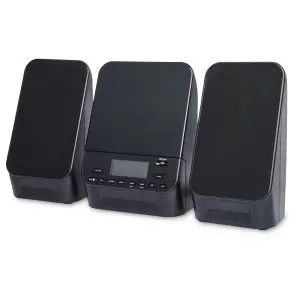
onn Mini CD Stereo 100008722 User Guide

Model: 100008722
We’d love to hear from you. Scan with you Walmart app and let us know what you think.
Information and Safety Instructions
Need help?
We’re here for you every day
from 7 a.m. – 9 p.m. CST.
Give us a call at 1-888-516-2630
Important Safety Instructions
- Read these Instructions.
- Keep these Instructions.
- Heed all Warnings.
- Follow all instructions.
- Do not use this apparatus near water.
- Clean only with a dry cloth.
- Do not block any ventilation openings. Install in accordance with the manufacturer’s instructions.
- Do not install near any heat sources such as radiators, heat registers, stoves, or other apparatus (including amplifiers) that produce heat.
- Do not defeat the safety purpose of the polarized or grounding – type plug. A polarized plug has two blades with one wider than the other. A grounding type plug has two blades and a third grounding prong. The wide blade or the third prong are provided for your safety. When the provided plug does not fit into your outlet, consult an electrician for replacement of the obsolete outlet.
- Protect the power cord from being walked on or pinched particularly at plugs, convenience receptacles, and the point where they exit from the apparatus.
- Only use attachments/accessories specified by the manufacturer.
- Unplug this apparatus during lightning storms or when unused for long periods of time.
- Refer all servicing to qualified service personnel. Servicing is required when the apparatus has been damaged in any way, such as power-supply cord or plug is damaged, liquid has been spilled or objects have fallen into the apparatus, the apparatus has been exposed to rain or moisture, does not operate normally, or has been dropped.
- Use only with a cart, stand, tripod, bracket, or table specified by the manufacturer, or sold with the apparatus. When a cart is used, use caution when moving the cart/apparatus combination to avoid injury from tip-over.
![]()
FCC Warnings
Warning: Changes or modifications to this unit not expressly approved by the party responsible for compliance could void the user’s authority to operate the equipment.
NOTE: This equipment has been tested and found to comply with the limits for a Class B digital device, pursuant to Part 15 of the FCC Rules. These limits are designed to provide reasonable protection against harmful interference in a residential installation.
This equipment generates, uses, and can radiate radio frequency energy and, if not installed and used in accordance with the instructions, may cause harmful interference to radio communications.
However, there is no guarantee that interference will not occur in a particular installation. If this equipment does cause harmful interference to radio or television reception, which can be determined by turning the equipment off and on, the user is encouraged to try to correct the interference by one or more of the following measures:
- Reorient or relocate the receiving antenna.
- Increase the separation between the equipment and receiver.
- Connect the equipment into an outlet on a circuit different from that to which the receiver is connected.
- Consult the dealer or an experienced radio/TV technician for help.
Additional Warnings and Precautions
- CAUTION: TO PREVENT ELECTRIC SHOCK, MATCH WIDE BLADE OF PLUG TO WIDE SLOT, FULLY INSERT.
- Mains plug is used as disconnect device and it should remain readily operable during intended use. In order to disconnect the apparatus from the mains completely, the mains plug should be disconnected form the mains socket outlet completely.
- WARNING: Shock hazard – Do Not Open.
- WARNING: To reduce the risk of fire or electric shock, do not expose this apparatus to rain, moisture, dripping, or splashing.
- Objects filled with liquids, such as vases, shall not be placed on the apparatus.
- CAUTION: Use of controls or adjustments or performance of procedures other than those specified may result in hazardous radiation exposure.
- WARNING: Changes or modifications to this unit not expressly approved by the party responsible for compliance could void the user’s authority to operate the equipment.
- WARNING: Do not place this unit directly onto furniture surfaces with any type of soft, porous, or sensitive finish. As with any rubber compound made with oils, the feet could cause marks or staining where the feet reside. We recommend using a protective barrier such as a cloth or a piece of glass between the unit and the surface to reduce the risk of damage and/or staining.
- CAUTION: Danger of explosion if battery is incorrectly replaced. Replace only with the same or equivalent type.
- Warning: Do not ingest battery, chemical burn hazard.
- Battery shall not be exposed to excessive heat such as sunshine, fire or the like.
- Caution marking is located at the rear or bottom of the apparatus.
- The marking information is located at the rear or bottom of apparatus.
- Keep new and used batteries away from children. If the battery compartment does not close securely, stop using the product and keep it away from children.
- If you think batteries might have been swallowed or placed inside any part of the body, seek immediate medical attention.
- Do not mix old and new batteries.
- Completely replace all old batteries with new ones.
- Do not mix alkaline, standard (carbon-zinc), or rechargeable (ni-cad, ni-mh, etc) batteries.
- Batteries should be recycled or disposed of as per state and local guidelines.
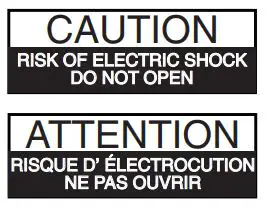 Warning: To reduce the risk of electric shock, do not remove cover (or back). No user-serviceable parts inside. Refer servicing to qualified service personnel.

 The lightning flash with arrowhead symbol, within an equilateral triangle, is intended to alert the user to the presence of uninsulated “dangerous voltage” within the product’s enclosure that may be of sufficient magnitude to constitute a risk of electric shock to persons.

 This product utilizes a Class 1 laser to read Compact Discs. This laser Compact Disc Player is equipped with safety switches to avoid exposure when the CD door is open and the safety interlocks are defeated. Invisible laser radiation is present when the CD Player’s lid is open and the system’s interlock has failed or been defeated. It is very important that you avoid direct exposure to the laser beam at all times. Please do not attempt to defeat or bypass the safety switches.
 WARNING : This product can expose you to chemicals including lead, which is known to the State of California to cause cancer and birth defects or other reproductive harm. For more information go to www.P65Warnings.ca.gov. This product meets and complies with all Federal regulations.
NOTE : Exposure to certain lasers can cause eye damage.
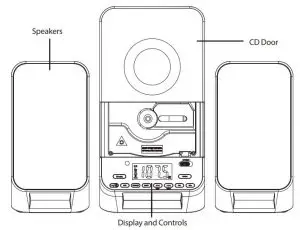
Overview
Setup
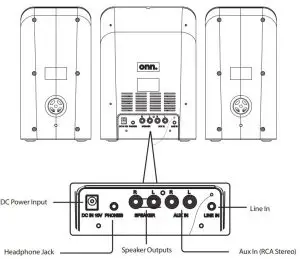
Power
Plug the DC power adapter into a standard wall outlet and the DC Power Input on the unit.
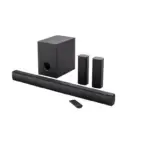
Connecting the Speakers
Connect the included speakers to the Speaker Outputs on the back of the unit. The Right speaker should connect to the Right output. The Left speaker should connect to the Left output.
CD and Radio
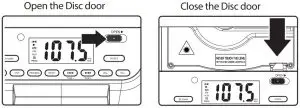
Loading & Playing a CD
Note: This unit is not compatible with MP3 CDs.
- Press the Source button to switch to CD Mode
- Slide Open button right to open the Disc door.
- Load a CD or CD-R/RW disc into the unit with the label side facing you.
- Push the Disc door down until the Disc door is locked.
- Press the Play/Pause button to begin playing the loaded CD. Press the Skip buttons to cycle
through different tracks. Press and hold the Skip buttons to search through an audio track.
Programming a CD
- While playing a CD, press the Stop button.
- Press the Program/Prog button on the unit or the remote.
- Press the Skip/Search buttons to select a track from the loaded CD to play first.
- Press the Program/Prog button again.
- Repeat steps 3 and 4 to program tracks from the loaded CD to play in the order they are selected.
- Press the Play/Pause button to begin playing the programmed CD.
- Press the Stop button twice to cancel the program.
FM Radio
- Adjust the position of the FM wire antenna to adjust radio reception.
- Press the Power button to turn the unit on.
- Press the Source button to switch to FM Radio Mode.
- Press and hold the Skip/Tune buttons to scan FM frequencies. Press the Skip/Tune buttons to fine tune the frequency adjustment.
Programming Radio Stations
- With the speaker on and in FM Mode, press and hold the Program/Prog button on the unit or the remote. The display will start blinking a preset number (Ex: P01).
- Use the Skip/Tune buttons to select a preset number you wish to save, then press the Program/ Prog button again to save the frequency to that preset number. Up to 20 stations may be preset.
- To select different presets, press the Program/Prog button, then use the Skip/Tune buttons to select a preset.
Remote
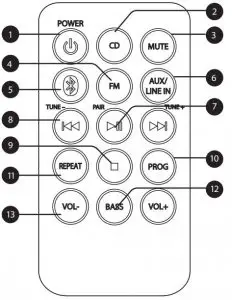
- Power: Press to power the unit on or off.
- CD: Press to switch to CD Mode.
- Mute: Press to mute volume.
- FM: Press to switch to FM Radio Mode.
- Bluetooth: Press to switch to Bluetooth Mode.
- Aux/Line In: Press to switch to a connected audio system or device.
- Play/Pause/Pair: Press to play or pause audio (CD/BLUETOOTH MODES).
Press and hold to begin pairing to a Bluetooth device. - Skip/Tune: Press to skip audio tracks (CD/BLUETOOTH MODES). Press and hold to scan FM radio frequencies (FM MODE).
Press to fine tune the frequency adjustment (FM MODE). - Stop: Press to stop audio playback (CD/BLUETOOTH MODES).
- Prog: Press to begin programming a CD.
- Repeat: Press to change playback modes from Standard play, Repeat, or Shuffle.
- Bass: Press to adjust bass level
- Volume: Press to adjust the volume level up or down.
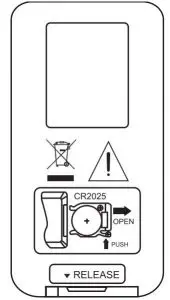
Remote Battery
Requires 1 CR2025 button cell battery (included). Follow the figure on the back of the remote to replace the battery.
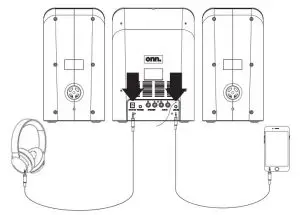
Connecting Devices to Your Stereo
Note: This unit receives Bluetooth signals. You can connect Bluetooth audio devices such as smart phones, MP3 players, tablets, computers etc. to this unit via Bluetooth and stream music. This unit does not send Bluetooth signals, it only receives Bluetooth signals. Therefore, headphones or earbuds cannot be connected to this unit via Bluetooth. However, you can connect headphones or earbuds via 3.5mm headphone jack with an aux cord.’
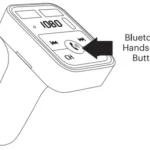
Connecting to a Bluetooth Device
- Press the Source button to switch to Bluetooth Mode. The letters “bt”will flash on the display.
- To pair to a new device, press and hold the Play/Pause/Pair button until the “bt” on the display begins flashing again, then repeat steps 3 and 4.
- Using the Bluetooth settings on your Bluetooth device, select the onn. Mini Stereo in the Bluetooth menu to pair.
- When successfully paired, a chime will sound and the “bt” on the display will stop flashing. The audio will now be heard through the speakers. Play, pause, or skip audio using the connected Bluetooth device or the speaker’s remote.
- The speaker will always try to reconnect to the last device to which it was connected.
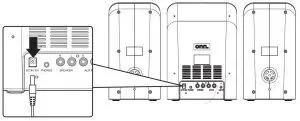
Headphone Jack
Requires a 3.5 mm audio cable (not included).
- Connect headphones to the Headphone Jack on the rear of the unit.
Connecting to Line In
Requires a 3.5mm audio cable (not included).
- Connect a 3.5mm audio cable to the Line In on the unit and the audio output/ headphone jack on a smartphone or other media player.
- Press the Source button to switch to Line Mode.
- Use the controls on the connected device to select and play audio.
To avoid hearing damage, be sure the volume on the stereo is turned down before connecting headphones, then gradually increase the volume to a comfortable level.
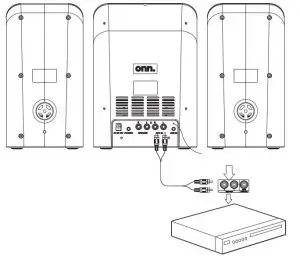
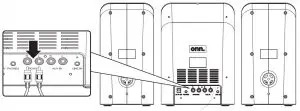
Connecting to a DVD/Blu-Ray Player, Gaming Console, etc.
Requires an RCA stereo audio cable (not included).
- Connect an RCA stereo audio cable to the Aux In (RCA stereo) inputs on the unit and the RCA stereo outputs on the media player.
- On the speaker, press the Source button to switch to Aux Mode.
- Audio from the connected media player will now be heard through the speaker. Use the speaker controls to adjust the volume level.