Perlesmith PSMTK1 Medium Tilt TV Wall Mount

PSMTK1
WARNING! SEVERE PERSONAL INJURY AND PROPERTY DAMAGE CAN RESULT FROM IMPROPER INSTALLATION OR ASS EMBLY. READ THE FOLLOWING WARNINGS BEFORE BEGINNING.
If you do not understand the instructions or have any concerns or questions, please contact a qualified installer.
Do not install or assemble if the product or hardware is damaged or missing. Not all parts and hardware included must be used. If you require replacement parts, contact customer service at: [email protected]
This product has been designed for using on vertical wall constructed of wood studs. Wood studs being defined as a wall consisting of a minimum of 2x 4studs with a maximum of 16stud spacing with a maximum of 1/2of wall covering (drywall, lath, plaster).For custom installations please contact a qualified installer.
This product may contain moving parts. Use with caution.
Please check www.perlesmith.com for more products and company information.
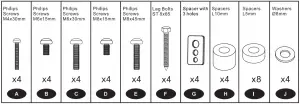
Tools Needed

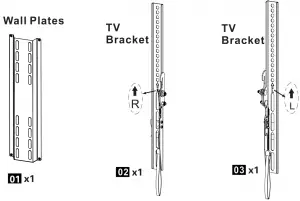
Hardware Included
 WARNING: This product includes small items that could cause a choking hazard if swallowed. Before starting assembly, verify all parts are included and undamaged. If any parts are missing or damaged, please contact: [email protected] and you will get the new parts ASAP
NOTE: Not all parts and hardware included will be used
Hardware (Wall/product)

CAUTION: These concrete anchors are for concrete and brick installations ONLY. Do not use in drywall or wood.
TV Screws / Washers
STEP 1-1 Select TV Screw Diameter
Thread screws by hand into the threaded holes on the back of your TV to select which screw diameter fit your TV
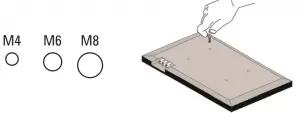
STEP 1-2 Select TV Screw Length
When attaching brackets to the flat screen, be careful not to over tighten screws and be sure that screws do not bottom out in the mounting holes.

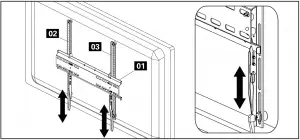
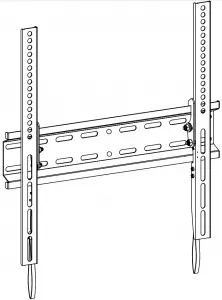
STEP 1-3 Attach the TV Bracket
Position your TV bracket configuration (A or B) over your TV hole pattern – making sure the bracket is centered over the TV hole pattern and level. Secure bracket using your screw/washer (A-Flat Back) or spacer/screw/ washer (B-Round Back/ Extra Space) selection.
CAUTION: Ensure TV bracket is securely fastened before moving on to
the next step.
(a) Flat Back
(b) Round Back/ Extra Space
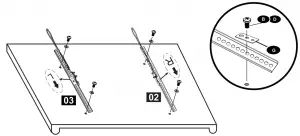
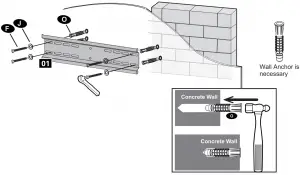
STEP 2A Wall Plate Installation (Concrete or brick)
CAUTION: Avoid potential personal injury or property damage! All lag bolts  firmly tightened to prevent unwanted movement of the wall plate
  .
.
CAUTION: Ensure the wall plate is securely fastened to the wall before continuing to the next step.
2A-1
Position the wall plate at your desired height, level the wall plate and mark the pilot hole locations.
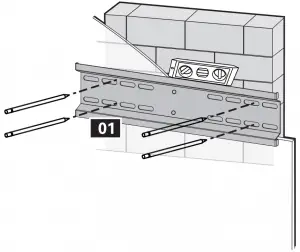
2A-2
2A-3
Install wall plate using lag bolts and washer  and anchor
  .
.
Tighten the lag bolts until they are pulled firmly against the wall plate .
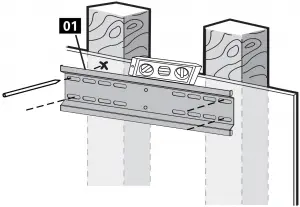
STEP 2B Wall Plate Install (Wood stud)
CAUTION: Avoid potential personal injuries and property damage!
- Drywall covering the wall must not exceed 5/8 in. (16mm)
- Minimum wood stud size: common 2 x 4 in.(51×102 mm) nominal 1½ x 3½ in.(38 x 89mm)
CAUTION: Avoid potential personal injury or property damage! All lag bolts firmly tightened to prevent unwanted movement of the wall plate .
CAUTION: Ensure the wall plate is securely fastened to the wall before continuing to the next step.
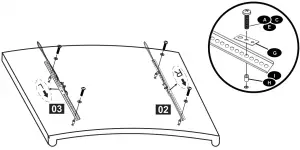
2B-1
Position the stud. Verify and mark the center of the stud by finding the stud edges using an awl, a thin nail, or an edge to-edge stud finder.
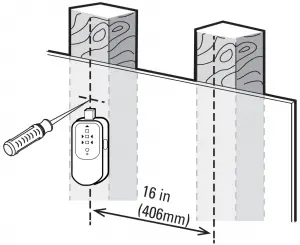
2B-2
Position the wall plate at your desired height and line up the holes with your stud center line.
level the wall plate and mark the holes.
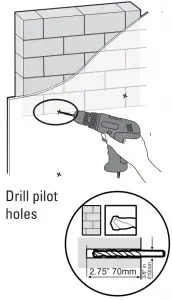
2B-3
Drill pilot holes using a 7/32 in.
(5.5mm) diameter drill bit.
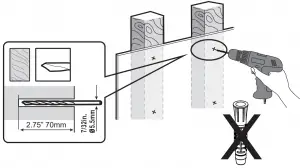
IMPORTANT: Pilot holes must be drilled to a depth of 2¾ in.(70mm). Be sure to drill into the center of the stud.
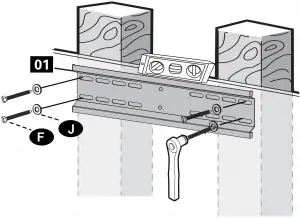
2B-4
Install the wall plate assembly using lag bolts and washer Tighten the lag bolts only until it against the wall plate
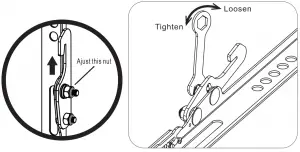
STEP 3 Tighten Nuts
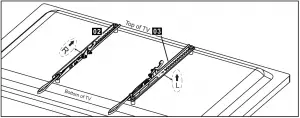
Please adjust the tilting angle with the Allen wrench for both  and
and  as
as
the pictures show before hanging TV
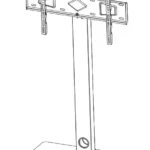
STEP 4 Hang TV
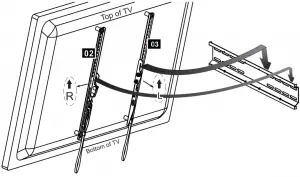
STEP 5 Secure TV
Pull the strap down and push the TV to secure the TV brackets and to the wall plate .If cannot tilt TV, please take TV off and then adjust the tilt as STEP 3 shows.