PetSafe 100, 300, 600 and 900 Yard Remote Trainers User Guide
Welcome.
You and your pet were made for each other. Our aim is to help you have the best companionship and the most memorable moments together. Your remote trainer is designed to give your pet more freedom while keeping him safe. We know that safe pets make happy owners. Before getting started, please take a moment to read through the important safety information. If you have any questions, please don’t hesitate to contact us.
Important Safety Information
Explanation of Attention Words and Symbols Used in this Guide
 This is the safety alert symbol. It is used to alert you to potential personal injury hazards. Obey all safety messages that follow this symbol to avoid possible injury or death.
WARNING indicates a hazardous situation which, if not avoided, could result in death or serious injury.
CAUTION, used with the safety alert symbol, indicates a hazardous situation which, if not avoided, could result in minor or moderate injury.
CAUTION, used without the safety alert symbol, indicates a hazardous situation which, if not avoided, could result in harm to your pet.

- Do not use this product if your dog is prone to aggressive behavior. Aggressive dogs can cause severe injury and even death to their owner and others. If you are unsure whether this product is appropriate for your dog, please consult your veterinarian or a certified trainer.

- It is vitally important that you and your pet remain safe while learning during on-leash training. Your pet should be on a strong leash, long enough for him to attempt to chase an object, but short enough for him not to reach a road or other hazard. You must also be physically strong enough to restrain your pet when he tries to chase.
- This pet training device is not a toy, keep away from children.

- A collar worn for too long or made too tight on the pet’s neck may cause skin damage ranging from redness to pressure ulcers. This condition is commonly known as bed sores.
- Avoid leaving the collar on the dog for more than 12 hours per day.
- When possible reposition the collar on the pet’s neck every 1 to 2 hours.
- Regularly recheck the fit to prevent excessive pressure; follow the instructions in this quick start guide.
- You may need to trim the hair in the area of the contact points. However, never shave the dog’s neck; this may lead to a rash or infection.
- Never connect a leash to a collar with contact points. It will cause excessive pressure on the contact points.
- When connecting a leash to a separate collar, do not allow it to put pressure on the training collar.
- Wash the dog’s neck area and the contacts of the collar weekly with a damp cloth.
- Examine the contact area daily for signs of a rash or a sore.
- If a rash or sore is found, discontinue use of the collar until the skin has healed.
- If the condition persists beyond 48 hours, see your veterinarian.
- For additional information on bed sores and pressure necrosis, please visit our website. This product is only for use with healthy pets. If you’re not certain that your pet is in good health, we recommend that you take your pet to a veterinarian before using this product.
Charge the Training Collar and Remote
Excessive charging can shorten battery life. Only charge your remote or collar when the batteries are low.
- Plug in and fully charge the remote and receiver collar. This can take up to 5 hours.
- When fully charged, the green LED on the collar will turn off, and the battery meter on the remote will stop cycling and appear full.
- When the collar and remote are charged, replace their rubber covers.
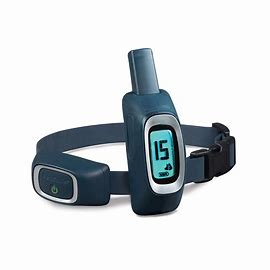
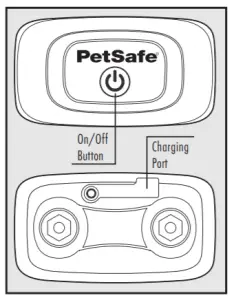
To Turn the Training Collar On
- Press and hold the on/off button until you hear a low to high beep and the green LED appears, and then release.
NOTE: The handheld remote is always on, and the display will appear when any button is pressed.
To Turn the Training Collar Off
- Press and hold the on/off button until the collar beeps high to low, and then release. The red LED will be illuminated during the button press and will turn off when the collar turns off.
Quick Tip: When you’re not using the collar, you’ll want to turn it off to increase the battery life.
Test the Remote Trainer
We recommend you experience firsthand how the static stimulation functions. Always begin at the lowest level, and increase the intensity up to your personal comfort level.
- Place one finger over both contact points of the training collar.
- Hold your remote approximately 2 ft. from the training collar. Starting at level 0, press the vibration button continuously for 1 to 2 seconds. You should feel continuous vibration. There is only one level of vibration.
- Increase the level to 1 for static stimulation. At this level you may not feel the stimulation. NOTE: Continuous stimulation will transmit for no more than 10 continuous seconds. To reactivate, release and repress the button.
- Increase the level until the sensation begins to feel uncomfortable.
 Tone Symbol: Delivers a tone with non-adjustable volume to the collar.
 Vibration Symbol: Sends 1 non-adjustable level of vibration stimulation to the collar.
 Static Symbol: Delivers up to 15 levels of static stimulation to the collar that can be adjusted with the side button.
 Lock Symbol: Indicates static stimulation levels 8-15 are locked or unlocked.
 Battery Indicator: Indicates the amount of battery remaining in the remote.

Pairing a Second Collar with the Remote
Note: available on the 300 Yard trainer or higher.
- Use the Dog 1/2 button on the remote to select Dog 2. With the remote turned on and the collar turned off, press and hold the on/off button on the collar.
- After about 5 seconds the LED on collar will turn off indicating that it is ready for pairing.
- Press either of the top 2 stimulation buttons. The collar LED will blink 5 times to indicate successful pairing.
Lock/Unlock
- To unlock press and hold the side up/down level adjuster simultaneously for 3 seconds.
- To lock press and hold the side up/down level adjuster simultaneously for 3 seconds.
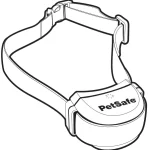
Fit the Training Collar
Important: The proper fit and placement of your training collar is important for effective operation. The contact points must have direct contact with your dog’s skin on the underside of his neck.
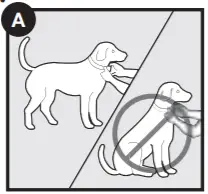
- Start with the collar turned off and your dog standing comfortably, not sitting (A).
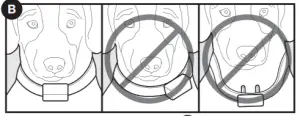
- Place the collar on your pet so that the PetSafe® logo is right side up and the collar is directly under your dog’s chin. Center the contact points underneath your dog’s neck, touching the skin (B).
NOTE: It is sometimes necessary to trim the hair around the contact points to make sure that contact is consistent.
- Check the tightness of the collar by inserting one finger between the end of a contact point and your dog’s neck (C). The fit should be snug but not constricting.
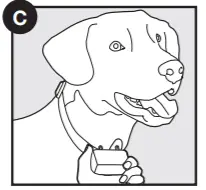
- Allow your dog to wear the collar for several minutes, then recheck the fit. Check the fit again as your dog becomes more comfortable with the collar.
Do not shave the pet’s neck as this may increase the risk of skin irritation. The collar should not be worn for more than 12 hours out of every 24-hour period. Leaving the collar on too long could lead to skin irritation.
Find the Best Stimulation Level for Your Pet
Important: Always start at the lowest level and work your way up.
The Remote Trainer has 1 tone, 1 vibration, and 15 static stimulation levels. This allows you to choose the stimulation level that is best for your pet. We recommend training with tone and vibration, or the lower levels of static correction when needed. In most cases static levels 1–7 will be adequate for your training needs. Levels 8–15 are locked as a
reminder that you are moving to higher stimulation levels. Once you have placed the training collar on your pet, it is time to find the “recognition level”. The “recognition level” is the stimulation level that your dog begins to notice. It should not make your pet uncomfortable.
YOUR PET SHOULD NOT VOCALIZE OR PANIC WHEN RECEIVING STIMULATION. IF THIS HAPPENS, THE STIMULATION IS TOO HIGH AND YOU NEED TO GO BACK TO THE PREVIOUS LEVEL.
Follow the steps below to find your pet’s recognition level:
- Choose level 0, and press the upper right button continuously for 1 to 2 seconds.
- If your pet shows no reaction, repeat this several times before moving to static stimulation.
- Choose level 1 and press the upper right button continuously for 1 to 2 seconds.
- If your pet shows no reaction, repeat this stimulation level several times before moving up to the next level.
- Move up through the static stimulation levels until your pet reliably responds to the stimulation. NOTE: The Remote Trainer is preset with the levels 8-15. To unlock, press and hold both the up and down buttons on the left simultaneously.
- If your pet continues to show no response at Level 15, check the fit of the training collar. See “Fit the Training Collar”. You might also want to test it on your hand at a lower level to ensure the collar is working.
If all of these steps have been done and your pet continues to show no reaction to the stimulation, please contact our Customer Care Center. For troubleshooting, videos on how to train your dog using your PetSafe® Brand training collar, or to download a complete product manual visit PetSafe.com.
Other Important Information
Use of this product implies acceptance of any and all terms, conditions and notices related to this product including, but not limited to, those found in this guide and the complete product manual available at PetSafe.com. Please see the complete product manual for important regulatory compliance information. For a list of patents protecting this product, please visit radiosystemscorporation.com/patents.
Radio Systems Corporation
10427 PetSafe Way • Knoxville, TN 37932
1-800-732-2677 • PetSafe.com
©2019 Radio Systems Corporation