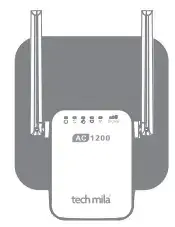
PIX-LINK LV-AC11/AC12 AC1200 Repeater/Router/Access Point Wireless WiFi Range Extender
Manual
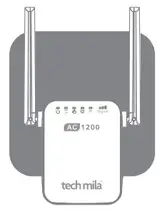
| Name | Statue | Indication |
| Power | On | The AC Mini Router is powered on. |
| Off | The AC Mini Router is powered off. | |
| Off | No active connection. | |
| Blinking | WPS connection is in progress. | |
| On/off | The wireless signal is on/off. | |
| On | The WAN port is connected. | |
| Off | The WAN port is disconnected. | |
| Flashing | Transferring data to/from a network device. | |
| On | The LAN port is connected. | |
| Off | The LAN port is disconnected. | |
| Flashing | Transferring data to/from a network device. | |
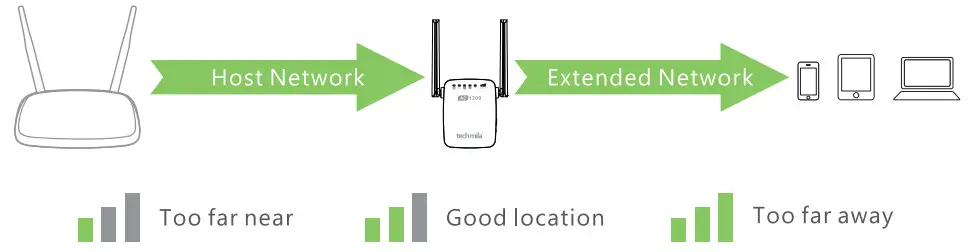
| Signal (Repeater Mode) |  |
The AC Mini Router is connected to the router or AP but is too far near the router or AP. |
 |
The AC Mini Router is connected to the router or AP and is in a good location. | |
 |
The AC Mini Router is connected to the router or AP but is too far away from the router or AP. |
Button and Port Explanation
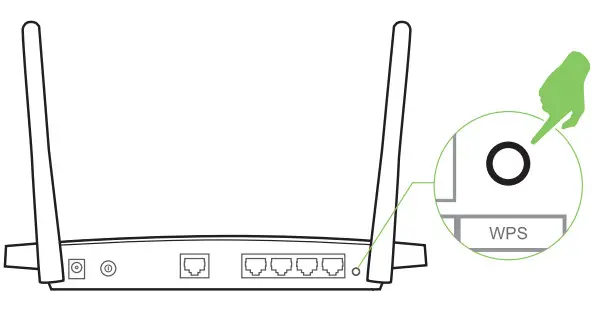
WPS Button:
If your host router supports the WPS function, you can press the WPS button and then press the WPS button of the AC Mini Router to establish a secure connection between the host router and the AC Mini Router.
Reset Button: This button is used to restore the AC Mi Ni Router’s factory default settings.
There are two ways to reset the AC Mini Router:
Option One: With the AC Mini Router powered on, use a pin press the Reset Button for less than 8 seconds, then release the button and wait for the AC Mi Ni Router to reboot to its factory default settings.
Option Two.: Restore the default setting from “Advanced-> System->Load default->Load default” of the AC Mini Router’s Web-based Management page.
WAN Port: One 10/1 OOMbps RJ45 Ethernet port.
- Router mode, it’s used for connecting to the DSL/cable Modem or Internet.
- Repeater/WISP mode, it’s used for connecting to an Ethernet-enabled device, working the same as the Ethernet port.
- Access Point mode, it’s used for connecting to the front router or Internet.
LAN Port: One 10/100Mbps RJ45 Ethernet port is used to add wireless connectivity to an Ethernet-enabled device such as Internet TV, DVR, gaming console, and so on. Please note that this port is not allowed to be connected to the router.
Quick setup using a web browser
Power on
Plug the AC Mini Router into an electrical outlet near your router. When the router boot is completed, the Signal LED is all on.

Connect to the AC Mi Ni Router
For Windows Users
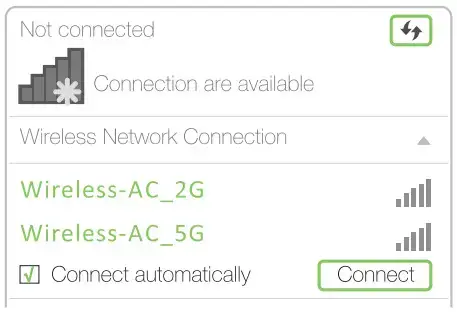
Disconnect your Ethernet (wired) connection from your computer Click the Wi-Fi icon on the taskbar and connect to the Repeater’s network(e.g. Wireless-AC_2G/5G)
For Mac OS X Users
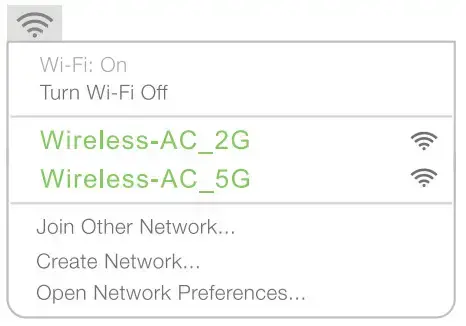
Disconnect the Ethernet (wired) connection from your computer (if any). Click the Wi-Fi icon in the top right corner of the screen, and connect to the Repeater’s network (e.g Wireless-AC_2G/5G)
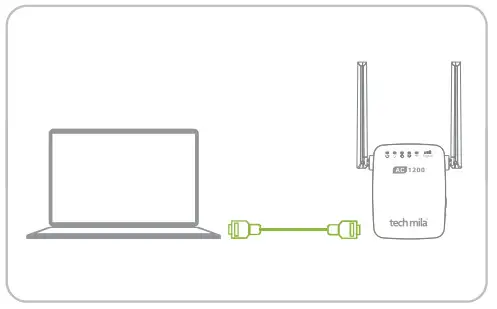
For Wired
Disable the Wi-Fi on your computer. Connect your computer to the Repeater via an Ethernet cable
Configure the AC Mi Ni Router
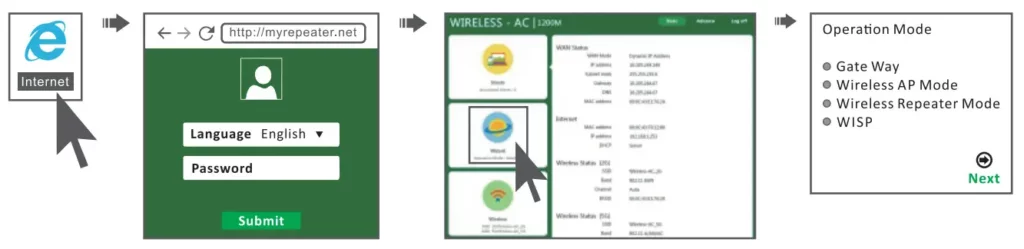
- Open a web browser and type http://myrepeater.net in the address field After a moment, alogin window will appear Select the language for the installation, and then enter admin for the Password, Then click the Submit button or press the Enter key to log in to
Language – Select the Language from the drop-down list. The default setting is English
Password -Enter the password for Login The default password is admin - After successful login, you can click the Wizard to quickly configure your router Select the Operation Mode you need and click Next to go on configuring
Gateway Mode(Default)
Stand Wireless Router Mode: This router connects to the Internet by WAN port, and then other terminal devices can connect to this router by wireless connection or connect to this router’s LAN port by wired.
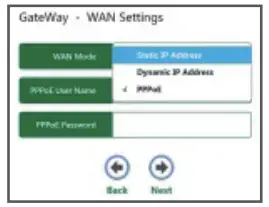
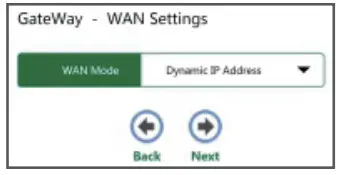
If GateWay is selected, click the drop-down menu of WAN Mode, and then WAN Connection Type will appear, Select the very type go on configuring.

a. If the connection type is Dynamic IP Address,Please click Next to continue.
b. If the connection type is Static IP Address, the next screen will appear as shown below Configure the following parameters and then click Next to continue.
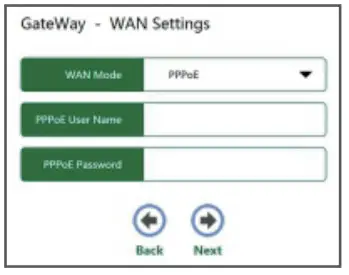
c. If the connection type is PPPoE, the next screen will appear as shown below Configure the following parameters and then click Next to continue.
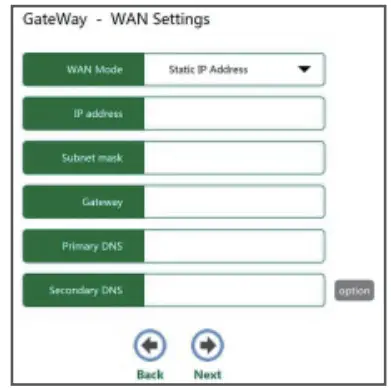
IP Address – This is the WAN IP address as seen by external users on the Internet (including your ISP). Enter the IP address into the field.
Subnet Mask – The Subnet Mask is used for the WAN IP address, it is usually 255.255.255.0.
Gateway – Enter the gateway IP address into the box if required.
Primary DNS – Enter the DNS Server IP address into the box if required.
Secondary DNS(option) – If your ISP provides another DNS server, enter it into this field.
PPPoE User Name – Enter the User Name provided by your ISP.
PPPoE Password – Enter the Password provided by your ISP.
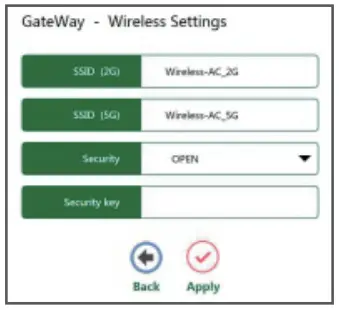
 SSID(2G)/SSID(5G)- Enter a value of up to 32 characters. The same name of SSID(Service Set Identification) must be assigned to all wireless devices in your network. The default SSID is set to be Wireless-AC 2G and Wireless-AC 5G.
Security – you can choose the security type on the drop-down list. The default setting is OPEN.
Security key – Wireless Password, When WPA/WPA2PSK is set as the Security Type, You can enter ASCII characters between 8 and 63 characters or 8 to 64 Hexadecimal characters.
Enter SSID and Security, then click Apply to complete setup.
Note: Do not close this window, the window will automatically close when the setup is complete.
Wireless AP Mode
Traditional wired router realizes wireless function: This router can connect to uplink router’s LAN port by wired connection, the user terminal can connect to this router by wireless connection.
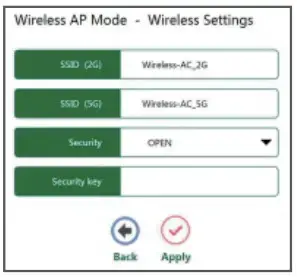
If Wireless AP Mode is selected, The Wireless settings page will appear as shown below.

S510(2G)/S51D(5G)- Enter a value of up to 32 characters. The same name of 55/D (Service Set Identification) must be assigned to all wireless devices in your network. The default SSID is set to be Wireless-AC_2G and Wireless-AC_5G. Security you can choose the security type on the drop-down list. The default setting is OPEN.
Security key – Wireless Password, When WPA/WPA2PSK is set as the Security Type, You can enter ASCII characters between 8 and 63 characters or 8 to 64 Hexadecimal characters.
Enter SSID and Security, then click Apply to complete setup.
Wireless Repeater Mode
Extend wireless signal comprehensively This router can connect to the uplink wireless router by wireless connection, the user terminal can connect to this router by wired or wireless connection.
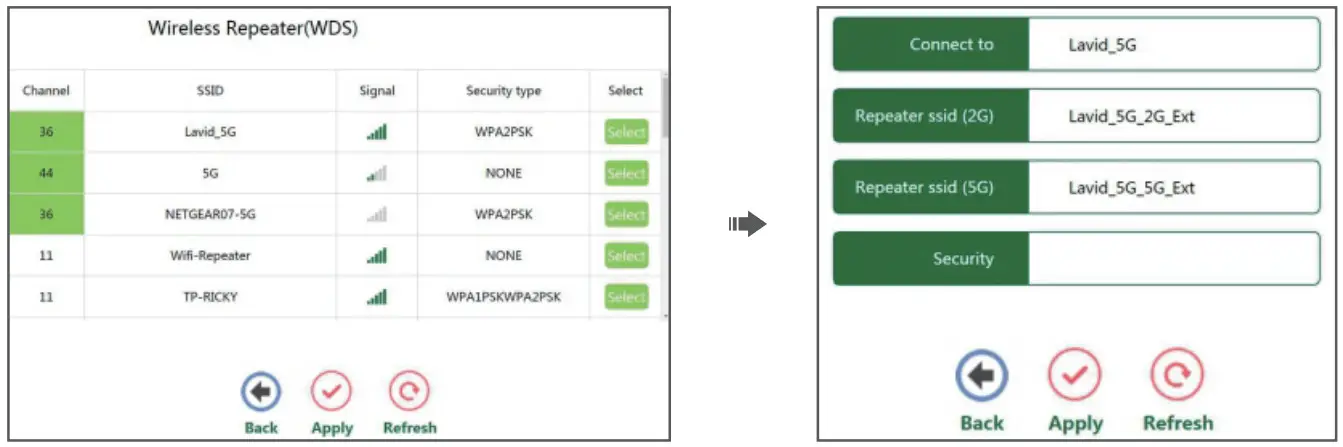
If Wireless Repeater Mode is selected, The Wireless Repeater(WDS) page will appear as shown below.
 Select the SSID of the target network and insert Repeater SSID and the key of your network. the default Repeater SSID is set to be 00ox 2G Ext/ X0ox 5G Ext (xxxx indicates The Main Router’s wireless network name). Then click Apply to complete setup.
Note The Security Key is the same as your Wireless Router.
WISP Mode
Wireless used as WAN port: This router can connect to the uplink wireless router by wireless connection, at the same time, it can extend wireless signal for other device’s connection.
If WIPS is selected, The Wireless ISP (APClient) page will appear as shown below.

Select the SSID of the target network and insert Repeater SSID and the key of your network. the default Repeater SSID is set to be x0xx_2G_Ext/ xxxx_5G_Ext (xxxx indicates The Main Router’s wireless network name). Then click Apply to complete setup.
Note The Security Key is the same as your Wireless Router.
Quick setup Repeater Mode using WPS Button
WPS is an easier way to extend your host network. You are recommended to use this method if your host router has a WPS button.
Note: your host router should support WPS.
The button might look like one of these: . Otherwise, please setup Using a Web Browser.
Power on
Plug the AC Mini Router into an electrical outlet near your router. When the router boot is completed, the Signal LED is all on.

Connect
Press the WPS button on the AC Mi Ni router, and then press the WPS button on your Host Router within 2 minutes.
The WPS LED will be blink when pressing the WPS button, the xxXX_2G_Ext/xxxx_5G_Ext appear in your wireless network list, indicating a successful WPS connection,(XXXX indicates The Host Router’s wireless network name). If not, please use Web Browser setup.
Note: The Security Key is the same as your Host Router.
The WPS first connects to the 5GHz network, if you want to connect to the 2.4GHz network of your dual-band router, please use Web Browser setup.
Relocate
- Plug the extender into an electrical outlet about halfway between your router and the Wi-Fi dead zone. The location you choose must be within the range of your host network.
- Wait until the signal LED displays two or three lattice signals.
If not, relocate it closer to the router to achieve better sig na I qua I ity.
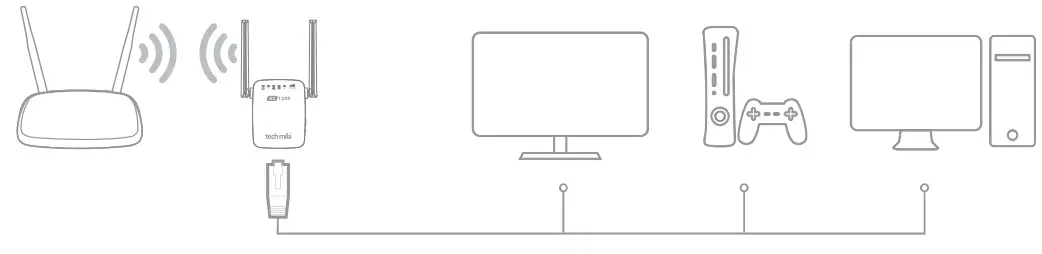
Entertaubment Adapter
The MiNi Router can be used as a wireless adapter to connect any Ethernet-only device such as a Blu-ray player, game console, DVR, or smart TV to your Wi-Fi network. First, connect the Mi Ni Router to your router using Repeater Mode or WISP Mode. Then connect your Ethernet-only device to the MiNi Router via an Ethernet cable.
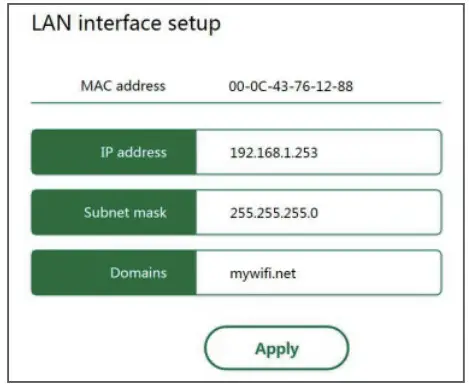
Change Default Access
Default Access of The AC Mini Router is http://myrepeater.net, and Default IP
The address of The AC Mini Router is 192.168.1.253.
Click “Advance -> Internet-> LAN Settings” located on the home page, the following message will be displayed on your web browser.
Click Apply to save the settings.
Note: If you change the IP Address of LAN or Domains, you must use the new IP Address or Domains to log in to the router.
Firmware Upgrade
The system software used by this AC Mini Router is called “firmware”, just like any application on your computer, when you replace the old application with a new one, your computer will be equipped with a new function. You can also use this firmware upgrade function to add new functions to your router, even fix the bugs of this router.
- Click “Advance -> System -> Upgrade Firmware ” located on the home page, the following message will be displayed on your web browser.
- Click the “Browse” button first; you’ll be prompted to provide the filename of the firmware upgrade file.
- After a firmware upgrade file is selected, click the “Upload” button. and the AC MiNi Router will start the firmware upgrade procedure automatically. The procedure may take several minutes, please be patient.
Frequently Asked Questions (FAQ)
01. What should l do if I cannot access the Router’s web management page?
- If your computer is wirelessly connected, make sure that you have connected to the Router’s SSID.
- If your computer is connected via an Ethernet cable, please make sure that the connection is stable.
- Make sure your computer is set to obtain an IP address and DNS server address automatically.
- Verify that http://myrepeater.net or http://192.168.1.253 is correctly entered in the web browser and press Enter.
- Please reset the extender and try again.
Q2. I have enabled a wireless MAC filter, wireless access control, or access control list (ACL) on my host router. What should I do before configuring and using the extender? - If you have enabled those functions of your host router, you may need to disable them first. And then follow a quick setup to complete the configuration.
FCC WARNING
This device complies with part 15 of the FCC Rules. Operation is subject to the following two conditions: (1) this device may not cause harmful interference, and (2) this device must accept any interference received, including interference that may cause undesired operation. Any changes or modifications not expressly approved by the party responsible for compliance could void the user’s authority to operate the equipment.
NOTE: This equipment has been tested and found to comply with the limits for a Class B digital device, pursuant to Part 15 of the FCC Rules. These limits are designed to provide reasonable protection against harmful interference in a residential installation. This equipment generates, uses, and can radiate radio frequency energy and, if not installed and used in accordance with the instructions, may cause harmful interference to radio communications. However, there is no guarantee that interference will not occur in a particular installation. If this equipment does cause harmful interference to radio or television reception, which can be determined by turning the equipment off and on, the user is encouraged to try to correct the interference by one or more of the following measures:
- Reorient or relocate the receiving antenna.
- Increase the separation between the equipment and receiver.
- Connect the equipment into an outlet on a circuit different from that to which the receiver is connected.
- Consult the dealer or an experienced radio/TV technician for help.
To maintain compliance with FCC’s RF exposure guidelines, This equipment should be installed and operated with a minimum distance of 20cm the radiator your body: Use only the supplied antenna.