Polaroid PLA21SB001A Dolby Atmos Soundbar

Your Sound Bar

- Remote control sensor
- Display: Shows the current status of the sound bar.
- Wall bracket screws.
- button: Use to switch between ON or STANDBY.
- button: Use to select the input source for the Sound Bar.
- Use to decrease the volume. + Use to increase the volume.
- AC~ socket.
- COAXIAL: Use to connect the sound bar to a COAXIAL OUT socket on an external device.
- OPTICAL socket: Use to connect the sound bar to a OPTICAL OUT socket on an external device.
- USB socket: Insert a USB device to play music. It can also be used to update the sound bar’s software functions.
- AUX socket: Use to connect to the AUX OUT/Headphone sockets on an external device.
- HDMI OUT (TV eARC/ARC) socket: The port supports the eARC/ARC HDMI feature, which allows the sound bar to play audio that originates on the connected TV.
- HDMI IN 1 / 2 sockets: Two HDMI IN ports for connecting HDMI source devices, such as a DVD player, Blu-ray Disc player, or gaming console. Note that only one HDMI input is usable at a time.
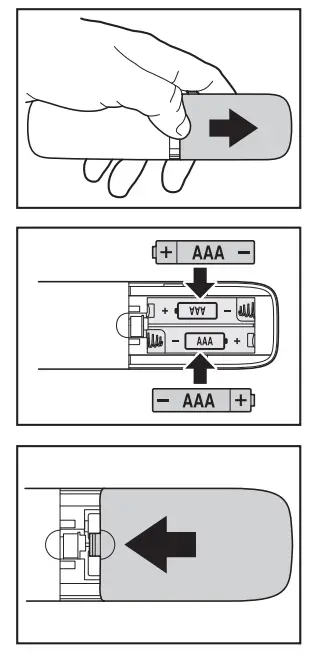
Preparing the remote control
IMPORTANT: The remote control will work within a 6m range, however this may be impossible if there are obstacles between the unit and the control. If the remote control is used near other devices which generate infrared rays then it may not operate properly and may interfere with other devices. Fitting/replacing the batteries:Push down gently on the top of the battery cover and slide down off the bottom of the remote control. Insert the two AAA batteries into the battery compartment.Ensure the + & – on the batteries are correctly aligned with the marks in the battery compartment. Slide the battery compartment cover back onto the bottom of the remote control as shown in the diagram and push upwards until it locks in place.
Important battery information
- When the remote control is not used for a long time (more than a month), remove the battery to prevent it from leaking.
- If the batteries do leak, wipe away the leakage inside the battery compartment and replace the batteries with new ones.
- Do not use any batteries other than those specified.
- Do not heat or disassemble batteries. Never throw them in fire or water.
- Do not carry or store batteries with other metallic objects. Doing so could cause batteries to short circuit, leak or explode.
- Never recharge a battery unless it is a rechargeable type.
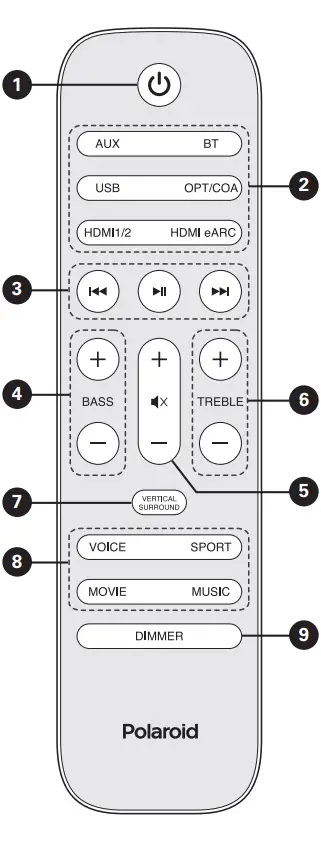
Recognising the remote control buttons
- : Switches the Sound Bar ON or into the STANDBY mode.
- SOURCE buttons: Use to select the input source for the sound bar.
- : Skip to previous track. uul : Skip to next track. ull : Play / pause / resume playback in Bluetooth mode. Press and hold to activate Bluetooth pairing function or to disconnect form a paired device.
- BASS +/–: Use to adjust the level of the bass.
- : Press to mute the sound bar. + / –: Press + to increase the volume. Press – to reduce the volume.
- TREBLE +/–: Use to adjust the level of the treble.
- VERTICAL/SURROUND: Press to turn the surround sound on or off.
- Equalizer setting buttons: Press to select the equaliser setting best suited to the material you are listening to.
- DIMMER: Used to adjust the brightness of the display.
Positioning your Sound Bar
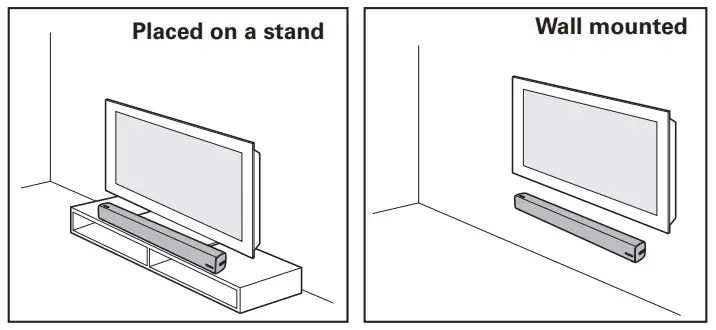
The correct position of the Sound Bar Placed on a stand: If your TV is placed on a stand, place the Sound Bar directly in front of the TV centred on the middle of the screen. Wall mounted: If your TV is fitted to the wall, Mount the Sound Bar directly below the TV centred on the middle of the screen. How to mount your Sound Bar on a wall IMPORTANT: Before installing your Sound Bar please read the information below.
- All installation must be carried out by a qualified person only. Incorrect assembly can result in severe personal injury and property damage (if you intend to install this product yourself, you must check for installations such as electrical wiring and plumbing that may be buried inside the wall). It is the responsibility of the installer to verify that the wall will safely support the total load of the Sound Bar and the wall brackets.
- Additional tools (not included) are required for the installation.
- Do not overtighten screws.
- Keep this instruction manual for future reference.
- Use an electronic stud finder to check the wall type before drilling and mounting.
- Suggested wall mounting height ≤1.5 meters.
Fitting the wall brackets
WARNING: Before attempting to fit the Sound Bar to the wall, if you are in any way unsure about how or where to fit the Sound Bar you should employ a qualified person to install your Sound Bar. IMPORTANT: The fittings supplied with your Sound Bar may not be suitable for all types of walls. Please consult a professional for advice before drilling any holes if you are in any doubt. IMPORTANT: Mark the position on the wall that you want the sound Bar to be fitted to and check that they align with the holes in the brackets before drilling any holes.
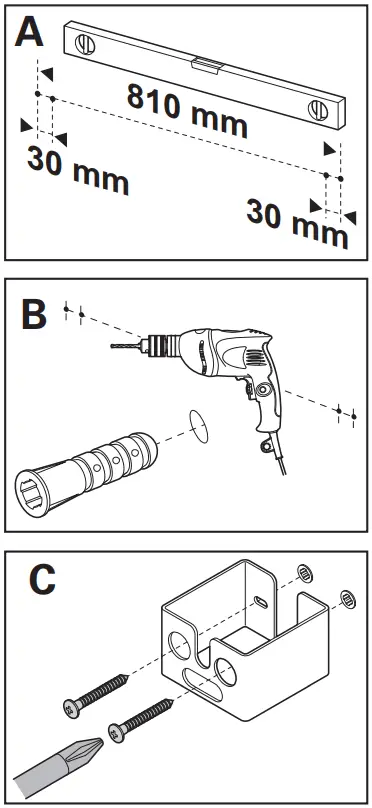
- The distance between the outer holes must be 810 mm with two more holes 30 mm in from them. Ensure the four points are level using a spirit level (A).
- Drill 4 parallel holes (Ø 3-8 mm each according to wall type) in the wall. The distance between the outer holes must be 810 mm With two more holes 30mm in from the outer holes. Firmly insert a dowel into each hole (B).
- Slot the screws into the holes in the brackets. Slot a crosshead screwdriver through the holes in the front of the bracket and tighten the screws into the wall (C).
Mounting the Sound Bar
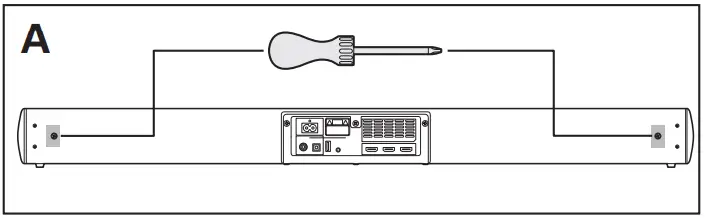
- Remove the two wall bracket screws on the back of the Sound Bar using a cross-head screwdriver (not supplied) (A).
- Screw the two wall mounting screws into the two screw holes left by removing the two wall bracket screws (B).
- Align the heads of the wall mounting screws on the back of the Sound Bar with the slots in the tops of the wall brackets (C).
- Gently push the Sound Bar down until it locks in place (D).
Connecting your Sound Bar
- Dolby Atmos®
Dolby Atmos gives you an immersive listening experience by developing sound in 3-dimensional space, and the richness, clarity, and power of Dolby sound. For more information, please visit: dolby.com/technologies/dolby-atmos - To use Dolby Atmos®
Dolby Atmos® is only available when your sound bar is connected using the HDMI ARC or HDMI sockets and a HDMI 2.0 cable. Please see below for more information on how to connect your soundbar to an external device.Your soundbar will still function when it is connected using other methods (such as a Digital Optical cable) but these are unable to support all of the Dolby Atmos® features. Given this, our recommendation is to connect via a HDMI 2.0 cable into the HDMI ARC or HDMI ports to ensure you can enjoy the full effect of your sound bar.
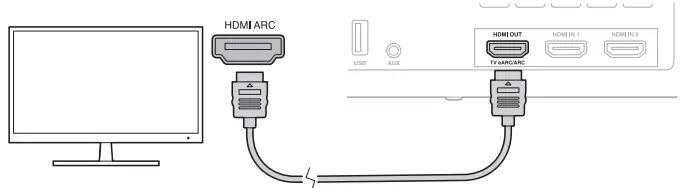
Connecting to the HDMI OUT ARC socket using an HDMI cable
IMPORTANT: The ARC (Audio Return Channel) function allows you to send audio from your ARC compliant TV to your Sound Bar through a single HDMI connection. To enjoy the ARC function, please ensure your TV is both HDMI-CEC and ARC compliant and set up accordingly. When correctly set up, you can use your TV remote control to adjust the volume or mute the Sound Bar.
- Slot one end of the HDMI cable (not supplied) into the HDMI OUT ARC socket on the back of the Sound Bar.
- Slot the other end of the HDMI cable into an HDMI OUT ARC socket on the TV or other device you want to connect to the Sound Bar. TIPS: Your TV must support the HDMI-CEC and ARC function. HDMI-CEC and ARC must be set to ON. The setting method of the HDMI-CEC and ARC may differ depending on the TV or device connected. Please refer to the user manual supplied with the device. Only HDMI 2.0 or higher versions cables are recommended for this soundbar.
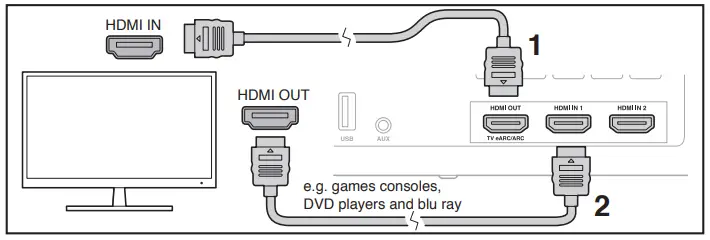
Connecting to the HDMI IN sockets using an HDMI cable
If the device you want to connect to is not HDMI ARC compatible, you can connect to the device using the standard HDIM IN ports on the Sound Bar and a HDMI cable. Note: The package does not include a HDMI cable.
- Use an HDMI cable to connect the soundbar’s HDMI OUT (eARC/ARC) socket to the TV’s HDMI IN socket.
- Use an HDMI cable to connect the soundbar’s HDMI IN (1 or 2) socket to your external devices (e.g. games consoles, DVD players and blu ray). TIPS: Only HDMI 2.0 or higher versions cables are recommended for this sound bar.
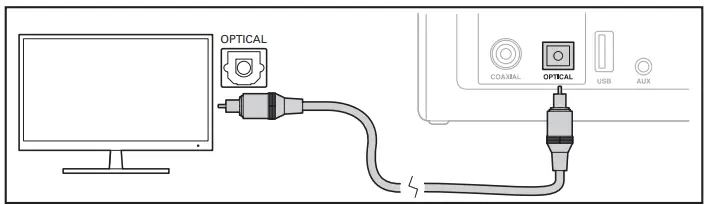
Connecting to the Optical socket using an OPTICAL cable
- Pull the protective cap out of the optical socket on the back of the Sound Bar.
- Slot one end of the OPTICAL cable (not supplied) into the socket on the Sound Bar.
- Slot the other end of the OPTICAL cable into the OPTICAL socket on your TV or other device you want to connect to.IMPORTANT: If there is no sound output and the OPTICAL Indicator flashes, ensure the audio setting of the input source (e.g. TV, game console, DVD player, etc.) is set to PCM mode with optical input.
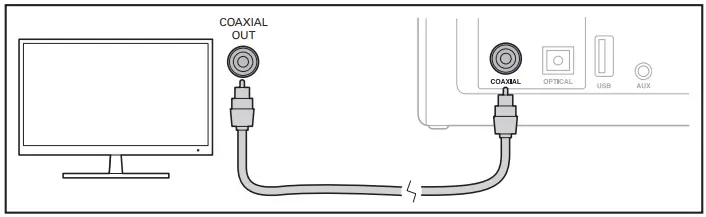
Connecting to the COAXIAL socket using an audio coaxial cable
- Slot one of the plugs on the audio coaxial cable (not supplied) into the COAXIAL socket on the back of the Sound Bar.
- Slot the other end of the audio coaxial cable into the COAXIAL OUT socket on your TV or other device you want to connect to. IMPORTANT: The Sound Bar may not be able to decode all digital audio formatsfrom the input source. If this happens, the Sound Bar will automatically go into mute, this is NOT a fault. Check that the input source (TV, games console, DVD player e.t.c) is set to PCM or Dolby Digital (refer to the user manual for the input device for its audio setting details) with HDMI / OPTICAL / COAXIAL input.
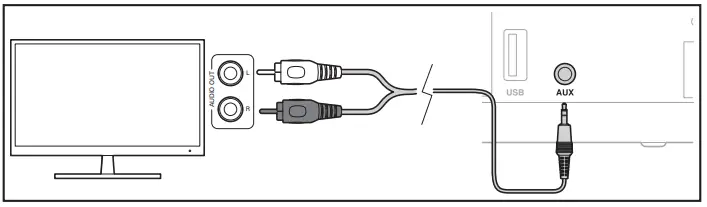
Connecting to the AUX socket using an RCA to 3.5mm audio cable
- Slot the 3.5mm plug on the RCA to 3.5mm cable (not supplied) into the AUX socket on the Sound Bar.
- Slot the other end of the AUX to 3.5mm cable into the red and white AUX sockets on your TV or other device you want to connect to. IMPORTANT: You may need to change the audio settings on your TV or device you have connected to, please consult the instructions supplied with the product for more information.
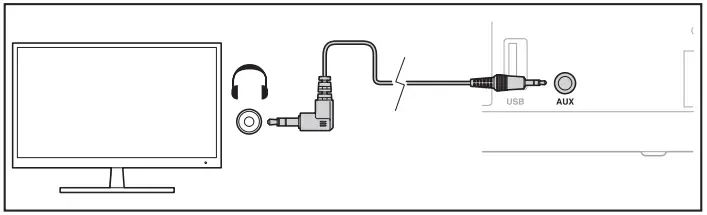
Connecting to the AUX socket using an 3.5mm to 3.5mm audio cable
- Slot one of the plugs on the 3.5mm to 3.5mm audio cable (supplied) into the AUX socket on the back of the Sound Bar.
- Slot the other end of the 3.5mm to 3.5mm audio cable into the headphone socket on your TV or another device you want to connect to.
- Fitting a USB drive using the USB socket
Slot the USB device into the USB slot in the back of the Sound Bar. - Attaching the power cable
Slot the end of the power cable into the power socket on the back of the Sound Bar. - Plugging the Sound Bar in
Slot the plug on the end of the power cable into a wall socket and turn the power on if required. Note: Ensure the power supply voltage corresponds to the voltage stated on the back or underside of the Sound Bar. Before plugging the Sound Bar in, ensure that all other connections have been completed. - Turning the Sound Bar on & off
You can turn the Sound Bar on by pressing either the button on the Sound Bar or by pressing the on the remote control. Test mode: Press and hold the buttonthen power up the sound bar to select the test mode, this mode is without DRC and the sound setting is FLAT. It is not a mode that consumers use.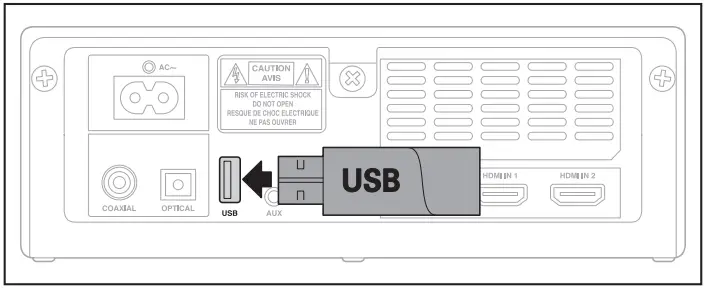
Using your Sound Bar
When you first connect your Sound Bar to the mains it will automatically go into standby mode.Turning on & off Press either the button on the Sound Bar or press the button on the remote control to turn your SoundBar on or off. To turn the Sound Bar off completely you will have to remove the plug from the mains socket. Note: If your TV or other externaldevice is connected, the Sound Bar will automatically switch on when the TV or other external device is switched on. If the Sound Bar is idle, it will automatically switch into standby mode after approximately 15 minutes. Mode selection
Press the button on the end of the Sound Bar repeatedly or press the AUX, BT, OPT/COA, HDMI 1/2, HDMI eARC and USB on the remote control to select the connection mode you have used on the external device.
The selected mode will be shown on the display on the front of the Sound Bar.
Adjusting the Bass/Treble level Press the BASS or TREBLE + / – buttons on the remote control to adjust the amount of bass or treble. Adjusting the volumePress the + / – buttons on the end of the Sound Bar or the volume + / – buttons on the remote control to increase or decrease the volume.
If you want to turn the sound off completely press the button on the remote control. To turn the sound onagain, press the button again or the + / – buttons on the end of the Sound Bar or the volume + / – buttons on the remote control.
Turning the Surround Sound
ON or OFF
Press the VERTICAL/SURROUND button on the remote control to turn on the surround sound. Press the button again to turn the surround sound off.
Setting the Audio Delay (AV SYNC)
Video image processing is sometimes longer than the time required to process the audio signal. This is called “delayed”. The Audio Delay feature is designed to remedy this delay.
IMPORTANT: You must be connected to the device you are listening to with a HDMI 2.0 cable using the HDMI eARC socket.
Press and hold the VERTICAL/ SURROUND button on the remote control to enter the audio delay setting. The Sound Bar display will scroll ‘LATENCY SET’ when activated. Press the volume + / – buttons to adjust the delay in 10 millisecond intervals to adjust the delay time.
Adjusting the brightness
Repeatedly press the DIMMER button on the remote control to select your preferred brightness level.
Using the equalizer (EQ)
effect
Press the VOICE / SPORT / MOVIE / MUSIC buttons on the remote control to select the desired preset equaliser effect.
AUX, OPTICAL, COAXIAL or HDMI operation
Ensure your Sound Bar is connect to the TV, DVD player or audio device as described on pages 10 to 13. When your Sound Bar is turned on, press the button on the end of the Sound Bar or the AUX, OPT/COA, HDMI 1/2 or HDMI eARC buttons on the remote control, the selected mode will be shown on the Sound Bars display. Use the connected device remote control or controls to operate the playback features. Tips The Sound Bar may not be able to decode all digital audio formats from the input source. If this happens, the Sound Bar will automatically go into mute, this is NOT a fault. Check that the input source (TV, games
Using the Bluetooth function
IMPORTANT: The operational range between the Sound Bar and a bluetooth enabled device is approximately 8 meters. The device you wish to connect to the Sound Bar must support Advanced.
- Turn the bluetooth function on the device you wish to pair.
- Press the button on the
end of the Sound Bar until BT is shown on the Sound Bar display or press the BT button on the remote control. “NO BT” will be shown on the display if the Sound Bar is not paired with a devise. - Check the found list on your devise for ‘PLA21SB001A’ and connect to it.
- If the bluetooth connection is successful the Sound Bar will give you an audio prompt ‘Paired’ and the display on the Sound Bar will show “BT”.
- To disconnect the device, switch to another function on the Sound Bar or Press and hold the ulI or BT button on the remote control. The Bluetooth disconnected will be disconnected when you hear a audible prompt.
- The device will also be disconnected if you move out of the range of the Sound Bar.
- If you want to reconnect, move closer to the Sound Bar. Note: Check the bluetooth list on the device to ensure the Sound Bar is still connected.
- If the connection is lost, reconnect following the instructions for pairing the Sound Bar.
Listening to music
If the connected Bluetooth device supports Advanced Audio Distribution Profile (A2DP), you can listen to the music stored on the device through the player.
If the device also supports Audio Video Remote Control Profile (AVRCP), you can use the players remote control to play music stored on the device. - Pair the device with the Sound Bar.
- Play music via your device (if it supports A2DP).
- Use the supplied remote control to control playback from the device (if it supports A2DP).
To pause / resume play, press the ull button on the remote control. To skip to a track, press the ltt / uuI buttons on the remote control.
Troubleshooting
| Problems | What to do |
| No power | • Ensure that the power cable of the apparatus is properly connected.
• Ensure that there is power at the power outlet. • Press button on the remote control or Sound Bar to turn the unit on. |
| Remote control does not work | • Before you press any playback control button, first select the correct source.
• Reduce the distance between the remote control and the unit. • Insert the battery with its polarities (+/-) aligned as indicated. • Replace the batteries. • Aim the remote control directly at the sensor on the front of the Sound Bar. |
| No sound | • Press or the + / – volume buttons on the remote control to ensure the Sound Bar is not muted.
• Increase the volume. Press Volume + button on the remote control or on the Sound Bar. • Press the button on the Sound Bar or one of the source buttons on the remote control to select a different input source. When using either of the Digital input, if there is no audio: • Try setting the TV output to PCM or • Connect directly to your Blu-ray/other source, some TVs do not pass through digital audio. • Your TV may be set to variable audio output. Confirm that the audio output setting is set to FIXED or STANDARD, not VARIABLE. Consult your TV’s user manual for more detailed information. • If using Bluetooth, ensure that the volume on your source device is turned up and that the device is not muted. |
| I can’t find the Bluetooth name of this unit on my Bluetooth device | • Ensure the Bluetooth function is activated on your Bluetooth device.
• Re-pair the unit with your Bluetooth device. |
| The Sound Bar turns off | • When the unit’s external input signal level is too low, the unit will be automatically turn off after 15 minutes. Please increase the volume level of your external device. |
Warnings
This product was designed and manufactured to meet strict quality and safety standards. There are, however, some operation precautions that you should be aware of:
- Read these instructions – All the safety and operating instructions should be read before this product is operated.
- Keep these instructions – The safety and operating instructions should be retained for future reference.
- Heed all warning – All warnings on the appliance and in the operating instructions should be adhered to.
- Follow all instructions – All operating and use instructions should be followed.
- Do not use this appliance near water – The appliance should not be used near water or moisture
- for example, in wet basements or near a swimming pool or similar environments.
- Clean only with a dry cloth.
- Do not block any ventilation
- Do not install near any heat source such as radiators, heaters, stoves or other apparatus (including amplifiers) that produce heat.
- Protect the power cord from being walked on or pinched, particularly at plugs, power boards and at the where it exits from the Sound Bar.
- Only use attachments/accessories specified by the manufacturer.
- Unplug the appliance during thunderstorms or when unused for long periods of time.
- Refer all servicing to qualified personnel. Servicing is required when the appliance has been damaged in any way, such as a damaged power cord or plug, liquid has been spilled or objects have fallen into the unit, the unit has been exposed to rain or moisture, does not operate normally, or has been dropped.
- To reduce the risk of fire or electric shock, do not expose this appliance to rain or moisture. The apparatus must not be exposed to dripping or splashing. Objects filled with liquids, such as vases, must not be placed on the apparatus.
- The mains plug/appliance coupler is used as the disconnect device, the disconnect device must remain readily operable.
- Danger of explosion if battery is incorrectly replaced. Replace only with the same or equivalent type.
- The ventilation should not be impeded by covering the ventilation openings with items such as newspapers, table-cloths, curtains, etc.
- Do not place this unit close to strong magnetic fields.
- Should any solid object or liquid fall into the system, unplug the system and have it checked by qualified personnel before operating it any further.
- Do not attempt to clean the unit with chemical solvents as this might damage the finish. Use a clean, dry or slightly damp cloth.
- When removing the power plug from the wall outlet, always pull directly on the plug, never yank on the cord.
- No naked flame sources, such as lighted candles, should be placed on the apparatus.
- Changes or modifications to this unit not expressly approved by the party responsible for compliance will void the user’s authority to operate the equipment.
- The marking label is pasted on the bottom or back of the equipment.
DO NOT INGEST BATTERY, CHEMICAL BURN HAZARD.
The remote control supplied with this product contains a coin/button battery. If the coin/button cell battery is swallowed, it can cause sever internal burns in just 2 hours and lead to death. Keep new and used batteries away from children. If the battery compartment does not close securely, stop using the product and keep it away from children. If you think batteries might have been swallowed or placed inside any part of the body, seek medical attention.
This appliance is not intended for use by young children
or infirm persons without supervision.
IMPORTANT INFORMATION
- Not placing the TV on tall furniture (for example, cupboards or bookcases) without anchoring both the furniture and TV to a suitable support.
- Not standing the TV on cloth or other materials placed between the TV and the supporting furniture.
- Educating children about the danger of climbing on furniture to reach the TV or its controls
- We hereby declares that this product is in compliance with the essential requirements and other relevant provisions of Directive 2014/53/EU.
Battery disposal information
The batteries used with this product contain chemicals that are harmful to the environment. To preserve our environment, dispose of used batteries according to your local laws and regulations. Do not dispose of batteries with normal household waste. For more information, please contact the local authority or the retailer where you purchased the product.
Technical specification
| Sound Bar | |||
| Bar power supply | AC | 100-240V ~ 50/60Hz | |
| Power consumption | 30 | W | / < 0.5 W (Standby) |
| Speaker impedance | 4Ω | x | 2 |
| USB | 5V | 500mA | |
| Hi-Speed USB (2.0) | |||
| 32GB (max), MP3 | |||
| Audio input sensitivity | 500mV | ||
| Dimensions (W x H x D) | 865 x 71 x 93 mm | ||
| Net weight | 2.5 kg | ||
| Bluetooth | |||
| Bluetooth version (Profiles) | V 4.2 (A2DP, AVRCP) | ||
| Bluetooth maximum power transmitted | 5 dBm | ||
| Bluetooth frequency bands | 2400 MHz~2483.5 MHz | ||
| Amplifier | |||
| Total | 100 W | ||
| Main Unit | 50W x 2 | ||
| Remote control | |||
| Distance/Angle | 6m / 30º | ||
| Battery type | AAA (1.5V x 2) | ||