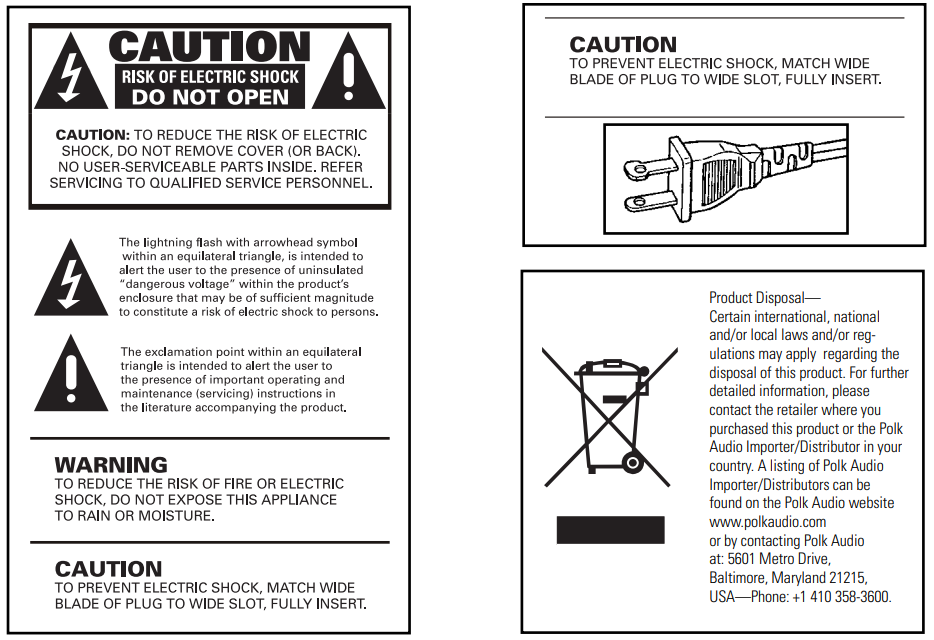
IMPORTANT SAFETY INSTRUCTIONS
READ BEFORE OPERATING EQUIPMENT
- Read these instructions.
- Keep these instructions.
- Heed all warnings.
- Follow all instructions.
- Do not use this apparatus near water.
- Clean only with dry cloth.
- Do not block any ventilation openings. Install in accordance with the manufacturer’s instructions.
- Do not install near any heat sources such as radiators, heat registers, stoves, or other apparatus (including amplifiers) that produce heat.
- Do not defeat the safety purpose of the polarized or grounding-type plug. A polarized plug has two blades with one wider than the other. A grounding type plug has two blades and a third grounding prong. The wide blade or the third prong are provided for your safety. If the provided plug does not fit into your outlet, consult an electrician for replacement of the obsolete outlet.
- Protect the power cord from being walked on or pinched particularly at plugs, convenience receptacles, and the point where they exit from the apparatus.
- Only use attachments/accessories specified by the manufacturer.
 Use only with the cart, stand, tripod, bracket, or table specified by the manufacturer, or sold with the apparatus. When a cart is used, use caution when moving the cart/apparatus combination to avoid injury from tip-over.
- Unplug this apparatus during lightning storms or when unused for long periods of time.
- Refer all servicing to qualified service personnel. Servicing is required when the apparatus has been damaged in any way, such as power-supply cord or plug is damaged, liquid has been spilled or objects have fallen into the apparatus, the apparatus has been exposed to rain or moisture, does not operate normally, or has been dropped.
- WARNING: To reduce the risk of fire or electric shock, this apparatus should not be exposed to rain or moisture and objects filled with liquids, such as vases, should not be placed on this apparatus.
- To completely disconnect this equipment from the mains, disconnect the power supply cord plug from the receptacle.
- The main plug of the power supply cord shall remain readily operable.
WARNING: Listen Carefully
Polk Audio loudspeakers and subwoofers are capable of playing at extremely high volume levels, which could cause serious or permanent hearing damage. Polk Audio, Inc. accepts no liability for hearing loss, bodily injury or property damage resulting from the misuse of its products.
Keep these guidelines in mind and always use your own good judgment when controlling volume: You should limit prolonged exposure to volumes that exceed 85 decibels(dB).
For more about safe volume levels, go to https://www.health.harvard.edu/blog/healthy-headphone-use-how-loud-and-how-long-2020072220565, refer to the Occupational Health and Safety Administration (OSHA) guidelines at www.osha.gov/dts/osta/otm/noise/standards_more.html, or review the WHO “Make Listening Safe” brochure.
FIRST THINGS FIRST
Caution: Subwoofers are heavy. Exercise caution when unpacking your subwoofer.
Please inspect your loudspeaker carefully. Notify your Polk dealer if you notice any damage or missing items. Keep the carton and packing material. It will do the best job of protecting your speaker if it needs to be transported.
Your system includes a detachable power cord that’s packaged separately from the cabinet. Insert female end into the receptacle on the amplifier plate and insert the polarized AC plug into a wall outlet (or power strip) as per the safety instructions found on the inside cover of this manual. We Do Not Recommend connecting the subwoofer’s AC power cord to your receiver’s switched outlet.
PLACING YOUR SUBWOOFER IN A ROOM
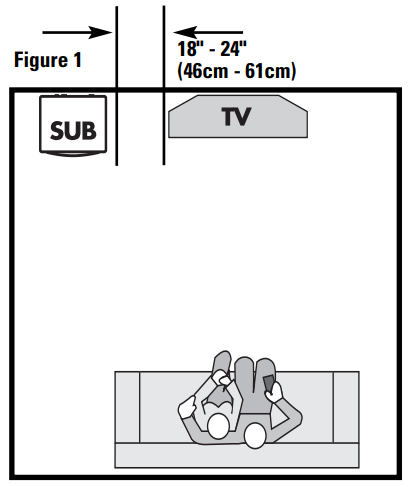
Your PSW Series subwoofer is not magnetically shielded. Do not place near video monitors. (LCD, DLP and Plasma televisions are not affected by magnetism.) Allow at least 18″ (45cm) of space between your subwoofer and any television, but if you do notice video distortion or discoloration, immediately move the subwoofer away from the TV.
Your PSW Series subwoofer offers many placement options: in an entertainment center , behind furniture, or next to a sofa or chair. You may place your subwoofer anywhere in the room, but you’ll enjoy the best performance when it’s on the same side of the room as your system’s front speakers (Figure 1). Placing your subwoofer near a wall or in a corner will increase its loudness. When placing your subwoofer in the room, always place your subwoofer on its base feet side down (Figure 2). If you can at all avoid it, do not place your subwoofer next to an open door.
We do recommend placing your subwoofer in different locations within your room to learn what produces the best sound quality for your listening environment.
For more information on subwoofer placement, go to www.polkaudio.com/education/article.php?id=20.
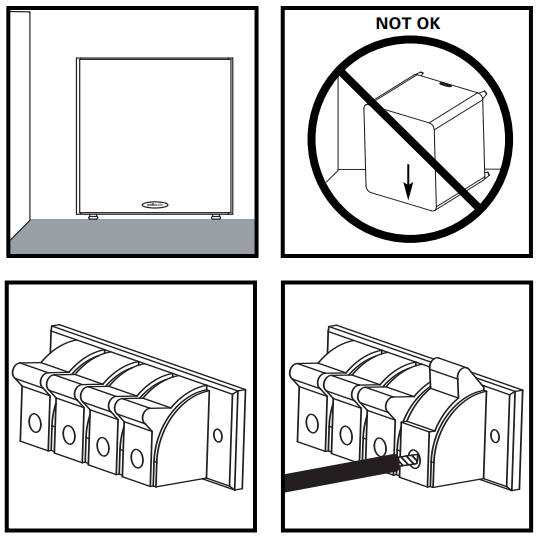
CONNECTING THE SUBWOOFER TO THE SYSTEM— HOOKUP OPTIONS
Important Note: Use only one of these options.
Never combine hookup options.
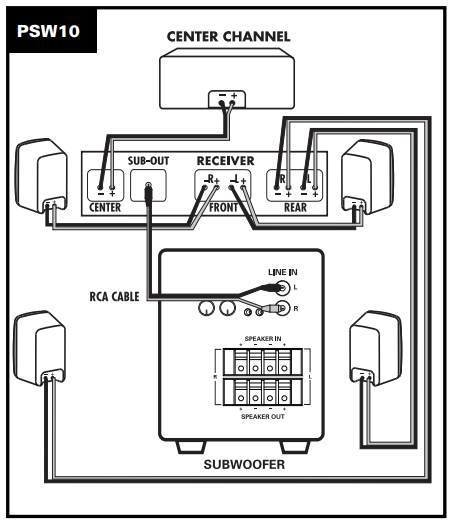
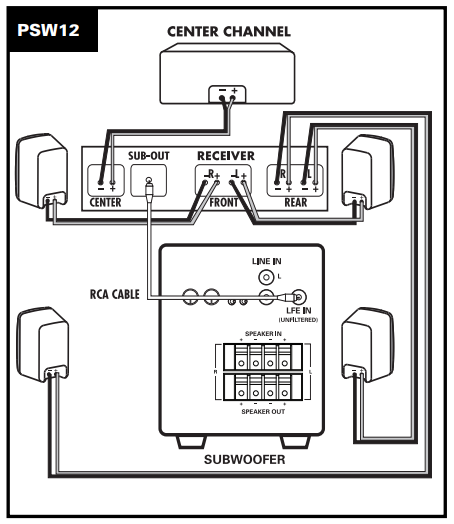
Hookup Option 1
Dolby® Digital Speaker Set Up Settings
Subwoofer = Yes
OPTION #1—
Receivers that include a “Sub Out” feature—the most common hookup method with Dolby® Digital receivers.
PSW10—
NOTE: The PSW10 subwoofer does not have an LFE input. Instead, use either the L or R Line input (another hookup option is to use a Y -split cable and connect both L and R Line inputs). After you make this Sub Out connection, turn the “Low Pass” filter fully clockwise. This will in effect create an LFE input.
PSW12—
NOTE: Connect a single RCA cable from the “SUB OUT” of your receiver to the LFE input of the subwoofer. This connecting method bypasses the subwoofer’s internal filter and relies on the filter built into your receiver. Make no other signal connections. Do not use speaker wire to make the connection to the subwoofer.
- Connect all speakers directly to the receiver. When using method #1, adjust your receiver’s speaker configurations as follows: Set Front, Center and Surround speakers to “small.”
- Depending on your speakers’ bass output capabilities, set the crossover frequency on the receiver to 80Hz for tower and bookshelf speakers (speakers with a woofer 5 1/4″ in diameter or larger) and 100-120Hz for satellite speakers.
- Receiver Settings:
- Front, Center, and Surrounds = “SMALL”
- Subwoofer = “ON,” or “YES,” or “PRESENT”
Consult your receiver’s owner’s manual for speaker configuration.
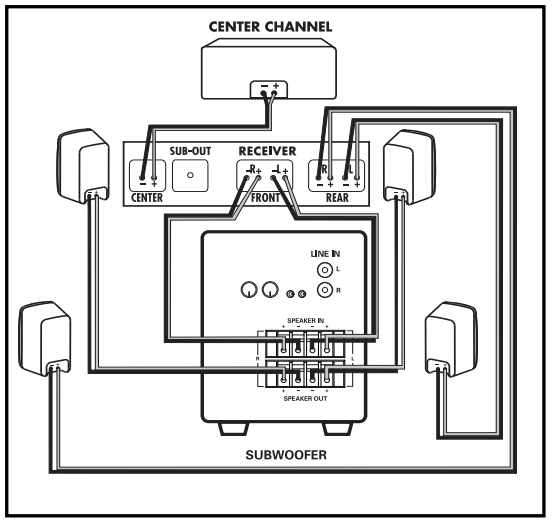
Hookup Option 2
Dolby Digital Speaker Set Up Settings
Front Speakers = Large
Center Speaker = Small
Rear Surround Speakers = Small
Subwoofer = No
OPTION #2—
Two channel or Dolby® Pro Logic receiver with no “Sub Out.”
If you elect to use the speaker level inputs, use two-conductor 16 gauge or thicker speaker wires. See your Polk dealer for wire recommendations.
Note that one of the speaker input terminals on the rear of the speaker is marked red (+) and the other black (-). Make certain that you connect the wire from the red (+) terminal of your receiver to the red (+) terminal on your speaker , and the wire from the black (-) terminal of the receiver to the black (-) terminal on your speaker. Speaker wire has some indication (such as color coding, ribbing, or writing) on one of the two conductors to help maintain consistency. If your subwoofer doesn’t seem to produce much bass, it is most likely that one of the speaker wires is connected backwards. Double check all connections for correct polarity.
Strip 1/2″ (12mm) of insulation from each of the two conductors on both ends to expose the bare wire. Twist the exposed wire of each conductor to form two un-frayed strands.
Note: Do not use the line or LFE input in this configuration.
- Connect the left and right front speaker outputs of your receiver to the speaker level inputs of the powered subwoofer using speaker wire.
- Then, connect the left and right front speakers using speaker wire from the speaker level outputs from the powered subwoofer.
- Connect the Center Channel Speaker directly to the center channel output from your receiver.
- Connect the Rear Surround Satellites directly to the rear or surround channel outputs from your receiver.
- Receiver Settings:
- Front speakers = LARGE
- Subwoofer = “OFF” or “NO”
- Center and Surrounds= SMALL
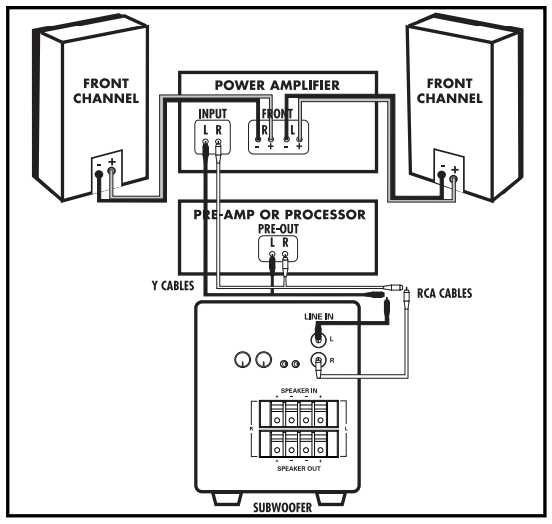
Hookup Option 3
OPTION #3—
Receivers with full-range (unfiltered) Left and Right “Pre Out” jacks (this is the least commonly used hookup).
- Connect the left and right preamp output from your receiver to the left and right LINE LEVEL input of the subwoofer. Do not use speaker wires.
- When using method #3, it is necessary to adjust the settings on your receiver as follows:
- Receiver Settings:
- Front speakers = LARGE
- Subwoofer = “OFF” or “NO”
ADJUSTING YOUR SYSTEM
SUBWOOFER ADJUSTMENTS
Your Powered Subwoofer offers a range of setting options. W e recommend the following settings as starting points, but the settings that are best for you depend upon your speaker placement, electronics and personal taste. After you’ve become familiar with what the settings do, experiment with alternate options to find the method that works best for your system setup. You’ll find an informative article on “Subwoofer Positioning and Adjustment” in the set up section at: www.polkaudio.com/education/article.php?id=19.
Note: When you set up your subwoofer for the first time, you will probably have to make adjustments several times before you hear what you personally like. Start with the volume at 50%.
AC POWER CONNECTION AND AUTO ON/OFF
Your PSW Series subwoofer features auto on/off circuitry, marked “auto” on the power switch, which automatically turns your subwoofer on when it senses a program signal. We recommend the “auto” setting if your subwoofer is always receiving power (ie, if it’s plugged into a wall outlet).
When no signal is present, the circuit turns the subwoofer of f after 15 minutes. If you are concerned about the brief delay between when the music starts and when the subwoofer turns on, simply leave your subwoofer in the “On” position. You may want to leave your PSW system unplugged during extended periods of non use, such as during a vacation.
FINE TUNING YOUR SUBWOOFER
- Volume—Adjust by ear using a wide variety of CDs and video sources. Adjust for deep, powerful bass without “boominess.”
- Low Pass—NOTE: (PSW12) This control does not operate when the subwoofer is connected with Method #1 (LFE Input). This control adjusts the frequency range over which the subwoofer operates. When using smaller main speakers, the upper range of the control will probably yield the best results. With larger speakers, the lower end of the control range will probably sound best, but always let your ear be the final judge. If male vocals sound “thin,” turn this control up until the voice sounds rich but not “boomy.” If male vocals sound too “thick” or “chesty,” turn this control down until the voice sounds natural.
- Phase Switch—Sit in your favorite listening position. Play music (not a movie) with a walking bass line. We recommend playing jazz or country music. Now listen carefully for the point at which the subwoofer transitions to your main speakers. This is the crossover point, and this point should be below the frequency of a male human voice. Whichever phase setting sounds louder or fuller at the subwoofer’s crossover (transition) point is the optimum setting. Sometimes no difference will be heard.
TROUBLESHOOTING
No sound coming from subwoofer
If hookup is “Sub Out” to LFE, is your receiver set to “Subwoofer—yes” If hookup is via speaker wire, check that the polarity of the wires is correct.
Subwoofer doesn’t sound right
If hookup is “Sub Out” to LFE, is your receiver set to “Subwoofer—yes” If hookup is via speaker wire, check that the polarity of the wires is correct.
Subwoofer has no power
Check outlet; check fuse after unplugging the subwoofer.
TECHNICAL ASSISTANCE AND SERVICE
If, after following these hook up directions, you experience difficulty , please double-check all wire connections. Should you isolate the problem to the speaker, contact the authorized Polk Audio dealer where you made your purchase, or call Polk Audio’ s friendly Customer Service Department at 1-800-377-7655 (calls from US or CAN only), (Outside the US or CAN, 410-358-3600), 9am to 6pm EST, Monday through Friday.
You may also contact us via email: . For more detailed hook up information and manual updates, visit: www.polkaudio.com.
For recommended accessories (including speaker stands, brackets, accessories and exclusive Polk Audio logowear), visit our Webstore: http://shop.polkaudio.com.
SPECIFICATIONS
| Model | PSW10 | PSW12 |
| Subwoofer Complement | (1) 10″ (25.4cm) | (1) 12″ (30.5mm) |
| Overall Freq. Response | 35Hz – 200Hz | 26Hz – 200Hz |
| Power Output Dynamic | 100 Watts | 260 Watts |
| Power Output RMS | 50 Watts | 100 Watts |
| Crossover Frequency | 80Hz – 160Hz | 60Hz – 160Hz |
| Magnetic Shielding | No | Yes |
| Available Finish | Black Oak & Cherry woodgrain |
Black Oak & Cherry woodgrain |
| Dimensions (H”xW”xD”) (Hcm x Wcm x Dcm) |
14-3/8 x 14 x 16-1/8 36.5 x 35.6 x 41 |
16-3/8 x 16 x 17-5/8 41.6 x 40.6 x 44.8 |
| Product Weight- Pounds each |
26 | 34 |
| Product Weight- Kilograms |
11.7 | 15.3 |
For more complete specifications visit www.polkaudio.com/home
Polk Audio has been crafting affordable high performance loudspeakers since 1972. They are one of the world’ s foremost manufacturers of quality home & car. Polk Audio’s dedication to research & development has resulted in over 55 worldwide patents for innovative loudspeaker technology, and Polk speakers consistently thrill our growing family of satisfied listeners, as well as the worldwide audio press.
Get free information about building the audio system of your dreams, or free information on tweaking your current system for higher performance, at www.polkaudio.com. Or, call our friendly customer service department toll free 1-800-377-7655 (in the US & Can only, outside the US call 410-358-3600), 9am-6pm EST. Ask for our Home Theater Handbook, or a copy of our annual newspaper , “The Speaker Specialist.” They’re both free, and chock full of audio information.
]]>
Polk Audio Signa S2 Ultra-Slim TV Sound Bar
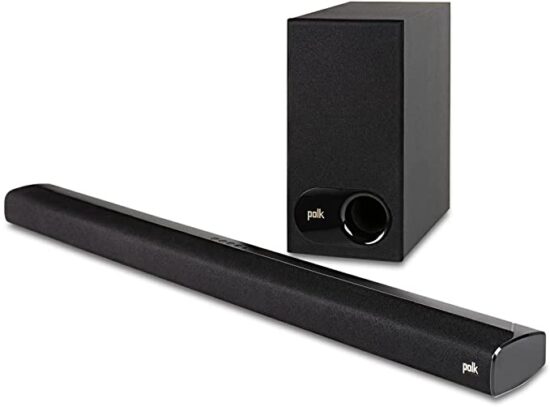
Polk Audio Signa S2 Ultra-Slim TV Sound Bar
Specifications
- SPECIAL FEATURE: Voice Adjust, Built-in music streaming
- SPEAKER TYPE: Soundbar
- MOUNTING TYPE: Tv, Sound Bar, Bar Mount
- BRAND: Polk Audio
- MODEL NAME: SIGNA S2
- SOUND BAR
POWER SUPPLY: AC 100- 230 V, 50/60Hz
OPERATING TEMPERATURE: 5°C – 35°C
POWER CONSUMPTION: 40 W
POWER CONSUMPTION IN STANDBY MODE: 0.3 W
POWER CONSUMPTION IN BLUETOOTH STANDBY: 1.6 W - SUBWOOFER
POWER SUPPLY: AC 100 – 230 V, 50/60Hz
OPERATING TEMPERATURE: 5°C – 35°C
POWER CONSUMPTION: 40 W
POWER CONSUMPTION IN STANDBY MODE: 0.26 W
POWER CONSUMPTION IN BLUETOOTH STANDBY: 1.1 W
Introduction
Beautiful rich sound with deep bass is delivered by 5 strong full-range speakers. POLK’S exclusive voice adjust technology, in combination with Dolby Digital Decoding, improves sound quality and cuts down on voice delays. It has excellent sound and value, comparable to any mid- to a high-end soundbar on the market. It fits most places at just over 2″ tall and can easily be wall-mounted or placed in front of your TV. It won’t interfere with the bottom edge of your TV or the IR remote sensor. On your 4K HD Smart TV, enjoy excellent picture quality and crystal-clear sound while watching your favorite shows. Connect any audio source by HDMI ARC, optical input, or AUX with a variety of connectivity options.
You can wirelessly stream music from your favorite streaming apps like Pandora, Spotify, TuneIn, and others using the built-in Bluetooth technology on your smartphone, iPad, or other compatible device. You can set up your sound bar in minutes. Use the provided subwoofer to link your TV to the sound bar, and HDMI and optical connections to connect your TV to the sound bar. In just a few minutes, you’ll be listening to music.
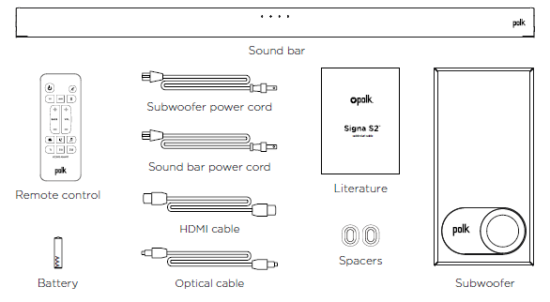
WHAT’S IN THE BOX
CONNECTING YOUR SIGNA S2 TO YOUR TV
IS AN HDMI PORT ON YOUR TV LABELED “ARC”?
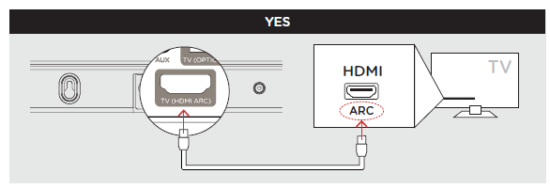
Connect the included HDMI cable to the HDMI ports labeled with “ARC” on both the TV and the sound bar.
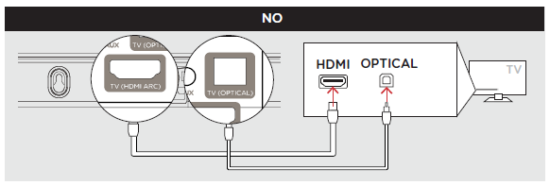
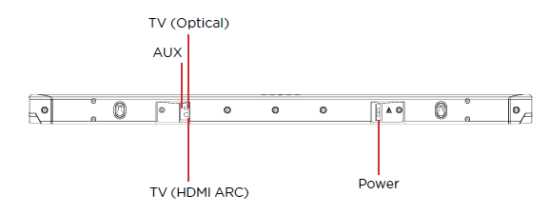
Connect an Optical cable between the TV and sound bar. Connect the included HDMI cable to any available HDMI port on the TV and to the “TV ARC” port on the sound bar.
NOTE: HDMI (ARC) and optical supports Dolby 5.1 decoding.
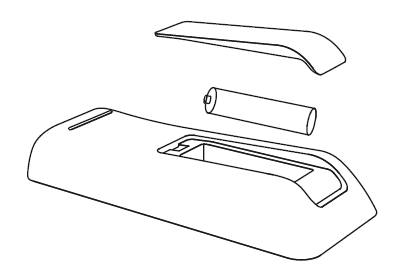
REMOTE BATTERY INSTALLATION
Insert the provided AAA battery.
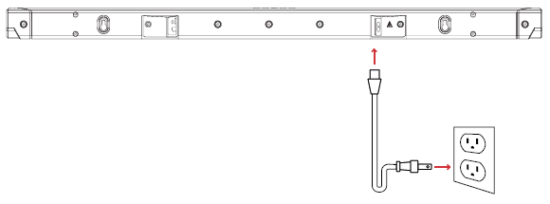
CONNECT THE SOUND BAR POWER CORD TO AN AC OUTLET
POSITION SUBWOOFER AND CONNECT TO AN AC OUTLET
(For best performance place on the same wall as the TV)
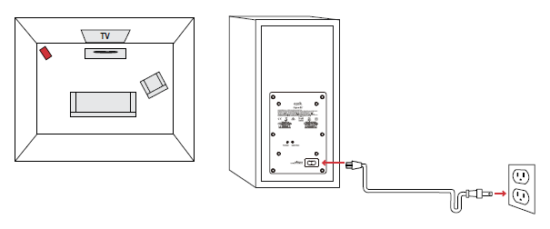
NOTE: The Signa S2 sound bar and wireless subwoofer are preset at the factory to work together. Should your wireless subwoofer stop receiving an audio signal, follow these instructions to re-establish the connection:
- Turn on your sound bar.
- Press and hold the BAR SYNC button on the back of the subwoofer for 3 seconds.
- Simultaneously press and hold Bluetooth and VOL+ buttons on the sound bar for 5 seconds.
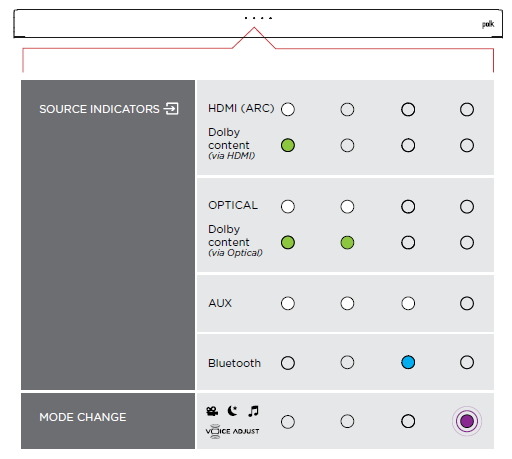
The sound bar will search for a connection while the first and second LEDs on the sound bar will flash intermittently. The lights will stop flashing when the sound bar and subwoofer connect. If the sound bar and subwoofer fail to connect, the first and second LEDs will flash together 5 times. Repeat steps above to establish a connection.
TURN ON YOUR SOUND BAR
Press the Power button on the sound bar or remote.
NOTE: Make sure TV internal speakers are off
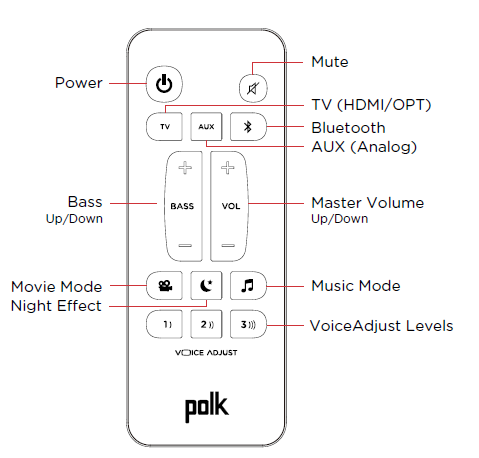
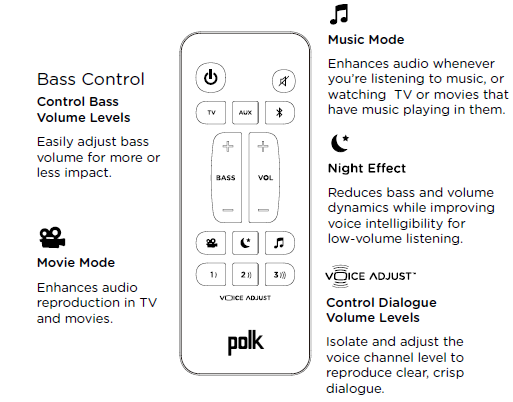
REMOTE CONTROL
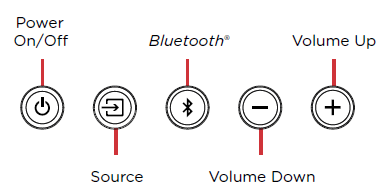
SOUNDBAR TOP PANEL
SOUNDBAR BACK PANEL
SOUNDBAR LEDS
The Signa S2 has a horizontal row of LED lights that provide status indications, like source, volume and listening modes.
OPTIMIZING YOUR LISTENING EXPERIENCE
MUSIC LISTENING
- To enable Bluetooth, press the Bluetooth button on the sound bar or remote control. A blue LED will pulse on the sound bar.

- Go to the Bluetooth devices section on your phone, tablet or computer and select Polk Signa S2. The LED is solid blue when Bluetooth is connected.
NOTE: To take control when another device is connected, press Bluetooth button.
HOW TO HEAR YOUR TV AGAIN: When you are finished using Bluetooth, press the source button on the sound bar or remote (TV, AUX).
AUTO STANDBY
When there is no input signal and operation for 15 minutes, this unit automatically enters the standby mode.
BLUETOOTH STANDBY
When Bluetooth connection is made from a registered Bluetooth device, this unit turns on automatically.
Press and hold the [TV] button for approximately 5 seconds. (The default setting is “Of”).
FAQs
What is the best way to connect my Polk Signa S2 soundbar to my television?
Activate your sound bar. For 3 seconds, press and hold the BAR SYNC button on the rear of the subwoofer. Press and hold the Bluetooth and VOL + buttons on the sound bar for 5 seconds at the same time.
Is there a Polk Signa S2 app?
You may stream your favorite tunes through Wi-Fi to the Polk Omni S2 speakers, Omni SB1 soundbar system, Omni P1 adaptor, and/or the Omni A1 amplifier using DTS’s groundbreaking Play-Fi(TM) technology.
Why isn’t my Polk soundbar working with my TV?
All you have to do now is make sure the subwoofer’s power cord is plugged in and the power is switched on. If you’re experiencing problems pairing your soundbar and subwoofer, turn off the subwoofer and press and hold the “Sync” button on the rear of the soundbar until the LED light [1] on the soundbar begins to blink.
Polk soundbars are they any good?
The Polk Signa S3 is a good soundbar for the money. It has a better music performance, a more powerful sub, and a slew of additional features like HDMI ARC and Wi-Fi streaming.
What is the best way to program my Polk soundbar?
The Amazon Alexa feature is not incorporated into the Signa S2, however it is available on the Polk Audio Command Bar.
What is the purpose of the Polk Connect app?
Polk Connect is the Polk Command Bar’s companion app. It will assist you with connecting your Polk Command Bar to your Wi-Fi network as well as linking your Amazon account to enable Alexa Voice Services.
How do you hook up a soundbar to a TV that doesn’t have HDMI?
Connect with a coaxial cable by plugging it into the output of the VCR or DVD player and the input of the TV. The audio output (typically RCA connectors) should then be connected to the soundbar. Coaxial and RCA inputs are likely on the VCR or DVD player.
What is the procedure for resetting my Polk Signa s2 soundbar?
For at least 10 seconds, press and hold the “POWER,” “SOURCE,” and “VOL+” buttons on the product’s top. – All of the Bar’s settings are then erased.
What’s wrong with my Polk soundbar?
Check the HDMI connection if your Polk Soundbar isn’t working. Ensure that the HDMI cable is plugged into the correct port. Use just the HDMI connection between the TV and the Polk Soundbar to prevent the soundbar from connecting to other sources.
How do I reset my Polk Signa s2 soundbar?
press and hold the button “POWER”, “SOURCE” and “VOL+” on the top of the product for at least 10 seconds. – After this, all settings of the Bar are erased.
Why is the blue light flashing on my Polk soundbar?
When a product has a flashing blue LED, this indicates that it is in Bluetooth Pairing mode. Go to your Bluetooth settings in your smartphone / tablet and select the model number from the list. Your device will now pair.
Can I control my Polk Soundbar with my phone?
Polk Audio makes great-sounding, whole-home wireless audio systems for smartphones and tablets, including the iPhone, iPad, and the iPod Touch.
]]>polkaudio Atrium 4/ 5/ 6/ 7/ 8SDI Outdor Speaker Installation Manual

IMPORTANT SAFETY INSTRUCTIONS
This product was designed and manufactured to meet strict quality and safety standards. There are, however, some installation and operation precautions which you should be particularly aware of.
- Read Instructions. All the safety and operating instructions should be read before the system is operated.
- Retain Instructions. The safety and operating instructions should be retained for future reference.
- Heed Warnings. All warnings on the appliances and in the operating instructions should be adhered to.
- Follow Instructions. All operating and use instructions should be followed.
- Attachments. Do not use attachments not recommended by the product manufacturer as they may cause hazards.
- Accessories. Do not place these appliances on an unstable cart, stand, tripod, bracket, or table. The audio/video products may fall, causing serious injury to a child or adult, and serious damage to the products. Use only with a cart, stand, tripod, bracket, or table recommended by the manufacturer, or sold with the appliances. Any mounting of the appliances should follow the manufacturer’s instructions, and should use mounting accessories recommended by the manufacturer.
- Object and Liquid Entry. Never push objects of any kind into this product through openings, as they may touch dangerous voltage points or short out parts that could result in a fire or electric shock. Never spill liquid of any kind on this audio/video product.
- Servicing. Do not attempt to service this product yourself, as opening or removing covers may expose you to dangerous voltage or other hazards. Refer all servicing to qualified service personnel.
- Damage Requiring Service. Unplug this product from wall outlets and refer servicing to qualified service personnel under the following conditions:
- If liquid has been spilled, or objects have fallen into the product.
- If the product does not operate normally by following the operating instructions. Adjust only those controls that are covered by the operating instructions, as an improper adjustment of other controls may result in damage and will often require extensive work by a qualified technician to restore the product to its normal operation.
- If the product has been dropped or the cabinet has been damaged.
- When the product exhibits a distinct change in performance—this indicates a need for service.
- Replacement Parts. When replacement parts are required, be sure the service technician has used replacement parts specified by the manufacturer or that the parts have the same characteristics as the original part. Unauthorized substitutions may result in fire, electric shock or other hazards.
- Safety Check. Upon completion of any service or repairs to this product, ask the service technician to perform safety checks to determine that the products are in proper operating condition.
SAFE LIMITS OF OPERATION
Polk Audio specifies the recommended amplification range for each of its passive (non-amplified) loudspeakers. Typically that specification will be expressed as a range of power such as 20-200 Watts (per channel). It is important to understand what those numbers mean when choosing a receiver or amplifier for your Polk Audio loudspeakers. The lower number indicates the lowest continuous rated power that will yield acceptable performance in a typical listening environment. The higher number indicates the highest per channel power that should be used with your Polk Audio speakers. That number should not be confused with a “Power Handling” specification and it does not imply that the speaker will safely handle that full amount of power on a long-term basis. We specify a wide range of power ratings because not all electronics manufacturers use the same method for rating power. In fact, high quality lower-rated amplifiers sound better and play louder than low quality units with higher power rating.
Automobile horsepower is a good analogy. Your car probably has far more horsepower than it needs for your daily commute and is likely capable of going well over 120mph (190km/hr). Having that extra power is good for on-ramp acceleration and danger avoidance (like getting away from brain-eating zombies) but that doesn’t mean that it is advisable to operate your car on North American highways at full power and maximum speed for an extended period of time. Just ask your local state trooper if you are in doubt. Similarly, we recommend using amplifiers and receivers with rated power above the power handling limits of our speakers because having extra power available for short term peaks is conducive to better sound quality, maximum dynamic range and effortless high volume output. But we strongly urge you not to use the full power of your amplifier or receiver for daily listening.
Loudspeakers can be damaged when an amplifier, regardless of its wattage, is made to play at higher listening levels than its power can clearly produce. Operation at this level can result in very high levels of audible distortion originating in the amplifier, which can add a harsh, gritty sound to your listening material. If you hear distortion—turn the volume down or risk damaging your speakers. You can damage just about any speaker, regardless of power rating, if you drive an amplifier to or beyond the point of distortion.
PRODUCT DISPOSAL
Certain international, national and/or local laws and/or regulations may apply regarding the disposal of this product. For further detailed information, please contact the retailer where you purchased this product or the Polk Audio Importer/ Distributor in your country. A listing of Polk Audio Importer/Distributors can be found on the Polk Audio website www.polkaudio.com or by contacting Polk Audio at: 5601 Metro Drive, Baltimore, Maryland 21215, USA Phone: +1 410 358-3600.
TECHNICAL ASSISTANCE OR SERVICE
If, after following the hookup directions, you experience difficulty, please double-check all wire connections. Should you isolate the problem to the speaker, contact the authorized Polk Audio dealer where you made your purchase, or contact Polk Audio Customer Service 800-377-7655 (M-F, 9am-6pm EST , US & Canada only) or via email [email protected]. Outside the US & Canada, call 410-358-3600. More detailed information including audio how-to articles, FAQs and online manuals are available on our award-winning website: www.polkaudio.com.
PLACEMENT OPTIONS
Atrium Series loudspeakers were created to live and play outdoors. Atriums have a wide dispersion pattern, and are also very efficient. This means your Atrium Series loudspeakers will deliver exceptional sound quality throughout a large listening area. However, if you want high sound levels in an outdoor setting with acoustic characteristics that differ from those of indoor conditions, we recommend multiple-pair setups.
In addition to the placement locations typically used for outdoor loudspeakers, all Atrium Series loudspeakers have built-in stability feet, which allows the loudspeakers to be placed securely on a shelf or other flat horizontal surface.
Please keep in mind that you’ll maximize the useful life of your Atrium loudspeakers by locating them where they’ll receive less exposure to the elements, under eaves for example. When locating your Atrium loud-speakers outdoors, take into account three factors: sound quality, convenience and exposure to the elements.
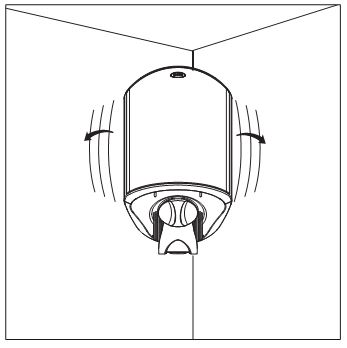
FIGURE 1: Place the speaker in a corner for more bass output. Bracket attached to side wall.
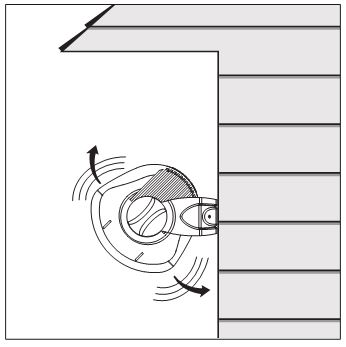
FIGURE 2: Place the speaker away from eaves and corners for less bass output.
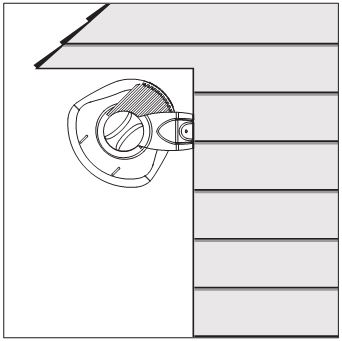
FIGURE 3: Place the speaker close under an eave for more bass output.
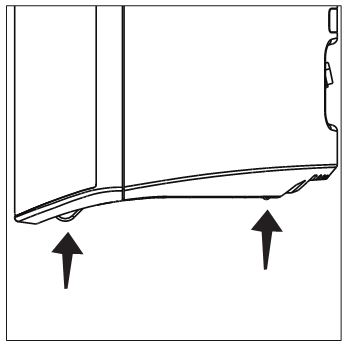
FIGURE 4: The Atrium’s built-in stability feet ensure safe, secure placement on a shelf of other flat surface.
PREPARING TO PAINT
Before you paint, you will need:
- A spray can of primer paint (Krylon Sandable Spray Primer #1318).
- A spray can of the paint of your choice. Choose exterior grade paint if you plan to use the speakers outdoors.
- A paperclip or corkscrew (for removing the paintable grille).
- Masking tape.
- Paint mask to cover unpaintable parts (not included). To make an easy paint mask, use the grille as a template and cut a mask from heavy, nonporous Kraft paper.
- Separate the parts of the speaker: Remove the brackets and bracket knobs. Remove the grille by carefully hooking it with a bent paper clip and pulling it gently away from the cabinet [figure 5].
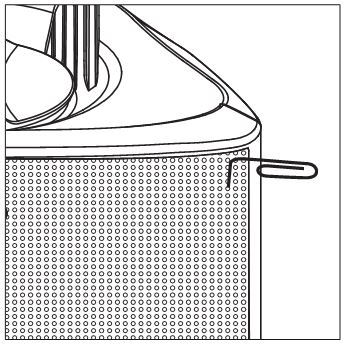
FIGURE 5: Remove the grille using a paper clip.
- Mask off the binding posts on the back of the speaker [figure 6], the end panels and bracket knobs, and carefully mask off the front of the speakers to protect the drivers and baffles while painting [figure 7]. The grille has a logo on it, which you may mask off should you choose not to paint over it.
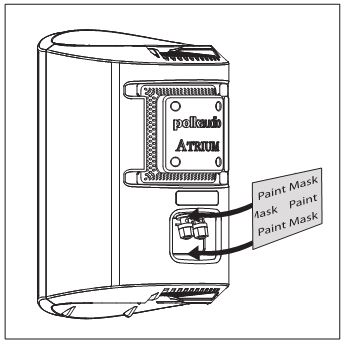
FIGURE 6: Mask the binding posts
on the rear of the speaker.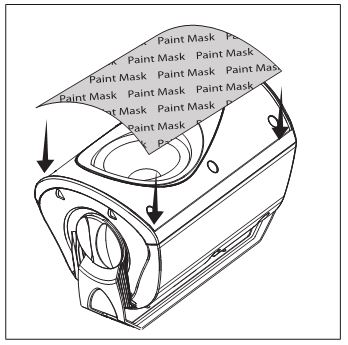
FIGURE 7: Mask the drivers and baffles.
- Separate the parts of the speaker: Remove the brackets and bracket knobs. Remove the grille by carefully hooking it with a bent paper clip and pulling it gently away from the cabinet [figure 5].
PAINTING THE CABINET, BRACKET KNOBS & BRACKET
- Apply two thin coats of primer to the cabinet and knobs. The bracket does not require a primer.
- Only after the primer is completely dry should you apply the finish color [figure 8].

FIGURE 8: After priming, apply thin coats
of finish color. - Do not remove the masking material (not included) until the paint is completely dry.
- Do not reattach the speaker to the bracket until the bracket is mounted. Try to handle any freshly painted parts as little as possible.
PAINTING THE GRILLE
- Atrium loudspeaker grilles have an even, protective powder coating. This powder coating is an ideal primer. The grille has a logo pod, which you may mask off or paint right over.
- Using spray paint, spray two thin coats of finish color [figure 9]. If you’re using a compressor and spray gun, use the finest, most diffuse setting. Be careful not to fill the holes in the grille with paint.
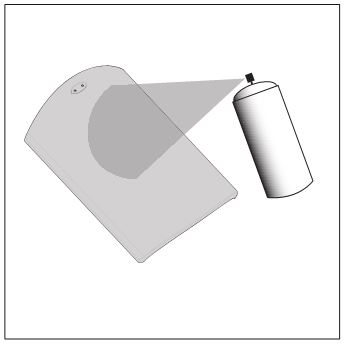
FIGURE 9: Paint the grille. Use thin coats of
spray paint. Do not block grille holes with paint. - When the paint is completely dry, carefully fit the grille into its recess so that it just rests on the cabinet. Starting with one corner, work around the speaker and push the grille into the grille notch a little at a time.
Be gentle; the grille may be easily bent by rough handling.
MOUNTING OPTIONS (SAFETY FIRST)
When installing Atrium loudspeakers note the weight of your particular model and the weight bearing tolerance of the material to which you’re mounting the speaker. If you’re not sure of a safe way of mounting your speakers, please consult a professional installer, your authorized Polk Audio dealer or a building contractor.
You’ll maximize the useful life of your Atrium loudspeakers by placing them where they’ll receive less exposure to the elements. If extreme weather conditions are expected, we recommend storing your speakers indoors. Look for the best overall compromise between sound quality, convenience and exposure. Never compromise safety.
The Atrium’s Speed-Lock ™ mounting bracket enables you to mount the speaker either horizontally or vertically. The Speed-Lock bracket holds the speaker in place so you can easily aim the speaker to deliver the best possible sound in a variety of situations. Follow the steps below to safely secure the brackets and speakers.
Installing Atrium Series loudspeakers requires basic skills in using tools such as a drill and screwdriver. If you are in doubt that you possess the necessary skills or tools, consult your Polk Audio dealer, or a professional installer.
Horizontal & Vertical Mounting
- Verify the material on which you plan to mount the speakers (plaster, drywall, paneling, stone, etc.) can support the weight of the speakers:
Speaker Weights
Atrium4 ——————— 3.6lbs / 1.63kg each
Atrium5 ——————— 4.6lbs / 2.09kg each
Atrium6 ——————— 5.4lbs / 2.45kg each
Atrium7 ——————— 8lbs / 3.63kg each
Atrium8 ——————— SDI 9.7lbs / 4.4kg each - Ensure the locations you select do not conceal electrical wiring or plumbing.
- Before you install the speaker, hold it in the chosen location to make sure it safely clears obstacles such as ceiling, adjacent walls, corners, beams, lighting fixtures and door/window frames.
- Using the keyhole slots in the bracket as a template, mark the installation location of the two keyhole slots with a pencil. You can do this by removing the bracket knobs on the top and bottom of the speaker and removing the bracket [figure 10].
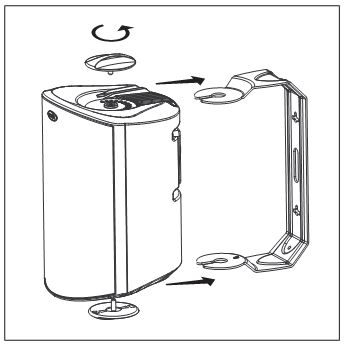
FIGURE 10: Turn the bracket knobs to remove
the bracket assembly. - Position the bracket so that the small ends of the keyhole slots are facing “up” according to the direction of installation.
- If you are certain there is a stud behind the wall surface, drive #10 screws (not included) through the wall and into the stud [figure 11a].
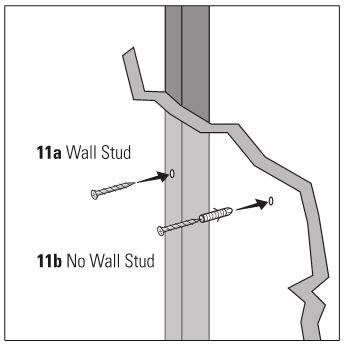
FIGURE 11a & 11b: Use #10 screw for wall stud, use #10 wall anchors and screw for no wall stud.
- If there is no stud behind the wall at the chosen location, install #10 wall anchors (not supplied) into the wall by following the wall-anchor-manufacturer’s instructions. Always use two wall anchors and two screws per speaker [figure 11b].
- Drive the screws into the stud or wall anchors, leaving screw heads protruding 1/8″~1/4″ (3mm~6mm).
- If you’re feeding speaker wire through a hole in the wall behind the bracket, pull this speaker wire through the hole in the bracket before mounting the bracket [figure 12].
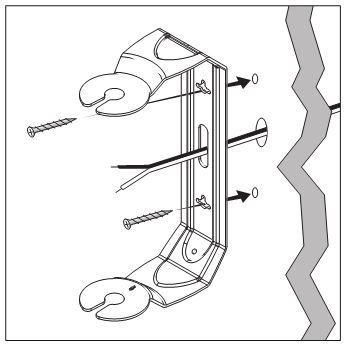
FIGURE 12: Feed speaker wire from wall
through bracket wire hole for easy mounting.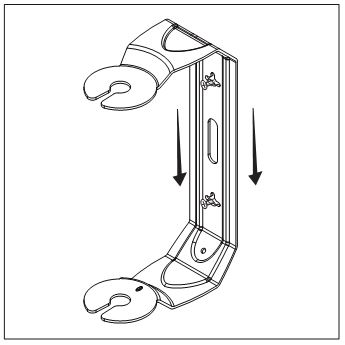
FIGURE 13: Slide the bracket down on
the screw heads to catch the keyhole slots. - Screw the bracket directly into a weight-bearing stud on the mounting surface. Place the screws securely in the smaller end of the keyhole slot. Do not leave screw heads protruding.
Note: All Atrium loudspeaker cabinets have molded ramps, which guide the speaker bracket onto threaded protrusions to which the bracket knobs attach. - Screw the bracket knobs into the protrusions but do not tighten them securely.
- Secure the speaker to the bracket by sliding the speaker between the bracket arms. The built-in ramps will spread the bracket slightly and guide the ends of the bracket onto the threaded protrusions. A ratcheting system holds the speaker in place and helps you fine tune how you want to aim it. [figure 14].
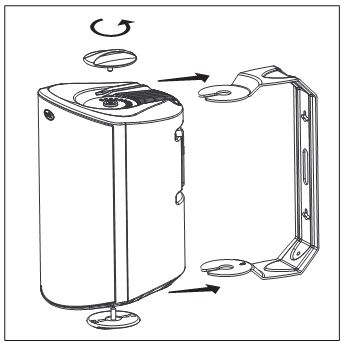
FIGURE 14: Turn the bracket knobs
to remove the bracket assembly. - Secure the loudspeaker to the bracket by tightening the adjusting bracket knobs.
- Tug gently on the speaker to make certain that the screws and bracket are properly aligned and that the wall anchors are secure.
- If the bracket is not held snug against the wall by the screw heads, remove the speaker from the wall, drive the screws in a little further and then remount the speaker.
- Once the speaker is mounted, the bracket knobs can be loosened to “aim” the speaker, and then hand tightened to keep the speaker angled correctly.
VERTICAL MOUNT AIMED 45° DOWN
The Atrium Series mounting bracket is designed so the speakers may be mounted in a vertical 45° downward firing position [Figure 15].
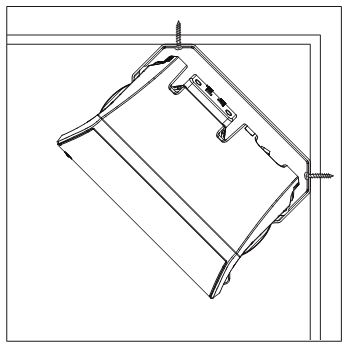
Use an anchoring device that can support the weight of your Atrium model and be sure the material you are mounting the loudspeaker to can support its weight.
RECEIVER HOOKUP
Follow the hookup directions included with your receiver. Strip 1/2″ of insulation from each of the two conductors of the wire to expose the bare metal and twist each of the conductors into a single un-frayed strand (so you have two unfrayed strands).
Note that one of the terminals on the rear of each speaker is red (+) and the other is black (–). Make certain that you connect the wire from the red terminal of your amplifier or receiver to the red terminal on your speaker; and the wire from the black terminal of your amplifier or receiver to the black terminal on your speaker [figure 16]. Most wire has some indicator (such as color-coding, ribbing or writing) on one of the two conductors to help you maintain consistency.
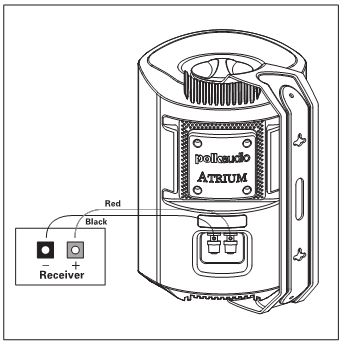
using binding posts.
ATRIUM8 SDI DUAL INPUT/SINGLE INPUT SWITCH
The Atrium8 SDI has a patented dual input/single input switch. this switch enables the Atrium8 SDI to be used either as a single high-performance stereo loudspeaker, or the left-or-right speaker in a high performance stereo pair [Figure 17].
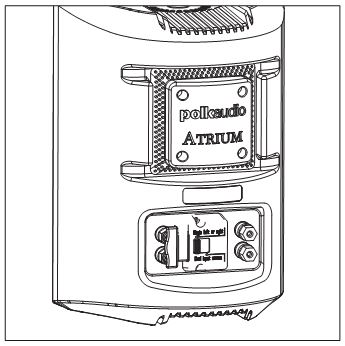
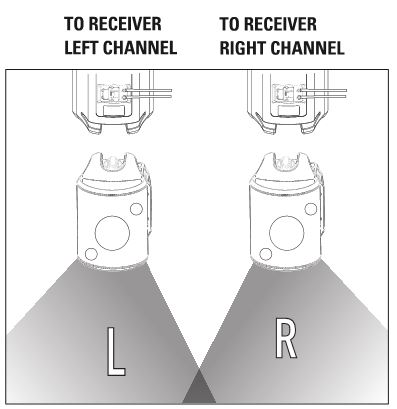
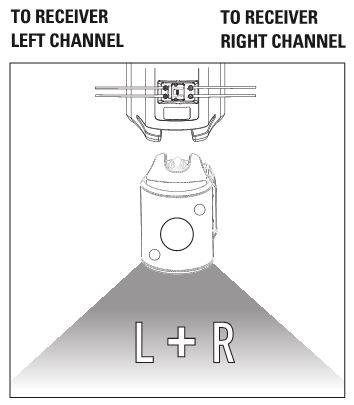
USING 5-WAY BINDING POSTS

]]>
PolkAudio R Series Loudspeakers Owner’s Manual
Using Binding Post connectors.
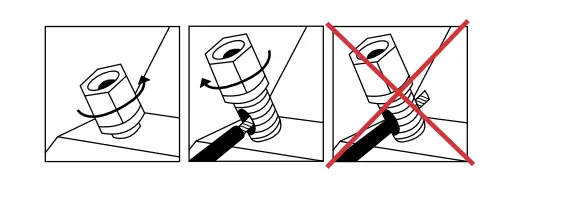
Loosen hex nut and insert bare speaker wire through hole. Tighten hex nut down to make connection. Do not insert insulated section of wire into hole (you will not get a connection).
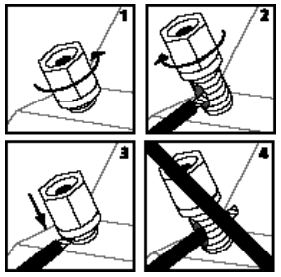
To use Banana Plugs (US only): Unscrew the Binding Post Lug Nuts completely to expose the Binding Post Plugs (plastic plugs inserted into the binding posts). Carefully pry out the Binding Post Plugs to expose Banana Plug holes. Screw the lug nuts back on the Binding Posts and insert banana plugs. (This is for US owners only.)
Basic speaker hookup.
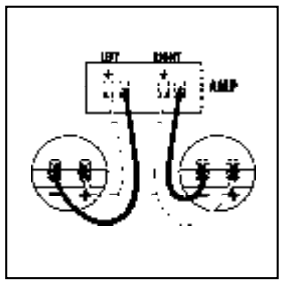
Make certain that the red (+) and black (-) connectors on your amplifier or receiver connect to the red (+) and black (-) connectors on your speakers. If your speakers sound “thin,” with little bass and little or no center image, odds are that one of the speaker wires is connected backwards. Double check all connections.
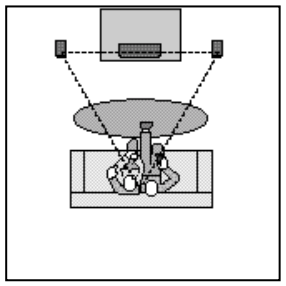
Get the most realistic stereo image by placing speakers as far apart as the listeners are sitting from them. If room conditions require that you place the speakers farther apart, you may choose to angle the speakers toward the middle to support a more solid center image.
You can use R Series speakers as rear surround speakers in a Polk Audio home theater system. Ideal rear channel surround speaker placement is on a side wall, slightly behind and above the listening position.
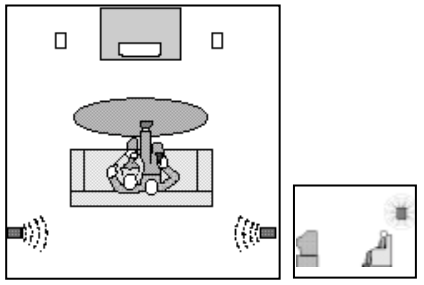
Alternate rear channel surround speaker placement for R Series speakers.
If you can not place rear surrounds on the side walls, position them on the rear wall above the listening position.

Wall mounting the R15 & R20 Bookshelf Loudspeakers
The R Series Bookshelf Loudspeakers feature a built-in keyhole slot for easy wall mounting. When wall mounting, we recommend using either bare wire or spade lug connections to ensure flush mounting. Follow the steps below to safely wall mount these speakers. Wall mounting requires basic skills with tools such as a drill and a screwdriver. If you are in doubt that you possess the necessary skills or tools, consult your Polk Audio dealer, or a professional installer.
- Make sure the material on which you plan to mount the speakers (plaster, drywall, paneling, stone, etc.) can support the weight of the speakers (R15=approx 9lbs/4kg ea; R20=approx 16lbs/7.25kg ea).
- Make sure the locations you select do not conceal electrical wiring or plumbing.
- Prior to installation, hold the speaker in the chosen location to make sure it safely clears obstacles such as ceiling, adjacent walls, corners, beams, lighting fixtures and door/window frames.
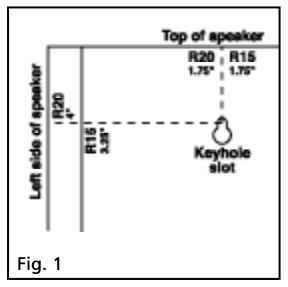
- Each speaker has a keyhole mounting slot on the back panel. The slot appears centered approximately 1 w” down from the top of the cabinet, approximately 4″ from the left corner of the R20 and 34″ from the left corner of the R15. Use these measurements to mark to your mounting location, being sure to leave approximately 1-2″ of clearance above the speaker to compensate for the function of the keyhole slot.
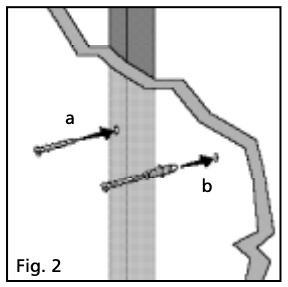
- If you are certain that there is a stud behind the wall surface, drive #10 sheet metal screws (not included) through the wall and into the stud [figure 2a].
- If there is no stud behind the wall at the chosen location, install #10 wall anchors (not supplied) into the wall by following the wall-anchor-manufacturer’s instructions. [figure 2b].
- Tighten screws into stud or wall anchors, leaving screw heads protruding a” to 2″ to leave room for attached wire and ensure that the screw fits into the keyhole slot. The speaker should mount flush to the wall.
- Line up the keyhole slot so that the screw head passes through the large center hole of the slot.
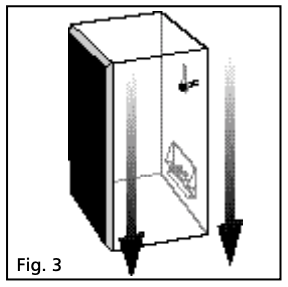
- Let the speaker slide straight down, allowing the screw head to slip behind the smaller end of the keyhole slot [figure 3].
- Tug gently on the speaker to make certain that the speaker is secure.
- If the speaker is not held snug against the wall by the screw heads, remove the speaker from the wall, drive the screws in a little further and then remount the speaker.
Use #10 screw for wall stud, use #10 wall anchors & screw for no wall stud.
Slide the speaker down on the screw heads to catch the keyhole slots.
Clean cabinets with a damp cloth. Avoid harsh detergents and cleaning fluids. Vacuum grilles to remove dust.

Polk Audio has been crafting affordable high performance loudspeakers since 1972. They are one of the world’s foremost manufacturers of quality home, car & multimedia speakers. Polk Audio’s dedication to research & development has resulted in over 45 worldwide patents for innovative loudspeaker technology, and Polk speakers consistently thrill our growing family of satisfied listeners, as well as the worldwide audio press
Get free information about building the audio system of your dreams, or free information on tweaking your current system for higher performance, at www.polkaudio.com. Or, call our friendly customer service department toll free 1-800-377-7655 (in the US & Can only, outside the US call 410-358-3600), 9am-6pm EST. Ask for our Home Theater Handbook, or a copy of our annual newspaper, “The Speaker Specialist.” They’re both free, and chock full of audio information
]]>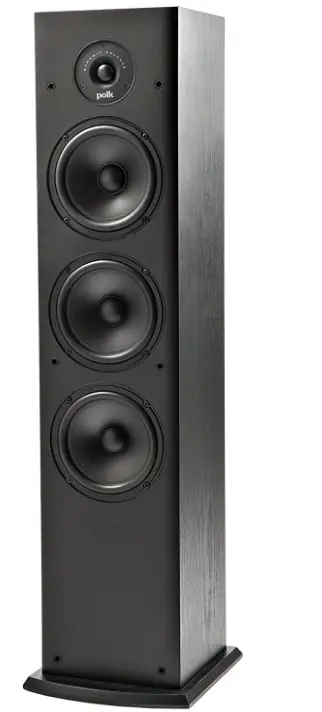
Polk Audio T50 150 Watt Home Theater Floor Standing Tower Speaker
Specifications
- Product Dimensions
8.75 x 7.75 x 36.25 inches - Item Weight
20.4 pounds - Batteries
1 Lithium-Ion battery - Speaker Amplification Type
Passive - Speaker Connectivity
Wired - Speaker Nominal Output Power
50 Watts - Material
Wood - Speaker Maximum Output Power
150 Watts - Driver Complement
6.5″ Diameter
6.5″ Bass Radiator (x2) - Electrical
38Hz – 24kHz - Amplifier Power
90 dB - Enclosure Type
Bass Reflex - Brand
Polk Audio
Introduction
T-Series speakers are perfect for building your first home theater or stereo listening system, whether you have a small room, or just want a great value-priced speaker for multi-room applications. T-Series speakers reproduce sound accurately with impressive volume. They’re solidly built and come in a black wood grain finish. Best of all, simply add a PSW Series-powered subwoofer yourself with real home theater performance.
Not your typical floor-standing tower speaker, the T50 stands out. Take a look beneath the hood by simply removing the grill; you’ll be amazed. Two performance tuned front-firing sub-bass radiators, one 6.25″ extended throw composite driver, and one 1″ silk dome tweeter, all developed with Polk’s exclusive Dynamic Balance technology, give the bass you seek a significant increase even at the lowest frequencies. Its audio has been updated, signed, sealed, and delivered by the people, for the people! Connects to the majority of home theatre processors, receivers, and stereos and supports Dolby and DTS. Play and have fun, but get ready to be amazed.
Polk Audio was founded in Baltimore in 1972 by Johns Hopkins University graduates, Matthew Polk and George Klopfer. Today, Polk Audio is a leading manufacturer of high-quality home, car and multimedia and the largest audio brand of Sound United. Polk products emphasize superior sound and build quality, and feature many patented and award-winning innovations. Having built their reputation as “The Speaker Specialists” for more than 40 years, Polk products are sold throughout the USA, Canada and in more than 50 countries around the world. Polk Audio’s mission is simple: Build high-quality, great-sounding speakers at affordable prices. For the people of Polk Audio, building speakers is not just a job—it’s a passion.
Important Notice
Please find the serial number located on the back of the product. It’s a good idea to write this number on the warranty sheet and put it in a safe place should you need to reference it later.
Prior to Using Equipment
Polk Audio thanks you for your purchase. Make sure to read this user guide in full before using your speaker system. It will ensure that you get the most from the product and understand all safety requirements. Once you’re done reading the user guide, put it in a safe place for later reference. To avoid damaging your speaker from input overload, please note the following:
- Don’t supply power to the speaker system that exceeds its maximum input
- Always make sure the amplifier is turned off when you connecting or disconnecting cables
- If you’re using a graphic equalizer to highlight those high and low frequencies, avoid excessive amplifier volume
- Never leave your speaker playing unattended.
How to Connect Your System
To get the best sound quality, it’s important to wire your speakers correctly.
How to Use Binding Post Connectors
Loosen hex nut and insert bare speaker wire through the hole. Tighten the hex nut down to make the connection.
Note
Do not insert an insulated section of wire into the hole (you will not get a connection).
Basic Speaker Hookup
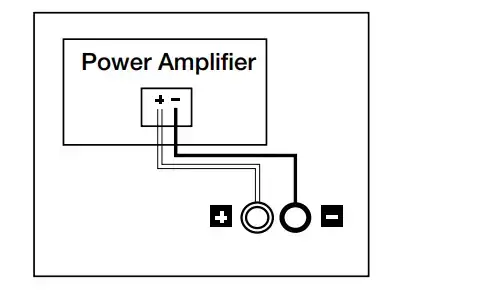
Make sure that the red (+) and black (-) connectors on your amplifier or receiver connect to the red (+) and black (-) connectors on your speakers. If your speakers sound “thin,” with little bass and little or no center image, odds are that one of the speaker wires is connected backward. Double-check all connections.
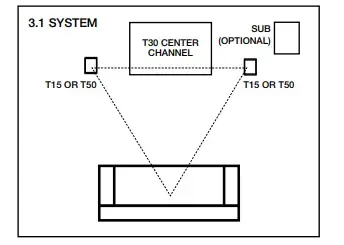
Placement Recommendations for the T30 Center Channel Speaker
The most popular placement for your T30 center channel speaker is on a shelf below your flat screen TV (if you have an older box TV, a popular option is to place your center channel speaker on top of it, anchoring the dialogue and effects to the screen).
Processor Mode for the T30 Center Channel Speaker
Note: Set Center Channel Speaker to “small” in your receiver’s Bass Management Settings.
The “bass management” or “speaker configuration” menus of most surround receivers offer the choice of “normal” or “wide” modes for center channel operation. In discrete channel digital processors, these modes are referred to as “small” and “large.” Normal (small) mode filters bass frequencies from the center channel speaker and sends them instead to the front left and right main speakers or to the subwoofer output (LFE) jack. Wide (large) mode sends an unfiltered, full-range signal to the center channel speaker. Use the Small (normal) mode for optimum center (and surround) channel performance and reliability.
T Series Speaker Positioning
To maximize the sound quality of your Speaker system— whether you’ve purchased T15 Bookshelf Speakers, a T30 center channel speaker, or T50 tower speakers—correct placement is everything. Take a look at the following examples and give them a try based on the T Series speakers you’ve purchased.
Note
Your T Series speakers are compatible with 2.0, 2.1, 3.1, 5.1, 7.1 and 9.1 setups (optional subwoofer shown in graphics).
Listening in 3.1 System (T15, T30, T50)
Get the most realistic stereo image by placing speakers as far apart as the listeners are sitting from them. If room conditions require that you place the speakers farther apart, you may choose to angle the speakers toward the middle to support a more solid center image.
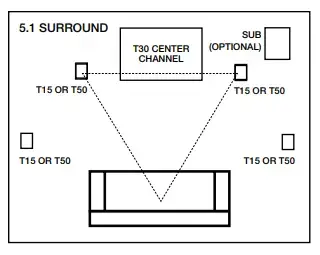
Listening in 5.1 Surround (T15, T30, T50)
You can use the T Series speakers as rear surround speakers in a Polk Audio home theater system. Ideal rear channel surround speaker placement is on a side wall, slightly behind and above the listening position.
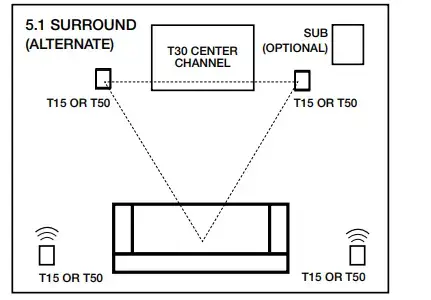
Listening in 5.1 Surround—alternate option (T15, T30, T50)
Alternate rear channel surrounds speaker placement for T Series speakers. If you cannot place rear surrounds on the side walls, position them on the rear wall above the listening position.

Wall Mounting the T15 Bookshelf Speaker
The T15 features a built-in keyhole slot for easy wall mounting. Follow the steps below to safely wall mount these speakers.
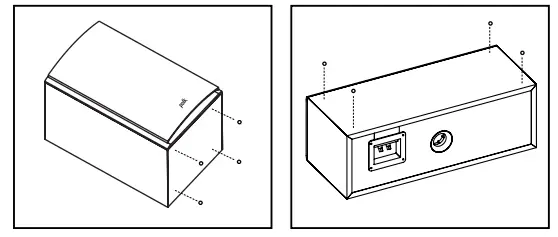
- Use the template to mark the mounting location
- Use #10 pan head screw for wall stud.
- Use #10 wall anchors with appropriate weight rating and screws for no wall stud
- leave screws 1/4″ – 1/8″ (4mm) exposed
- Slide the speaker down on the screw head to catch the keyhole slots
Adding Adhesive-Backed Rubber Feet to the T Series
To keep your Polk speakers firmly in place and prevent damage to floors or furniture, it’s a smart idea to attach the included adhesive-backed rubber feet to the bottom of your speaker.
 Peel and stick in the corners of the speaker enclosure
Cleaning Your Polk Speakers
You bought Polk quality for a reason. Keep your speakers looking good for years to come with these simple tips.
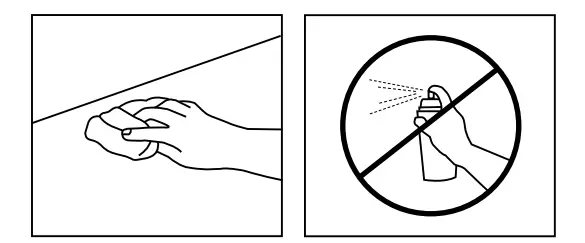
Clean the cabinet with a damp cloth. Do not use furniture polish on the veneer.
Frequently Asked Questions
- Speaker impedance and frequency response?
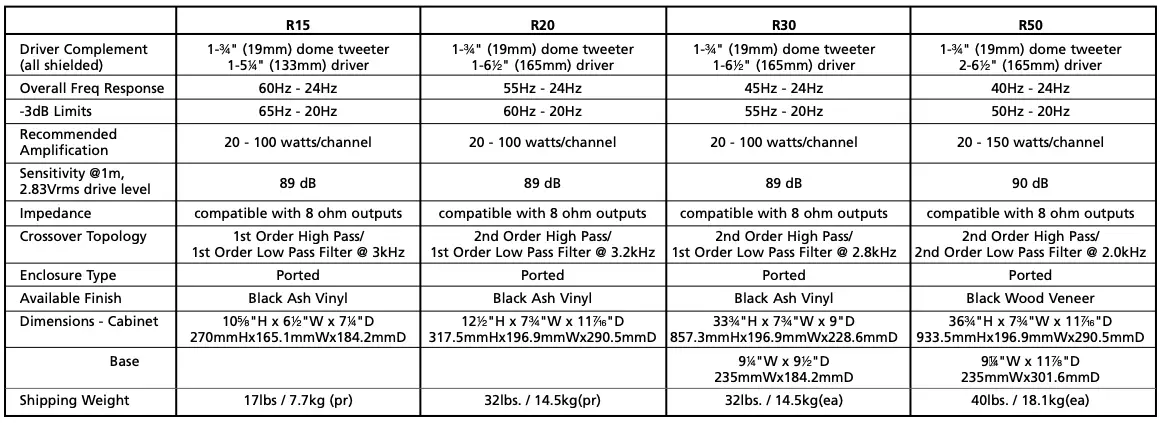
8 Ohms each, 60 – 24,000 Hz response but without a decibel variation or a response curve that is meaningless. They do say the -3db useful low end is 65 Hz. Over all it is a good value for use in a small room like a small bedroom or computer office say about 10′ x 10′. I play mine with “loudness” on and have the bass turned up a bit to give a nice balanced sound on most material. These would obviously benefit from being paired with a subwoofer, but they are still adequate even without for normal listening. You’d have to spend at least double the money to get much better speakers. Note that oftentimes through the year, Amazon and Best Buy will have these on sale for about $49 for the pair, which is when I bought mine, so obviously THAT makes them an even better deal. I’ve compared a lot of small bookshelf speakers and to my ears, you’d have to get some Boston Acoustics at $250 for the pair to offer anything much better than these, but you may wish to compare them to others by Klipsch and JBL. But really, when I got them for $49 I was VERY happy with them and how they have grown on me after I broke them in for a few hours. Do be aware that playing them overly loud can result in some “noise” or “rattle” from pushing the little 5.25″ woofer too hard. You just need to use some common sense and have realistic expectations for such small speakers in terms of volume. - Should I set this speaker to “Small” or to “Large” in my receiver? My Yamaha RX-V581 automatic calibration sets this to Large.
So this depends on your receiver. I realize this is an old question, but could be helpful for others. Many receivers have the speaker size selection and many newer (last several years) receivers may also allow you to tweak your crossover settings for each set of speakers. Basically, what that means is that if your sub crossover is set at 150 hz, you want your other speakers to pick up the frequency where the sub left off. So you would want your other speakers to “crossover” at 150 Hz. This means that those speakers will play frequencies from 150 hz and higher. If you set your sub for 80 Hz and your other speakers at 150 Hz, you’ll miss all of the sounds between 80 and 150. All that to say, if you set your speakers to small, you’ll want to look in your receiver manual to see what the low-frequency cut-off is so you know what to set your sub crossover at. This way, you won’t lose part of your sound. - Do you need a receiver to use these? or can i just hook up to my tv?
I have seen TVs that have speaker outputs, but it’s pretty rare. If your TV has those, they’d be labeled “External Speakers” or something like that. Otherwise, you need a receiver or at least an amplifier. - How tall are these speakers?
The Polk T15 is a little over 10.5 inches tall. - Does it have a built-in amplifier?
No- this one does not. However, you can purchase the amplifier upgrade for this speaker, separately, to match the sound output. - If these can hit 38Hz, do I still need a subwoofer?
Placement is very important, especially with these speakers. They are designed yo work better when they are placed 20 or so degrees above or below ear level. For better bass you should place them closer to the ground. Also, note indeed they will produce sound at the listed frequencies, but that does not mean it will produce that frequency at a loud volume. The bass speakers in the T15 is wonderful, but it is small. And may not produce the loud bass sound some prefer. That’s why I mentioned placement. In the end, after u play them, break them in a bit, try different locations, if you are not satisfied with the bass, look for a subwoofer. - Does it come as a pair?
Yes, it comes with a pair, (2) speakers. - These Polk t50 speakers are compatible with Yamaha RXV 385 receiver?
Yes it will. Your Yamaha RX V385 receiver will take speakers that are 6 ohms and above. Let me say from experience that you’re better off NOT BUYING the POLK T50s because they do not have 4 active speakers. They have 1 tweeter, 1 full-sized woofer and 2 passive radiators. Passive radiators look like real speakers, but are not powered and only serve to exaggerate the bass in a different way than ports would. You’re better off going with Pioneer by Andrew Jones or for even less money and a better sound Dayton Audio Towers because these options have more than one active woofer.
- Does anyone have these speakers in a total 5.1 setup?
Yes. These are the rear speakers in my 5.1 setups. - Are these speakers good for creating music in the studio? or mostly for tv purposes?
Sorry if I sound dumb, but I do not know what you mean by, “in-studio”… I listen to a lot of music, and do not know what you are referring to… these speakers are compact and heavy, and well constructed, they play music and televised programming, excellently, with good, clear, and powerful sound. it will not play the loud super bass rap crap, as this is not what they are.
View Fullscreen