PolkAudio R Series Loudspeakers Owner’s Manual
Using Binding Post connectors.
Loosen hex nut and insert bare speaker wire through hole. Tighten hex nut down to make connection. Do not insert insulated section of wire into hole (you will not get a connection).

To use Banana Plugs (US only): Unscrew the Binding Post Lug Nuts completely to expose the Binding Post Plugs (plastic plugs inserted into the binding posts). Carefully pry out the Binding Post Plugs to expose Banana Plug holes. Screw the lug nuts back on the Binding Posts and insert banana plugs. (This is for US owners only.)
Basic speaker hookup.
Make certain that the red (+) and black (-) connectors on your amplifier or receiver connect to the red (+) and black (-) connectors on your speakers. If your speakers sound “thin,” with little bass and little or no center image, odds are that one of the speaker wires is connected backwards. Double check all connections.

Get the most realistic stereo image by placing speakers as far apart as the listeners are sitting from them. If room conditions require that you place the speakers farther apart, you may choose to angle the speakers toward the middle to support a more solid center image.

You can use R Series speakers as rear surround speakers in a Polk Audio home theater system. Ideal rear channel surround speaker placement is on a side wall, slightly behind and above the listening position.

Alternate rear channel surround speaker placement for R Series speakers.
If you can not place rear surrounds on the side walls, position them on the rear wall above the listening position.

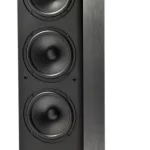
Wall mounting the R15 and R20 Bookshelf Loudspeakers
The R Series Bookshelf Loudspeakers feature a built-in keyhole slot for easy wall mounting. When wall mounting, we recommend using either bare wire or spade lug connections to ensure flush mounting. Follow the steps below to safely wall mount these speakers. Wall mounting requires basic skills with tools such as a drill and a screwdriver. If you are in doubt that you possess the necessary skills or tools, consult your Polk Audio dealer, or a professional installer.
- Make sure the material on which you plan to mount the speakers (plaster, drywall, paneling, stone, etc.) can support the weight of the speakers (R15=approx 9lbs/4kg ea; R20=approx 16lbs/7.25kg ea).
- Make sure the locations you select do not conceal electrical wiring or plumbing.
- Prior to installation, hold the speaker in the chosen location to make sure it safely clears obstacles such as ceiling, adjacent walls, corners, beams, lighting fixtures and door/window frames.
- Each speaker has a keyhole mounting slot on the back panel. The slot appears centered approximately 1 w” down from the top of the cabinet, approximately 4″ from the left corner of the R20 and 34″ from the left corner of the R15. Use these measurements to mark to your mounting location, being sure to leave approximately 1-2″ of clearance above the speaker to compensate for the function of the keyhole slot.
- If you are certain that there is a stud behind the wall surface, drive #10 sheet metal screws (not included) through the wall and into the stud [figure 2a].
- If there is no stud behind the wall at the chosen location, install #10 wall anchors (not supplied) into the wall by following the wall-anchor-manufacturer’s instructions. [figure 2b].
- Tighten screws into stud or wall anchors, leaving screw heads protruding a” to 2″ to leave room for attached wire and ensure that the screw fits into the keyhole slot. The speaker should mount flush to the wall.
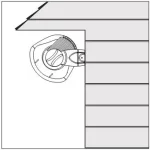
- Line up the keyhole slot so that the screw head passes through the large center hole of the slot.
- Let the speaker slide straight down, allowing the screw head to slip behind the smaller end of the keyhole slot [figure 3].
- Tug gently on the speaker to make certain that the speaker is secure.
- If the speaker is not held snug against the wall by the screw heads, remove the speaker from the wall, drive the screws in a little further and then remount the speaker.

Use #10 screw for wall stud, use #10 wall anchors & screw for no wall stud.

Slide the speaker down on the screw heads to catch the keyhole slots.

Clean cabinets with a damp cloth. Avoid harsh detergents and cleaning fluids. Vacuum grilles to remove dust.

Polk Audio has been crafting affordable high performance loudspeakers since 1972. They are one of the world’s foremost manufacturers of quality home, car & multimedia speakers. Polk Audio’s dedication to research & development has resulted in over 45 worldwide patents for innovative loudspeaker technology, and Polk speakers consistently thrill our growing family of satisfied listeners, as well as the worldwide audio press
Get free information about building the audio system of your dreams, or free information on tweaking your current system for higher performance, at www.polkaudio.com. Or, call our friendly customer service department toll free 1-800-377-7655 (in the US & Can only, outside the US call 410-358-3600), 9am-6pm EST. Ask for our Home Theater Handbook, or a copy of our annual newspaper, “The Speaker Specialist.” They’re both free, and chock full of audio information