PolkAudio PSW10/ PSW12 Powered Subwoofers Owner’s Manual

IMPORTANT SAFETY INSTRUCTIONS
READ BEFORE OPERATING EQUIPMENT
- Read these instructions.
- Keep these instructions.
- Heed all warnings.
- Follow all instructions.
- Do not use this apparatus near water.
- Clean only with dry cloth.
- Do not block any ventilation openings. Install in accordance with the manufacturer’s instructions.
- Do not install near any heat sources such as radiators, heat registers, stoves, or other apparatus (including amplifiers) that produce heat.
- Do not defeat the safety purpose of the polarized or grounding-type plug. A polarized plug has two blades with one wider than the other. A grounding type plug has two blades and a third grounding prong. The wide blade or the third prong are provided for your safety. If the provided plug does not fit into your outlet, consult an electrician for replacement of the obsolete outlet.
- Protect the power cord from being walked on or pinched particularly at plugs, convenience receptacles, and the point where they exit from the apparatus.
- Only use attachments/accessories specified by the manufacturer.

- Unplug this apparatus during lightning storms or when unused for long periods of time.
- Refer all servicing to qualified service personnel. Servicing is required when the apparatus has been damaged in any way, such as power-supply cord or plug is damaged, liquid has been spilled or objects have fallen into the apparatus, the apparatus has been exposed to rain or moisture, does not operate normally, or has been dropped.
- WARNING: To reduce the risk of fire or electric shock, this apparatus should not be exposed to rain or moisture and objects filled with liquids, such as vases, should not be placed on this apparatus.
- To completely disconnect this equipment from the mains, disconnect the power supply cord plug from the receptacle.
- The main plug of the power supply cord shall remain readily operable.

WARNING: Listen Carefully
Polk Audio loudspeakers and subwoofers are capable of playing at extremely high volume levels, which could cause serious or permanent hearing damage. Polk Audio, Inc. accepts no liability for hearing loss, bodily injury or property damage resulting from the misuse of its products.
Keep these guidelines in mind and always use your own good judgment when controlling volume: You should limit prolonged exposure to volumes that exceed 85 decibels(dB).
For more about safe volume levels, go to https://www.health.harvard.edu/blog/healthy-headphone-use-how-loud-and-how-long-2020072220565, refer to the Occupational Health and Safety Administration (OSHA) guidelines at www.osha.gov/dts/osta/otm/noise/standards_more.html, or review the WHO “Make Listening Safe” brochure.
FIRST THINGS FIRST
Caution: Subwoofers are heavy. Exercise caution when unpacking your subwoofer.
Please inspect your loudspeaker carefully. Notify your Polk dealer if you notice any damage or missing items. Keep the carton and packing material. It will do the best job of protecting your speaker if it needs to be transported.
Your system includes a detachable power cord that’s packaged separately from the cabinet. Insert female end into the receptacle on the amplifier plate and insert the polarized AC plug into a wall outlet (or power strip) as per the safety instructions found on the inside cover of this manual. We Do Not Recommend connecting the subwoofer’s AC power cord to your receiver’s switched outlet.

PLACING YOUR SUBWOOFER IN A ROOM
Your PSW Series subwoofer is not magnetically shielded. Do not place near video monitors. (LCD, DLP and Plasma televisions are not affected by magnetism.) Allow at least 18″ (45cm) of space between your subwoofer and any television, but if you do notice video distortion or discoloration, immediately move the subwoofer away from the TV.
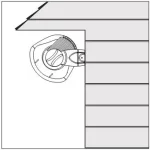
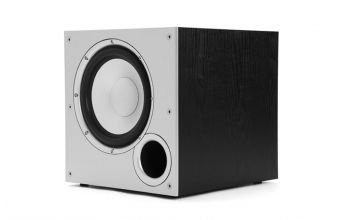
Your PSW Series subwoofer offers many placement options: in an entertainment center , behind furniture, or next to a sofa or chair. You may place your subwoofer anywhere in the room, but you’ll enjoy the best performance when it’s on the same side of the room as your system’s front speakers (Figure 1). Placing your subwoofer near a wall or in a corner will increase its loudness. When placing your subwoofer in the room, always place your subwoofer on its base feet side down (Figure 2). If you can at all avoid it, do not place your subwoofer next to an open door.
We do recommend placing your subwoofer in different locations within your room to learn what produces the best sound quality for your listening environment.
For more information on subwoofer placement, go to www.polkaudio.com/education/article.php?id=20.

CONNECTING THE SUBWOOFER TO THE SYSTEM— HOOKUP OPTIONS
Important Note: Use only one of these options.
Never combine hookup options.


Hookup Option 1
Dolby® Digital Speaker Set Up Settings
Subwoofer = Yes
OPTION #1—
Receivers that include a “Sub Out” feature—the most common hookup method with Dolby® Digital receivers.
PSW10—
NOTE: The PSW10 subwoofer does not have an LFE input. Instead, use either the L or R Line input (another hookup option is to use a Y -split cable and connect both L and R Line inputs). After you make this Sub Out connection, turn the “Low Pass” filter fully clockwise. This will in effect create an LFE input.
PSW12—
NOTE: Connect a single RCA cable from the “SUB OUT” of your receiver to the LFE input of the subwoofer. This connecting method bypasses the subwoofer’s internal filter and relies on the filter built into your receiver. Make no other signal connections. Do not use speaker wire to make the connection to the subwoofer.
- Connect all speakers directly to the receiver. When using method #1, adjust your receiver’s speaker configurations as follows: Set Front, Center and Surround speakers to “small.”
- Depending on your speakers’ bass output capabilities, set the crossover frequency on the receiver to 80Hz for tower and bookshelf speakers (speakers with a woofer 5 1/4″ in diameter or larger) and 100-120Hz for satellite speakers.
- Receiver Settings:
- Front, Center, and Surrounds = “SMALL”
- Subwoofer = “ON,” or “YES,” or “PRESENT”
Consult your receiver’s owner’s manual for speaker configuration.

Hookup Option 2
Dolby Digital Speaker Set Up Settings
Front Speakers = Large
Center Speaker = Small
Rear Surround Speakers = Small
Subwoofer = No
OPTION #2—
Two channel or Dolby® Pro Logic receiver with no “Sub Out.”
If you elect to use the speaker level inputs, use two-conductor 16 gauge or thicker speaker wires. See your Polk dealer for wire recommendations.
Note that one of the speaker input terminals on the rear of the speaker is marked red (+) and the other black (-). Make certain that you connect the wire from the red (+) terminal of your receiver to the red (+) terminal on your speaker , and the wire from the black (-) terminal of the receiver to the black (-) terminal on your speaker. Speaker wire has some indication (such as color coding, ribbing, or writing) on one of the two conductors to help maintain consistency. If your subwoofer doesn’t seem to produce much bass, it is most likely that one of the speaker wires is connected backwards. Double check all connections for correct polarity.
Strip 1/2″ (12mm) of insulation from each of the two conductors on both ends to expose the bare wire. Twist the exposed wire of each conductor to form two un-frayed strands.
Note: Do not use the line or LFE input in this configuration.
- Connect the left and right front speaker outputs of your receiver to the speaker level inputs of the powered subwoofer using speaker wire.
- Then, connect the left and right front speakers using speaker wire from the speaker level outputs from the powered subwoofer.
- Connect the Center Channel Speaker directly to the center channel output from your receiver.
- Connect the Rear Surround Satellites directly to the rear or surround channel outputs from your receiver.
- Receiver Settings:
- Front speakers = LARGE
- Subwoofer = “OFF” or “NO”
- Center and Surrounds= SMALL

Hookup Option 3
OPTION #3—
Receivers with full-range (unfiltered) Left and Right “Pre Out” jacks (this is the least commonly used hookup).
- Connect the left and right preamp output from your receiver to the left and right LINE LEVEL input of the subwoofer. Do not use speaker wires.
- When using method #3, it is necessary to adjust the settings on your receiver as follows:
- Receiver Settings:
- Front speakers = LARGE
- Subwoofer = “OFF” or “NO”
ADJUSTING YOUR SYSTEM
SUBWOOFER ADJUSTMENTS
Your Powered Subwoofer offers a range of setting options. W e recommend the following settings as starting points, but the settings that are best for you depend upon your speaker placement, electronics and personal taste. After you’ve become familiar with what the settings do, experiment with alternate options to find the method that works best for your system setup. You’ll find an informative article on “Subwoofer Positioning and Adjustment” in the set up section at: www.polkaudio.com/education/article.php?id=19.
Note: When you set up your subwoofer for the first time, you will probably have to make adjustments several times before you hear what you personally like. Start with the volume at 50%.
AC POWER CONNECTION AND AUTO ON/OFF
Your PSW Series subwoofer features auto on/off circuitry, marked “auto” on the power switch, which automatically turns your subwoofer on when it senses a program signal. We recommend the “auto” setting if your subwoofer is always receiving power (ie, if it’s plugged into a wall outlet).
When no signal is present, the circuit turns the subwoofer of f after 15 minutes. If you are concerned about the brief delay between when the music starts and when the subwoofer turns on, simply leave your subwoofer in the “On” position. You may want to leave your PSW system unplugged during extended periods of non use, such as during a vacation.
FINE TUNING YOUR SUBWOOFER
- Volume—Adjust by ear using a wide variety of CDs and video sources. Adjust for deep, powerful bass without “boominess.”
- Low Pass—NOTE: (PSW12) This control does not operate when the subwoofer is connected with Method #1 (LFE Input). This control adjusts the frequency range over which the subwoofer operates. When using smaller main speakers, the upper range of the control will probably yield the best results. With larger speakers, the lower end of the control range will probably sound best, but always let your ear be the final judge. If male vocals sound “thin,” turn this control up until the voice sounds rich but not “boomy.” If male vocals sound too “thick” or “chesty,” turn this control down until the voice sounds natural.
- Phase Switch—Sit in your favorite listening position. Play music (not a movie) with a walking bass line. We recommend playing jazz or country music. Now listen carefully for the point at which the subwoofer transitions to your main speakers. This is the crossover point, and this point should be below the frequency of a male human voice. Whichever phase setting sounds louder or fuller at the subwoofer’s crossover (transition) point is the optimum setting. Sometimes no difference will be heard.
TROUBLESHOOTING
No sound coming from subwoofer
If hookup is “Sub Out” to LFE, is your receiver set to “Subwoofer—yes” If hookup is via speaker wire, check that the polarity of the wires is correct.
Subwoofer doesn’t sound right
If hookup is “Sub Out” to LFE, is your receiver set to “Subwoofer—yes” If hookup is via speaker wire, check that the polarity of the wires is correct.
Subwoofer has no power
Check outlet; check fuse after unplugging the subwoofer.
TECHNICAL ASSISTANCE AND SERVICE
If, after following these hook up directions, you experience difficulty , please double-check all wire connections. Should you isolate the problem to the speaker, contact the authorized Polk Audio dealer where you made your purchase, or call Polk Audio’ s friendly Customer Service Department at 1-800-377-7655 (calls from US or CAN only), (Outside the US or CAN, 410-358-3600), 9am to 6pm EST, Monday through Friday.
You may also contact us via email: . For more detailed hook up information and manual updates, visit: www.polkaudio.com.
For recommended accessories (including speaker stands, brackets, accessories and exclusive Polk Audio logowear), visit our Webstore: http://shop.polkaudio.com.
SPECIFICATIONS
| Model | PSW10 | PSW12 |
| Subwoofer Complement | (1) 10″ (25.4cm) | (1) 12″ (30.5mm) |
| Overall Freq. Response | 35Hz – 200Hz | 26Hz – 200Hz |
| Power Output Dynamic | 100 Watts | 260 Watts |
| Power Output RMS | 50 Watts | 100 Watts |
| Crossover Frequency | 80Hz – 160Hz | 60Hz – 160Hz |
| Magnetic Shielding | No | Yes |
| Available Finish | Black Oak & Cherry woodgrain |
Black Oak & Cherry woodgrain |
| Dimensions (H”xW”xD”) (Hcm x Wcm x Dcm) |
14-3/8 x 14 x 16-1/8 36.5 x 35.6 x 41 |
16-3/8 x 16 x 17-5/8 41.6 x 40.6 x 44.8 |
| Product Weight- Pounds each |
26 | 34 |
| Product Weight- Kilograms |
11.7 | 15.3 |
For more complete specifications visit www.polkaudio.com/home
Polk Audio has been crafting affordable high performance loudspeakers since 1972. They are one of the world’ s foremost manufacturers of quality home & car. Polk Audio’s dedication to research & development has resulted in over 55 worldwide patents for innovative loudspeaker technology, and Polk speakers consistently thrill our growing family of satisfied listeners, as well as the worldwide audio press.
Get free information about building the audio system of your dreams, or free information on tweaking your current system for higher performance, at www.polkaudio.com. Or, call our friendly customer service department toll free 1-800-377-7655 (in the US & Can only, outside the US call 410-358-3600), 9am-6pm EST. Ask for our Home Theater Handbook, or a copy of our annual newspaper , “The Speaker Specialist.” They’re both free, and chock full of audio information.