RCA 32 INCH LED HD LCD TV User Manual

IMPORTANT SAFETY INSTRUCTIONS
- Read these instruct ion s.
- Keep these instructions.
- Heed a ll warnings.
- Follow a ll instruct ions.
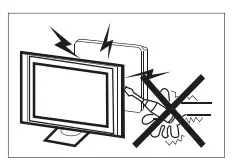
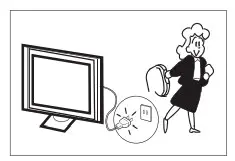
- Do not use ch is apparatus near water
- Clean only with dry cloth.
- Do not block any vent i la tion openings, install in accordance with the instruction s.
- Do not install near any heat sources such as radiations, heat registers, stoves, or other apparatus (including amplifiers) that produce heat
- Do not defeat the safety purpose of the polarized plug. If the provided plug does not fit int o your outlet, consult an electrician for replacement of the obsolete outlet.
- Protected the power cord from being walked on or pinched pa rt i cu larly at plugs, convenience receptacles, and the point where they exit from the apparatus.
- Only use attachments/accessories specified by the manufacturer.
- Unplug this apparatus during lighting storms or when unused for long periods of time.
- Refer a ll servicing to qualified service personnel. Servicing is required when the apparatus has been damaged in any way such as power-supply cord or p lug is damaged , liquid has been spilled or objects have fallen into the apparatus, the apparatus has been exposed to rain or moisture, does not operate normally, or has been dropped
- Mains plug i s used as the disconnect device, the disconnect device sh all remain readily operable.
- The ventilation should not be impeded by covering the ventilation openings with items such as newspapers, table-cloth, curtains, etc.
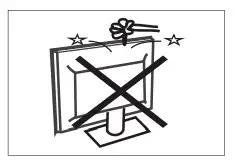
- No naked flame sources, such as lighted candles, should be p laced on the apparatus.
- Attention should be drawn to the environmental aspects of battery disposal
- The use of apparatus in moderate climate.
- The apparatus shall not be exposed to dripping or splashing and that no objects filled with liquids, such as vases, shall be placed on the apparatus.

 The symbol indicates that dangerous voltage constituting a risk of electric shock are present within this unit.
 The symbol indicates that there are important operating and maintenance instructions in the litcraturuccompanying t his unit.
WARNING
To reduce the risk of fire or electric shock,do not expose this apparatus to rain or moisture.
WARNING
The batteries shall nol be exposed t o excessive heat such as sunshine, fire or the like.

This symbol indicates that this product incorporates double insulation between hazardous ma ins voltage and user accessible parts.When servicing use only identical replacement parts.

This marking indicates that this product should not be disposed with other household wastes throughout the EU. To prevent possible harm to the environment or human health from uncontrolled waste disposal, recycle it responsibly to promote the sustainable reuse of material resources.To return your used device, please use the return and collection systems or contact the retailer where the product was purchased. They can take this product for environmental safe recycling.
PRECAUTIONS AND REMINDERS
High voltages are used in the operation of this television receiver. Do not remove the cabinet back from your set. Refer servicing to qualified service personnel.
To prevent fire or electrical shock hazard, do not expose the television receiver to rain or moisture.
Do not drop or push objects into the television cabinet slots or openings. Never spill any kind of liquid on the television receiver.
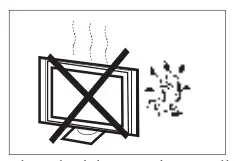
Do not block the ventilation holes in the back cover.
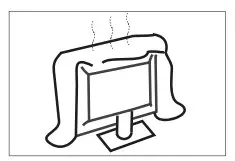
Adequate ventilation is essential to prevent failure of electrical components.
Do not trap power supply cord under the television receiver
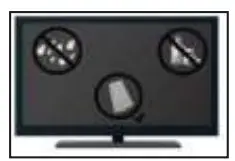
If you are going to clean product unplug the tv use soft fabric no water never chemical.

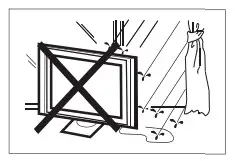
Never Stand on lean on. or suddenly push the television or its stand .You should pay special attention 10 children. Serious injury may result if it fail.
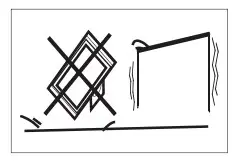
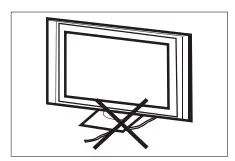
Do not place your television on an unstable cart stand, shelf or table. Serious injury to an individual ,and damage to the television,may resul1 if i1 falls.
When the television receiver is not used for an extended period of time. it is advisable to disconnect the AC po,ver cord fronl the AC outlet.
Avoid exposing the television receiver to direct sunlight and other sources of heat. Do not stand the television receiver directly on other products which give off heat.
e.g. video cassette players and audio amplifiers. Do not place naked fla1nc sources. such as lighted candles on the television.
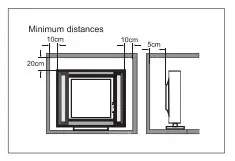
If the television is lo be built into a compartment or similar enclosure, the minimum distances must be maintained. Heat build up can reduce the service life of your television, and can also be dangerous.
Note: the use of apparatus in moderate climates.
BUTTON CONTROL AND PERIPHERAL CONNECTION
BUTTON CONTROL
OK/
In the standby mode, press the OK/ to turn on the TV. In the boot state, long press the OK/ to shut down. Under the menu page , function equivalent to the OK key.


In the non-menu page, you can adjust the TV channel under the program addition and subtraction; Under the menu page, you can move the cursor up and down.


In the non-menu page,Under the menu page, press the left and right keys to adjust the volume addition and subtraction.
PERIPHERAL CONNECTION

- RJ45
- Coaxial out terminal.
- HDMI1(ARC) input terminal.
- HDMI2 input terminal.
- HDMI3 input terminal.
- Audio&Video input terminal.
- Earphone terminal.
- LNB IN.
- RF antenna.
- USB 1& 2: Connect USB device, such as flash disk.
- CI slot.
- .YPbPr(MINI) input terminal.
OPERATING INSTRUCTIONS
USING THE REMOTE CONTROL
| Item | Descriptions |
 Power Power |
Press to turn the tv on or off when your tv is off still flows through it to completely disconnect power unplug the power cord |
| Google Assistant | Press to open the google assistant or start a voice search. |
0 9 number 9 number |
Press to enter a TV channel number |
| INFO | Press to display the channel information. |
| Guide | Enter electronic program guide. (Used for models with DTV function only) |
| NETFLIX | NETFLIX |
| YouTube | Press to open the YouTube. |
| Google Play | Press to open the Google Play |
| Prime video | Press to open the prime video |
| HOME | Press to open the Home Page |
| MENU | Press to open or close the on-screen menu. |
 |
Press to navigate the on-screen menu. |
| OK | Enter the selected option or perform the selected operation. |
| BACK | Return to the previous menu. |
| EXIT | It depends on the actual function |
| VOL+/VOL- | Press VOL+ or VOL- to adjust volume level. |
| CH+/CH – | Press CH+ or CH- to change TV channels. |
 MUTE MUTE |
Press to switch the sound on or off |
| SOURCE | SOURCE |
| COLOR BUTTONS | Press to access directly to the corresponding function in APP service. |
 (reverse) (reverse) |
Press to reverse playback in multimedia & Timeshift mode. |
 (play) (play) |
Press to play in multimedia mode &Timeshift mode. |
 (forward) (forward) |
Press to fast forward in multimedia &Timeshift mode. |
 (Pause) (Pause) |
Press to pause in multimedia mode&Timeshift mode. |
 (stop (stop |
Press to stop multimedia playback, REC& Timeshift mode. |
| Text | Press to enter the Tele text mode. |
| SUBT | Open or close subtitle. |
| AUDIO | O Press to select the DTV audio |
INITIAL SETUP
Please according to the Text Tip to First Time Setup. This function is used for the remote control pair code. After the code is successful, you can use the Bluetooth remote control to operate the TV. press and hold “HOME” button and” Left” button Simultaneously for 5 seconds.Then press “OK” button When the “TV_BLE_Remote” displays in the upper right corner of the screen.


HOME SCREEN
During initial setup, press EXIT to exit the initial setup, and enter the HOME screen.
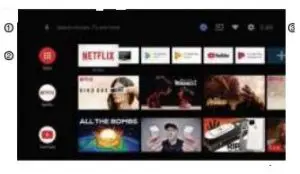
- Open the google assistant or start a voice search.
- Among the applications installed on the TV, the icons for the favourite applications are shown inside here. (Favourite applications can be added / deleted / changed its order by users.)
 Apps: Click to jump to Apps screen where all the installed applications are listed.
  Notification:Display the notification.
 Inputs: Icon to select an input source.
 Network Internet: Icon to set up network such as wifi.
 Settings: Various setting can be configured here.
For details on the settings, see the next explanation
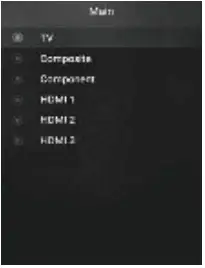
INPUT SOURCE
- In the HOME interface, press
 to select the “Inputs” icon, press OK to open the input source list, then press up to highlight an input and press OK to switch.

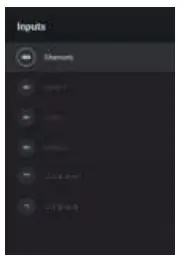
- Under live TV, press the SOURCE button to display the list of input sources. You can select the desired source.
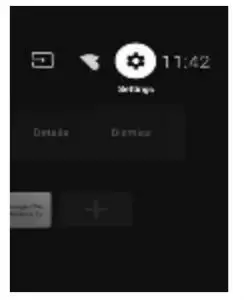
NAVIGATING THE ON-SCREEN MENU
- There are two ways to enter. First, in live TV, press the menu button to display TV options, press
 /
/ 
 /
/ to select the settings menu and press the key to select the icon of the circular settings menu, press OK to confirm.

- Press / button to select what you want set.
- Press OK to enter setting.
Press BACK to return to the previous menu. If the main menu is displayed, pressing BACK will close the onscreen menu.
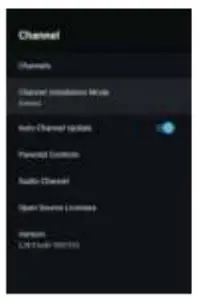
Network
- Press / button to select what you want set .
- Press OK button to adjust.
- After finishing your adjustment OK button to save and return to the previous menu.
- Preferred Satellite/General Satellite Set the signal type to Satellite. When set to Satellite, the TV can receive Satellite broadcasting signals.
Auto Channel Update
Parental controls - Press / button to select the option then press OK button to enter the sub-menu.
Audio Channel – Press /button to select the option then press OK button to enter the sub-menu.
Open source licenses - Press/ button to select the option then press OK button to enter the sub-menu.
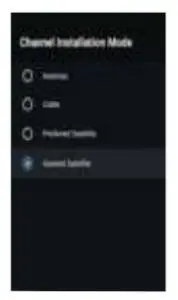
Antenna
- Menu->Settings->Channel->Channel Installation Mode enter, choose Antenna.

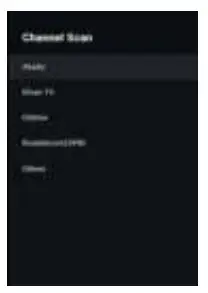
- Enter Menu->Settings->Channel->Channels..
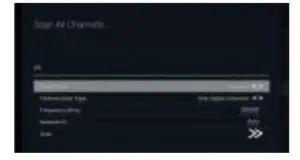
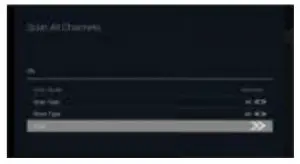
- Channel Scan directly enters the ATV+DTV automatic search platform interface of Antenna.
Update Scan: Re-automatically search for frequency points outside the station.
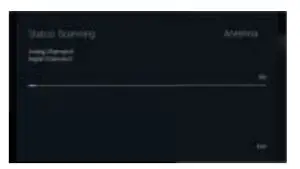
Analog Manual Scan: Manual ATV search station. After input the frequency point, you can select up or down search station.

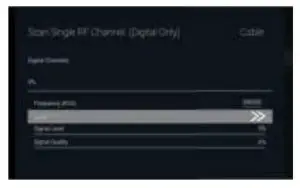
Single RF Scan: manual search station. Satellite Single RF Scan: DTV manual search, left and right after selecting RF Channel, directly OK search.
Cable
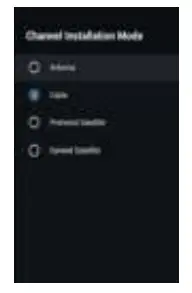
- Menu->Settings->Channel->Channel Installation Mode, select Cable.
- Enter Menu->Settings-> channel-> Channels.
- Enter Channel Scan, where Akado, Divan TV, Online and Rostelecom (SPB) are the local operators, and the default Scan Mode is Advance;Others have Advance, Quick and Full Scan modes.
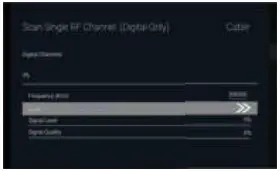
Single RF Scan: manual search station.
Satellite
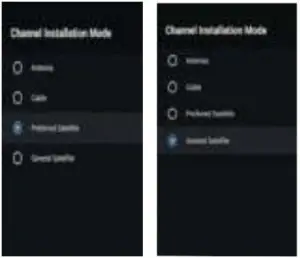
- Menu->Settings->Channel->Channel Installation Mode, select Preferred Satellite or General Satellite. Among them, Preferred Satellite has been preset with corresponding satellites of NTV+, Tricolor and Telekarta operators. I’m going to go to General Satellite.
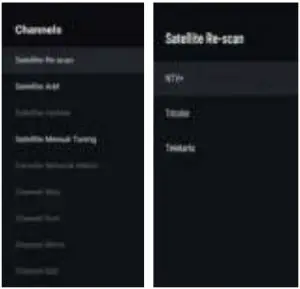
- Enter Menu->Settings-> channel-> Channels->Satelli Re-scan.
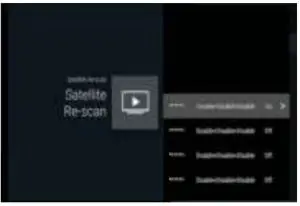
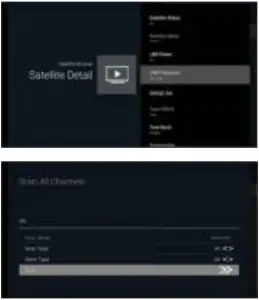
- Press OK to enter Satellite parameter Settings, which include LNB POWER, LNB Frequency, DiSEqC Set, 22K and other parameters. Then return to Satellite re-scan and right click to enter the search menu.Then return to Satellite re-scan and right click to enter the search menu.
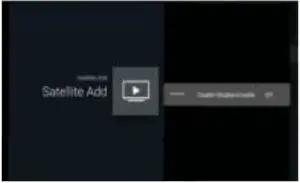
Satellite Add: Add a star broadcast signal.
DEVICE PREFERENCES
ABOUT
3. Press OK to enter Satellite parameter Settings, which include LNB POWER, LNB Frequency, DiSEqC Set, 22K and other parameters. Then return to Satellite re-scan and right click to enter the search menu.Then return to Satellite re-scan and right click to enter the search menu.
Single RF Scan: manual search station.
Satellite

- Menu->Settings->Channel->Channel Installation Mode, select Preferred Satellite or General Satellite. Among them,
Preferred Satellite has been preset with corresponding satellites of NTV+, Tricolor and Telekarta operators. I’m going
to go to General Satellite.


- Enter Menu->Settings-> channel-> Channels->Satelli Re-scan.
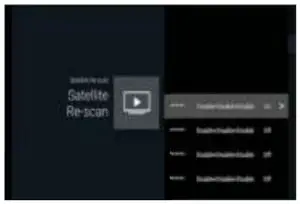
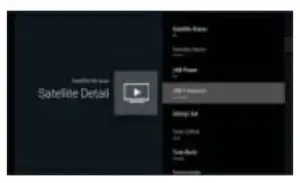
- Press OK to enter Satellite parameter Settings, which include LNB POWER, LNB Frequency, DiSEqC Set, 22K and other parameters. Then return to Satellite re-scan and right click to enter the search menu.Then return to Satellite re-scan and right click to enter the search menu.
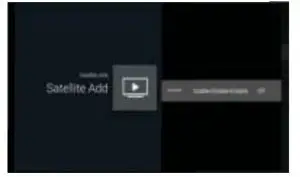
Satellite Add:Add a star broadcast signal.
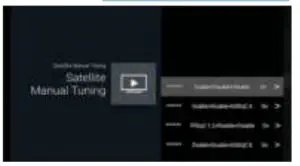
Satellite Manual Tuning: manually search for a certain TP, which can be added by Satellite Add if needed.
DEVICE PREFERENCES
ABOUT

In this menu, you can read the information and settings of TV.
- Press / button to select what you want set
- Press OK button to adjust.
- After finishing your adjustment press BACK button to return to the previous menu.
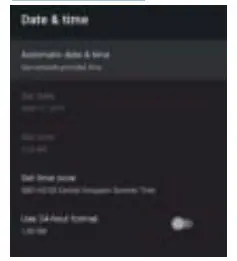
DATE&TIME
 .
.
Automatic date & time – Press A. I T button to select the option then press OK button to enter the sub-menu. (Optional:Use network-provided time,Off)

- Manually adjusting date & time settings will automaticall change the Automatic date & time to OFF .
Set date – Press / button to select the option then press OK button to enter the sub-menu. Set time – Press / button to select the option then press OK button to enter the sub-menu. Set time zone – Press / button to select the option then press OK button to enter the sub-menu. Use 24-hour format – Press / button to select the option then press OK button to choose ON/OFF.
TIMER
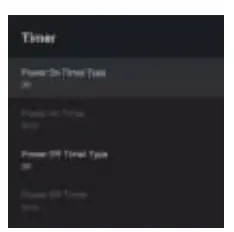
Power On Timer Type -Press / button to select the option then press OK button to choose ON/OFF/ONCE.
Power On Timer – Press / button to select the option then press OK button to enter the sub-men u. Power Off Timer Type – Press / button to select the option then press OK button to choose ON/OFF/ ONCE. power Off Timer – Press / button to select the option then press OK button to enter the sub-men u.
LANGUAGE
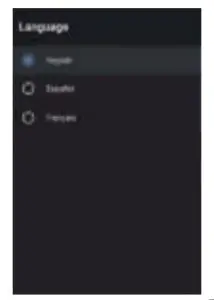
Language – Press / button to select the option then press OK button to enter the select language.
KEYBOARD
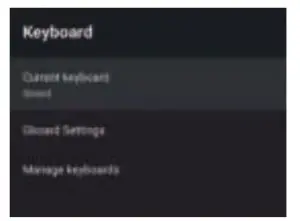
Current keyboard – Press / button to select the option then press OK button to enter the sub-menu. Gboard Settings – Press / button to select the option then press OK button to enter the sub-menu. Manage keyboards – Press / button to select the option then press OK button to enter the sub-menu. Power On Timer Press/ button to select the option then press 0, button to enter the sub-menu.
INPUTS
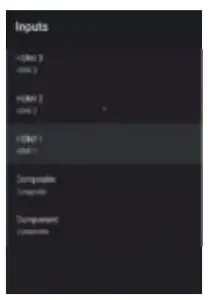

Inputs – Press/ button to select the option then press OK button to enter the sub-menu. HDMI control – Press/ button to select the option then press OK button to choose ON/OFF. Device auto power off- Press / button to select the option then press OK button to choose ON/OFF. TV auto power on – Press / button to select the option then press OK button to choose ON/OFF. HDMI EDID Version – show EDID version. CEC Device List – Press / button to select the option then press OK button to enter the sub-menu.
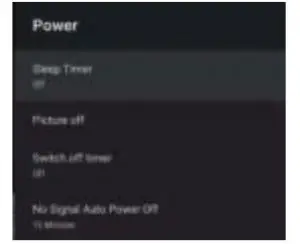
POWER

Sleep Timer – Press / button to select the option then press OK button to enter the sub-menu. (Optional:off,10 minutes, 20 minutes, 30 minutes, 40 minutes,50 minutes,60 minutes,90 minutes, 120 minutes ). Picture off – Press / button to select the option then press OK button to choose ON/OFF. Switch off timer – Press / button to select the option then press OK button to enter the sub-menu. (Optional:off,30 minutes, 60 minutes, 90 minutes, 120 minutes, 150 minutes, 180 minutes, 210 minutes, 240 minutes ) No Signal Auto Power Off – Press / button to select the option then press OK button to enter the sub-menu.(Optional:off,5 minutes,10 minutes,15 minutes,30 minutes,60 minutes
PICTURE
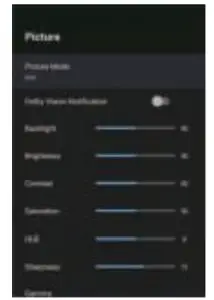
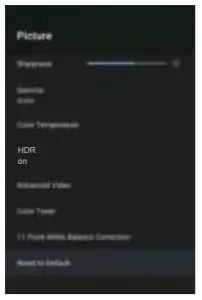
Picture Mode – Press / button to select the option button to enter the sub-men u. (Optional: user,Standard, Vivid, Sport, Movie, Game, Energy saving). Backlight/Brightness/Contrast/Saturation/HUE/ Sharpness – Press / button to select the option. Press ..,.. to decrease the parameter. Press to increase the parameter.
Gamma –Press / button to select the option then press OK button to enter the sub-men u.(Optional: Dark, middle,Bright).
Color Temperature – Press / button to select the option then press OK button to enter the sub-men u. picture rormat -Press /button to select the option the press OK button to enter the sub-men u.Optional: Automatic/Super zoom/4:3/Movie expand 14:9/Movie expand 16:9/Wide screen/Full/Unscaled) HDR – Press / button to select the option the press OK button to enter the sub-menu .(Optional:on,off).
Advanced Video – Press/ button to select the option then press OK button to enter the sub-menu.
Color Tuner – Press/ button to select the option then press OK button to enter the sub-menu.
11 Point White Balance Correction – Press / button to select the option then press OK button to enter the sub-menu.
Reset to Default – Reset all settings to the factory defaults.
SOUND


Sound style – Press/ button to select the option then press OK button to enter the sub-menu. (Optional: user,Standard,Vivid,Sports,Movie,Music, News). Balance/ Bass/ Treble – Press/ button to select the option. Press  to decrease the parameter. Press to increase the parameter.
Sound Surround – Press/ button to select the option then press OK button to choose ON/OFF.
Equalizer Detail – Press / button to select the option then press OK button to enter the sub-menu.
Speakers – Press/ button to select the option then press OK button to enter the sub-menu. (Optional:TV Speaker.External Audio System).
Digital Output – Press/ button to select the option then press OK button to enter the sub-menu. (Optional:Auto, Bypass,PCM,Dolby Digital Plus,Dolby Digital).
SPDIF Delay – Press /button to select the option. Press <II to decrease the parameter. Press / to increase the parameter.
Auto Volume Control – Press/ button to select the option then press OK button to choose ON/OFF.
Downmix Mode – Press/ button to select the option then press OK button to enter the sub-menu (Optional:Stereo,Surround). Reset to Default – Reset all settings to the factory defaults.
STORAGE
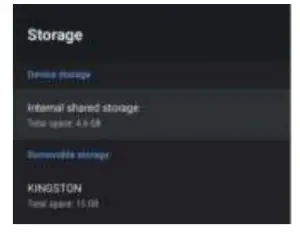
Internal shared storage- Press/ button to select the option then press OK button to enter the sub-meo_ui
Removable Storage – Press/ button to select the option then press OK button to enter the sub-menu.( Note:Show external devices if available)
HOME SCREEN

In this menu, you can set channels, apps, open source licenses.
1. Press/ button to select what you want set
2. Press OK button to adjust.
3.After finishing you r adjustment, Press SACK button return to t he previous menu.
STORAGE

Storage mode press / button to select the option the press OK button to choose ON/OFF HOME SCREEN
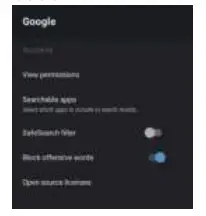
In this menu, you can set searchable apps, safe search filter block offensive words open source licenses.
- Press / button to select what you want set.
- Press OK button to adjust.
- After finishing your adjustment press BACK button return to the previous menu
CHROMECAST BUILT-IN
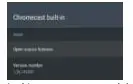
In this menu.you can read the information and settings of Chromecast
- Press/ button to select what you want set
- Press OK button to adjust
- After finishing your adjustment Press BACK button return to the previous menu.
SCREEN SAVER
Screen saver – Press/ button to select the option then press OK button to enter the sub-menu. (optional: turn screen off backdrop colors)
When to Start – Press/ button to select the option then press OK button to enter the sub-menu. (Optional:5 minutes, 15 minutes, 30 minutes,1 hour, 2 hours,).
Put device to sleep – Press/ button to select the option then press OK button to enter the sub-menu. (Optional:30 minutes, 1 hour, 3 hours, 6 hours,12 hours, Never).
Start now – Press / button to select the option then press OK button to enter screen saver.
LOCATION
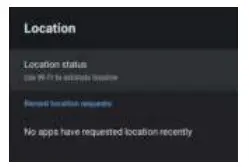
Location status – Press/ button to select the option then press OK button to enter the sub-menu. (Optional:Use Wi-Fi to estimate location,Off)
USAGE & DIAGNOSTICS

Usage & diagnostic- press/button to select the option OK button to choose ON/OFF .
ACCESSIBILITY

Caption – press/ button to select the the option then press OK button to choose ON/OFF.
High contrast text – Press/ button to select option then press OK button to enter the sub-menu.
RESET
Press OK button to enter the sub-menu reset-erase everything.
REMOTE & ACCESSORIES


In this menu,you can pair Bluetooth devices.
- Press the “HOME” and “LEFT” buttons at the bottom of the remote control for 5 seconds.
- When the LED start to flash release it the remote controller will send the pairing signal to the TV and display the information of the remote control on the right side of the screen.
- Press the OK button to display the pairing. If the paired is displayed, the connection is successful.
- If the couldn’t pair appears, the connection fails. Wait 30 seconds and then press the “HOME” and “LEFT” buttons at the bottom of the remote control for 5 seconds to repeat the previous steps.
- Press BACK or EXIT button return to the previous menu.
ADD AND USE OF MULTI MEDIA PLAYER
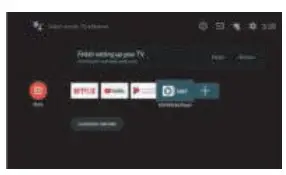
- In the HOME interface, select the + icon in the APP column to add the application, and click OK. Press up and down to select the MultiMedia Player application, and click OK to add it to the HOME interface.
- Select OK key to enter MultiMedia Player and display Video,Photo,Audio Text.After Inserting the usb flash drive, you can view the corresponding files in the usb flash drive.

The menu may be different depending on when you purchased the TV.
SPECIFICATIONS
HDMI INPUT
| Mode | Resolution | Horizontal Frequency
(KHz) |
Vertical Frequency
(Hz) |
| 480i | 720 x480i | 15.73 | 59.94/60 |
| 576i | 720 x 576i | 15.63 | 50 |
| 480p | 720 x480p | 31.47 | 59.94/60 |
| 576p | 720 x 576p | 31.26 | 50 |
| 720p | 1280 x 720p | 37.50
44.96 |
50
59.94/60 |
COMPONENT VIDEO (YPbPr) INPUT
| Mode | Resolution | Horizontal Frequency
(KHz) |
Vertical Frequency
(Hz) |
| 480i | 720 x480i | 15.73 | 59.94/60 |
| 576i | 720 x 576i | 15.63 | 50 |
| 480p | 720 x480p | 31.47 | 59.94/60 |
| 576p | 720 x 576p | 31.26 | 50 |
| 720p | 1280 x 720p | 37.50
44.96 |
50
59.94/60 |
Due to continuous product development, specifications are subject to change without prior notice.
TROUBLESHOOTING
Please make these simple checks before calling service. These tips may save you time and money since charges for
receiver installation and adjustments of customer controls are not covered under your warranty.
| Symptoms | Items to Check and Actions to Follow |
| “Ghost” or double image |
|
| No power |
|
| No picture |
|
| Good picture but no sound |
|
| Good sound but poor color |
|
| Poor picture |
|
| Snowy picture and noise |
|
| Horizontal dotted line |
|
| Television not responding to remote control |
|
| Pixels (dots) that are always dark or always lit |
|