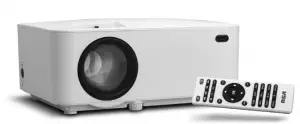
RCA Multimedia Projector
RCA Multimedia Projector
PLEASE READ BEFORE OPERATING THIS EQUIPMENT
This product is manufactured and sold by Curtis International Ltd. RCA, the RCA logo, the two dogs (Nipper and Chipper) logo, are registered trademarks or trademarks of RCA Trademark Management and are used under license by Curtis International Ltd. Any other product, service, company, trade or product name and logo referenced herein are neither endorsed nor sponsored by RCA Trademark Management or its affiliates.
Important Safety Instructions
- Read these Instructions.
- Keep these Instructions.
- Heed all Warnings.
- Follow all instructions.
- Do not use this apparatus near water.
- Clean only with a dry cloth.
- Do not block any ventilation openings. Install in accordance with the manufacturer’s instructions.
- Do not install near any heat sources such as radiators, heat registers, stoves, or other apparatus (including amplifier) that product heat.
- Protect the power cord from being walked on or pinched particularly at plugs, convenience receptacles, and the point where they exit from the apparatus.
- Only use attachments/accessories specified by the manufacturer.
- Unplug this apparatus during lightning storms or when unused for long periods of time.
- Refer all servicing to qualified service personnel. Servicing is required when the apparatus has been damaged in any way, such as power-supply cord or plug is
damaged, liquid has been spilled or objects have fallen into the apparatus, the apparatus has been exposed to rain or moisture, does not operate normally, or has been dropped. - Use only with a cart, stand, tripod, bracket, or table specified by the manufacturer or sold with the apparatus. When a cart is used, use caution when moving the cart/ apparatus combination to avoid injury from tip-over.
Additional Warnings and Precautions
- Do not look directly into the projector light.
- Don’t touch the project lens.
- Mains adapter is used as disconnect device and it should remain readily operable during intended use. In order to disconnect the apparatus from the mains completely, the mains plug should be disconnected from the mains socket outlet completely.
- CAUTION: Use of controls or adjustments or performance of procedures other than those specified may result in hazardous radiation exposure.
- WARNING: Changes or modified to this unit not expressly approved by the party responsible for compliance could void the user’s authority to operate the equipment.
- WARNING: Use of this unit near fluorescent lighting may cause interference regarding use of the remote. If the unit is displaying erratic behavior move away from any fluorescent lighting, as it may be the cause.
- WARNING: Shock hazard – Do Not Open.
- Caution and marking information is located at the rear or bottom of the apparatus.
- WARNING: To reduce the risk of fire or electric shock, do not expose this apparatus to rain, moisture, dripping, or splashing.
- Objects filled with liquids, such as vases, shall not be placed on the apparatus.
FCC Warning
This device complies with Part 15 of the FCC rules. Operation is subject to the following two conditions: (1) this device may not cause harmful interference, and (2) this device must accept any interference received, including interference that may cause undesired operation.
NOTE: This equipment has been tested and found to comply with the limits for a Class B digital device, pursuant to Part 15 of the FCC Rules. These limits are designed to provide reasonable protection against harmful interference in a residential installation. This equipment generates, uses, and can radiate radio frequency energy and, if not installed and used in accordance with the
instructions, may cause harmful interference to radio communications. However, there is no guarantee that interference will not occur in a particular installation. If this equipment does cause harmful interference to radio or television reception, which can be determined by turning the equipment off and on, the user is encouraged to try to correct the interference by one or more of
the following measures:
- Reorient or relocate the receiving antenna.
- Increase the separation between the equipment and receiver.
- Connect the equipment into an outlet on a circuit different from that to which the receiver is connected.
- Consult the dealer or an experienced radio/TV technician for help.
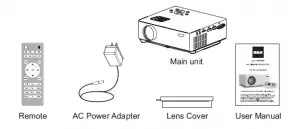
In The Box
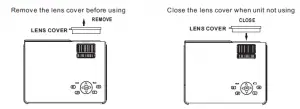
Remove and Close The Lens Cover
Placing Your Projector
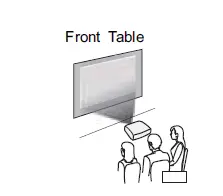
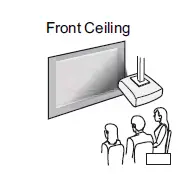
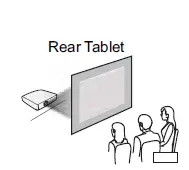
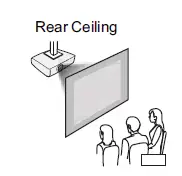
Your projector can be installed in four different configurations ( see picture below):
Front Table:
Select this location with the projector placednear the floor in front of the screen. This is the most common way to position the projector for quick setup and portability.
Front Ceiling:
Select this location with the projector suspended upside-down from the ceiling in front of the screen.
NOTE: A projector mount is required to install the projector in a ceiling
Rear Table:
Select this location with the projector placed near the floor behind the screen.
NOTE: That a special rear projection screen is required.
Rear Ceiling:
Select this location with the projector suspended upside-down from the ceiling behind the screen.
NOTE: A projector mount is required to install the projector in a ceiling. A special rear projection screen is required.
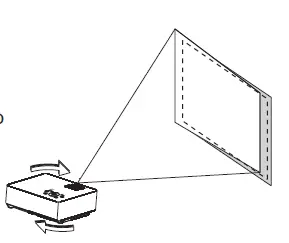
To Reduce Image Distortion
It is recommended to move the projector as close to center of screen
Distance Between The Projector And Screen
Measure the distance between the projector and where you want to position the screen. This is the projection distance.

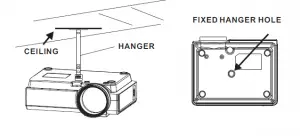
Placing Your Projector On Ceiling
When installing the projector in the ceiling, please purchase a projector mount recommended by an installation professional and follow the instructions that come with the mount.
Before installing the projector in the ceiling, please check to make sure the ceiling structure can support the weight of the projector and the mount. If in doubt, please ask the advice from an installation professorial.
NOTE: Projector mount and screw(s) not included
Adjust The Vertical Location
Follow below picture to adjust the vertical location
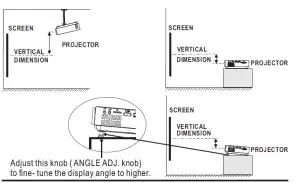
Adjust The Focus And Keystone
Follow below picture to adjust the focus and trapezoidal screen. Adjust the focus by turning the knob while observing the image pixels near the center of the screen. Optimal focus is obtained when the pixels are clearly visible. Depending on the projected screen size, the focus near the screen edges may be less sharp than the screen center. Keystone image is created when the projector beam is projected to the screen in an angle. Keystone correction will restore the distorted image to a rectangular or square shape.

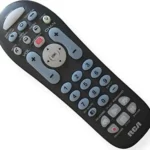
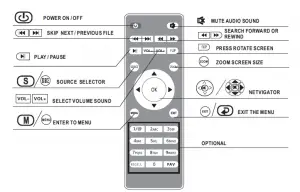
Controls Of Remote
Install / Remove Battery Of Remote
Remove the battery compartment cover on the back of your remote by carefully sliding to open. The battery cover can then be lifted away. Fit the correct
batteries (not included), referring to the polarity markings. Finally, replace the cover.
NOTES:
- Batteries shall not be exposed to excessive heat such as sunshine, fire
- Be sure that the batteries are installed polarity correctly.
- Do not mix old and new batteries.
- Only same or equivalent type batteries as recommend are to be used.
- Do not dispose of batteries in fire, battery may explode or leak. Do not try to recharge a battery
Controls Of Projector
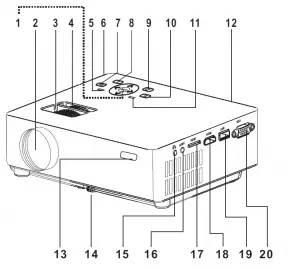
- NETVIGATOR Buttons
- LENS
- FOCUS ADJ. Knob
- TRAPEZOIDAL ADJ. Knob
- POWER on Indicator
- DC IN jack
- POWER Button
- SOURCE Button
- RETURN Button
- MENU Button
- STANDY indicator
- IR Window ( Rear Side)
- IR Window ( Front Side)
- ANGEL ADJ. Knob
- EAR PHONE Jack
- AV OUT Jack
- TF Card Slot ( Micro SD Card )
- HDMI Port
- USB Port
- VGA Port
Install Power Adapter
Follow below picture to connect power adapter Connect small end of adapter FIRST. Plug the adapter body to power outlet.
- – Press the button to turn on unit, press again to turn off.
- / SOURCE – Press the button to select input source.
- / MENU – Press the button to enter projector menu.
- – Press the buttons to select screen item of projector menu.
- / EXIT – Press the button to exit the projector menu.
- – Press the buttons to fast search forward and rewind on USB / TF.
- – Press the buttons to search next or previous file on USB / TF.
- VOL+ / VOL – Press the buttons to select correct sound.
- – Press the button to play/pause the connect USB / TF card.
- FLIP – Press the button to rotate / mirror projector screen
- ZOOM – Press the button to select image scale.
- – Press to muting the audio sound of your projector. Press again to resume.
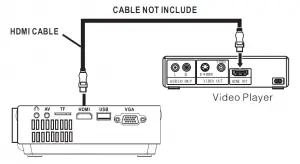
Connect HDMI Show The Image On Projector Screen
Follow below picture to connect HDMI cable and device.
- Turn off the unit before connect HDMI cable.
- After connect, press the
 button to turn on unit and power indicator will light GREEN
 - Press the
 SOURCE button to HDMI mode and the video of HDMI device will show on projector screen.
 - Press the button to turn off unit power
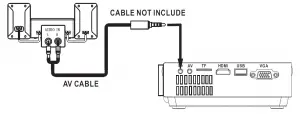
Connect AV Show The Image On Projector Screen
Follow below picture to connect AV cable and device.
- Turn off the unit before connect AV cable.
- Use AV cable to connect follow below figure
- After connect, press the button to turn on unit and power indicator will light GREEN
- Press the SOURCE button to AV mode and the video of AV device will show on projector screen
- Press the button to turn off unit power
Connect VGA Show The Image On Projector Screen
Follow below picture to connect HDMI cable and device.
- Turn off the unit before connect VGA cable.
- Press the button to turn off power of your projector before connection.
- After connect, press the button to turn on unit and power indicator will light GREEN
- Press the SOURCE button to VGA mode and the video of VGA device will show on projector screen.
- Press the button to turn off unit power.
Please refer to the following table to adjust the output signal from computer
| Type | Resolution | Frequency | Field Frequency | |
|
PC |
VGA |
640×480 |
31.5 | 60 |
| 34.7 | 70 | |||
| 37.9 | 72 | |||
| 37.5 | 75 | |||
|
SVGA |
800×600 |
31.4 | 50 | |
| 35.1 | 56 | |||
| 37.9 | 60 | |||
| 46.6 | 70 | |||
| 48.1 | 72 | |||
| 46.9 | 75 | |||
|
XGA |
1024×768 |
40.3 | 50 | |
| 48.4 | 60 | |||
| 56.5 | 70 | |||
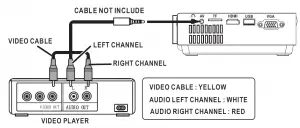
Connect Audio Output ( Aux Out / Line Out / Earphones)
Follow below picture to connect audio cable and device.
- Press the button to turn off power of your projector before connection.
- Use audio cable to connect follow below figure.
- After connect and turn on both units. Your projector sound from external device now.
- After using , turn off both unit
Station Amplifier
Install USB Device And Micro Sd Card “TF”
Follow below picture to install USB and TF card Turn off the unit before install USB / TF card.
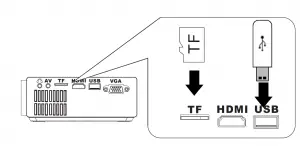
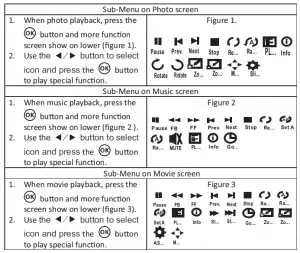
Using TF Card And USB Playback (Media Player)
Install USB / TF device:
- Turn off the unit before install USB / TF card.
- Install the USB device into USB port.
- After connect, press the button to turn on unit and the power indicator light GREEN.
- Press the SOURCE button to enter and use buttons to search the MEDIAPLAYER mode.
- After selection, use buttons to search the MUSIC
 PHOTO / MOVIE icon and press the
  button to enter. If necessary, use the button to select TF card or USB and press the press the button to enter.
 - Use buttons to search the correct file and press the
 button to preview playback file and press the
  button of unit or button of remote to start playback.
 - Press
 button to fast search forward and rewind.
 - Press button to search next or previous file.
- During playback, press the
 button to pause and press again to resume.
NOTE: Remove USB / TF device, press the button to turn off power FIRST.
Using Bluetooth Playback
Pairing is the term used when two Bluetooth devices are connected wirelessly for the first time. This allows the devices to see each other and sets up a one to
one communication channel between both devices.
Bluetooth Connection
- Press the button to turn on unit.
- Press the
 button to enter the menu screen.
 - Use the
 button to select right side menu
 - Use the
 button to select Bluetooth column.
 - Press the button to enter Bluetooth menu.
- Use the
 button to select “ ON”
 - Turn on your External Bluetooth Speaker and select to Bluetooth pairing mode
- A few seconds, you hearing “ do” sound that your unit and external Bluetooth speaker connected.
- After connection completed, the unit sound to External Bluetooth speaker.
Disconnect the Bluetooth
- Press the button to enter the menu screen.
- Use the button to select above menu.
- Use the button to select Bluetooth column.
- Press the button to enter Bluetooth menu.
- Use the button to select “ OFF” that the Bluetooth disconnect.
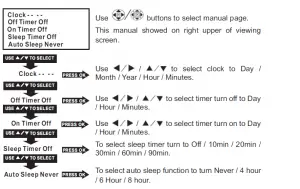
Using Projector Menu 1.0
Press button to enter projector menu. Press again to previous status
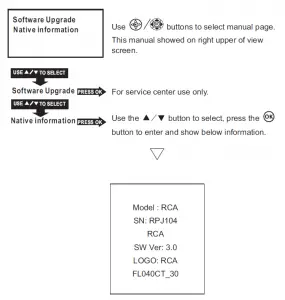
Using Projector Menu 2.0
Press button to enter projector menu. Press again to previous status.
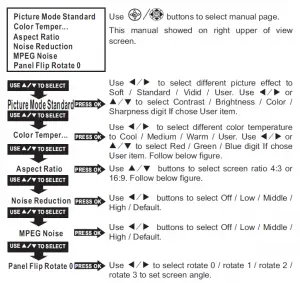
| Color temper… (temperature) | |
| Customer define | Parameter |
| red | 0-100 |
| blue | 0-100 |
| green | 0-100 |
| Aspect Ratio | |
| 4:3 | The signal in a 4:3 aspect ratio projection image |
| 16:9 | The signal in a 16:9 aspect ratio projection image |
Using Projector Menu 3.0
Press button to enter projector menu. Press again to previous status.
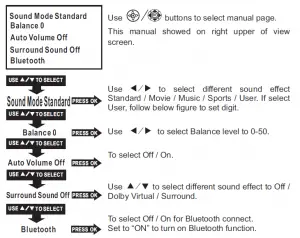
| Sound Mode – User | Parameter |
| Treble | 0-100 |
| Bass | 0-100 |
Using Projector Menu 4.0
Press button to enter projector menu. Press again to previous status.
Using Projector Menu 5.0
Press button to enter projector menu. Press again to previous status.

| English | Hrvatski | Nederlands | Chinese |
| Franais | Deutech | Slovenina | Slovak |
| Espanol | Italiano | Norsk | |
| Portugues | Magyar | Srpski | |
| Esky | Polski | Svenska | |
| Dansk | Romnete | Suomi |
Specifications
| Bluetooth version | 4.0 |
| Light Source Type | LED |
| Brightness Output | 2000 lumens |
| Display Native Resolution | 800 x 640 |
| HDMI Input Supported
Video Resolution. |
1080p , 1080i , 720p, 576i , 480p, and 480i |
| Power Consumption | Operating 36W; Standby 0.8W |
| Power Input
Connect Included Adapter |
DC 12V , 2.5A |
| Included Adapter
Connect DC input of unit |
Input AC100-240V,50/60Hz
Output DC12V , 2.5A. |
| Display Color | 16.7K |
| Projection Size | 30-100 inch |
| Signal Port | Video / VGA / HDMI |
| USB Port | Support USB device up to 32GB
Support format mpeg1, Mpeg2 ,mpeg4, mp3 , Jpeg |
| SD Card | Support SD card up to 32GB
Support format mpeg1, Mpeg2 ,mpeg4, mp3 , Jpeg |
| Weight | 0.9 KG |
| Dimension | 207 x 160 x 85 mm |
LIMITED PRODUCT WARRANTY
This quality product is warranted to be free from manufacturer’s defects in material and workman-ship, provided that the unit is used under the normal operating conditions intended by the manufacturer. Should you have any problem with this product, please and it is highly recommended to visit our website at www.curtisint.com before you take any other steps as we have additional copies of instruction manuals, operating manuals and trouble shooting tips on our website which gives you the answer on most of the questions you could have in operating the unit.
TERMS OF WARRANTY
C.I. Service Dept. warrants this product to be free from defects in materials and workmanship for 90 days on parts and 90 days on labor. If you originally purchased your product more than 90 days ago, a repair fee may apply. Nothing within this warranty shall imply that C.I. will be responsible or liable for any damage to any items placed in this product, whether due to any defect of the product, or its use, whether proper or improper.
EXCLUSIONS
Save as herein provided, C.I. Service Dept. (Canada) or C.I. Service Dept. (USA), there are no other warranties, conditions, representations or guarantees, express or implied, made or intended by C.I. or its authorized distributors and all other warranties, conditions, representations or guarantees, including any warranties, conditions, representations or guarantees under any Sale of Goods Act or like legislation or statue is hereby expressly excluded. Save as herein provided, C.I. Service Dept. (Canada) or C.I. Service Dept. (USA), shall not be responsible for any damages to persons or property, including the unit itself, howsoever caused or any consequential damages arising from the malfunction of the unit and by the purchase of the unit, the purchaser does hereby agree to indemnify and save harmless C.I. from any claim for damages to persons or property caused by the unit.
TO OBTAIN REPAIRS UNDER THE TERMS OF THIS WARRANTY
- The original purchaser must present a copy of the original bill of sale and the service warranty card.
- Any alterations, abuse, misuse, battery corrosion or accidental damage voids the warranty.
- The warranty does not cover cabinets and accessories.
- No warranty or insurance contained or set out shall apply when damage or repair is caused by power failure; damage in transit or when moving the unit; improper power supply; use for commercial or industrial purposes; service calls resulting in customer education, etc.
- The defective product should be mailed to:
DOWNLOAD RESOURCES
- RCA Multimedia Projector [pdf] Instruction Manual Multimedia Projector, RPJ104
- Read more: https://manuals.plus/rca/multimedia-projector-manual#ixzz7dBx4gMqk
FAQ’S
How do I use my RCA home theater projector?
Connect AV Show The Image On Projector Screen
Turn off the unit before connect AV cable.
Use AV cable to connect follow below figure.
After connect, press the button to turn on unit and power indicator will light GREEN.
Press the SOURCE button to AV mode and the video of AV device will show on projector screen.
Does RCA make good projectors?
It is not as bright as others, the graphics are not as defined as others but it pulls its weight and makes for a good quality projector. RCA products are known to be durable and last for a long time so that is a huge plus. The design is compact and very nice, with a nice fabric top, very small and portable.
Is the RCA home theater projector Bluetooth?
Offering exceptional color performance, the RCA RPJ106 Home Theater Projector with Bluetooth delivers immersive experiences. It provides stunning, razor sharp images and true to life colors.
Can you connect your phone to a RCA home theater projector?
You can use an RCA cable, a composite cable which will require separate plug-ins for the sound and the video. Or, you can use an adaptor to connect your smartphone to a VGA port (the same kind that you use to connect a monitor to your PC).
Does RCA projector have speakers?
BUILT-IN ACCESSORIES: Our project is ideal for travel, with its huge lithium battery, built-in handles, and two built-in 8-watt speakers. With our projector, you won’t need to carry another speaker with you to hear what is playing.
Why does my projector have no sound?
These are the most common reasons you may not have sound on your projector: The volume is turned down. Check the volume control on the projector to ensure the volume is turned up. If you are connected to a source device, via HDMI or USB-C, check the volume control on that device as well to ensure it is turned up.
Are projectors better than TVs?
The better projectors also had far better contrast ratios, and therefore better image quality, than most TVs of thVe time. Short-throw projectors can help fit a projector into just about any room but they can still look washed out in brighter lighting. Life moves pretty fast. Technology even more so.
How do I get my TV to play sound through my home theater system?
Connect a Coaxial Digital Cable, Optical Digital Cable, or Audio cable to the Audio Output jack on your TV. Connect the other end of the cable to the corresponding jacks on the A/V receiver or home theater system. Depending on your device, the audio input may be labeled TV INPUT or VIDEO INPUT.
Do projectors use a lot of electricity?
A standard projector uses anywhere from 150-800 watts per hour, with the average coming in at around 300. In comparison, TVs average between 80-400 watts per hour.
Is projector better for eyes than screen?
Screens like TVs produce eye-damaging direct blue light. A projector’s Indirect light – even its indirect blue light – is much gentler on the eyes. Along with other safety features which you can learn about below – projectors are the best option based strictly on eye health.
Do projectors give off blue light?
Blue light is a light wavelength not only found in natural sunlight. It’s also found in anything emitting light such as fire, TVs, computer screens, light bulbs, LEDs, and projectors.
How do I stop my projector from lighting?
So, you can draw your room out, place the projector in the room, and draw the lines to the screen. If you are sitting under the projector, you will NEVER have an issue if you just sit down. If you are a few feet in front of the projector, then when seated you still shouldn’t have an issue.
RCA Multimedia Projector
www://rca.com/