![]()
Quick Start Guide
What’s in the Box

General Introduction

Install the Antenna

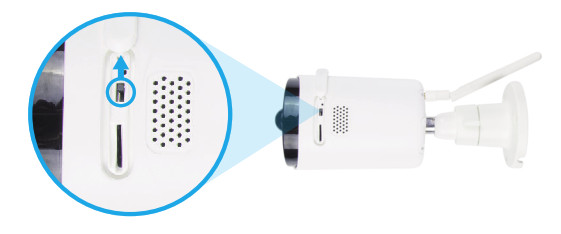
Turn on the Camera
- Reolink Argus Eco is turned off by default, please turn it on before setting up the camera.

Setup Camera on Reolink App (For Smartphone)
Download and install the Reolink App in App Store (for iOS) and Google Play (for Android).

Please follow the prompt tone to configure the camera.
- Please click the “

- Scan the QR code on the back of the camera.
- Click “Connect to Wi-Fi” to configure the Wi-Fi settings.
Note:
• Reolink Argus Eco Camera only supports 2.4GHz Wi-Fi, 5GHz is not supported.
• Your family can click “Access Camera” for live view after the initial setup.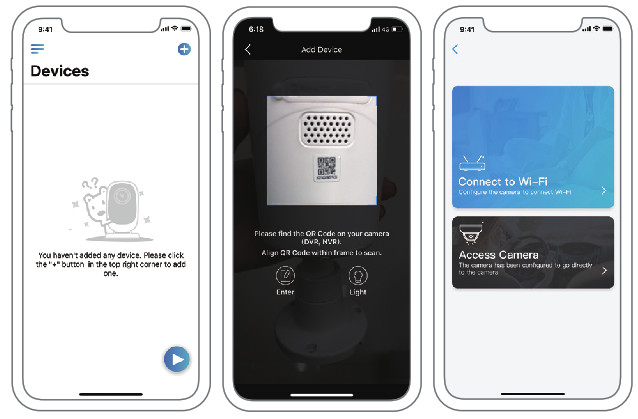
- A QR code will be generated on the phone. Please place the QR code on your phone towards the Reolink Argus Eco camera’s lens at a distance of about 20cm (8 inches) to let the camera scan the QR code. Please make sure that you’ve ripped the protection film of the camera’s lens.
Note: To help to scan, please click the QR code to display in full screen. - Follow the steps to finish the Wi-Fi settings.
- After you created a password for your camera, please follow the steps to sync the time, and then start live view or go to “Device Settings”.


 |
Menu |
 |
Add New Device |
 |
Enable/Disable PIR Motion Sensor (In default, the PIR sensor is enabled.) |
 |
Device Settings |
 |
Access the Live View |
 |
Battery Status |
Setup Camera on Reolink Client (For PC)
Please download the client software from our official website: https://reolink.com/software-and-manual and install it.
Note: The camera must be first set up on Reolink App before being connected to Reolink Client.
Launch the Reolink Client software and manually add the camera to the Client. Please follow the steps below.
• In LAN
- Click “Add Device” on the right-side menu.
- Click “Scan Device in LAN”.
- Double click on the camera you want to add. The information will be filled in automatically.
- Input the password created on Reolink App to log in.
- Click “OK” to log in.

• In WAN
- Click “Add Device” on the right-side menu.
- Choose “UID” as the Register Mode.
- Type in the UID of your camera.
- Create a name for the camera displayed on Reolink Client.
- Input the password created on Reolink App to log in.
- Click “OK” to log in.


Attention for Camera Installation
• PIR Sensor Detecting Distance
The PIR sensor has 3 sensitivity levels for your adjustment: Low/Mid/High.
Higher sensitivity offers a longer detecting distance. The default sensitivity of the PIR sensor is at “Mid”.
| Sensitivity | Value | Detecting Distance (For moving and living things) | Detecting Distance (For moving vehicles) |
| Low | 0 – 50 | Up to 4 meters (13ft) | Up to 10 meters (33ft) |
| Mid | 51 – 80 | Up to 6 meters (20ft) | Up to 12 meters (40ft) |
| High | 81 – 100 | Up to 10 meters (30ft) | Up to 16 meters (52ft) |
Note:
Path for adjusting distance in App: Device settings-PIR settings

To reduce false alarms, please note that:
- Do not install the camera facing any objects with bright lights, including sunshine, bright lamp lights, etc.
- Do not place the camera too close to a place where there are frequently moving vehicles. Based on our numerous tests, the recommended distance between the camera and the vehicle is 16 meters (52ft).
- Stay away from the outlets, including the air conditioner vents, humidifier outlets, the heat transfer vents of projectors, etc.
- Do not install the camera where there are strong winds.
- Do not install the camera facing the mirror.
- Keep the camera at least 1 meter away from any wireless devices, including Wi-Fi routers and phones in order to avoid wireless interference.
PIR Sensor Installation Angle
When installing the camera, please install the camera regularly (the angle between the sensor and the detected object is larger than 10°) for effective motion detection. If the moving object approaches the PIR sensor vertically, the sensor may not detect the motion events.
FYI:
- The PIR sensor’s detecting distance: 23ft (in default)
- The PIR sensor’s detecting angle: 100° (H)

The ideal viewing distance is 2-10 meters (7-33ft), which enables you to recognize a human.

Charge the Battery
- Charge the battery with a power adapter.


Charging indicator:
Orange LED: Charging
Green LED: Fully charged
Note:
- The battery is built-in, please do not remove it from the camera.
- Please note that the solar panel is NOT included in the package. You can buy the solar panel on Reolink official online store.
Battery Use
Reolink Argus Eco is not designed for 24/7 full capacity running or around-the-clock live streaming. It’s designed to record motion events and remotely view live streaming only when you need it.
Please learn some useful ways to maximize the battery life in this post: https://reolink.com/faq/extend-battery-life/
- Please charge the rechargeable battery with a standard and high-quality DC 5V or 9V battery charger.
- If you want to power the battery via the solar panel, please note that the battery is ONLY compatible with the Reolink solar panel. You cannot charge the battery with other solar panel brands.
- Please charge the battery in temperatures between 0°C and 45°C.
- Always use the battery in temperatures between -20°C and 60°C.
- Please make sure the battery compartment is clean.
- Please keep the USB charging port dry, clean and free of any debris and make sure the battery contacts are aligned.
- Always make sure the USB charging port is clean. Please cover the USB charging port with the rubber plug after the battery has been fully charged.
- Never charge, use or store the battery near any ignition sources, such as fire or heaters.
- Always store the battery in a cool, dry and ventilated environment.
- Never store the battery with any hazardous or combustible objects.
- Do keep the battery away from children.
- Do not short-circuit the battery by connecting wires or other metal objects to the positive (+) and negative (-) terminals. Do NOT transport or store the battery with necklaces, hairpins or other metal objects.
- Do NOT disassemble, cut, puncture, short-circuit the battery, or make it dispose of in water, fire, microwave ovens, and pressure vessels.
- Do NOT use the battery if it gives off an odor, generates heat, becomes discolored or deformed, or appears abnormal in any way. If the battery is being used or charged, remove the battery from the device or the charger immediately, and stop using it.
- Always follow the local waste and recycle laws when throwing the used battery away.
How to Install Security Mount
Step 1
Screw the security mount into the wall.

Screw the antenna to the camera.
Screw the camera to the security mount.

Loose the screw and adjust the camera to the proper direction. 
Tighten the screw.

How to Install Tree Mount
Step 1
Thread the hook & loop strap through the slots.

Screw the plate to the security mount.

Fasten the wrap strap to the tree.

Screw the antenna to the camera.

Screw the camera to the security mount, adjust its direction and tighten the knob to fix it.