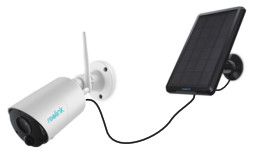
![]() Reolink Argus Eco
Reolink Argus Eco
Quick Start Guide
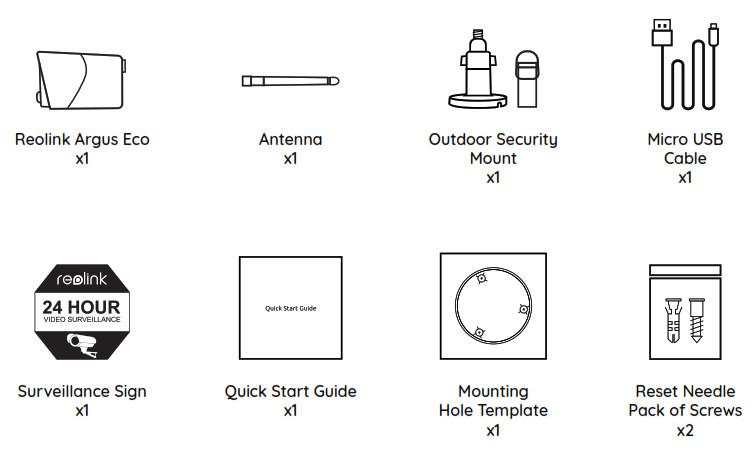
What’s in the Box
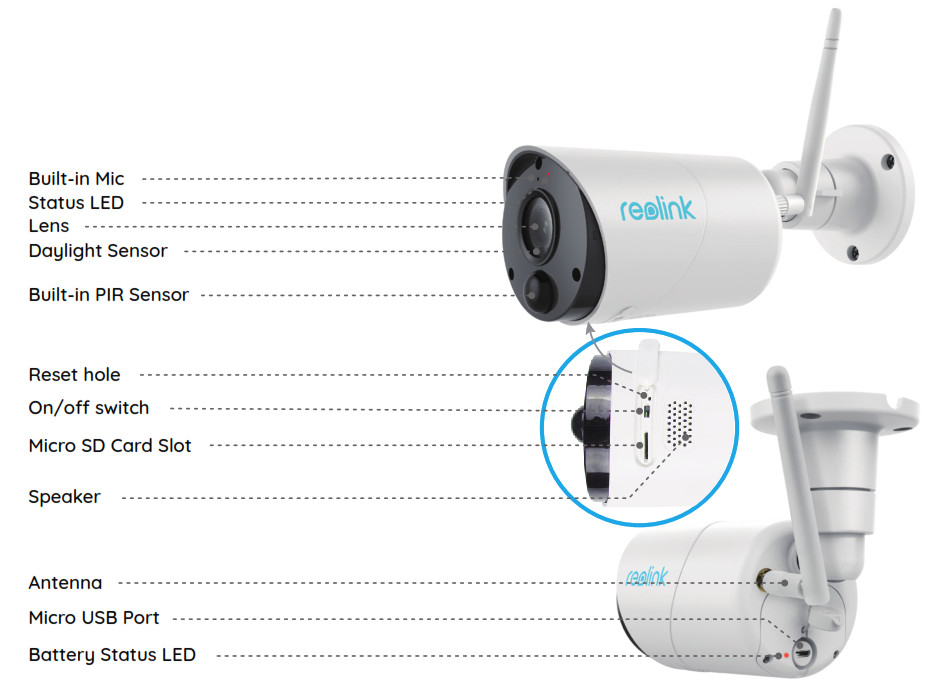
General Introduction
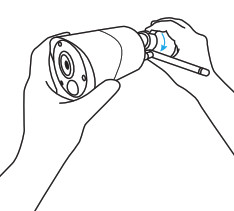
Install the Antenna
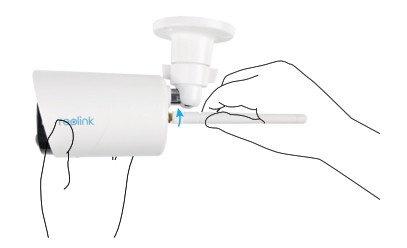 Please install the Antenna to the camera. Turn the antenna base in a clockwise motion to connect. Leave the antenna in a vertical position for best reception.
Turn on the Camera
- Reolink Argus Eco is turned off by default, please turn it on before setting up the camera.
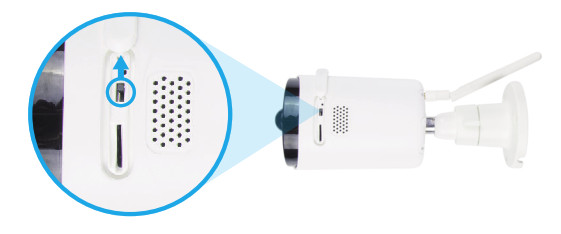 Note: If the camera will not be in use for a very long time, it’s suggested to turn it off.
Setup Camera on Reolink App (For Smartphone)
Download and install the Reolink App in App Store (for iOS) and Google Play (for Android).

Please follow the prompt tone to configure the camera.
- Please click the “
 ”button in the top right corner to add the camera.
 - Scan the QR code on the back of the camera.
- Click “Connect to Wi-Fi” to configure the Wi-Fi settings.
Note:
• Reolink Argus Eco Camera only supports 2.4GHz Wi-Fi, 5GHz is not supported.
• Your family can click “Access Camera” for live view after the initial setup.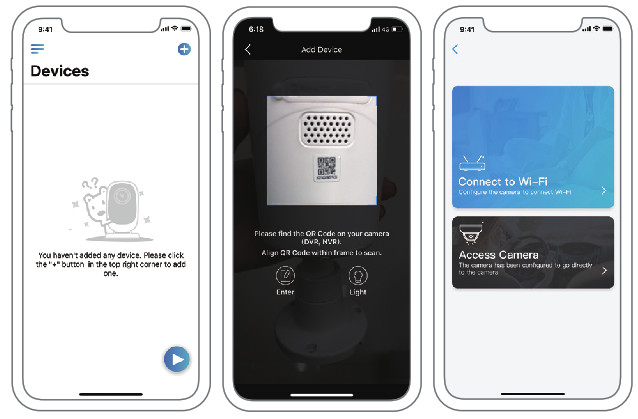
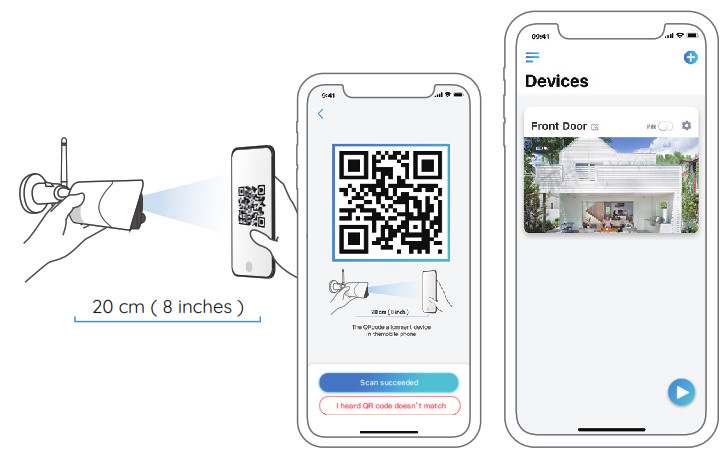
- A QR code will be generated on the phone. Please place the QR code on your phone towards the Reolink Argus Eco camera’s lens at a distance of about 20cm (8 inches) to let the camera scan the QR code. Please make sure that you’ve ripped the protection film of the camera’s lens.
Note: To help to scan, please click the QR code to display in full screen. - Follow the steps to finish the Wi-Fi settings.
- After you created a password for your camera, please follow the steps to sync the time, and then start live view or go to “Device Settings”.
 |
Menu |
|
Add New Device |
 |
Enable/Disable PIR Motion Sensor (In default, the PIR sensor is enabled.) |
 |
Device Settings |
 |
Access the Live View |
 |
Battery Status |
Setup Camera on Reolink Client (For PC)
Please download the client software from our official website: https://reolink.com/software-and-manual and install it.
Note: The camera must be first set up on Reolink App before being connected to Reolink Client.
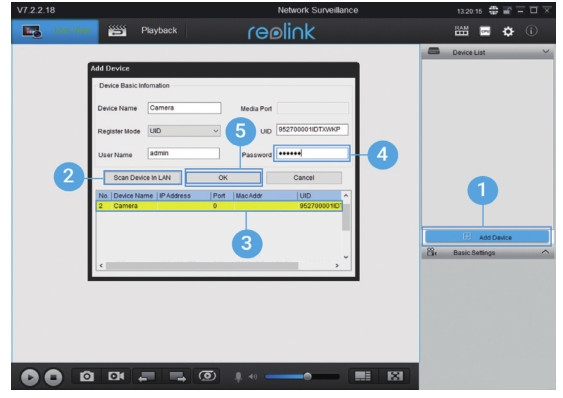
Launch the Reolink Client software and manually add the camera to the Client. Please follow the steps below.
• In LAN
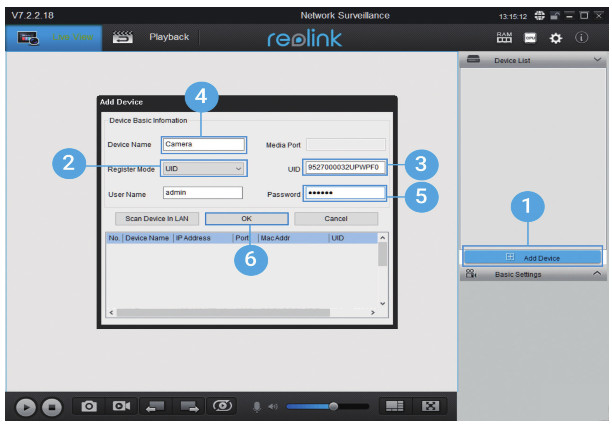
- Click “Add Device” on the right-side menu.
- Click “Scan Device in LAN”.
- Double click on the camera you want to add. The information will be filled in automatically.
- Input the password created on Reolink App to log in.
- Click “OK” to log in.
• In WAN
- Click “Add Device” on the right-side menu.
- Choose “UID” as the Register Mode.
- Type in the UID of your camera.
- Create a name for the camera displayed on Reolink Client.
- Input the password created on Reolink App to log in.
- Click “OK” to log in.
 Note: To save power, the camera will log out if cooperation is conducted for about five minute. You must login again by clicking the “
  ” btton.
Attention for Camera Installation
• PIR Sensor Detecting Distance
The PIR sensor has 3 sensitivity levels for your adjustment: Low/Mid/High.
Higher sensitivity offers a longer detecting distance. The default sensitivity of the PIR sensor is at “Mid”.
| Sensitivity | Value | Detecting Distance (For moving and living things) | Detecting Distance (For moving vehicles) |
| Low | 0 – 50 | Up to 4 meters (13ft) | Up to 10 meters (33ft) |
| Mid | 51 – 80 | Up to 6 meters (20ft) | Up to 12 meters (40ft) |
| High | 81 – 100 | Up to 10 meters (30ft) | Up to 16 meters (52ft) |
Note:
Path for adjusting distance in App: Device settings-PIR settings
 Important Notes for Reducing False Alarms
To reduce false alarms, please note that:
- Do not install the camera facing any objects with bright lights, including sunshine, bright lamp lights, etc.
- Do not place the camera too close to a place where there are frequently moving vehicles. Based on our numerous tests, the recommended distance between the camera and the vehicle is 16 meters (52ft).
- Stay away from the outlets, including the air conditioner vents, humidifier outlets, the heat transfer vents of projectors, etc.
- Do not install the camera where there are strong winds.
- Do not install the camera facing the mirror.
- Keep the camera at least 1 meter away from any wireless devices, including Wi-Fi routers and phones in order to avoid wireless interference.
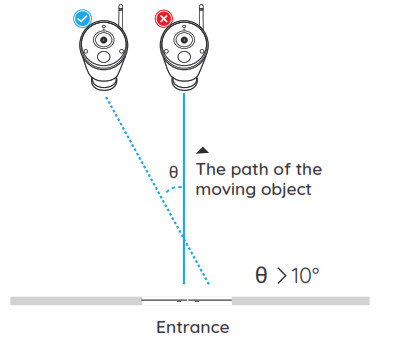
PIR Sensor Installation Angle
When installing the camera, please install the camera regularly (the angle between the sensor and the detected object is larger than 10°) for effective motion detection. If the moving object approaches the PIR sensor vertically, the sensor may not detect the motion events.
FYI:
- The PIR sensor’s detecting distance: 23ft (in default)
- The PIR sensor’s detecting angle: 100° (H)
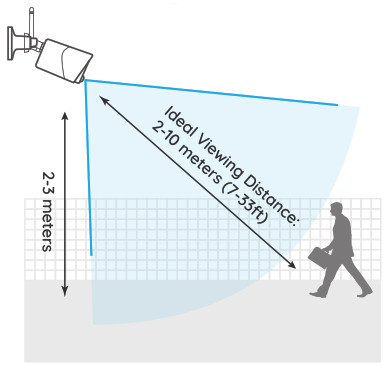
 Camera Ideal Viewing Distance
The ideal viewing distance is 2-10 meters (7-33ft), which enables you to recognize a human.
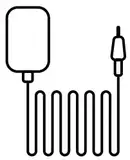
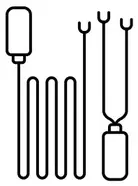
Charge the Battery
- Charge the battery with a power adapter.
 Charge the battery with the Reolink solar panel.
Charging indicator:
Orange LED: Charging
Green LED: Fully charged
Note:
- The battery is built-in, please do not remove it from the camera.
- Please note that the solar panel is NOT included in the package. You can buy the solar panel on Reolink official online store.
Important Safeguards on Rechargeable
Battery Use
Reolink Argus Eco is not designed for 24/7 full capacity running or around-the-clock live streaming. It’s designed to record motion events and remotely view live streaming only when you need it.
Please learn some useful ways to maximize the battery life in this post: https://reolink.com/faq/extend-battery-life/
- Please charge the rechargeable battery with a standard and high-quality DC 5V or 9V battery charger.
- If you want to power the battery via the solar panel, please note that the battery is ONLY compatible with the Reolink solar panel. You cannot charge the battery with other solar panel brands.
- Please charge the battery in temperatures between 0°C and 45°C.
- Always use the battery in temperatures between -20°C and 60°C.
- Please make sure the battery compartment is clean.
- Please keep the USB charging port dry, clean and free of any debris and make sure the battery contacts are aligned.
- Always make sure the USB charging port is clean. Please cover the USB charging port with the rubber plug after the battery has been fully charged.
- Never charge, use or store the battery near any ignition sources, such as fire or heaters.
- Always store the battery in a cool, dry and ventilated environment.
- Never store the battery with any hazardous or combustible objects.
- Do keep the battery away from children.
- Do not short-circuit the battery by connecting wires or other metal objects to the positive (+) and negative (-) terminals. Do NOT transport or store the battery with necklaces, hairpins or other metal objects.
- Do NOT disassemble, cut, puncture, short-circuit the battery, or make it dispose of in water, fire, microwave ovens, and pressure vessels.
- Do NOT use the battery if it gives off an odor, generates heat, becomes discolored or deformed, or appears abnormal in any way. If the battery is being used or charged, remove the battery from the device or the charger immediately, and stop using it.
- Always follow the local waste and recycle laws when throwing the used battery away.
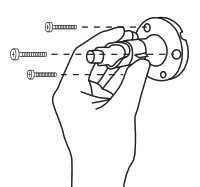
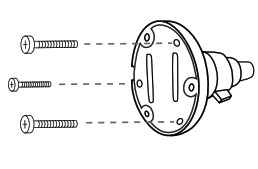
How to Install Security Mount
Step 1
Screw the security mount into the wall.
 Step 2
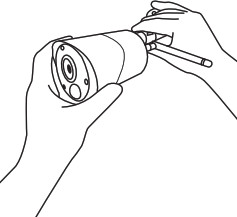
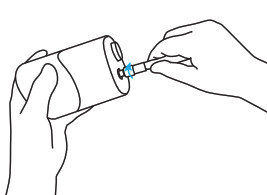
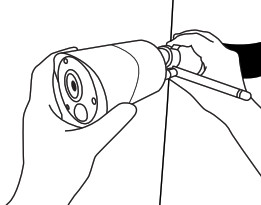
Screw the antenna to the camera.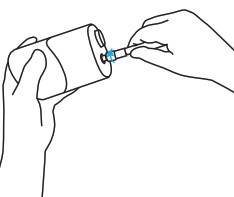 Step 3
Screw the camera to the security mount.
 Step 4
Loose the screw and adjust the camera to the proper direction. 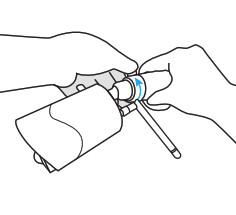 Step 5
Tighten the screw.
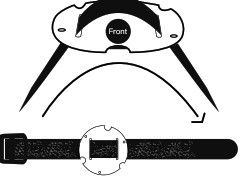
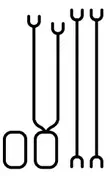
How to Install Tree Mount
Step 1
Thread the hook & loop strap through the slots.
 Step 2
Screw the plate to the security mount.
 Step 3
Fasten the wrap strap to the tree.
 Step 4
Screw the antenna to the camera.
 Step 5
Screw the camera to the security mount, adjust its direction and tighten the knob to fix it.
reolink Wireless NVR System
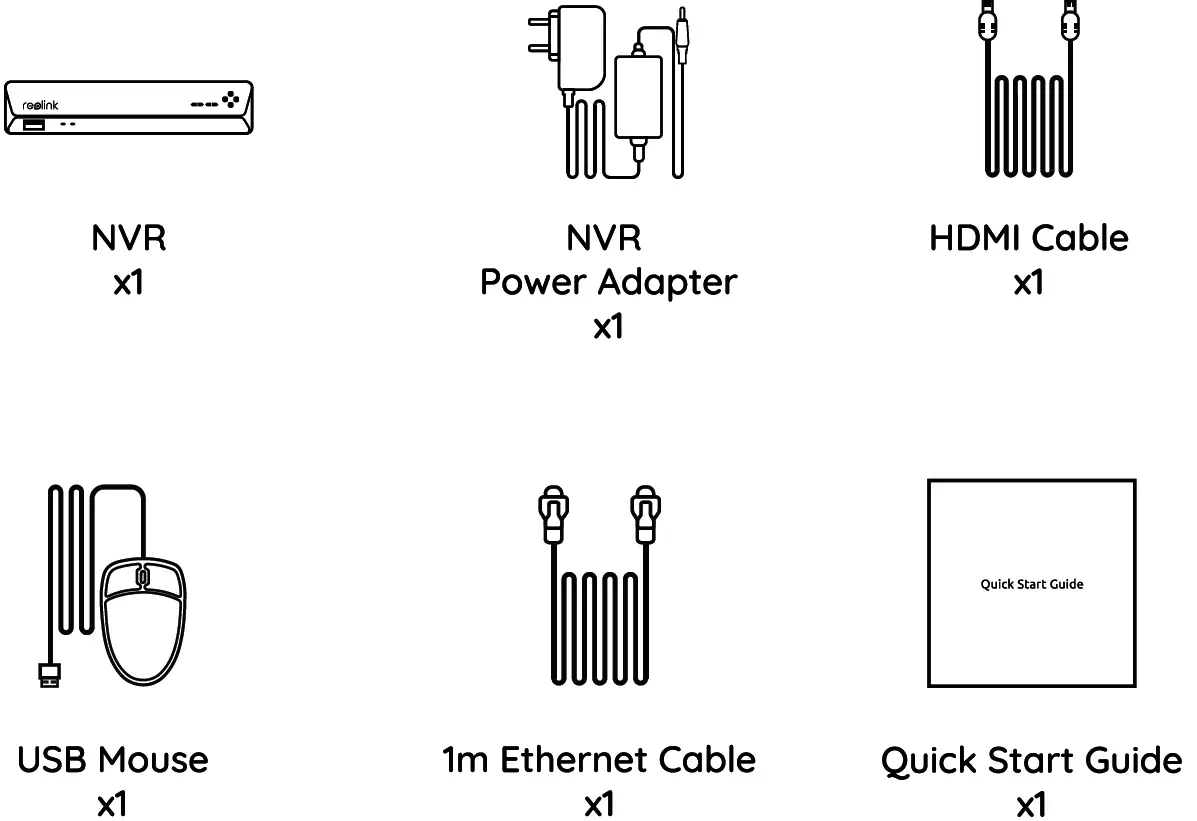
What’s in the Box
Note: The Micro SD card can only record when motion detected. If you want to set the 24/7 video recordings, please purchase and install the HDD to record. The way to install the HDD, please refer to https://bit.ly/2HkDChC
Connection Diagram
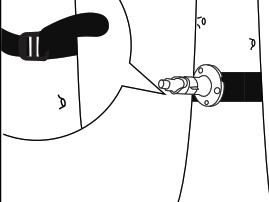
To make sure nothing was damaged during shipping, we recommend that you connect everything and try it before you do a permanent installation.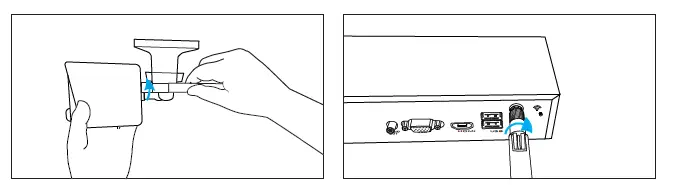 Step 1: Turn the antenna base in a clockwise motion to connect. Leave the antenna in a vertical position for best reception. Screw the WiFi antenna to connect to the antenna socket on the WiFi NVR
Note: Before installing the antenna, you need to fold the bracket of the camera as the picture shown so that you can install the antenna easily.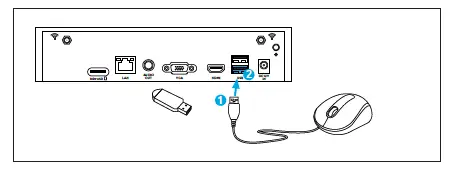
Step 2: Connect the supplied mouse (1) to the bottom USB port (2). To copy video recordings and to perform a firmware upgrade, connect a USB flash drive (not included) to the top port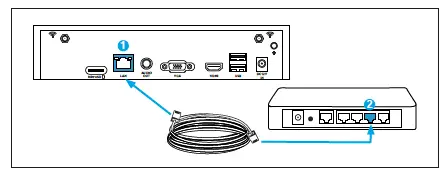
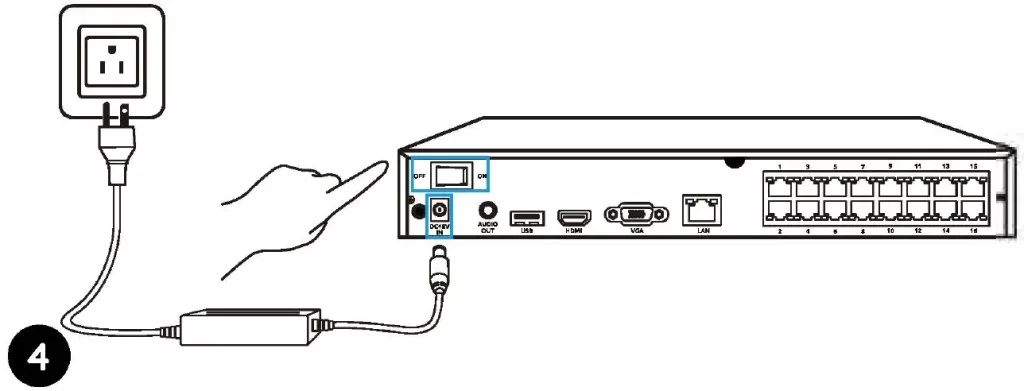
Step 3: Connect the supplied Ethernet cable to the Ethernet port (1) on your NVR then connect the other end to a spare port (2) on your router. Don’t proceed to the next step until this is done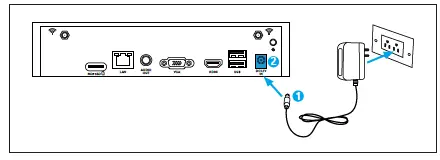 Step 4: Connect the supplied power adapter’s power connection (1) to the power input (2) on your NVR first (to minimize sparking). Connect the power adapter to a power outlet to supply power
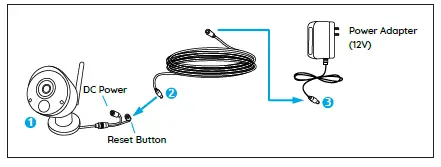
Step 5: Connect the output on the power cable to the power input on the camera. Then connect the input on the power cable to the power adapter. The reset button is used to restore factory default settings.
Setup WiFi System on Monitor
If you want to initial setup the WiFi system on monitor, you need to connect the HDMI/VGA cable to the HDMI/VGA port (1) then connect the other end to a spare HDMI/VGA input (2) on your TV.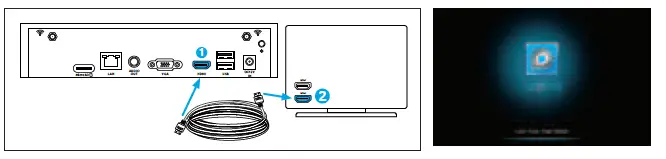
After you connect the system according to the connection diagram, during the startup, you will see the
below splash screen after a few seconds.
You need to follow the Setup Wizard to set up your NVR by clicking “Right arrow”to continue and click “Finish” to save your settings at the last step.
Note: Please enter at least 6 characters as the password. Then You can skip the remaining steps to finish the wizard and configure them later
Wizard Setup
- Choose a language, video standard, resolution and check the UID.
- Name the system and create a password.
Live View Screen and Menu Bar
Live View is the NVR’s default display mode, and all of your connected cameras are displayed on screen. You may check the status or operation of your NVR and cameras by using the icons and menu bars on the Live View screen Right click the mouse on the LiveView screen to open the Menu bar.
- Open the Main Menu
- Open Camera List
- Search Video Files
- Audio On/Off (audios can be set up only after you enable Record Audio in Recordings)
- Lock/Shut Down/Reboot
Setup WiFi system on Reolink App (For Smartphone)
Download and install the Reolink App in App Store (for iOS) and Google Play (for Android).
-
Phone is in the Same Network with NVR
- After downloading finished, install and launch the app.
- During start-up, you will see the Devices page. The NVR will automatically show in the device list.
- Click the device you want to add, it will pop up a menu asking you to create a password. For security consideration, you’d better create a password and name the device for the first-time use.
- Done! You can start to live view now.
-
Phone is Not in the Same Network with NVR or Using Cellular Data
- Click the button to Enter the UID of the NVR, then click Next to add the device.
- You need to create a login password and name the device to finish the initialization for the NVR.
Note: The default password is blank (no password). - Initialization Done! You can start to live view now.
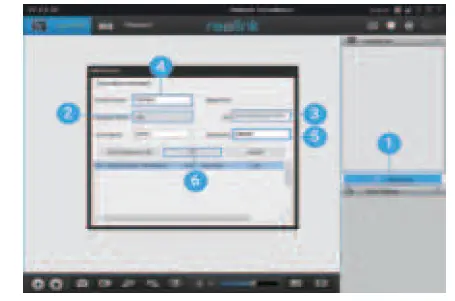
Setup WiFi System on Reolink Client (For PC)
Please download the client software from our official website: https://reolink.com/software-and-manual and install it.
Launch the Reolink Client software and manually add the NVR to the Client. Please follow the steps below.
-
PC is in the Same Network with NVR
- Click “Add Device” on the right-side menu.
- Click “Scan Device in LAN”.
- Double click on the device you want to add. The information will be filled in automatically.
- Input the password created on Reolink App or on NVR to log in.
Note: The default password is blank. If you’ve already create a password on the mobile app or on NVR, you need to use the password you’ve created to log in. - Click “OK” to log in
-
PC is Not in the Same Network with NVR
- Click “Add Device” on the right-side menu.
- Choose “UID” as the Register Mode and type in the UID of the NVR.
- Create a name for the camera displayed on Reolink Client.
- Input the password created on Reolink App or on NVR to log in.
Note: The default password is blank. If you’ve already create a password on the mobile app or on NVR, you need to use the password you’ve created to log in. - Click “OK” to log in.
-
Client UI Introduction
Attention for Camera Installation
PIR Sensor Installation Angle
When installing the camera, please install the camera angularly (the angle between the sensor and the detected object is larger than 10°) for effective motion detection. If the moving object approaches the PIR sensor vertically, the sensor may not detect the motion events.
FYI:
- The PIR sensor’s detecting distance: 23ft (in default)
- The PIR sensor’s detecting angle: 100° (H)
Camera Ideal Viewing Distance
The ideal viewing distance is 2-10 meters (7-33ft), which enables you to recognize a human
Note: The PIR trigger can’t work alone, it needs to be used with motion detection. There are two detection types can be chosen. One is Motion and PIR, the other is Motion.
How to Install the Camera
Mounting Tips
Lighting
- For best results, do not point the camera towards a light source.
- Pointing the camera towards a glass window intending to see outside may result in a poor image because of glare and lighting conditions inside and outside.
- Don’t place the camera in a shaded area that is pointing into a well-lit area as this will result in a poor display. The light to the sensor located at the front of the camera needs to be the same as the light at the focal target for best results.
- As the camera uses infrared LEDs to see at night, it’s recommended to clean the lens from time to time if the picture degrades.
Environment
- Make sure the power connections are not directly exposed to water or moisture and not shielded from other outdoor elements.
- Weatherproof only means that the camera can be exposed to weather such as rain and snow. Weatherproof cameras cannot be submerged under water.
- Do not expose the camera where rain and snow will hit the lens directly.
- Cameras geared for cold weather may work in extreme conditions as low as -25° as the camera produces heat when plugged in.
- Suggested Working Distance: Less than 3 WOOD WALLS within 90ft.

reolink RLN16-410-3T PoE NVR
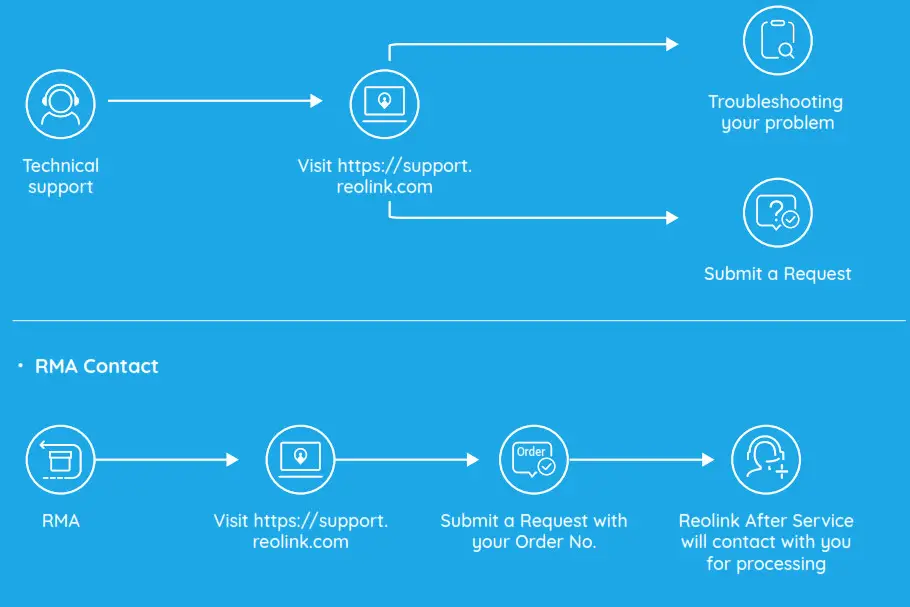
Technical Support
If you need any technical help, please visit our official support site and contact our support team before returning the products, [email protected]
REOLINK INNOVATION LIMITED
Room B, 4th Floor, Klngway Commercial Building, 171-173 Lockhart Road, Wan Chai, Hong Kong
I REP I Product ldent GmbH
Hof erstasse 9B, 71636 Ludwlgsburg,
Germany [email protected]
@ReolinkTech https://reolink.com
What’s in the Box
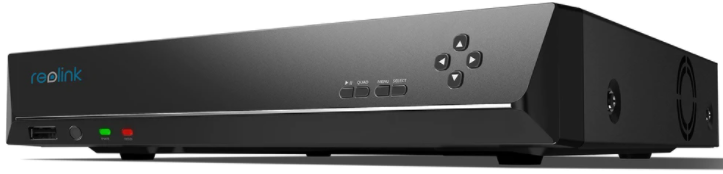
NVR Introduction
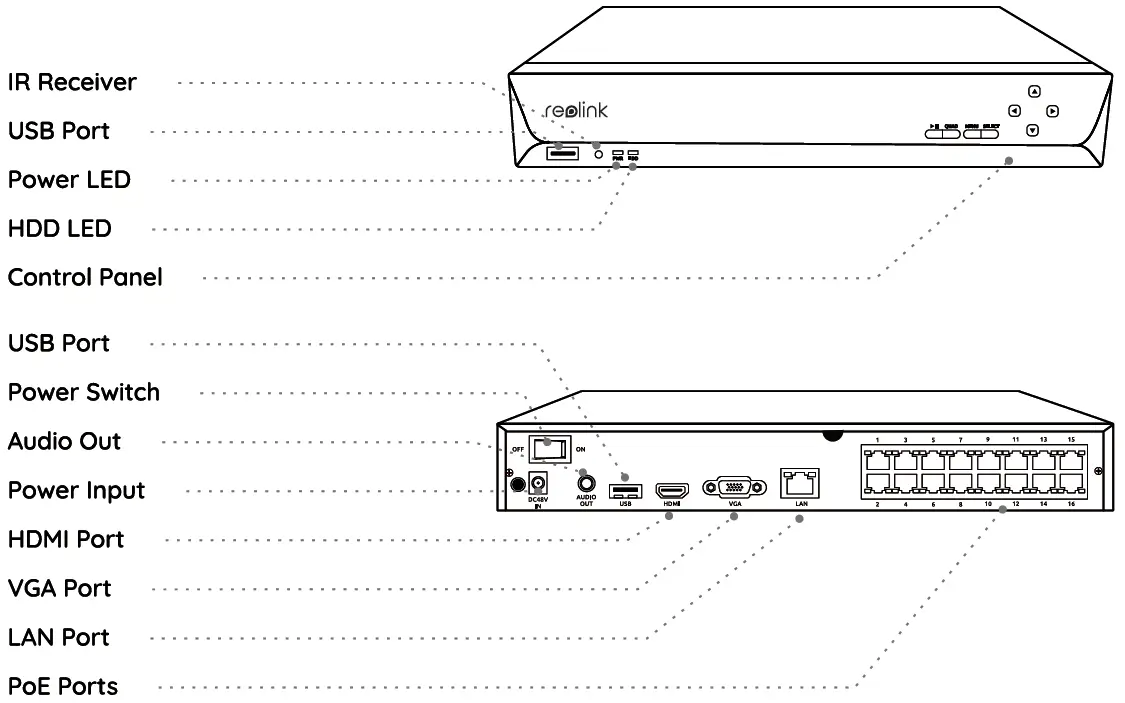
Connection Diagram
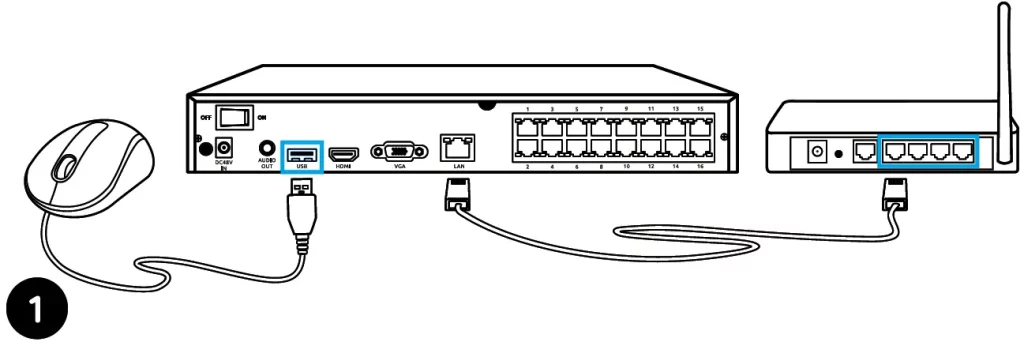
Connect the NVR (LAN port) to your router with an Ethernet cable. Next, connect the mouse to the USB port of the NVR.
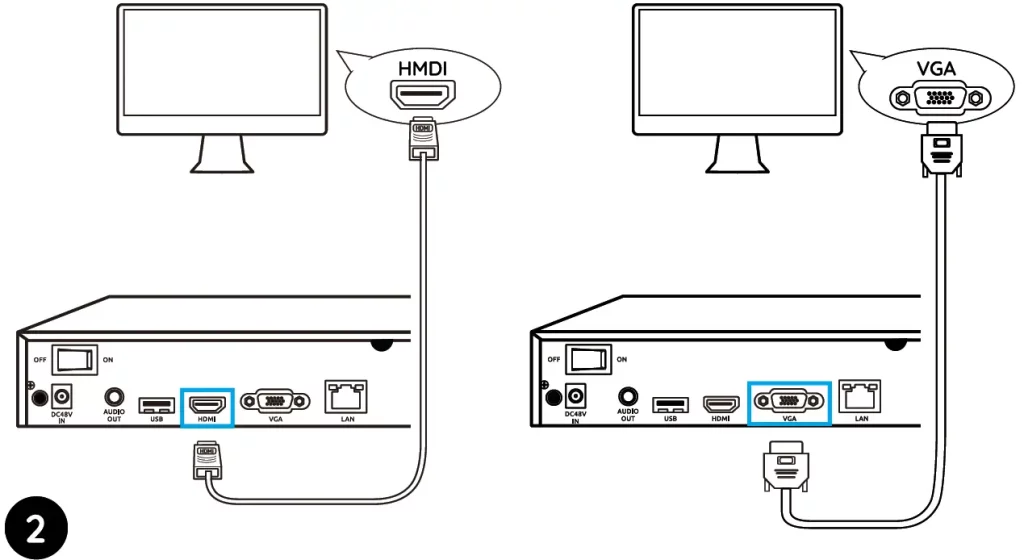
Connect the NVR to the monitor with a VGA or HDMI cable.
NOTE: There is no VGA cable Included In the package.
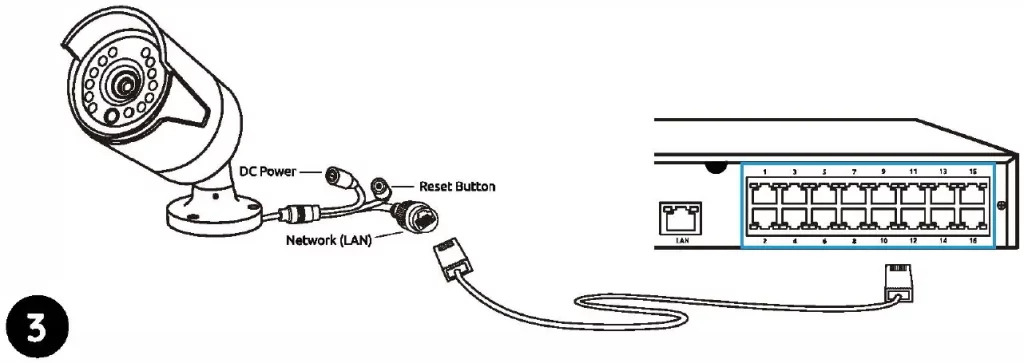
Connect cameras to PoE ports on the NVR.
Connect the NVR to a power outlet and turn on power switch.
NOTE: Some Reolink WiFi cameras also work with Reolink PoE NVR. For more information, visit https://support.reolink.com and search Make Reolink WiFi Cameras Work with Reolink PoE-NVRs.
Set up PoE NVR System
A setup wizard will guide you through the NVR system configuration process. Please set a password for your NVR (for the initial access) and follow the wizard to configure the system.
NOTE: The password should be at least 6 characters. It is recommended that you note down the password and keep it in a secure place.
Access the NVR via Smartphone or PC
Download and launch the Reolink App or Client software and follow the instructions to access the NVR.
Download path: Go to https://reolink.com >Support> App & Client
Troubleshooting
No Video Output on the Monitor
If there’s no video output on the monitor from Reolink NVR, please try the following solutions:
- TV/monitor resolution should be at least 720p or above.
- Make sure your NVR is powered on.
- Double check the HDMI/VGA connection, or swap another cable or monitor to test.
If it still doesn’t work. please contact Reolink Support [email protected]
Failed to Access the PoE NVR Locally
If you failed to access the PoE NVR locally via mobile phone or PC, please try the following solutions:
- Connect the NVR (LAN port) to your router with a network cable.
- Swap another Ethernet cable or plug the NVR to other ports on the router.
- Go to Menu -> System -> Maintenance and restore all settings.
If it still doesn’t work, please contact Reolink Support [email protected]
Failed to Access the PoE NVR Remotely
If you failed to access the PoE NVR remotely via mobile phone or PC. please try the following:
- Make sure you can locally access this NVR system.
- Go to NVR Menu -> Network -> Network Advanced and make sure that UID Enable Is selected.
- Please connect your phone or PC under the same network (LAN) of your NVR and see If you can visit any website to verify whether there is Internet access available.
- Please reboot your NVR and home router and try again.
- If It still doesn’t work, please contact Reolink Support [email protected]
Specifications
Video/ Audio Output
HDMI Output: Up to 8MP
VGA Output: Up to 2MP
Audio output: 1CH RCA
Decoding
Decoding Resolution: 12MP/BMP/SMP/4MP/3MP/1080p/720p
Video Format: H.264,H.265
Synchronous Playback: Up to 4 Channels
General
Operating Temperature: -1o·c to 45″C (-10″C to 55″C for RLN16-410)
Size: 260 x 41 x 230mm, (330 x 45 x 285mm for RLN16-410)
Weight: 2.0kg, (3.0kg for RLN16-410)
Notification of Compliance
FCC Compliance Statement
This device complies with Part 15 of FCC Rules. Operation Is subject to the following two conditions: (1) this device may not cause harmful interference, and (2) this device must accept any Interference received, Including Interference that may cause undesired operation. For more information. visit: https://reolink.com/fcc-compliance-notice/.
Simplified EU Declaration of Conformity
Reolink declares that this device is in compliance with the essential requirements and other relevant provisions of Directive 2014/53/EU. )?’.
Correct Disposal of This Product
This marking Indicates that this product cannot be disposed with other household wastes throughout the EU. To prevent possible harm to the environment or human health from uncontrolled waste disposal and promote the sustainable reuse of material resources, please recycle It responsibly. To return your used device, please visit the Return and Collection System or contact the retailer from whom the product was purchased. They can take this product away for environmentally safe recycling.
Limited Warranty
This product comes with a 2-year limited warranty that Is valid only If purchased from Reolink Official Store or a Reolink authorized reseller. Learn more: https://reolrnk.com/warranty-and-return/.
NOTE: We hope that you enjoy your new purchase. But if you are not satisfied with the product and plan to return It, we strongly suggest that you format the Inserted HDD first.
Terms and Privacy
Use of the product is subject to your agreement to the Terms of Service and Privacy Policy at reolink.com. Keep it out of reach of children.
End User License Agreement
By using the Product Software that is embedded on the Reolink product, you agree to the terms of this End User License Agreement (“EULA) between you and Reolink. Learn more: https://reollnk.com/eula/.
![]()
reolink RLC-423 PTZ Camera

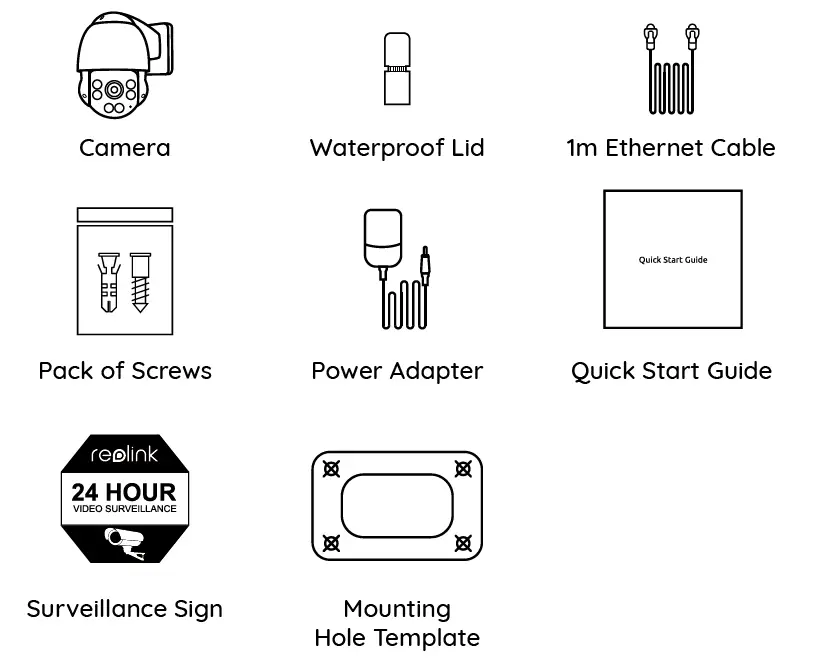
What’s in the Box
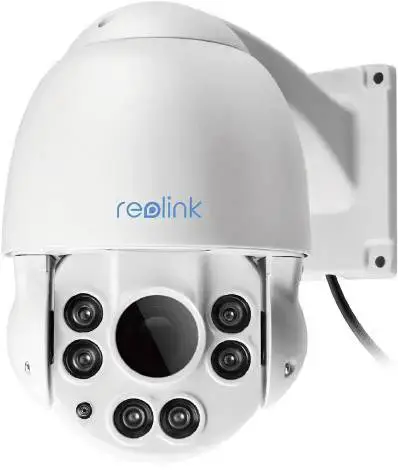
- Camera
- Waterproof Lid
- 1m Ethernet Cable
- Pack of Screws
- Power Adapter
- Quick Start Guide
- Surveillance Sign
- Mounting Hole Template
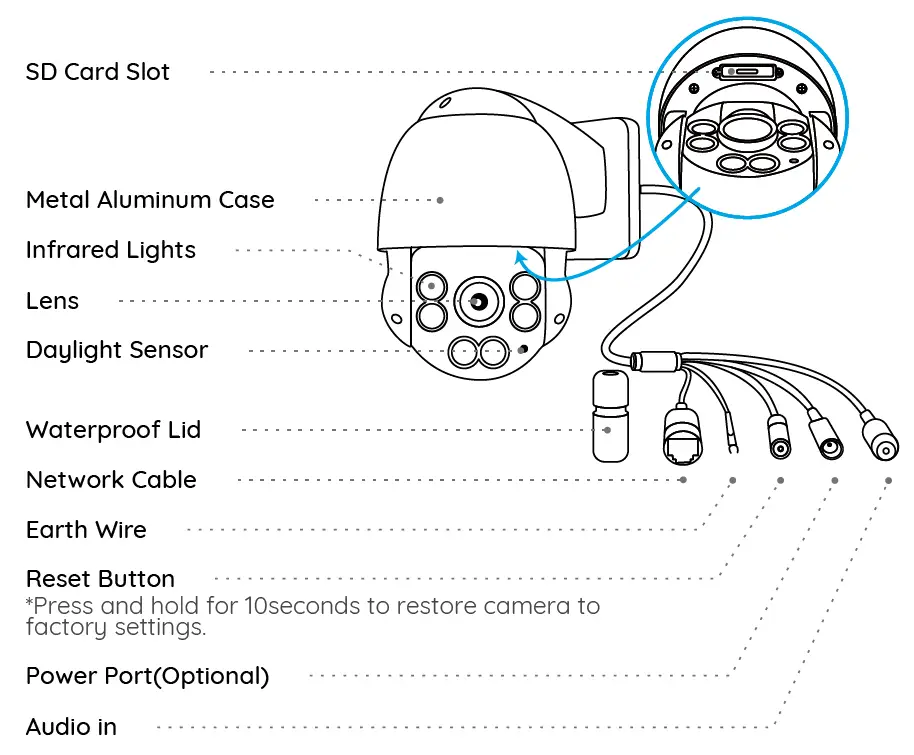
Camera Introduction
Camera Connection Diagram
Before using the camera, please connect your camera as instructed below to finish initial setup.
- Connect the camera to a LAN port on your router with an Ethernet cable.
- Power on the camera with a power adapter.
Set up the Camera
Download and launch the Reolink App or Client software and follow the onscreen instructions to finish initial setup.
- On Smartphone
Scan to download the Reolink App.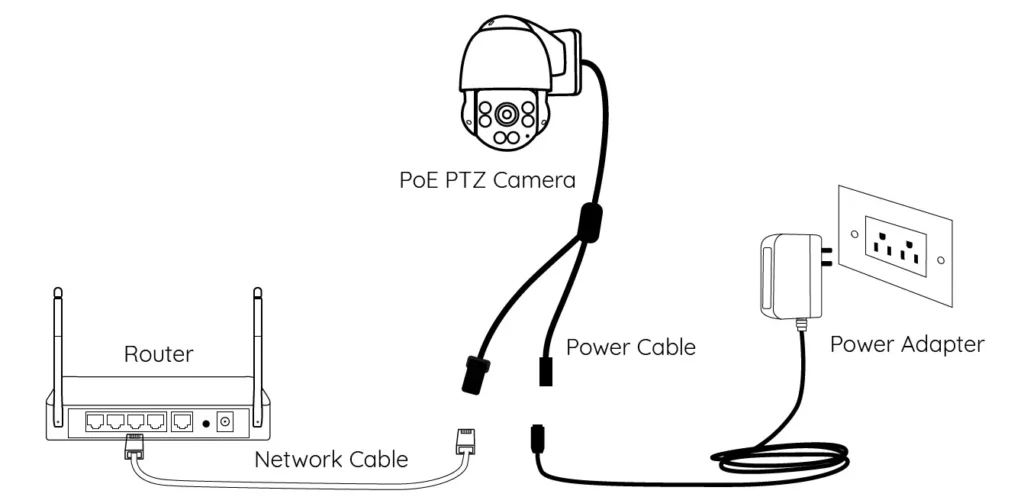
- On PC
Download path of the Reolink Client: Go to https://reolink.com > Support> App & Client.
NOTE: If you are connecting the camera to a Reolink PoE NVR, please set up the camera via the NVR interface.
Mount the Camera
Installation Tips
- Do not face the camera towards any light sources.
- Do not point the camera towards a glass window. Or, it may result in poor image performance because of the window glare by infrared LEDs, ambient lights or status lights.
- Do not place the camera in a shaded area and point it towards a well-lit area. Or, it may result in poor image performance. For better image quality, please make sure that the lighting condition for both the camera and the capture object is the same.
- For better image quality, it’s recommended to clean the lens with a soft cloth from time to time.
- Make sure the power ports are not exposed to water or moisture or blocked by dirt or other elements.
- The camera comes with waterproof design so it can work properly under conditions like rain and snow. However, it doesn’t mean the camera can work underwater.
- Do not install the camera at places where rain and snow may hit the lens directly.
- The camera may work in extreme cold conditions as low as -25°C. Because when it is powered on, the camera will produce heat. You may power on the camera indoors for a few minutes before installing it outdoors.
Mount the Camera to the Wall
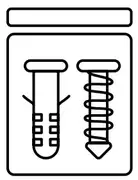
- Drill holes in accordance with the mounting hole template.
 NOTE: Use the drywall anchors included in the package if needed.
 - Install the mount base with screws included in the package.
 NOTE: Run the cable through the cable notch on the mount base.
 - To adjust the camera direction, you may control the camera to pan and tilt via Reolink app or Client.
Troubleshooting
Camera Is Not Powering on
If your camera is not powering on, please try the following solutions:
- Make sure your camera is powered on properly. The PoE camera should be powered by a PoE switch/injector, a Reolink NVR or a 12V power adapter.
- If the camera is connected to a PoE device as listed above, connect the camera to another PoE port and see if the camera will power on.
- Try again with another Ethernet cable.
If these won’t work, contact Reolink Support https://support.reolink.com/.
Infrared LEDs Stop Working
If the Infrared LEDs on your camera stop working, please try the following solutions:
- Enable infrared lights on Device Settings page via Reolink App/Client.
- Check if the Day/Night mode is enabled and set up auto infrared lights at night on Live View page via Reolink App/Client.
- Upgrade the firmware of your camera to the latest version.
- Restore the camera to factory settings and check out the infrared light settings again.
If these won’t work, contact Reolink Support https://support.reolink.com/.
Failed to Upgrade the Firmware
If you cannot upgrade firmware for the camera, try the following solutions:
- Check out the current camera firmware and see if it is the latest one.
- Make sure that you download the correct firmware from Download Center.
- Make sure that your PC is working on a stable network.
If these won’t work, contact Reolink Support https://support.reolink.com/.
Specifications
Hardware Features
- Night Vision: 60 meters (190ft)
- Day/Night Mode: Auto switchover
- Angle of View:
- Horizontal: 87°~31°,
- vertical: 65°~24°
General
- Operating Temperature: -10°C to 55°C (14°F to 131°F)
- Operating Humidity: 10%-90%
- Ingress Protection: IP66
- Size: Φ1 36 x 201mm
- Weight: 1.70kg
- For more specifications, visit https://reolink.com/.
Notification of Compliance
FCC Compliance Statement
This device complies with Part 15 of FCC Rules. Operation is subject to the following two conditions:
- this device may not cause harmful interferenc
- this device must accept any interference received, including interference that may cause undesired operation.
For more information, visit: https://reolink.com/fcc-compliance-notice/.
NOTE: This equipment has been tested and found to comply with the limits for a Class B digital device, pursuant to Part 15 of the FCC Rules. These limits are designed to provide reasonable protection against harmful interference in aresidential installation.
Simplified EU Declaration of Conformity
Reolink declares that this device is in compliance with the essential requirements and other relevant provisions of Directive 2014/53/EU.
Correct Disposal of This Product
This marking indicates that this product should not be disposed with other household wastes throughout the EU. To prevent possible harm to the environment or human health from uncontrolled waste disposal, recycle it responsibly to promote the sustainable reuse of material resources. To return your used device, please use the return and collection systems or contact the retailer where the product was purchased. They can take this product for environmentally safe recycling.
Limited Warranty
This product comes with a 2-year limited warranty that is valid only if purchased from Reolink official stores or a Reolink authorized reseller. Learn more: https://reolink.com/warranty-and-return/.
NOTE: We hope that you enjoy the new purchase. But if you are not satisfied with the product and plan to return, we strongly suggest that you reset the camera to factory default settings and take out the inserted SD card before returning.
Terms and Privacy
Use of the product is subject to your agreement to the Terms of Service and Privacy Policy at reolink.com. Keep out of reach of children.
End User License Agreement
By using the Product Software that is embedded on the Reolink product, you agree to the terms of this End User License Agreement (“EULA”) between you and Reolink. Learn more: https://reolink.com/eula/.
Technical Support
If you need any technical help, please visit our official support site and contact our support team before returning the products, https://support.reolink.com.
]]>Reolink El Series
Operational Instruction
![]()
![]() @ReolinkTech https://reolink.com
@ReolinkTech https://reolink.com
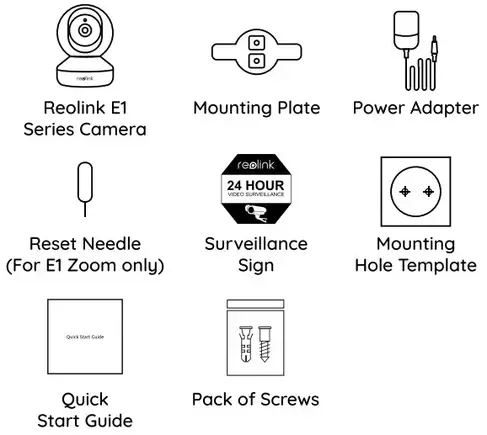
What’s in the Box

Camera Introduction
Meaning of the Status LED:
| Status/LED | LED in Blue |
| Blinkin g | WiFi connection failed |
| WiFi is not configured | |
| On | The camera is starting up |
| WiFi connection succeeded |
Set up the Camera
Download and Launch the Reolink App or Client software and follow the onscreen instructions to finish the initial setup.
- On Smartphone
Scan to download the Reolink App.


- On PC
Download path of the Reolink Client: Go to https://reolink.com > Support > App & Client.
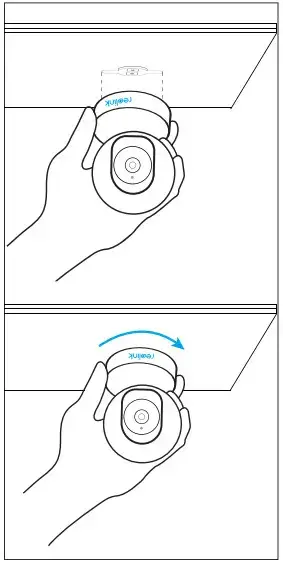
Mount the Camera
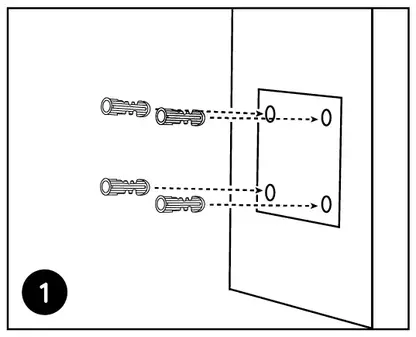
Step 1
Drill two holes on the wall according to the mounting hole template.
Step 2
Insert the two plastic anchors into the holes.
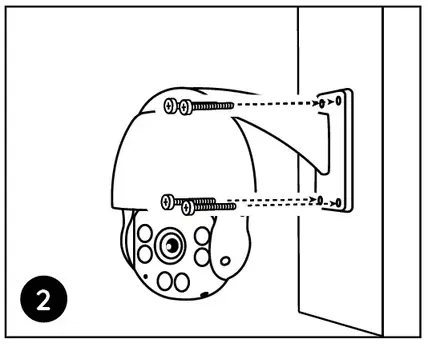
Step 3
Secure the base unit in place by tightening the screws into the plastic anchors.

Step 4
Align the camera with the bracket and turn the camera unit clockwise to lock it in position.
NOTE:
- To remove it from the wall, turn the camera anticlockwise.
- In case your camera is mounted upside down, its picture shall be rotated as well. Please go to Device Settings -> Display on Reolink app/Client and click Rotation to adjust the image.
Tips for Camera Placement
- Do not face the camera towards any light sources.
- Do not point the camera towards a glass window. Or, it may result in poor image performance because of the window glare by infrared LEDs, ambient lights, or status lights.
- Do not place the camera in a shaded area and point it towards a well-lit area. Or, it may result in poor image For better image quality, please make sure that the lighting condition for both the camera and the capture object is the same.
- For better image quality, it’s recommended to clean the lens with a soft cloth from time to time.
- Make sure the power ports are not exposed to water or moisture or blocked by dirt or other elements.
Troubleshooting
The camera Is Not Powering on
If your camera is not powering on, please try the following solutions:
- Plug the camera into another outlet.
- Use another 5V power adapter to power up the camera.
If these won’t work, please contact Reolink Support [email protected]
Failed to Scan QR Code on Smartphone
If the camera failed to scan the QR code on your phone, please try the following solutions:
- Remove the protective film from the camera lens.
- Wipe the camera lens with a dry paper/towel/tissue.
- Vary the distance (about 30cm) between your camera and the mobile phone, which enables the camera to focus better
- Try scanning the QR code under a brighter atmosphere.
If these won’t work, please contact Reolink Support [email protected]
WiFi Connection Failed During Initial Setup Process
If the camera fails to connect to WiFi, please try the following solutions:
- Please make sure the WiFi band meets the network requirement of the camera.
- Please ensure you have entered the correct WiFi password.
- Put your camera close to your router to ensure a strong WiFi signal.
- Change the encryption method of the WiFi network to WPA2-PSK/WPA-PSK (safer encryption) on your router interface.
- Change your WiFi SSID or password and make sure that SSID is within 31 characters and password is within 64 characters.
- Set your password using only the characters on the keyboard.
If these won’t work, please contact Reolink Support [email protected]
Specifications
Hardware
Display Resolution: 5MP(E1 Zoom)/4MP(E1 Pro)/3MP(E1)
IR Distance:12 meters (40ft)
Pan/Tilt Angle: Horizontal: 355°/Vertical: 50°
Power Input: DC 5V/1A
Software Features
Frame Rate: l5fps (default) Audio: Two-way audio
IR Cut Filter: Yes
General
Operating Frequency: 2.4 GHz (E1)/Dual-band (El Pro/E1 Zoom)
Operating Temperature: -10°C to 55°C 04°F to 131°F)
Size: Φ76 x 106 mm
Weight: 200g (El/E1 Pro)/250g (El Zoom)
Notification of Compliance
FCC Compliance Statement
This device complies with Part 15 of FCC Rules. Operation is subject to the following two conditions: (1) this device may not cause harmful interference, and (2) this device must accept any interference received, including interference that may cause undesired operation. For more information, visit: https://reolink.com/fcc-compliance-noticet
 Simplified EU Declaration of Conformity
Reolink declares that this device is in compliance with the essential requirements and other relevant provisions of Directive 2014/53/EU.
 Correct Disposal of This Product
This marking indicates that this product should not be disposed of with other household wastes throughout the EU. To prevent possible harm to the environment or human health from uncontrolled waste disposal, recycle it responsibly to promote the sustainable reuse of material resources. To return your used device, please use the return and collection systems or contact the retailer where the product was purchased. They can take this product for environmentally safe recycling.
Limited Warranty
This product comes with a 2-year limited warranty that is valid only if purchased from Reolink official stores or a Reolink authorized reseller. Learn more: https://reolink.com/warranty-and-return/.
NOTE: We hope that you enjoy the new purchase. But if you are not satisfied with the product and plan to return it, we strongly suggest that you reset the camera to factory default settings and take out the inserted SD card before returning.
Terms and Privacy
Use of the product is subject to your agreement to the Terms of Service and Privacy Policy at reolink.com. Keep out of the reach of children.
End-User License Agreement
By using the Product Software that is embedded on the Reolink product, you agree to the terms of this End User License Agreement (“EULA”) between you and Reolink. Learn more: https://rcolink.com/culo/.
ISED Radiation Exposure Statement
This equipment complies with RSS-102 radiation exposure limits set forth for an uncontrolled environment. This equipment should be installed and operated with a minimum distance of 20cm between the radiator & your body.
OPERATING FREQUENCY
(the maximum transmitted power)
2412MHz-2472MHz (17dBm)
58.03.001.0155
]]>What’s in the Box
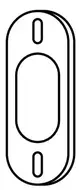
- Doorbell

- Chime
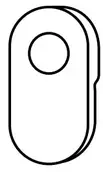
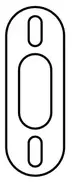
- Wedge
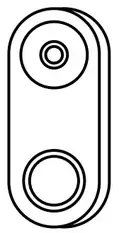
- Mounting Plate
- Mounting Hole Template
- 1m Ethernet Cable
- Power Adapter*
- Jumper Cable
- Power Extension Cable*
- Pack of Screws
- Quick Start Guide
NOTE: The Reolink Video Doorbell PoE doesn’t come with a power adapter and power extension cable.
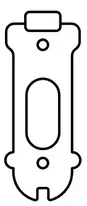
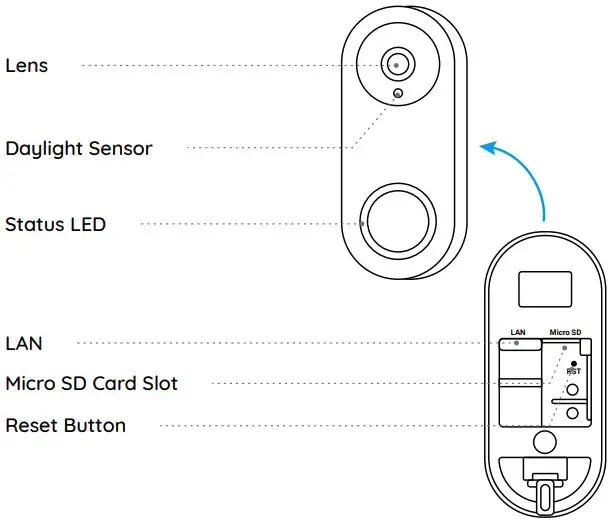
Doorbell Introduction
Video Doorbell PoE
Video Doorbell WiFi

Set up the Doorbell
Set up the Doorbell on Phone
*The Reolink Video Doorbell PoE is taken as an example.
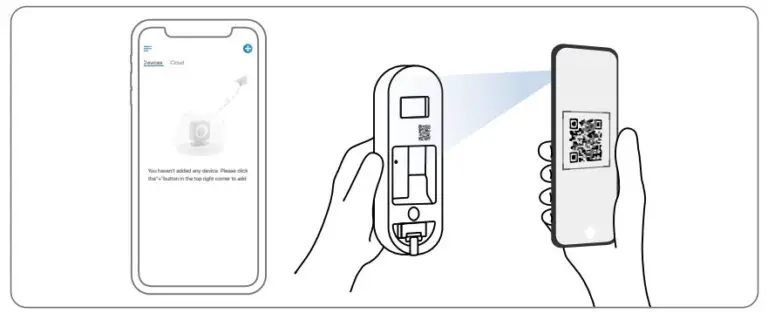
Step 1 Scan to download the Reolink App from the App Store or Google Play Store.


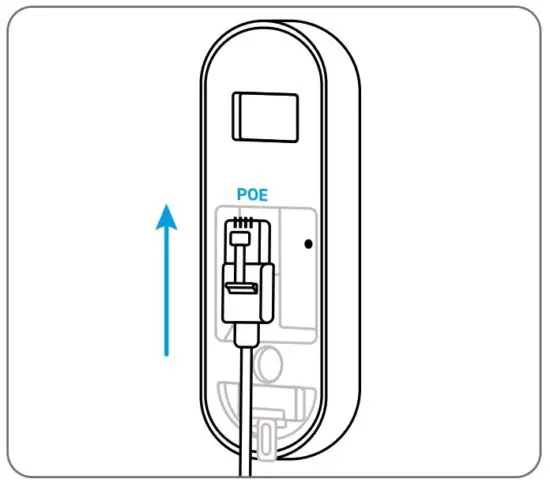
Step 2 Power on the video doorbell with an Ethernet cable.

NOTE: If you’re using the Reolink Video Doorbell WiFi, you need to connect it to the power adapter or your existing doorbell wiring to power it on.
Step 3 Launch the Reolink App. Click the “ + ” button in the top right corner and scan the QR code on the doorbell to add it
Step 4 Follow the onscreen instructions to finish the initial setup.
Set up the Doorbell on PC (Optional)
Step 1 Download and install the Reolink Client. Go to https://reolink.com > Support > App & Client
Step 2 Power on the video doorbell with an Ethernet cable.
Step 3 Launch the Reolink Client. Click the “ ” button and input the UID number of the doorbell to add it.
Step 4 Follow the onscreen instructions to finish the initial setup.
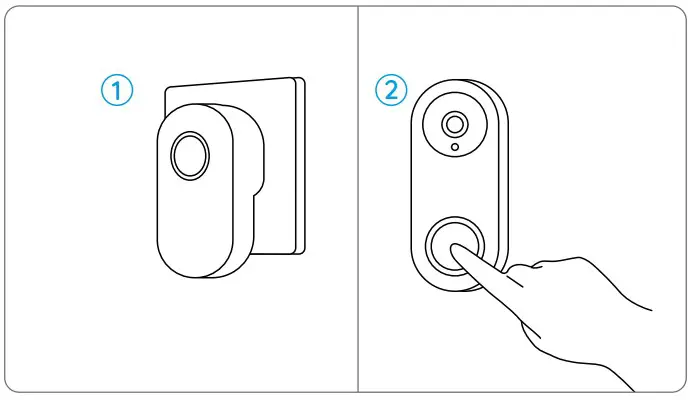
Set up the Chime
Step 1 Plug in the Chime and press the button on your doorbell.
Step 2 Follow the onscreen instructions to finish the initial setup.
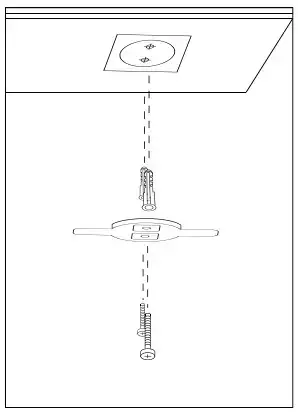
Install the Doorbell
*The Reolink Video Doorbell PoE is taken as an example.
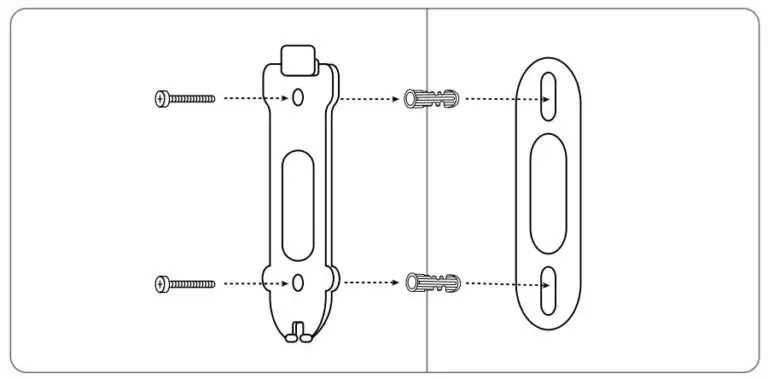
Step 1 Put the mounting hole template on the wall and drill holes as shown.
Step 2 Install the mounting plate using the screws provided through the two holes
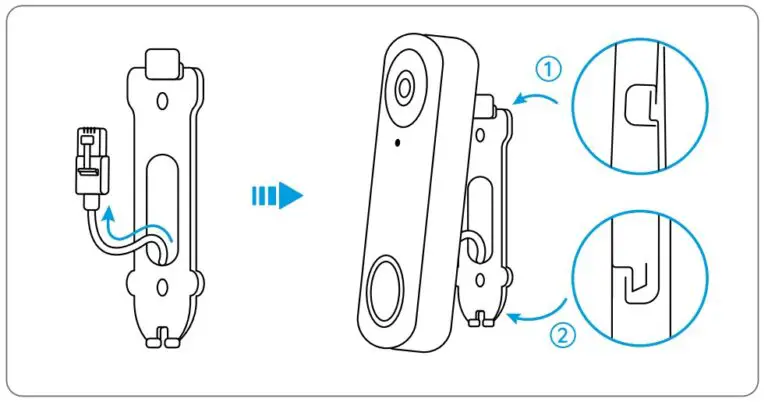
Step 3 Run the Ethernet cable through the mounting plate and attach the doorbell to the plate
NOTE: If you’re using the Reolink Video Doorbell WiFi, you need to run the power wires through the mounting plate.
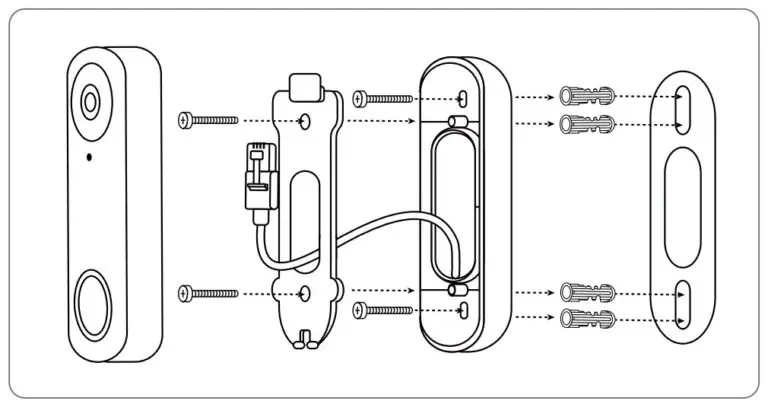
If you need to adjust the angle of the doorbell, you can use the wedge provided.
Step 1 Put the mounting hole template on the wall and drill holes as shown.
Step 2 Install the wedge using the screws provided through the two holes.
Step 3 Screw the mounting plate to the wedge.
Step 4 Run the Ethernet cable through the wedge and mounting plate, and attach the doorbell to the plate.
Specification
Hardware Features
Field of View: 140° Horizontal, 98° Vertical, 190° Diagonal
Infrared LED: 2pcs/850nm
Dimension: 133 x 48 x 23mm
Weight: 96g
Notification of Compliance
FCC Compliance Statement
This device complies with Part 15 of the FCC Rules. Operation is subject to the following
this device may not cause harmful interference, and this device must accept any interference received, including interference that may cause undesired operation.
NOTE: This equipment has been tested and found to comply with the limits for a Class B digital device, pursuant to part 15 of the FCC Rules. These limits are designed to provide reasonable protection against harmful interference in a residential installation. This equipment generates uses and can radiate radio frequency energy and, if not installed and used in accordance with the instructions, may cause harmful interference to radio communications. However, there is no guarantee that interference will not occur in a particular installation. If this equipment does cause harmful interference to radio or television reception, which can be determined by turning the equipment off and on, the user is encouraged to try to correct the interference by one or more of the following measures:
- Reorient or relocate the receiving antenna.
- Increase the separation between the equipment and receiver.
- Connect the equipment into an outlet on a circuit different from that to which the receiver is connected.
- Consult the dealer or an experienced radio/TV technician for help.
Changes or modifications not expressly approved by the party responsible for compliance could void the user’s authority to operate the equipment
FCC RF Exposure Warning Statements
This equipment complies with FCC radiation exposure limits set forth for an uncontrolled environment. This equipment shall be installed and operated with minimum distance 20cm between the radiator & body
 Simplified EU Declaration of Conformity
Reolink declares that the WiFi camera is in compliance with the essential requirements and other relevant provisions of Directive 2014/53/EU, the PoE camera is in compliance with Directive 2014/30/EU.
 Correct Disposal of This Product
This marking indicates that this product should not be disposed with other household wastes.throughout the EU. To prevent possible harm to the environment or human health from uncontrolled waste disposal, recycle it responsibly to promote the sustainable reuse of material resources. To return your used device, please use the return and collection systems or contact the retailer where the product was purchased. They can take this product for environmentally safe recycling
Limited Warranty
This product comes with a 2-year limited warranty that is valid only if purchased from Reolink Official Store or a Reolink authorized reseller. Learn more: https://reolink.com/warranty-and-return/
NOTE: We hope that you enjoy the new purchase. But if you are not satisfied with the product and plan to return, we strongly suggest that you reset the camera to factory default settings before returning.
Terms and Privacy
Use of the product is subject to your agreement to the Terms of Service and Privacy Policy at reolink.com. Keep out of reach of children.
End User License Agreement
By using the Product Software that is embedded on the Reolink product, you agree to the terms of this End User License Agreement (“EULA”) between you and Reolink. Learn more: https://reolink.com/eula/.
ISED Statements
This device contains licence-exempt transmitter(s)/re ceiver(s) that comply with Innovation, Science and Economic Development Canada’s licence-exempt RSS(s). Operation is subject to the following two conditions
- This device may not cause interference.
- This device must accept any interference, including interference that may cause undesired operation of the device.
Radio Frequency Exposure Statement for IC
The device has been evaluated to meet general RF exposure requirements. The device can be used in mobile exposure conditions. The min separation distance is 20cm.
OPERATING FREQUENCY (For WiFi Version) (the maximum transmitted power)
2412MHz — 2472MHz (19dBm)
5150MHz — 5350MHz (18dBm)
5470MHz — 5725MHz (18dBm)
Technical Support
If you need any technical help, please visit our official support site and contact our support team before returning the products: https://support.reolink.com.
Product Ident GmbH
Hoferstasse 9B, 71636 Ludwigsburg, Germany
Email: [email protected]
APEX CE SPECIALISTS LIMITED
Addr.: 89 Princess Street, Manchester, M14HT, UK
Email: [email protected]
