ring Access Controller Pro 2
Included installation hardware
- (1) Ring Access Controller Pro 2
- (1) 8-pin, 3.5 mm Pitch Terminal Block Connector
- (1) Puck Antenna · (4) Cable Labels
- (2) Adhesive Strips
- (1) USB Adapter
You’ll also need…
- Wires (18-22 AWG)/Cables for Connector Terminals
- Precision Flathead Screwdriver
- Wire Strippers
- Optional: RJ45 Ethernet Cable ( 3 meters)
- Optional: PVC Junction Box (if installed outside of the call box or existing junction box)
Download the Ring app
The Ring app walks you through setting up and managing your Ring Access Controller Pro 2.
Search for “Ring” in one of the app stores below, or visit ring.com/app


In the Ring app, select Set Up a Device and follow the in-app instructions.
Connect the wires to the terminal block
Using a precision flathead screwdriver, loosen the terminal block connector screws. Strip about 0.25″ of the insulation to expose the wire (18-22 AWG), then place the wire in the desired opening.
Tighten the screw to hold the wire in place. Give it a gentle tug to make sure it’s secure. Repeat for the rest of your wires.
Note: the positive and negative terminals are interchangeable.
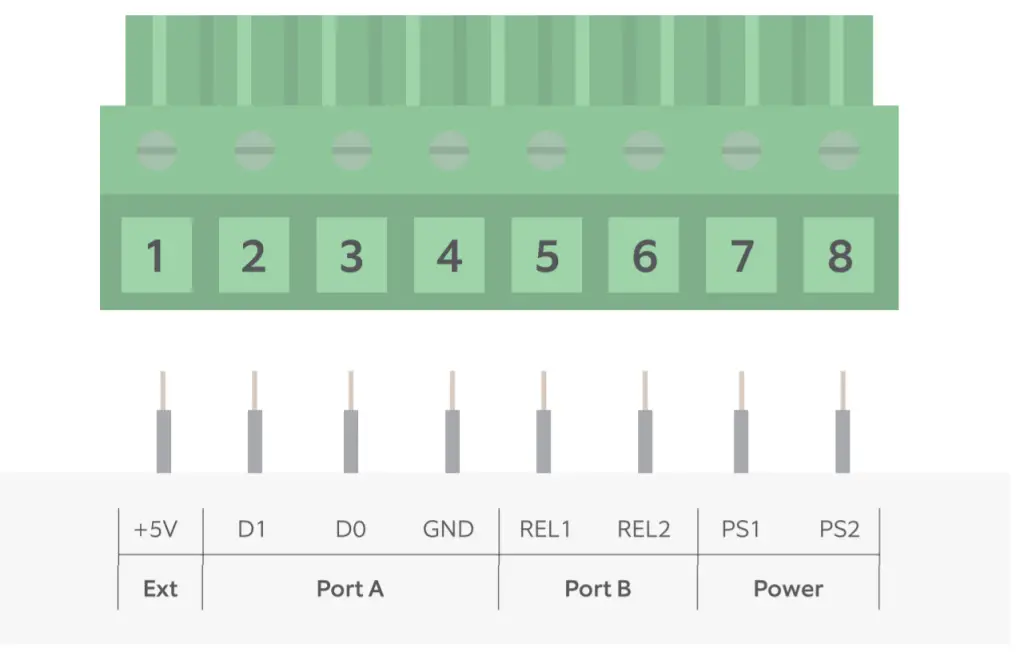
Once you’re done, connect the wires to your desired access control terminals. Use the included cable labels to properly identify the wires.
Remove the knockout
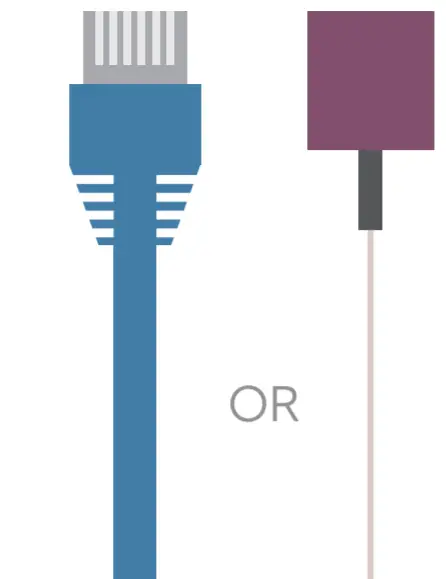
If you’re using an Ethernet cable, you can skip ahead to “Place your Access Controller.”
On your call box or junction box, identify a knockout that is at least 1/2″ away from the wall, making sure the antenna wire can reach your Access Controller install location.
Once you’ve found a good spot, remove the knockout.
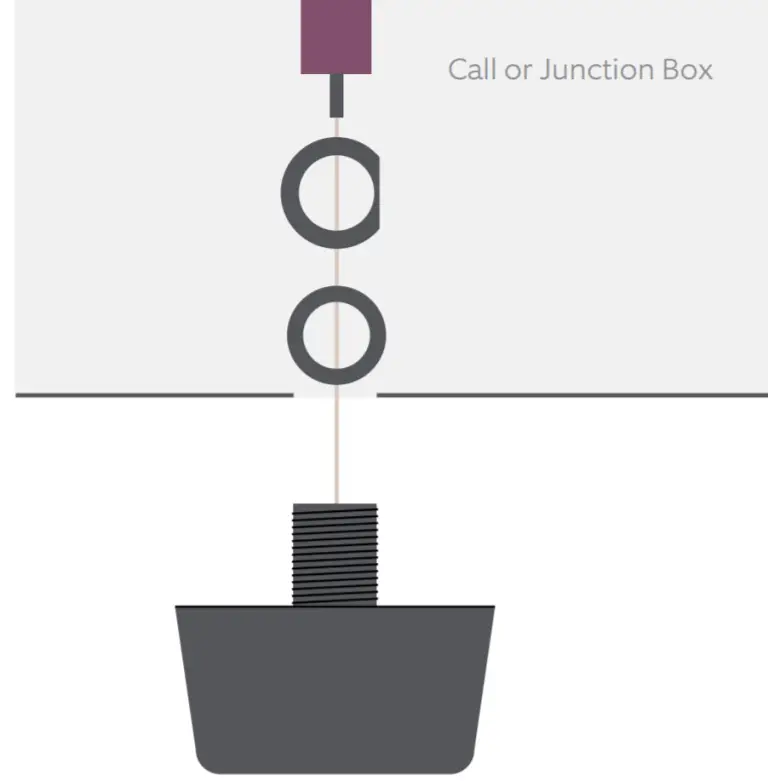
Install the puck antenna
Unscrew the nut and remove the washer from the puck antenna. Insert the cable through the knockout hole, ensuring the puck antenna is outside the call box or junction box.
Place the washer on the antenna mounting post and screw the nut to fix the puck antenna in place. Make sure it’s secure, but do not overtighten.
Place your Access Controller
Remove the liner from one side of the adhesive strips and place the strips in the recesses on the back of your access controller. Clean the surface where the access controller will be placed. Peel the liner off of the other side and place the Access Controller against the clean and dry mounting surface for 30 seconds.
If you’re mounting outside your call box, drill a hole for the antenna and terminal block wires. Pass the wires and terminal block through the hole.
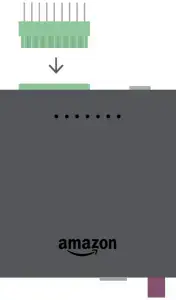
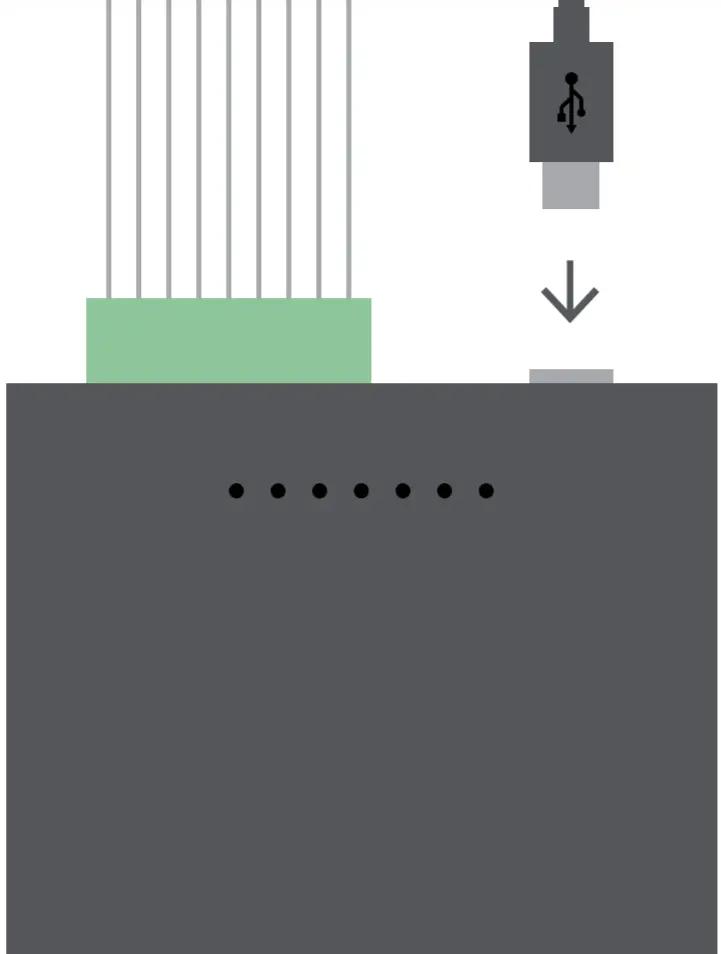
Connect the terminal block to your Access Controller
Plug the terminal block connector into the mating connector on your Access Controller.
Connect the antenna or Ethernet cable
Attach the puck antenna connector to the antenna port on your Access Controller until it locks into place.
If you have an Ethernet connection in your call box or junction box, plug the cable into the Ethernet port on your Access Controller instead.
Power it up
If you mounted your device outside the call box, plug it into an outlet using the included micro USB cable and DC power brick.
If you mounted your device inside the call box, connect the power wires from your box to terminals 7 and 8 on the terminal block (it doesn’t matter which wire connects to which terminal).
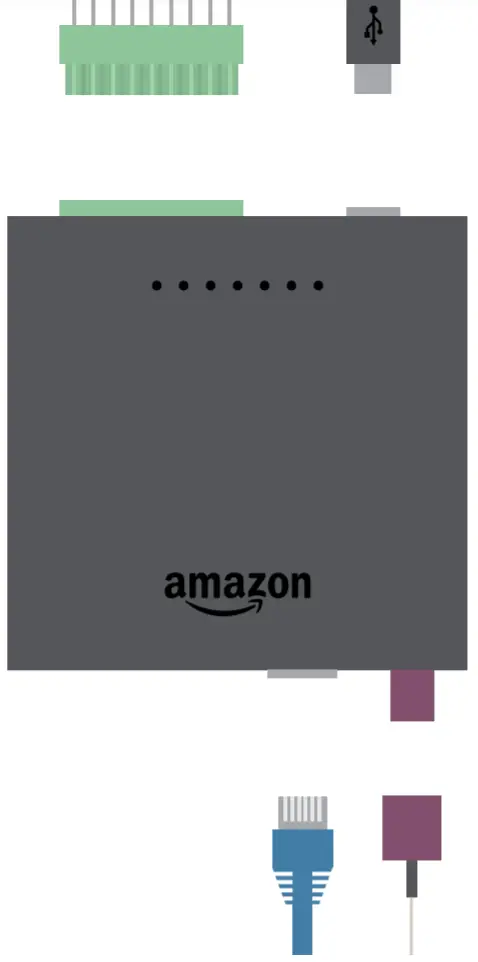
LED and Connector Terminal Indicators
PWR: Solid light indicates the device is powered
CELL:
- Red indicates no cellular coverage
- Yellow indicates low cellular coverage
- Green indicates good cellular coverage
- White indicates the device is using Ethernet
- Blue indicates attempting to get cellular strength
CON: Flashing light indicates device has Internet connectivity
RUN: Flashing light indicates device is running as programmed
REC: Solid light indicates device is in record mode and scanning for access credential (only occurs while provisioning a fob credential)
DR1 and DR2: Solid light for 2 seconds indicates respective door is opening at that time
IMPORTANT PRODUCT INFORMATION
This device should only be installed by a professional installer or licensed electrician.
⚠ SAFETY INFORMATION: FAILURE TO FOLLOW THESE SAFETY INSTRUCTIONS COULD RESULT IN FIRE, ELECTRIC SHOCK, OR OTHER INJURY OR DAMAGE.
Users are required to use a power supply that complies with PS2 or L.P.S. certification and approval. Use only accessories supplied with your device, or specifically marketed for use with your device, to power your device. Use of third-party accessories may impact your device’s performance. In limited circumstances, use of third-party accessories may void your device’s limited warranty. In addition, use of incompatible third party accessories may cause damage to your device or the third-party accessory. Read all safety instructions for any accessories before using with your device.
Protect the device from direct sunlight. Install the device at dry locations and protect it against rain and humidity. The device may not get contact to salt water or other conductive liquids. The device must be charged only within a building in a dry state.
⚠ SAFETY INFORMATION: FAILURE TO FOLLOW THESE SAFETY INSTRUCTIONS COULD RESULT IN INJURY.
Small parts contained in the Access Controller Pro 2 may present a choking hazard to small children. Keep small parts away from children. Your Ring Access Controller Pro 2 should only be used in accordance with the instructions and intended purpose. Using this accessory in any way other than its intended purpose could cause injury to yourself, others or damage to the device. Your Ring Ring Access Controller Pro 2 is not waterproof and as such should not be submerged in water, doing so could cause injury to yourself, others or damage to the device.
DANGER — TO REDUCE THE RISK OF FIRE OR ELECTRIC SHOCK, FOLLOW THESE INSTRUCTIONS CAREFULLY.
- Do not force the adapter into a power outlet.
- Do not expose your device or adapter to liquids. If your device or adapter gets wet, carefully unplug all cables without getting your hands wet and wait for the device and adapter to dry completely before plugging them in again. Do not attempt to dry your device or adapter with an external heat source, such as a microwave oven or a hair dryer. If the device or adapter appear damaged, discontinue use immediately. Use only accessories supplied with the device to power your device. To avoid risk of electric shock, do not touch your device or any wires connected to your device during a lightning storm.
- If the adapter or cable appears damaged, discontinue use immediately.
Install your power adapter into an easily accessible socket-outlet located near the equipment that will be plugged into or powered by the adapter.
Product Specifications
- Model No.: ecBAC-1
- Temperature Rating: -20°C to 65°C
- Power Input: 100240V ~0.3A 50/60Hz
- Power Output: 5.2V, 1.8A (9 watts)
RECYCLING YOUR DEVICE PROPERLY
In some areas, the disposal of certain electronic devices is regulated. Make sure you dispose of, or recycle, your device in accordance with your local laws and regulations. For information about recycling your device, go to amazon.com/devicesupport.
TERMS OF SERVICE AND WARRANTY
By purchasing or using the product, you agree to the Terms of Service found at ring.com/terms.
For information on our warranty, visit ring.com/legal.
This device complies with Part 15 of the FCC Rules. Operation is subject to the following two conditions: (1) this device may not cause harmful interference, and (2) this device must accept any interference received, including interference that may cause undesired operation.
NOTE: This equipment has been tested and found to comply with the limits for a Class B digital device, pursuant to Part 15 of the FCC Rules. These limits are designed to provide reasonable protection against harmful interference in a residential installation. This equipment generates, uses and can radiate radio frequency energy and, if not installed and used in accordance with the instructions, may cause harmful interference to radio communications.
However, there is no guarantee that interference will not occur in a particular installation. If this equipment does cause harmful interference to radio or television reception, which can be determined by turning the equipment off and on, the user is encouraged to try to correct the interference by one or more of the following measures:
- Reorient or relocate the receiving antenna.
- Increase the separation between the equipment and receiver.
- Connect the equipment into an outlet on a circuit different from that to which the receiver is connected.
- Consult the dealer or an experienced radio/TV technician for help.
Pursuant to Section 15.21 of the FCC rules, changes or modifications to a Product by the user that are not expressly approved by the party responsible for compliance could void the user’s authority to operate the equipment.
The device meets the FCC Radio Frequency Emission Guidelines. Information on the product is on file with the FCC and can be found by inputting such Product’s FCC ID (which can be found on the device) into the FCC ID Search form available at fcc.gov/oet/ea/fccid.
The party responsible for FCC compliance is: Ring LLC, 1523 26th St, Santa Monica, CA USA, 90404
FCC Radiation Exposure Statement
This device complies with FCC radiation exposure limits set forth for an uncontrolled environment and it also complies with Part 15 of the FCC RF Rules. This equipment must be installed and operated in accordance with provided instructions and the antenna(s) used for this transmitter must be installed to provide a separation distance of at least 20 cm from all persons and must not be co-located or operating in conjunction with any other antenna or transmitter. End-users and installers must be provided with antenna installation instructions and consider removing the no-collocation statement.
Additional info
Manufactured by: Ring LLC
Website: Ring.com
Contact Name: RACP Tech Support
Contact Number: 1-888-255-1041
Email: [email protected]
For information on our warranty, visit ring.com/legal
© 2021 Ring LLC or its affiliates. Ring and all related marks are trademarks of Ring LLC or its affiliates.