Rubicson Wireless Weather Station User Manual
Installation
Connect the power adapter to the base station or insert batteries (3x AAA) if you want to power it via batteries. Remove the battery hatch on the back of the sensor and insert 2x AM batteries. The base station will display battery warnings if the battery levels are low on both the station and outdoor sensor.
Hang up or place the weather station where you want to read the information and measure temperature and humidity indoors. Hang up or place the transmitter where you want to measure temperature and humidity outdoors. Place the sensor under roof to keep it protected from heavy rain.
The base station and the sensor unit will try to connect in 5 minutes when both are powered on The base station will start the 14-day learning process once powered on and connected to the sensor. This learning process is necessary for the weather station to be able to predict the weather forecast. The display will show ‘LEARNING.: at the top of the display during this time.
The base station will also start searching for a DCF signal for the time setting, if no signal is found the search will stop and you will need to manually set the time. It may take some time for the base station to receive the signal. The station will update the DCF signal every day at 1, 2 and 3 AM.
Time, date and forecast settings
Press the mode button and then hold the set button for 3 seconds to enter the time setting mode. The current value will start blinking. The values are changed in this order: time zone > language > year > month/day order > month > day > 12/24 hr > hour >minute > second > exit. Change the values with the un/down buttons. confirm and move to the next value with the set button.
Weather display and trends
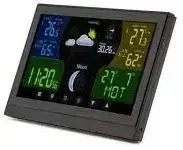
The base station is capable of showing the temperature, relative humidity, barometric pressure, a weather forecast (based on the barometric pressure) and lunar phase. The forecast feature takes 14 days to compute the pressure data before it can start displaying forecasts on it’s own. The first forecast it shows when powered on for the first time is random. Press the set button to change between Fahrenheit and Celsius.
The display can show temperature, humidity and air pressure trends. An up arrow indicates a rise in temperature by 1 °C/2 °F, a rise in humidity by 5 % or a barometric pressure increase by 2 hPa. A downwards arrow indicate a downwards change of the same values, and a straight arrow indicates currently stable weather.
Barometric pressure
The base station can be calibrated to show the correct barometric pressure based on its height above sea level. Press the mode button 3 times to highlight the barometric pressure on the display and press the set button for 3 seconds. The number will start flashing. press the mode button to change between metres and feet. press the up/down button to adjust it to your height above sea level. Press the set button to set the height setting.
Alarm settings and features
Press the clock/bell button to select one of the two alarms, this will be indicated on the display with All or AL2. Both alarms can also be active at the same time. Press the mode button twice and then hold the set button for 3 seconds until the hour value starts blinking to set the alarms. Change the values with the up/down buttons and confirm with the set button.
When the alarm goes off the backlight on the display will turn on and the alarm will sound for three minutes before turning off. Press the snooze/light button on top of the base station to snooze the alarm for 5 minutes. Press any other button to tum the alarm off for the day.
Temperature alert
The base station can alert you of changes to the temperature inside and outside. To change the settings. press the mode button 4 times and then hold the set button for 3 seconds. The settings can be changed with the set button in the following order: outdoor low temp > outdoor low alarm on/off > outdoor temp high > outdoor high alarm on/off> indoor low temp > indoor low alarm on/ off> indoor high temp > indoor temp alarm on/off. Change the values with the up/down buttons.
Backlight
The base station has a backlight feature that can be activated by pressing the snooze/light button, it will then light up for 5 seconds. If the base station is powered by the power adapter the backlight will by default be turned on. You can lower the brightness of the display by pressing the snooze/light button, It will get gradually darker and turn off when pressed a third time.
Max/min temperature memory
The base station saves the max/min temperature and humidity settings for each day and deletes the values at midnight. Press the up button once to display the maximum values. Press it again to display the minimum values. Press it a third time to return to the standard display.
Sensor connections and reception
The remote sensor communicates with the base station every 5 minutes. Up to 3 sensors can be connencted to the base station. Press the channel button to switch between multiple sensors. If a sensor has lost its connection to the base station for 60 minutes, it will show on the display. The base station will then start searching for any new sensors. Hold the channel button for 2 seconds to clear the sensor data and start searching for a new sensor. To connect a new sensor, open the sensor’s battery hatch and switch the button between different channels.
Specifications
| Temperature range indoors | 0 – 50 °C |
| Temperature range outdoors | -40 – 60 °C |
| Humidity indoors | 1 – 99 % |
| Humidity outdoors | 25 – 95 % |
| Barometric pressure | 850 -1050 hPA |
| Rang | 50 m |
| Time | 12/24 h |
| Temperature unit | °C/°F |
| Dimensions weather station | 191x127x16 mm |
| Dimensions transmitter | 100x62x15 mm |
| 230 V adapter | 5 V, 0,3 A output |
| Battery | 3x AAA (optional) & 2x AAA (none included) |
| Frequency Range | 433.040 MHz to 434.790 MHz |
| Effective Radiated Power | N/A |
Safety Information
Replace an empty battery with a battery of the same or corresponding type only. Return used batteries to your local battery recycling.
- Mode Button

- Set Button

- Klock Button

- Channel Button

- Up/down buttons

| Input voltage (V) | AC 100-240W |
| Input AC frequency (Hz) | 50-60Hz |
| Output voltage (V) | DC 5.0V |
| Output current (A) | 0.3A |
| Output power (W) | 1.5W |
| Average active efficiency (%) | 74.5% |
| No-load power consumption (W) | 0.04W |