
USER MANUAL
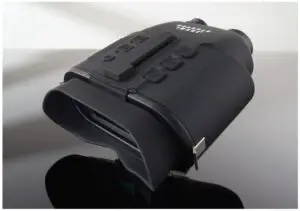
GENERAL OVERVIEW
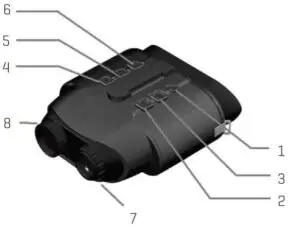
- Power – Short press down to power ON and Long press down to power OFF.
- Zoom – Press to enable 12 level digital Zoom ratio
(1.0->1.07->1.14->1.22->1.30->1.38->1.48->1.58->1.68->1.79->1.92->2.0->1.0) - Mode – Press to flick between 4 modes: Photo, Video, , Gallery, and Setting.
- IR – Press IR for 3 levels of IR brightness (0->IR1- >IR2->IR3->0….) when using the binoculars at night.
- OK
• In Photo mode, press OK to take a photo.
• In Video mode, press OK to start and stop video recording.
• In Gallery/Setting mode, press OK to select options – for example, start playing a recorded video or to select an option from the menu. - Intensity – Pop up TFT backlight adjusting bar for easy adjusting the TFT brightness. Use zoom and IR button to increase/decrease the TFT brightness. Press OK to save.
- Focus Adjustment – Focus the picture by turning the focus wheel clockwise or counter-clockwise.
- IR LED
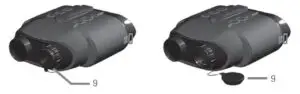
9. Lens cap attachment – Take off for night-time use. Failure to do so will result in severely limited performance.
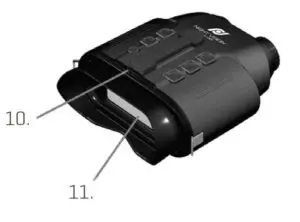
10. Micro SD card and USB slot – These are located just above the eyepiece. Your micro SD card slots in with the card upwards. Push your Micro SD card into the slot until it clicks into place.
11. Eyepiece
USING THE TRUE NIGHT VISION BINOCULARS
Turn the True Night Vision Binoculars on by pressing down on the ON button for a short period.
Pick an infrared power level by pressing the IR button to illuminate at night. There are 3 brightness settings. A higher setting will provide a brighter picture, but will deplete the batteries quicker.
Focus the picture by turning the focus wheel clockwise or counter-clockwise.
You can use digital zoom to increase the zoom ratio more by pressing the Zoom
button to magnify the picture from 1.0x- >1.07->1.14…to 2.0x then go back to 1x
magnification.
Adjust the LCD brightness level by pressing down on the INTEN button. Operating True Night Vision Binoculars at night may have LCD brightness issues — use the intensity button to adjust LCD brightness accordingly.
Press the Mode button to switch modes — the four modes are: Photo, Video, Gallery and Setting. These are explained in the next sections.
DISPLAY INFORMATION
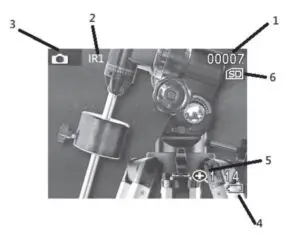
- No. of photos taken
- IR level Indication
- Photo/Video mode icon
- Battery level indicator
- Zoom Ratio indication
- SD card insert indication
TAKING PICTURES AND VIDEOS
To take a picture, go to Photo mode (this is the default mode when the True Night Vision Binoculars are switched on). A camera icon shows at the bottom of the screen. To take a photo, press the OK button.
To record a video, go to Video mode. A small video icon will appear at the bottom of the screen. To start recording, press the OK button. To stop recording, press the OK button again. Video will save automatically onto the Micro SD memory card.
SETTING MENU NAVIGATION
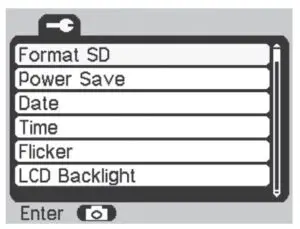
- To get the settings menu, use the MODE button to flick through the photo, video and gallery modes until you reach the setting menu. (pictured).
- Use the Zoom and IR buttons to go up and down, and the OK button to enter/exit menus.
- Pressing the MODE button will go back to Photo mode.
Menu Options:
- Format SD: Erase everything on your installed memory card.
- Power Save: Configure the True Night Vision Binoculars to Turn off after a certain duration of non-use.
- Date: Edit current date for displaying date information on the Photos/Videos.
- Time: Edit current time for showing time information on the Photos/Videos.
- Flicker: Select 50Hz/60Hz according to power system frequency. For example, select 50Hz for 220V/50Hz power system.
- LCD Backlight: Change the brightness of the screen. Use the ZOOM and IR buttons to increase/ decrease the brightness. Press OK to save.
- Date/Time Tag: ON/OFF Date and Time information on the Photos/Videos.
- Version: Display software version installed.
DOWNLOADING FOOTAGE TO YOUR PC
- The True Night Vision Binoculars have a small connection port just above the eyepiece (next to the memory card slot.) Using the supplied USB cable, connect your PC to the True Night Vision Binoculars.
- When the True Night Vision Binoculars are turned off, plug them into your PC. An SDHC & USB icon (pictured) will display on the screen of your True Night Vision Binoculars.
- On Windows, navigate to your File Explorer. The True Night Vision Binoculars may appear as “USB DISK”, “REMOVABLE STORAGE” or something similar, normally processed by a “D or E:”.
- Within this drive, your photos and videos will be in a folder called DCIM100JLCAM.
![]()
VIEWING FOOTAGE ON THE TRUE NIGHT VISION BINOCULARS
You can review your photos and videos directly on the True Night Vision Binoculars. Keep pressing the MODE button until you get to the Gallery mode.
Use the ZOOM and IR buttons to scroll up and down your photos and videos.
You can start playing a video by pressing the OK button on a selected video and selecting “Play” from the sub-menu using the OK button.
To delete a photo or video, press the OK button and select “Delete” from the sub-menu.
TROUBLESHOOTING
Poor image
Check that the True Night Vision Binoculars are focused by adjusting the focus wheel at the front of the device.
Check that the IR illumination level is well adjusted.
Check to make sure lens cap attachment is off when operating in night mode.
No power
If the True Night Vision Binoculars fail to turn on, check for defective, missing, or improperly-installed batteries. Replace or install batteries correctly.
Please make sure to use only alkaline AA batteries.
SPECIFICATIONS
- Optical Zoom 7x
- Objective aperture: 20mm
- Viewing angle: 5.5˚
- Exit pupil distance: 20mm
- Min focus range: 1m
- F# for object lens: Night 1.311/Day 2.8
- Viewing distance at night: 300 feet (100m)
- Sensor: CMOS
- Recording resolution: 640 x 480
- Display resolution: 320 x 240
- IR LED power: 1.5W
- Wavelength: 850nm
- Digital Zoom: 12 levels/Max 2x
- Battery life: Operation Time 8hrs (IR off)/ 2hrs (IR 3)
- Power supply: AA x 4 batteries (included)
- Memory card: Max 32GB Micro SD (not included)
WARRANTY / CUSTOMER SERVICE
Sharper Image branded items purchased from SharperImage.com include a 1-year limited replacement warranty. For Customer Service, please call +1 (877) 210-3449.
