USER MANUAL

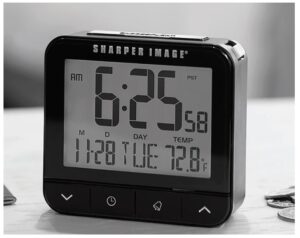
Thank you for choosing the Sharper Image Travel Alarm Clock. Please take a moment to read this guide and store it for future reference.
IDENTIFICATION OF PARTS
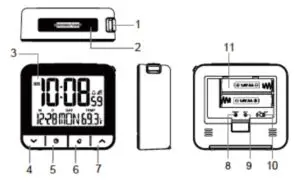
- [ ALARM ON/OFF] slide switch
• Slide upward to turn on alarm function.
• Slide downward to turn off alarm function. - [ SNOOZE / LIGHT ] key
• Press to turn on the backlight with 5 seconds.
• When the alarm sounds, press to stop the current alarm and enter snooze mode. - LCD display
- [ DOWN ] key
• In setting mode, press to decrease the setting value.
• Press and hold to speed up the setting. - [ CLOCK SET ] key
• In normal time mode, press and hold for 2 seconds to enter normal time setting mode.
• In setting mode, press to set items up or press and hold for 2 seconds to save the setting and return to normal time mode. - [ ALARM ] key
• In normal time mode, press and hold for 2 seconds to enter alarm time setting mode.
• In setting mode, press to set up alarm time.- After setting mode, press it again to save the setting values. - [ UP ] key
• In setting mode, press to increase the setting value.
• Press and hold to speed up the setting. - [ RESET ] key
- [ RCC ] key
• Press to switch between Celsius and Fahrenheit.
• Press and hold for 3 seconds for manual receiving RC signal or turn off RCC function. - Auto night-light slide switch
• Slide to [ ON ] position to activate night-light function. When itis ON, the backlight will automatically turn on in dim and dark environment detected by the light sensor. The brightness of night-light is weaker than normal backlight.
• Slide to [ OFF ] position to turn off the night-light function. - Battery compartment
• Accommodates 2 AA batteries.
GETTING STARTED
- Remove the battery door.
- Insert 2 new AA size batteries into the battery compartment. Make sure you insert them the right way according to the polarity information marked on the battery compartment.
- Replace the battery door.
- Once the battery is installed, the normal segments of the LCD will be shown before entering the radio controlled time reception mode.
- The RC clock will automatically start scanning for the radio controlled time signal in 8 seconds.
NOTE: If no display appears on the LCD after inserting the batteries, press the [RESET] key by using a metal wire. In some cases, you may not receive the signal immediately. Due to the atmospheric disturbance, the best reception often occurs during night time.
SIGNAL RECEPTION INDICATOR
The signal indicator displays signal strength in 4 levels. Wave segment flashing means time signals are being received. The signal quality could be classified into 4 types:
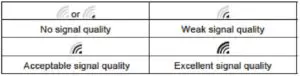
Note:
- This unit will automatically search for the time signal at 2:00am, 8:00am, 2:00pm and 8:00pm per day.
- Always place the unit away from interfering sources such as TV set, computer, etc.
- Avoid placing the unit on or next to metal plate.
- Closed area such as airport, basement, tower block or factory is not recommended.
- Do not start reception on a moving article such as vehicle or train.
- You can press and hold the [RCC] key for 3 seconds to receive the time signal manually. The receive mode will be off automatically after 6-16 minutes. Receive mode consumes more battery power that may reduce battery lifetime.
TIME AND CALENDER SETTING
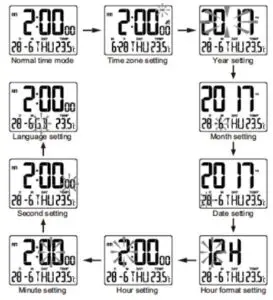
Note: If the clock does not receive the time signal successfully, you can set the time manually. As soon as the transmitter is received again, the clock will automatically synchronize with the received time.
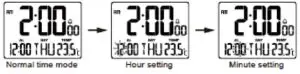
- In normal time mode, press and hold [CLOCK] key for 2 seconds until the Year digit flashes.
- Press [UP] or [DOWN] key to set desired value of the flashing Year digit, press [UP] or [DOWN] key without releasing to speed up the setting.
- Press [CLOCK] key again to confirm the desired value and go to next setting.
- Repeat the above operations to set the time and calendar in this order: Time zone > Year > Month > Date > 12/24 Hour format>Hour > Minute > Second > Language: GB (English) / FR (French) / DE (German) / ES (Spanish) / IT (Italian).
- Press and hold [CLOCK] key for 2 seconds to save and exit the
setting, or let it exit automatically 30 seconds later without
pressing any key.
Note: When adjusting the value of seconds, press [UP] or [DOWN] key to clear the value to 00.
ALARM TIME SETTING
- In normal mode, press and hold [ALARM] key for 2 seconds untilthe Hour digit flashes.
- Press [UP] or [DOWN] key to set the desired value, press [UP] or [DOWN] key without releasing to speed up the setting.
- Press [ALARM] key to minute setting and then press [UP] or [DOWN] key to adjust its value.
- Press [ALARM] key again to save and exit the setting, or let it exit automatically 30 seconds later without pressing any key.
USING ALARM AND SNOOZE FUNCTION
- Set the alarm time as described in the above section.
- Slide [ALARM ON/OFF] switch to ON position to turn on alarm function with the alarm icon displayed on the LCD.
- Slide [ALARM ON/OFF] switch to OFF position to turn off alarm function.
Note:
- When the alarm is sounding, the sound will keep going for 1 minute without any operation, and it will sound again at the alarm time next day.
- Press [SNOOZE/LIGHT] to enter snooze with the bell icon flashing, the 4-step crescendo alarm will sound 4 times in every 5 minutes interval (once alarm and 4 times snooze). The sound duration is 1 minute without any operation.
BATTERY REPLACEMENT
When the LCD becomes dim, replace with 2 new AA size batteries at once. Pay attention to the battery polarity. Note: Dispose of the used unit or batteries in an ecologically safe manner.
SPECIFICATIONS
MAIN UNIT
Operating temperature range: -5°C~50°C / 23° F~122°F
Resolution: 0.1°C/°F (above -10°C/14°F)
1°C/°F (below -10°C/14°F)
POWER
Main unit: 3V, use 2 x AA 1.5V (alkaline battery recommended)
DIMENSIONS
Main unit: 3.8” L x 1.4” W x 3.5” H. 0.4 lbs.
IMPORTANT NOTE: This clock syncs using radio station WWVB near Ft. Collins, Colorado. You may sync it manually during the initial set up or simply leave the clock running overnight to automatically set the time and date. User may be required to select the Time Zone depending on your location.
WARRANTY/CUSTOMER SERVICE
Sharper Image branded items purchased from SharperImage.com include a 1-year limited replacement warranty. If you have any questions not covered in this guide, please call our Customer Service department at 1 (877) 210-3449. Customer Service agents are available Monday through Friday, 9:00 a.m. to 6:00 p.m. ET.
