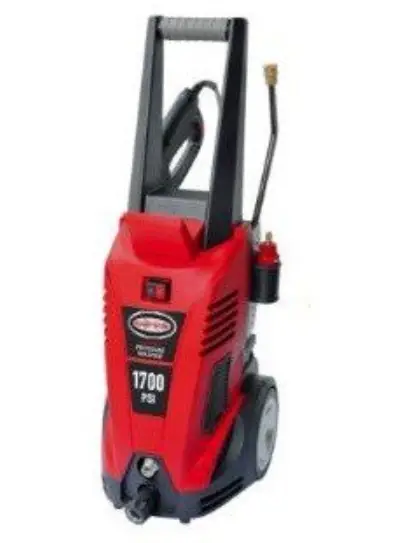
SIMPSON 13SIE-170 Electric Pressure Washer
EASY INSTALLATION
WARNING: CAREFULLY READ THE OPERATOR’S INSTRUCTIONS BEFORE USING THE PRESSURE WASHER FOR THE FIRST TIME.
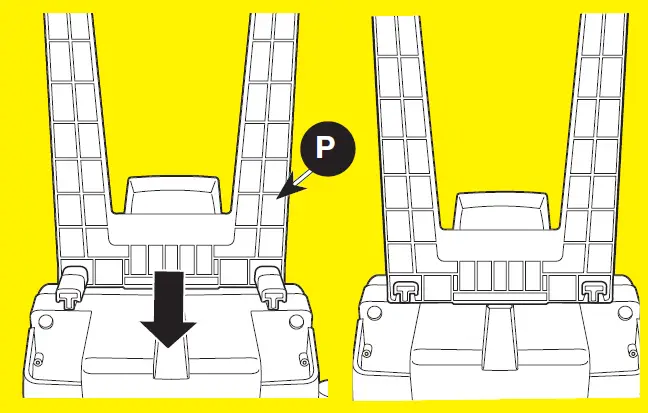
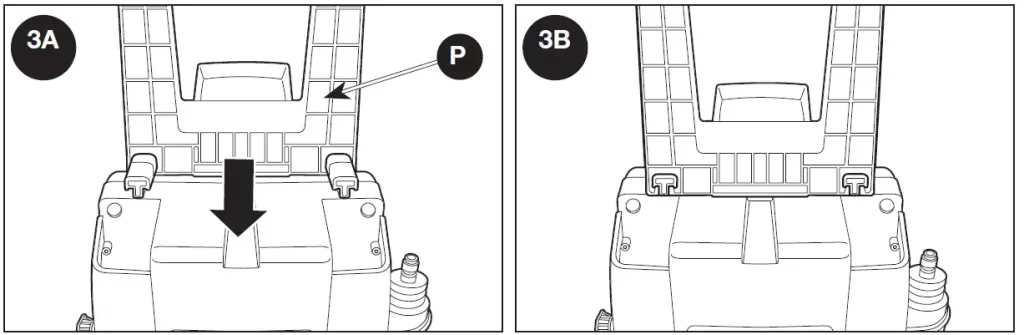
- WITH THE HANDLE ORIENTED AS SHOWN, ALIGN GROOVES IN THE CARRY HANDLE (P) WITH RAILS ON TOP OF PRESSURE WASHER AND SLIDE INTO PLACE. PUSH AS SHOWN TO FURTHER LOCK CARRY HANDLE INTO PLACE.
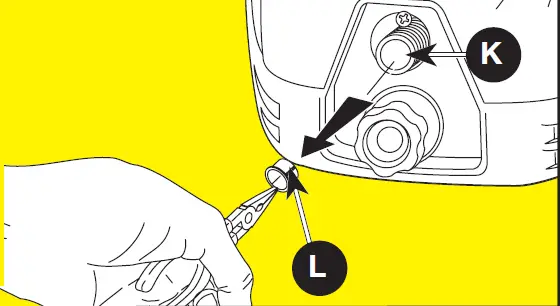
- REMOVE AND DISCARD THE SHIPPING PLUG (L) FROM THE OUTLET (K) ON THE FRONT OF THE MACHINE.
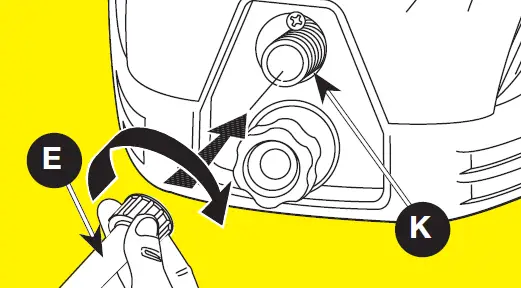
- CONNECT THE HIGH PRESSURE HOSE (E) TO THE MACHINE OUTLET (K).
- CONNECT THE GARDEN HOSE (Y) TO THE CONNECTOR (D) ON THE FRONT OF THE MACHINE.

- Insert the spray wand (B) into the gun (A). Twist Spray wand 90° to securely lock in place.

- Pull the quick-connect coupler back and insert a nozzle.
Release the quick-connect coupler and twist the nozzle to make sure it is secure in the coupler.
- TURN INCOMING WATER ON.
NOTE: USE COLD WATER ONLY.
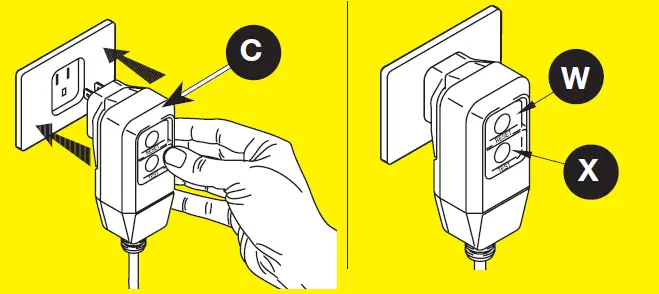
- PLUG GFCI (C) INTO THE POWER RECEPTACLE. FIRMLY PRESS AND RELEASE THE TEST BUTTON (X), THEN PRESS AND RELEASE THE RESET BUTTON (W). THE LIGHT ON THE GFCI SHOULD
- SQUEEZE AND HOLD TRIGGER UNTIL WATER FLOW IS STEADY. RELEASE THE TRIGGER.

- Turn switch to ON position (I) AND SQUEEZE TRIGGER TO START MOTOR AND WATER FLOW. Note: motor only runs when trigger is depressed and water is spraying.

SAFETY GUIDELINES
DEFINITIONS
This manual contains information that is important for you to know and understand. This information relates to protecting YOUR SAFETY and PREVENTING EQUIPMENT PROBLEMS. To help you recognize this information, we use the symbols below. Please read the manual and pay attention to these symbols.
DANGER: Indicates an imminently hazardous situation which, if not avoided, will result in death or serious injury.
WARNING: Indicates a potentially hazardous situation which, if not avoided, could result in death or serious injury.
CAUTION: Indicates a potentially hazardous situation which, if not avoided, may result in minor or moderate injury.
NOTICE: Indicates a practice not related to personal injury which, if not avoided, may result in property damage.
CONSUMER SAFETY INFORMATION
WARNING: This product contains chemicals known to the State of California to cause cancer, and birth defects or other reproductive harm. In addition, some cleaning products and dust contain chemicals know to the State of California to cause cancer, and birth defects or other reproductive harm. Wash hands after handling.
IMPORTANT SAFETY INSTRUCTIONS
WARNING: Please read this entire manual before attempting to assem-ble, operate or install the product. If you have any questions regard-ing the product, please contact our customer service department at www.simpsoncleaning.com.
WARNING: This unit was designed for specific applications. It should not be modified and/or used for any application other than that which it was designed.
NOTICE: Always store your pressure washer in a location where the temperature will not fall below 40 °F (4 °C). freeze damage is not covered by the warranty.
READ AND SAVE THESE INSTRUCTIONS
WARNING: When using this product basic precautions should always be followed, including the following:
- Read all the instructions before using the product.
- To reduce the risk of injury, do not operate near children or animals.
- Know how to stop the product and bleed pressures quickly. Be thoroughly familiar with the controls.
- Stay alert – watch what you are doing.
- Do not operate the product when fatigued or under the influence of alcohol or drugs.
- Keep the operating area clear of all persons.
- Do not overreach or stand on unstable support. Keep good footing and balance at all times.
- Follow the maintenance instructions specified in the manual.
- This product is provided with a Ground Fault Circuit Interrupter built into the power cord plug. If replacement of the plug or cord is needed, use only identical replacement parts.
- Do not touch plug or outlet with wet hands.
- Avoid accidental starts. Move switch on unit to OFF position before connecting or disconnecting cord to electrical outlets.
- Water spray must never be directed towards any electric wiring or directly towards the pressure washer machine itself or fatal electric shock may occur.
- Never carry your pressure washer by the cord. Do not pull on the cord to disconnect from the outlet.
- To prevent damage, the cord should not be crushed, placed next to sharp objects or near a heat source.
- Check power cords before using. Damaged cords can reduce performance of pressure washer or cause a fatal electrical shock.
- The narrow pin point stream is very powerful. It is not recommended for use on painted surfaces, wood surfaces or items attached with an adhesive backing.
- Keep operating area clear of all persons and ani mals.
- Always use both hands when operating pressure washer to maintain complete control of the wand.
- Do not touch nozzle or water spray while operating. Never place hands in front of nozzle.
- Wear safety goggles while operating. Wear protective clothing and footwear to protect against accidental spraying.
- Disconnect power plug from the outlet when not in use and prior to the detaching of the high pressure hose.
- Never tie knots or kink the high pressure hose as da mage could result. Inspect the high-pressure hose regularly. Replace the hose immediately if it is damaged, worn or shows any signs of cracks, bubbles, pinholes, or other leakage. Never grasp a high-pressure hose that is leaking or damaged.
- Do not operate or store this product in temperatures below 40 °F (4 °C). Freeze damage is not covered by the warranty.
- Carefully observe all chemical instructions and warnings before using. Use only approved pressure washer cleaners. Do not use bleach, chlorine, or any cleaners containing acids. Always follow manufacturer’s label recommendations for proper use of cleaners. Always protect eyes, skin and respiratory system from cleaners.
- The pressure washer should not be used in areas where gas vapors may be present. An electric spark could cause an explosion or fire.
- To minimize the amount of water getting into the pressure washer, the unit should be placed as far as possible from the cleaning site during operation.
- To prevent accidental discharge, the spray gun should be secured by locking the trigger when not in use.
- To allow free air circulation, the pressure washer should NOT be covered during operation.
- Never touch, grasp or attempt to cover a pinhole or similar water leak on the high-pressure hose. The stream of water IS under high pressure and WILL penetrate skin.
- Use only hoses and accessories rated for pressure higher than your pressure washer’s psi. Never use with any other manufacturer’s accessories or components.
- Never defeat the safety features of this product.
- Do not op er ate machine with missing, broken or un au tho rized parts.
- Never spray flammable liquids or use a pressure washer in areas containing combustible dust, liquid, or vapors.
WARNING: Risk of injection or injury. Do not direct the discharge stream at persons.
SAVE THESE INSTRUCTIONS
SAFETY FEATURES
AUTOMATIC TOTAL STOP®
The pressure washer is equipped with a stop device that will sense when the trigger on the gun is released. It will open the power circuit to the motor and cause the pressure washer to stop.
WARNING: If Automatic Total Stop fails to operate, DO NOT USE THE MACHINE. Contact our customer service department. Further use will damage the machine and/or cause personal injury.
WARNING: The pressure washer is also equipped with a main power ON/OFF switch located on the unit. It should always be moved to the OFF position when the pressure washer is not being used to prevent possible injury or damage.
MOTOR OVERLOAD
The electric motor in this pressure washer is equipped with an overload protection device which will automatically shut off the motor in the event the motor draws excessive current or overheats. The device will automatically reset itself and resume normal operation after a short period of time.
GROUND-FAULT CIRCUIT INTERRUPTER PROTECTION
This pressure washer is provided with a Ground-Fault Circuit-Interrupter (GFCI) built into the plug of the power supply cord. This device provides additional protection from the risk of electric shock. Should replacement of the plug or cord become necessary, use only identical replacement parts that include GFCI protection.
SERVICING A DOUBLE-INSULATED APPLIANCE
 In a double-insulated product, two systems of insulation are provided instead of grounding.
No grounding means is provided on a double-insulated product, nor should a means for grounding be added to the pressure washer.
Servicing a double-insulated product requires extreme care and knowledge of the system, and should be done only by qualified service personnel. Replacement parts for a double-insulated product must be identical to the parts they replace.
A double-insulated product is marked with the words “DOUBLE-INSULATION” or “DOUBLE-INSULATED”. The symbol above may also be marked on the product.
POWER SUPPLY AND ELECTRICAL INFO GROUND-FAULT CIRCUIT INTERRUPTER PROTECTION
The pressure washer is factory-equipped with an electrical cord and a Ground Fault Circuit Interrupter (GFCI) power plug. This cord should only be connected to an electrical outlet installed in accordance with local safety regulations.
NOTE: The power supply must be 120 V, 60 Hz and a minimum 15 amp dedicated circuit.
- Inspect cord before using. Do not use if cord is damaged.
- Keep all connections dry and off the ground.
- Do not touch plug with wet hands.
- The pressure washer is provided with a ground fault circuit interrupter built into the power plug.
If replacement of the plug or cord is needed, use only identical replacement parts. Contact customer service for proper replacement parts.
WARNING: Test GFCI before each use. DO NOT use pressure washer if test below fails.
GFCI Test Procedures:
- Plug GFCI into power receptacle.
Indicator light should illuminate. - Press test button (X). Light should turn off.
- Press reset button (W) for use. Indicator light should illuminate.

Do not use if above test fails.
NOTE: The GFCI must be reset each time the pressure washer is connected to an electrical outlet. Reset by simply pushing the reset button on the GFCI power plug.
EXTENSION CORDS
Use only extension cords that are intended for outdoor use. These extension cords are identified by a marking “Acceptable for use with outdoor appliances: store indoors while not in use”. Use only extension cords having an electrical rating not less than the rating of the product. Do not use damaged extension cords. Examine extension cord before using and replace if damaged. Do not abuse extension cord and do not yank on any cord to disconnect.
Keep cord away from heat and sharp edges. Always disconnect the extension cord from the receptacle before disconnecting the product from the extension cord.
When using an extension cord, observe the specification below:
WARNING: To reduce the risk of electrocution, keep all connections dry and off the ground. Do not touch plug with wet hands.
SAVE THESE INSTRUCTIONS
GET TO KNOW THE PRESSURE WASHER
NOTE: Photographs and line drawings used in this manual are for reference only and do not represent a specific model.
Compare the illustrations with your unit to familiarize yourself with the location of various controls and adjustments. Save this manual for future reference.
A. Spray Gun
B. Pro-Style Spray Wand
C. GFCI
D. Garden Hose Connector
(factory installed)
E. High-Pressure Hose
F. Safety Lock
G. Motor and Pump in Case
H. Power Supply Cord with GFCI
I. ON/OFF Switch
J. On-board Detergent Tank
K. High Pressure Outlet (metal)
L. Shipping Plug
M. Water Inlet (plastic)
N. On-Board Accessory
Storage Holsters
O. Water Inlet Filter Screen [factory installed inside water inlet (M)]
P. Carry Handle
Q. Cord Storage Location
R. Turbo Spray Nozzle
S. Quick Connect Spray Nozzles
T. Turbo Nozzle Storage Holster
U. Quick Connect Nozzle Storage
V. Hose Storage Location
ASSEMBLY INSTRUCTIONS
- Locate and remove all loose parts from the carton.
- With handle oriented as shown, align grooves in carry handle (P) with rails on top of pressure washer and slide into place.
- Push as shown to further lock carry handle into place.
- Remove and discard the shipping plug (L) from the outlet (K) on the front of the machine.

OPERATING INSTRUCTIONS
PRESSURE WASHER TERMINOLOGY
PSI: Pounds per Square Inch. The unit of measure for water pressure. Also used for air pressure, hydraulic pressure, etc.
GPM: Gallons Per Minute. The unit of measure for the flow rate of water.
CU: Cleaning Units. GPM multiplied by PSI. GPM x PSI = CU
Detergent Injection System: Mixes cleaners or cleaning solvents with the water to improve cleaning effectiveness.
Water Supply: All pressure washers must have a source of water . The minimum requirements for a water supply are 20 psi and 5 gallons per minute. If your water source is a well, the garden hose length can only be 30 ft. (9 m) max.
WARNING: T o reduce the possibility of contamination always protect against backflow when connected to a potable water system.
DANGER: Risk of fluid injection and laceration. When using the high-pressure setting, DO NOT allow the high-pressure spray to come in contact with unprotected skin, eyes, or with any pets or animals. Serious injury will occur.
- Your washer operates at fluid pressures and velocities high enough to penetrate human and animal flesh, which could result in amputation or other serious injury. Leaks caused by loose fittings or worn or damaged hoses can result in injection injuries. DO NOT TREAT FLUID INJECTION AS A SIMPLE CUT! See a physician immediately!
Pressure Washer Operating Features
How To Use Spray Wand
Refer to the following chart to choose the correct nozzle for the job to be performed.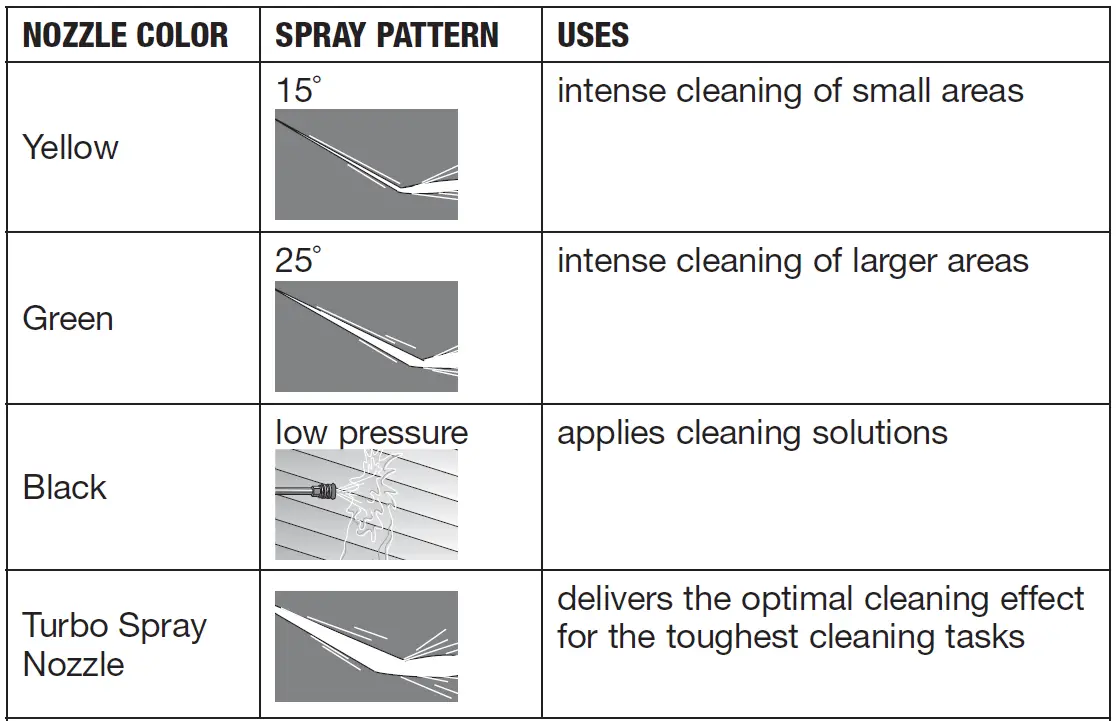
NOTE: The pressure of the spray on the surface you are cleaning increases as you move the wand closer to the surface.
NOTICE: The high pressure spray from your pressure washer is capable of causing damage to surfaces such as wood, glass, automobile paint, auto striping and trim, and delicate objects such as flowers and shrubs. Before spraying, check the item to be cleaned to assure yourself that it is strong enough to resist damage from the force of the spray.
CHANGING NOZZLES ON SPRAY WAND (FIG. 4)
DANGER: Risk of fluid injection. Do not direct discharge stream toward persons, unprotected skin, eyes or any pets or animals. Serious injury will occur.
WARNING: Flying objects could cause risk of serious injury. Do not attempt to change nozzles while pressure washer is running. Turn pressure washer off before changing nozzles.
- Pull quick-connect coupler back and insert nozzle (S).
- Release quick-connect coupler and twist nozzle to make sure it is secure in coupler.
 WARNING: Flying object could cause risk of serious injury. Ensure nozzle is completely inserted in quick-connect socket and quick-connect snap ring is fully engaged (forward) before squeezing gun trigger
TURBO SPRAY NOZZLE (FIG. 5)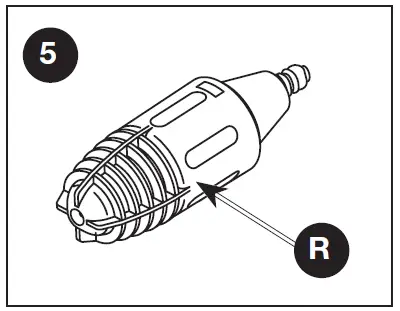
CAUTION: Do not attempt to move the nozzle to adjust pressure. The turbo nozzle is NOT adjustable.
The high pressure turbo nozzle (R) is intended for maximum cleaning effect. Keep the spray wand a minimum of 6–8 in (15–20 cm) away from the cleaning surface at all times.
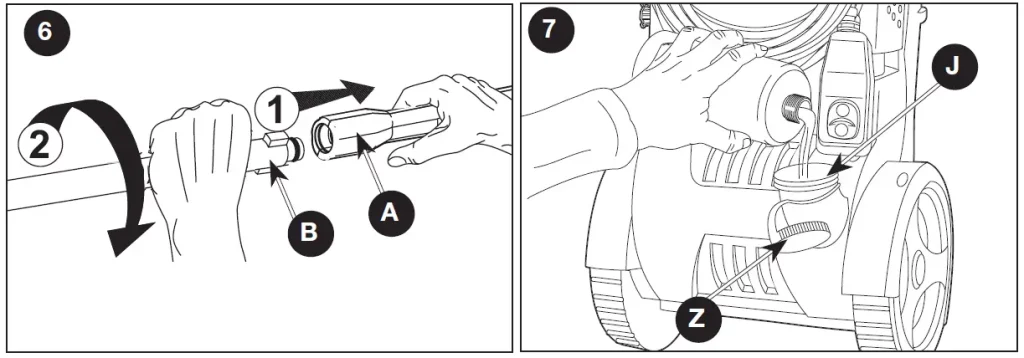
USING DETERGENT (FIG. 6–7)
NOTICE: Use only approved pressure washer cleaners. Do not use bleach, chlorine, or any cleaners containing acids.
NOTICE: Fill and flush the detergent tank with clear water after use.
- Insert the spray wand (B) into the gun (A) by pushing firmly and simultaneously twisting a 1/4 of a turn until locked into place.
- Remove the tank cap (Z) present on the back of the machine.
- Fill the tank (J) with suitable cleaning solution.
- Install low pressure (black) nozzle into quick connect fitting of spray wand, see How To Use Spray Wand paragraph in this section.
NOTE: Detergent will not siphon when the spray wand is equipped with the Yellow, Green, or Turbo Nozzles. The Low Pressure BLACK Nozzle must be used to dispense detergent - Squeeze the trigger and the detergent will automatically be mixed with the water and dispensed from the nozzle.
- When you have completed the use of detergent, Fill and flush the detergent tank with clear water after use. See Storage for correct procedure.
- See Storage section in this manual for proper shutdown and storage procedures
CLEANING TECHNIQUES
When cleaning with the pressure washer, some cleaning tasks can be solved with water alone, but for most tasks it is advantageous to use a detergent. A detergent ensures a quick soaking of the dirt allowing the high pressure water to penetrate and remove the dirt more effectively.
APPLICATION OF DETERGENT
CAUTION: Avoid working on hot surfaces or in direct sunlight to minimize the chance of the soap damaging painted surfaces.
CAUTION: Damage may occur to painted surface if soap is allowed to dry on the surface. Wash and rinse a small section at a time.
- Apply the solution to a DRY work surface.
NOTE: WETTING THE SURFACE FIRST IS NOT RECOMMENDED, AS IT DILUTES THE DETERGENT AND REDUCES ITS CLEANING ABILITY.
On a vertical surface, apply soap horizontally from side to side starting from the bottom to avoid streaking. - Allow detergent to remain on the surface for a short time before rinsing.
- Rinse with clean water under high pressure. On a vertical surface, first rinse from the bottom up, then rinse from the top down. Hold nozzle 6–8 in. (15–20 cm) from the work surface at a 45° angle using the flat spray as a peeling tool rather than a scrub brush.
NOTE: Ensure that the detergent injection system is completely clean prior to switching from one detergent to another. starting (Fig. 8–14)
DANGER: Risk of injury from spray. Always engage the trigger lock when gun is not in use. Failure to do so could cause accidental spraying.
WARNING: Risk of Injury. Do not direct discharge stream at self or others.
WARNING: Risk of unsafe operation. Stand on a stable surface and grip gun/spray wand firmly with both hands.
- Connect the high pressure hose (E) to the machine outlet (K). Ensure the threads are aligned properly and the connection is secure.
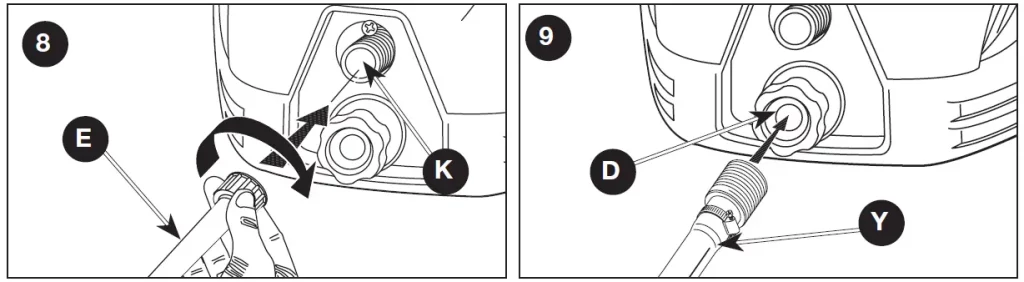
- Connect the garden hose (Y) to the connector (D) on the front of the machine. Before connecting, run water through the garden hose (not supplied) to flush out any foreign matter.
NOTE: If your water source is a well, the garden hose length can only be 30 ft. (9 m) maximum. - Insert the spray wand (B) into the gun (A) by pushing firmly and simultaneously twisting a 1/4 of a turn until locked into place.
WARNING: If the wand is not securely locked into place, it could be ejected under high pressure during operation, possibly causing injury or damage. - Turn incoming water on and fully open valve to insure maximum water flow to machine.

- Plug GFCI (C) into power receptacle. Firmly press and release the TEST button (X), then press and release the RESET button (W). The light on the GFCI should be illuminated.

- Ensure the gun safety is unlocked and squeeze the trigger until the air has escaped and a steady flow of low pressure water is coming from the nozzle.
NOTE: The power supply must be 120 V, 60 Hz and a minimum 15 amp dedicated circuit. - Turn switch to ON position (I). Note that the motor will momentarily start then stop.
- Squeeze the trigger to start motor and begin pressure washing.
NOTE: The motor only runs when the gun trigger is depressed and water is spraying.
SHUTTING DOWN
See Storage section in this manual for proper shutdown and storage procedures.
MAINTENANCE
Risk of burn hazard. When perfrming maintenance, you may be exposed to hot surfaces, water pressure or moving parts that can cause serious injury or death.
To ensure efficient operation and longer life of your pressure washer , a routine maintenance schedule should be prepared and followed. If the pressure washer is used in unusual conditions, such as high-temperatures or dusty conditions, more frequent maintenance checks will be required.
CONNECTIONS
Connections on pressure washer hoses, gun and spray wand should be cleaned regularly and lubricated with light oil or lithium grease to prevent leakage and damage to the o-rings.
NOZZLE
The nozzles should be cleaned regularly.
Clogging of the nozzle causes diminished performance and the pump pressure to be too high and cleaning is immediately required.
- Remove the wand from the gun.
- Clear the nozzle by forcing a stiff wire or straightened out paper clip (small size) through the center hole of each nozzle.
- Backflush the nozzle with water from both ends.
- Reconnect the wand to the gun.
Restart the pressure washer and depress the trigger on the spray gun.
LUBRICATION
The pressure washer is designed with a permanent lubrication system. Conventional oil checks and changes are not necessary.
NOTE: In case of oil leakage, contact our customer service department at www.simpsoncleaning.com. A SMALL AMOUNT OF OIL LEAKAGE IS NORMAL.
WATER SCREEN FILTER
The pressure washer is equipped with a water inlet screen filter to protect the pump. Never operate the pressure washer without the screen filter in place.
CAUTION: If the screen filter is not kept clean, the flow of water to the pressure washer will be restricted and the pump may be damaged.
- To clean the inlet water screen filter, remove garden hose connector (D) and remove the screen filter from the inlet.
- Flush screen filter with warm water to clean.
- Replace screen filter, and garden hose connector immediately to prevent any foreign matter from entering the pump.
CAUTION: Do not damage the screen filter, while removing or cleaning. Any foreign particles entering the pump may damage the pump.
COOLING SYSTEM
The air vents, located in and around the pressure washer, must be kept clean and free of any obstructions to ensure proper air cooling of the motor during operation.
WARNING: Prevent water from penetrating the vents of the pressure washer to minimize the risk of damage to the machine and to reduce the risk of shock to the operator.
Storage
CAUTION: Prior to moving the unit, always disconnect the garden hose via the garden hose connector.
CAUTION: Always store your pressure washer in a location where the tem-perature will not fall below 40 °F (4 °C). The pump in this machine is susceptible to permanent damage if frozen. FREEZE DAMAGE IS NOT COVERED BY THE WARRANTY.
END-OF-USE AND WINTER STORAGE INSTRUCTIONS
- When finished using the pressure washer, you must first drain and rinse the detergent tank.
- Run the pressure washer in low pressure until all of the soap is drained from the detergent tank.
- Pour clear water into the tank and run it through on low pressure as though it were detergent.
NOTICE: Failure to clean properly will cause bottle or suction tube to become clogged and inoperable. - Turn the machine OFF and squeeze the trigger to re lease the trapped pressure inside of the machine.
- Remove both the garden hose and high pressure hose from the unit.
- Disconnect the wand from the gun.
- Turn ON the machine and allow it to run for 5 seconds. (This will clear out most of the water trapped in the pump).

- Unplug machine .
- Wrap high pressure hose and power supply cord onto storage rack and snap power supply cord into place as shown.
- Store the machine and accessories in a dry, climate controlled environment. Do not store the machine or accessories in a place where the temperature could drop below 40 °F (4 °C).
ACCESSORIES
DANGER: Risk of fluid injection. When using replacement wands or guns with this pressure washer, DO NOT use a wand and/or wand/gun combi-nation that is shorter in length than what was provided with this pressure washer as measured from the nozzle end of the wand to the gun trigger.
NOTICE: The use of any other accessory not recommended for use with this tool could be hazardous. Use only accessories rated equal to or greater than the rating of the pressure washer.
SPECIFICATIONS
Model – 13SIE-170
- Rated Pressure* 1700 psi
- Rated Water Flow* 1.3 gpm
- Electrical Requirements 120V, 13 A, 60 Hz
- Electrical Cord 35 ft. (10.67 m)
- High Pressure Hose 23 ft. (7.0 m)
- Minimum Amp Source 15 A
- Presure of Inlet Water 20–100 psi
- Inlet Water cold tap
- Soap Consumption Rate 10% max
Rated Pressure and Rated Water Flow is within manufacturing tolerance of (+/- 10%).
In a continued commitment to improve quality , the manufacturer reserves the right to make component changes, design changes, or specification changes when necessary and without notice.
SERVICE INFORMATION
Do not return this product to your retailer. Please contact our customer service department at www.simpsoncleaning.com.
LIMITED WARRANTY
This product is warranted against defects in material and workmanship for a period of one year on all components excluding the spray gun, high pressure hose, wands, nozzles, and ground fault circuit interrupter (GFCI) which are only covered for 90 days; effective from the date of retail purchase and is not transferable.
This warranty excludes incidental/consequential damages and failures due to misuse, abuse or normal wear and tear. This warranty applies only to products used in consumer (home) applications.
This warranty does not apply to commercial or rental applications.
This warranty gives you specific rights, and you may also have other rights, which vary from state to state.
Please complete and return the enclosed Customer Information Card. Return of this card is not required to validate this warranty. A store issued receipt or credit card statement showing the purchase date is an acceptable warranty validation. Please retain one of these documents in your records.
If you have any questions, please contact our customer service department at www.simpsoncleaning.com.
What is covered: Replacement parts and labor. Please note that we reserve the right to repair or replace the product as we deem appropriate.
What is not covered: This warranty does not include such parts as nozzles which must be replaced as part of normal maintenance of the equipment, rather than as the result of a defect. Transportation charges to warranty center for defective products.Transportation charges to consumer for repaired products. Damages caused by abuse, accident, improper repair, or failure to perform normal maintenance. Use of improper chemicals or noncompliance with the operator manual’s instructions. Sales outside of the United States or Canada. Any other expense including consequential damages, incidental damages, or incidental expenses, including damage to property. Some states do not allow the exclusion or limitation of incidental or consequential damages, so the above limitation or exclusion may not apply to you. This warranty does not cover damage resulting from failure to observe any of the following conditions:
- The inlet water pressure must be between 20 and 100 psi.
- The inlet water temperature must not exceed 90 °F (32 °C).
- The unit should not be stored in areas where temperatures may drop below 40 °F (4 °C).
Implied Warranties
Any implied warranties, including the implied warranties of merchantability and fitness for a particular purpose, are limited in duration to one year on all components excluding the spray gun, high pressure hose, wand, and ground fault circuit interrupter (GFCI) which are only covered for 90 days; effective from the date of retail purchase and is not transferable. This warranty excludes incidental/consequential damages and failures due to misuse, abuse or normal wear and tear. This warranty applies only to products used in consumer (home) applications. This warranty does not apply to commercial or rental applications. This warranty gives you specific rights, and you may also have other rights, which vary from state to state.
TROUBLE SHOOTING GUIDE
| OPERATIONAL ISSuE | POSSIbLE CAuSE | SOLUTION |
| Detergent is not dispensing | Detergent is not pressure washer approved | Use only detergents, degreasers, waxes and other cleaning solutions, that are designed specifically for pressure washers. Cleaners in this category will clearly state on the label that they are meant for use in pressure washers. Do NOT use any other type of cleaning solution in your pressure washer. Never use bleach, ammonia, any type of acid, or hot water in your machine! |
| Incorrect noz- zle installed | See How to use Spray Wand paragraph in the
Operation Section. NOTE: Chemicals and soaps will not siphon if the black soap nozzle is not installed on the spray wand. |
|
| Detergent tank is filling up with water | Detergent suction assembly is malfunctioning, contact our customer service department.
Contact our customer service department at |
|
| Detergent to Water ratio | The pressure washer draws detergent at a maximum 10:1 water to detergent ratio. Most pressure washer detergents
are concentrated within this range. If you feel you are using more detergent than is required for the application, you can dilute the detergent with regular tap water. |
|
| Circuit breaker trips or fuse blown in
fuse box |
Circuit overload | Verify that the circuit is rated at 15 amps or greater. Ensure no other appliance is drawing power from the same circuit (dedicated circuit). |
| Extension cord too long or wire gauge too small | We do not recommend the use of extension cords with your pressure washer. If you must use an extension cord, verify that it meets the minimum requirements listed in the Extension Cord paragraph under the Power Supply & Electrical Info in this manual. | |
| Nozzle partially blocked | Clean the nozzle according to the instructions provided in the Nozzle paragraph under
the Maintenance section of this manual. |
| OPERATIONAL ISSuE | POSSIbLE CAuSE | SOLUTION |
| GFCI Plug Malfunction | For GFCI reset procedure see ground-fault Circuit Interrupter Protection paragraph under Power Supply & Electrical Info in this manual.
To order a replacement GFCI or for GFCI installation instructions, please contact our customer service department at www.simpsoncleaning.com. |
|
| Spray gun, wand or high pressure hose leaking water | Improperly connected accessory | Verify all components (gun, wand, high pressure hose) are properly connected according
to instructions provided in this manual. |
| Leaking oil/ water from pump | NOTE: A small amount of leakage is normal. If oil/ water leakage from pump is excessive, please locate the specific source of the leak
and contact our customer service department. Contact our customer service department at www.simpsoncleaning.com. NOTE: Have the pressure washer present when calling with this issue. |
|
| Low / surging pressure or motor does not stop when spray gun trigger
is released NOTE: The Pressure washer is NOT receiving a full volume of incoming water The machine requires a pressurized water source capable of sustaining a minimum of 20 psi at 5 gpm. |
Faucet is not fully open | Verify incoming water supply faucet is open at the maximum setting. |
| Garden hose is too long or it is kinked
/ restricted |
Use a maximum garden hose length of 50 ft. (15.2 m) (city water) or 25 ft. (7.5 m)
(well water). Ensure the garden hose is laid out flat and does not have any kinks or leaks. Unwrap garden hose from reel or hook (if applicable). Replace garden hose if necessary. |
|
| Water inlet filter screen is clogged | Remove the filter screen (O) from the water inlet (M) and clean it thoroughly. Replace the filter screen. | |
| Extension cord is too long or wire gauge is too small | We do not recommend the use of extension cords with your pressure washer. If you must use an extension cord, verify that it meets the minimum requirements listed in the Extension Cord paragraph under the Power Supply & Electrical Info in this manual. |
| OPERATIONAL ISSuE | POSSIbLE CAuSE | SOLUTION |
| No water coming out of nozzle | Nozzle is clogged | Clean the nozzle according to the instructions provided in the Nozzle paragraph under Maintenance section of this manual. |
| Water inlet filter screen is clogged | Remove the filter screen (O) from the water inlet (M) and clean it thoroughly. Replace the filter screen. | |
| Kink in the garden hose or hose is wrapped on a storage wheel | Use a maximum garden hose length of 50 ft. (15.2 m) (city water) or 25 ft. (7.5 m)
(well water). Ensure the garden hose is laid out flat and does not have any kinks or leaks. Unwrap garden hose from reel or hook (if applicable). Replace garden hose if necessary. |
|
| Nozzle is not installed correctly | See How to use Spray Wand
paragraph in the Operation Section. |
|
| No water coming out of nozzle | Detergent Suction Assembly (the part which the
High Pressure Hose con- nects to) is malfunc- tioning |
Remove the Gun and Hose assembly from the front of the unit. Aim water stream away
from electric source. Turn the faucet on. Water should start to come out of the front of the unit. If no water comes out, the Detergent Suction Assembly will have to be cleaned or replaced. Contact our customer service department at www.simpsoncleaning.com. |
| Spray Gun Trigger will NOT Move | Gun safety lock is engaged | Release safety lock according to instructions provided in the Starting paragraph
under Operation in this manual. |
| Unit will NOT start
NOTE: Unit will only start and run when trigger is depressed and water is spraying! |
Unit is not turned ON | Verify that the On/Off Switch (I) is fully engaged in the ON position. |
| GFCI Plug is not reset | Confirm the GFCI plug is reset and functioning according to instructions provided in ground-Fault Circuit Interrupter Protection paragraph under Power
Supply & Electrical info in this manual. |
| OPERATIONAL ISSuE | POSSIbLE CAuSE | SOLUTION |
| The motor stops working during normal operation
NOTE: Motor’s thermal overload switch is tripping because the motor is overheated Allow the motor to cool for 20 minutes before troubleshooting and the switch will automatically reset. |
An extension cord is too long or wire gauge is too small | We do not recommend the use of extension cords with your pressure washer. If you must use an extension cord, verify that it meets the minimum requirements listed in the Extension Cord paragraph under the Power Supply & Electrical Info in this manual. |
| Nozzle is clogged | Clean the nozzle according to the instructions provided in the Nozzle paragraph under the Maintenance section of this manual. | |
| Defective Spray Gun | Turn the unit OFF, disconnect incoming water from unit, and remove the gun and hose assembly. Aim the pressure washer away from the electrical outlet, reconnect incoming water, and switch the unit into the ON position. If
the motor starts and water flows steadily out of the front (and you have verified that the nozzle is not clogged), the spray gun may be malfunction and need to be replaced. Please contact our customer service department at www.simpsoncleaning.com. |
|
| Connecting and Disconnecting the Spray Wand
NOTE: Due to the high pressures produced by your pressure washer, the wand must seal tightly to the gun. As the result of normal operation, the wand can become difficult to attach or remove and this process may require considerable force. |
To attach the Wand – apply steady downward pressure on the wand (In the direction of the trigger) while simultaneously twisting the wand 90°. It may help if you set the gun vertically on a flat surface with the wand pointing upwards. The two tabs on the end of the wand must be fully inserted in the gun before the wand will twist and lock. If this does not work then remove the bayonet o-ring from the end of the wand and attach the wand to the gun without the o-ring in place. If the wand attaches to the gun without the o-ring in place you will need to replace the o-ring. Please contact our customer service
department at www.simpsoncleaning.com. |
|
| To remove the Wand – release any trapped pressure in the gun/hose by turning the unit OFF and squeezing the gun trigger. Apply steady downward pressure on the wand (In the direction of the trigger) while simultaneously twisting the wand 90°. It may help if you set the gun vertically on a flat surface with the wand pointing upwards. |
Patent Pending
Internet Address: www.simpsoncleaning.co