SNAPTAIN S5C 4-Axis Drone

DISCLAIMER AND SAFETY GUIDELINES
- DO NOT look directly into the drone light.
- DO NOT treat the product as household waste.
- DO NOT fly above or near obstacles, crowds, open water, public road, high voltage power lines or trees.
- DO NOT use the drone in severe weather conditions. These include wind, snow, rain, smog, hail, lightning, tornadoes or hurricanes.
- Stay away from the rotating propellers and motors to avoid some tiny objects (e.g. hair) to get into them.
- This product is not a toy and not recommended for users under age 14.
- Please maintain line-of-sight of your drone at all times after it is powered up. Do not reply on the camera image to control your drone.
- This drone does not come with a GPS module. Please fly the drone within the control range and always keep an eye on the flying.
- This product is not intended for professional aerial drone photography.
- Be sure to observe all local regulations, obtain appropriate authorizations and understand risks. Please note it is solely your responsibility to comply with all flight regulations.
SNAPTAIN accepts no liability for damage, injury or any legal responsibility incurred directly or indirectly from the use of this product. The user shall observe safe and lawful practices including, but not limited to, those set forth in these Safety Guidelines. SNAPTAIN reserves the right to update this user manual.
MAINTENANCE AND CARE
- Thoroughly check the drone after crash or violent impact.
- Do not charge battery if it is hot. Let it cool down first.
- Remove the batteries from both the drone and the remote if they will not be used for a long time.
- Unplug the charger once it’s fully charged.
- Store the drone and remote in a cool, dry place away from direct sunlight.
- Avoid direct contact of the camera with water or other liquids. Wipe dry with a soft absorbent cloth if it gets wet.
- Do not charge the battery next to inflammable materials, such as carpet, wood floors or countertops etc, or on surfaces that are electrically conductive. Do not leave the battery unattended while charging.
PACKING LIST
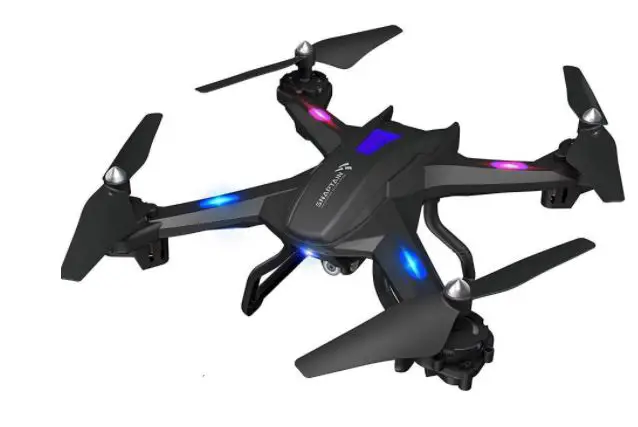
SSC Drone
- Propeller
- Motor
- Front LED
- Battery Compartment
- RearLED
- Camera
- ON/OFF
- microSD Card Slot
FUNCTION OVERVIEW
Remote
- Speed Switch
- Left Control Stick
- Forward Trim
- Leftward Trim
- Backward Trim
- Rightward Trim
- Phone Clamp
- 360’Flip
- One Key Take-off/Landing
- Headless Mode/One Key Return(long press)
- Photo/Video(long press)
- Emergency Stop
- Right Control Stick
- Power Indicator
- On/Off
FLIGHT PREPARATION
- Install the landing skids and propeller guards into the drone, then tighten the screws.

- Charge the battery of the drone.

Notes:- The LEDs of the drone will flash when the battery is low during flight.
- It takes around 90mins to reach a full charge.
- Please use the original battery and USB cable provided.
- Keep the battery away from any sharp objects that could puncture into the battery to avoid risks of explosion and fire.
- It’s not recommended to charge the battery from the USB port of PC.
- Battery capacity is significantly reduced when flying in low-temperature environments. Flight time will be reduced, too. If flying in such an environment is inevitable, please keep the battery indoors or insert it into the drone for 1-2 minutes to warm it.
- Install the drone battery after it’s fully charged.

• Place your thumb on the edge of the lid covering the drone battery and slide to open.
• Push towards the head of the drone to close the battery cover. - Insert a microSD card (not included) into the drone.

- Install the remote batteries.

- Unfold the Phone Clamp and mount your mobile device when using it to fly your drone. (Optional)

- Replace the propellers when it’s needed. (Optional)

FLIGHT OPERATION GUIDE
- Remove the cap on the propeller.
- Loosen the screw to remove the propeller.
- Fit the spare propeller into the drone. Make sure the mark (A/B) on the propeller is the same as the mark on the arm of the drone.
- Tighten the screw and install the cap. FLIGHT OPERATION GUIDE
IMPORTANT:- Make sure you power on the drone first, then the remote in each flight.
- Do repeat the paring procedure each time when the drone or remote is restarted.
- For all flight functions and modes, the operator and tail of the drone must be aligned.
- We recommend flying in the open air and within the control range for beginners.
Remote Operation Guide
Pair the Remote with the Drone
Step 1:
Turn on the drone, then place it on a flat surface with the head forward. LEDs on the arms of the drone start to flash slowly.
Step 2:
Press the On/Off button on the remote to turn on it and there is a beep from the remote.
Tip: Press and hold the On/Off button to turn off the remote.
Step 3:
Push the Left Control Stick forward to the top, then pull it backward till the bottom. Pairing is successful when the LEDs of the drone turn to solid on from quick flashing.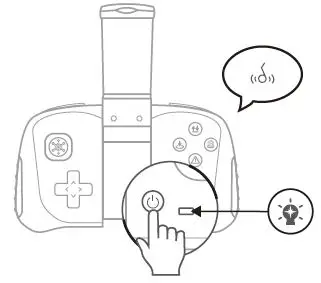
FLIGHT OPERATION GUIDE
Flight Calibration
Move both control sticks to lower left or right at 45°, then hold for 2s until you hear a long beep from the remote. Calibration completes when the LEDs of the drone turn to solid on from quick flashing.
Flight Instructions
Take-off
Option 1: Press the ‘1) button to take off.
Option 2:
Push the Left Control Stick to lower left at 45° and the Right Control Stick to lower right at 45° at the same time until the four rotor blades start rotating, then slowly push the Left Control Stick forward to take off.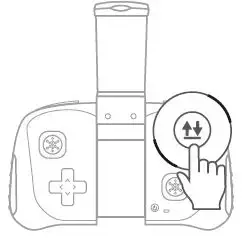
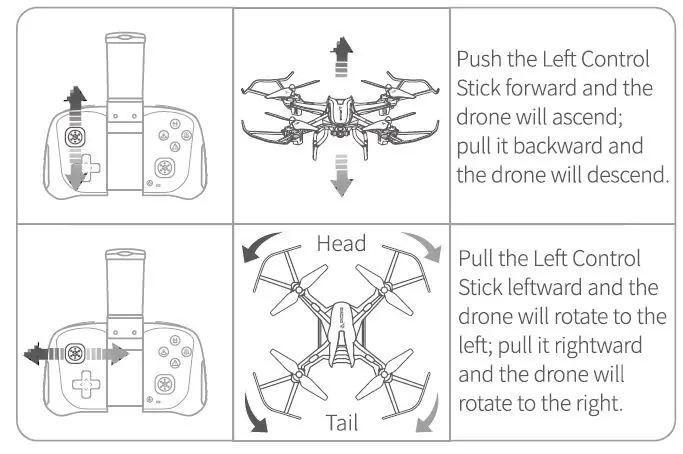
Flight Directions
Left Control Stick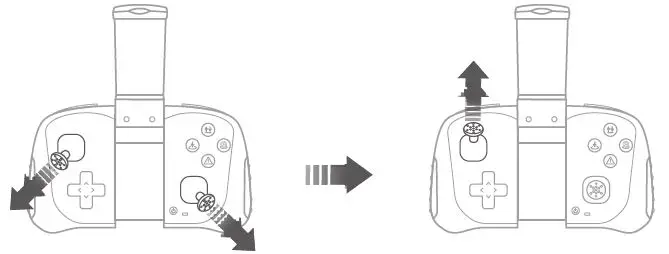
Right Control Stick
Flight Trimming

Photo/Video
Short press the (i) button to take a photo. There’s a beep from the remote and the rear LEDs of the drone flash once.
Press and hold the (i) button to start recording a video; there’s a beep from the remote and the rear LEDs of the drone keep flashing while recording the video. Press and hold it again to end and save the video.
Speed Switch
The drone is set to low speed by default. Press the C button once for Medium speed and there are two beeps from the remote. Press it again for High speed and there are three beeps from the remote.
Press it the third time to get back to Low speed and there is one beep from the remote.
Headless Mode
Short press the O button to activate Headless Mode. There are continuous beeps from the remote; the LEDs of the drone flash slowly. In this mode, the drone will fly following the direction of the Right Control Stick regardless of the position of your drone’s head or tail. Press the same button to exit this mode.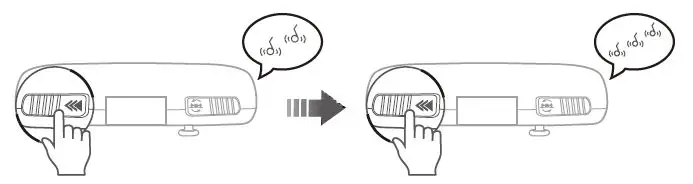
360° Flip
After flying the drone to a height over 2m, press the@button to activate 360° Flip function. Then move the Right Control Stick to flip the drone accordingly.
- There’s a beep from the remote about 2s after you press the @ button, indicating that this function is cancelled. Please move the Right Control Stick timely to flip the drone.
- This function can’t be activated when the battery of the drone is low.
One Key Return
Press and hold the O button, then the drone will fly toward its back following a path paralleled to its original take-off path. Press and hold the O button again or push the Right Control Stick forward to cancel this mode.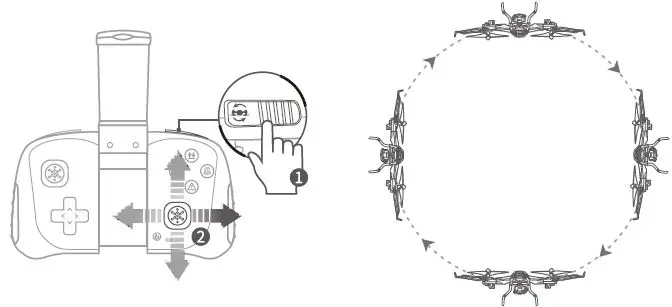
Altitude Hold/Hover
This is one of the default settings on the drone. When you release the Left Control Stick after an ascending/descending action, the drone will hover at the current flight height. For a stable flight, press the trim buttons to adjust accordingly.
Landing
Option 1: Press the(!) button to land the drone.
Option 2: Slowly pull the Left Control Stick backward to land the drone until the propellers stop rotating.
Emergency Stop
Press the O button, then the drone will stop in the air and fall.
Note: It’s NOT recommended to use this function during normal flight for landing, which may result in serious damage for your drone.
App Operation Guide
App Downloading and Installation
Download and install Snaptain Era into your mobile device from App Store/Google Play or by scanning the QR code below.
Pair the App with the Drone
Step 1:
Power on the drone and the LEDs will flash.
Step 2:
Go to the Wifi settings of your mobile device and connect to the Wifi Snaptain-SSC-xxxxxx.
Step 3:
Open Snaptain Era App. Tap Function Display and ON/OFF to turn on the App. LEDs on the drone turn to solid on at a successful connection.
Step 4:
Tap Oto calibrate the drone.
Notes:
- If Snaptain-SSC-xxxxxx is not listed or the App doesn’t show the preview image, please restart the drone and search the Wifi of the drone again.
- Make sure Snaptain-SSC-xxxxxx Wifi is only connected to one device.
- It’s recommended that you turn off cellular data when your mobile device connects to the Wifi Snaptain-SSC-xxxxxx. Otherwise, the Wifi connection with the drone may be interrupted.
Function Overview of the App
- Back
- Photo
- Video
- Media Gallery
- Speed Switch
- G-Sensor
- Emergency Stop
- One Key Take-off/Landing
- App ON/OFF
- More
More:
Tap Oto hide or display icons from D to I.
Photo:
Tap once to take one photo.
Video:
Tap once to start recording, tap again to end and save the video.
Media Gallery:
Tap to check the photos and videos saved to the mobile device.
G-Sensor Mode:
Tap to activate this mode. The drone will fly following the inclines of your mobile device in its landscape orientation.
VR Mode:
VR device (not included) is required to activate VR Mode.
Calibration:
Tap 9 to calibrate the drone directly. If the LEDs of the drone flash quickly after a sudden impact, please first swipe down the Left Control Stick, then tap Oto calibrate the drone.
Voice Control:
Take off, land, forward, backward, to leftside, to rightside.
Gestures for Photo/Video:
Tap 4D to activate this function. Within a distance of2-3m between you and the camera, please face the camera and make a ‘i”J gesture with your right hand to take a photo, a gesture to start/end recording a video.
Wifi Signal:
Check the Wifi status of the drone to avoid losing control. When it drops to l of 4 bars (),please fly the drone back immediately.
Battery Status:
Check the battery status of the drone.
Trajectory Flight:
Tap$ to activate this mode. Draw a path in the blank area on the screen and the drone will fly following the path. Tape to modify flight distance and time accordingly. Tap$ again to exit from this mode.
 Note:
Note:
- To fly the drone with the remote while see the image through your mobile device in the App operation mode, tap the ON/OFF icon to OFF, then pair the drone with the remote again.
TROUBLESHOOTING GUIDE
Ql: Drone LEDs do not light up.
- Press power button on the drone.
- Replace or charge your drone battery.
- Make sure the connectors of the battery are plugged in firmly.
Q2. Drone LEDs keep flashing, but the drone never responds to any command from the remote.
- Pair the drone and remote again.
- Replace or charge the battery of drone.
- Make sure the batteries of the remote have enough power.
Q3: The flight is not stable.
- Return the drone and restart to do a flight calibration as instructed.
- Make the flight trimming accordingly.
- Fly the drone when the weather is good.
Q4: The response from the drone to the control is not sensitive.
Make sure the distance between the drone and the mobile device is effective.
Q5: Connection between the drone and the App is frequently lost.
- Make sure the distance between the drone and the mobile device is effective.
- Make sure your mobile device is not connected to another network.
Q6: The App doesn’t respond to voice commands.
Ensure the drone App has access to the audio function of your mobile device.
Q7: Some of the functions don’t work in the App.
Make sure the switch for the App is ON.
Q8: The drone will fly beyond the control range.
Activate the Headless Mode, then move the Right Control Stick to fly the drone back.
us: support@snapta in.com
CA: [email protected]
UK: [email protected]
FR: [email protected]
ES: [email protected]