![]()

SP500
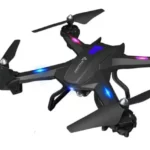
4-Axis GPS Drone
(RAGES I
USER MANUAL
Please read this manual carefully before flying and keep it well for future reference.
V4.02(A)
DISCLAIMER AND SAFETY GUIDELINES
Please read the disclaimer carefully before using this product. By using it, you hereby agree to this disclaimer and signify that you have read them fully.
- Before flying, please make some practice with a simulator or seek for instruction from a professional.
- DO NOT fly above or near obstacles, crowds, open water, public road, high voltage power lines or trees.

- DO NOT use the drone in severe weather conditions, such as a rainy day or windy (wind speed is more than 5.5m/s), snow, hail, lightning, tornadoes, hurricanes, etc..

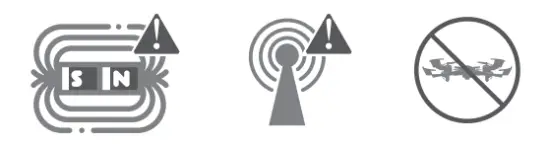
- DO NOT fly the drone in the magnetic interference area, radio interference area, and government-regulated no-fly zones.
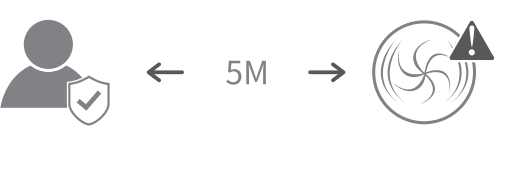
- The fast-rotating motors and propellers are a potential hazard to cause serious damage and injury. A safe distance of 5m must be maintained from the drone at all times while it is operational. Fly with responsibility.
- Please maintain the line of sight of your drone at all times after it is powered up. Do not rely on the camera image to control your drone.

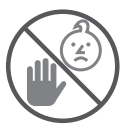
- This product is not a toy and not recommended for users under age 14.

- This product is not intended for professional aerial drone photography.
- All parts must be kept out of the reach of children to avoid CHOKE HAZARD.
- CAUTION: Dispose of the drone and batteries in accordance with local regulations. DO NOT treat it as household waste.

- Be sure to observe all local regulations, obtain appropriate authorizations and understand risks. Please note it is solely your responsibility to comply with all flight regulations.


CAPTAIN accepts no liability for damage, injury or any legal responsibility incurred directly or indirectly from the use of this product. The user shall observe safe and lawful practices including, but not limited to, those set forth in these Disclaimer and Safety Guidelines. CAPTAIN reserves the right to update this user manual.
MAINTENANCE AND CARE
- Thoroughly check the drone after a crash or violent impact.
- Do not use or store the battery near a fire.
- Do not charge the battery if it is hot. Let it cool down first.
- Do not charge the battery next to inflammable materials, such as beds, carpets, wood floors, etc., or on surfaces that are electrically conductive. Do not leave the battery unattended while charging.
- ONLY use the original cable provided. Unplug the charger once the battery is fully charged.
- Remove the battery from the drone if it will not be used for a long time.
- Store the drone and remote in a cool, dry place away from direct sunlight.
- Be sure to clean off your drone with a dry cloth to prevent any moisture from getting onto the electronics.
- Do not try to disassemble or repair the product by yourself. Please contact SNAPTAIN for more help.
- Please use the original battery provided. Using an incorrect type of battery may lead to fire hazards.
- Do not dispose of the battery in a fire or a hot oven, cut or mechanically crush the battery, as this may cause explosions.
- Do not leave the battery in an extremely high-temperature environment that can result in an explosion or the leakage of flammable liquid or gas.
- Do not expose the battery to extremely low air pressure, as this may result in an explosion or the leakage of flammable liquid or gas.
PRODUCT OVERVIEW
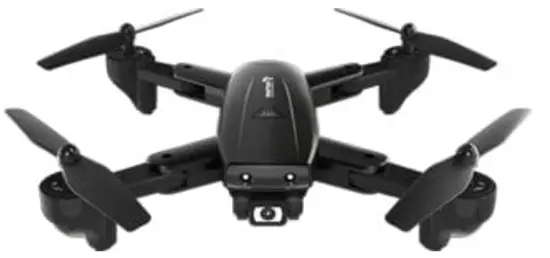
SP500 Drone


PRODUCT OVERVIEW
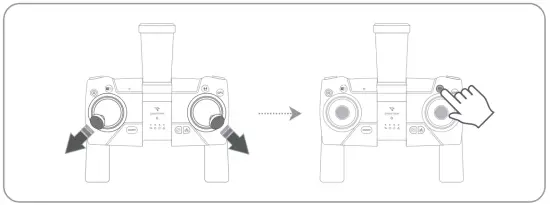
Remote
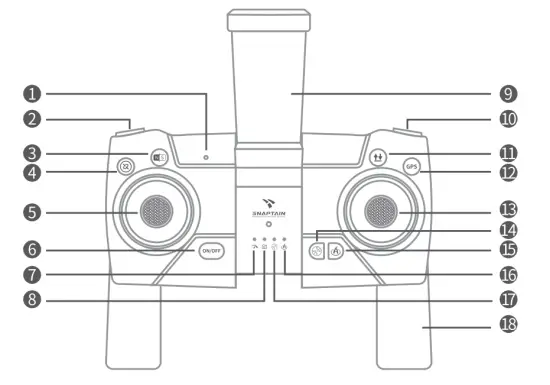
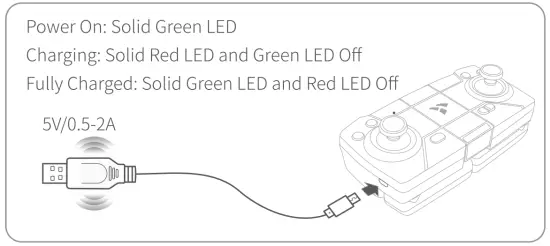
| 1. Power Indicator | 11. One Key Take-off/Landing. Emergency Stop(Long press) |
| 2. Speed Switch | 12. GPS Mode On/Off |
| 3. CompassCalibration (Long press) | 13Right Control Stick |
| 4. Gyro Calibration(Long press) | 14Headless Mode |
| 5.Left Control Stick | 15. Smart RTH |
| 6. on/off | 16. Smart RTH Indicator |
| 7.Speed Indicator | 17. Headless Mode Indicator |
| 8. Photo/Video Indicator | 18. Remote Handle |
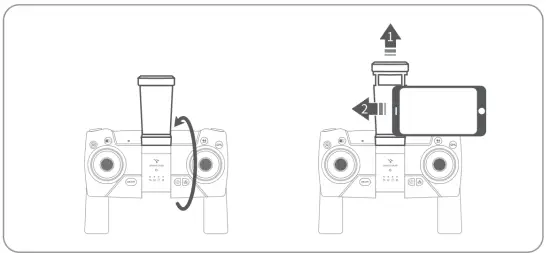
| 9. Phone Clamp | |
| 10. Photo/Video(long press) | |
FLIGHT PREPARATION
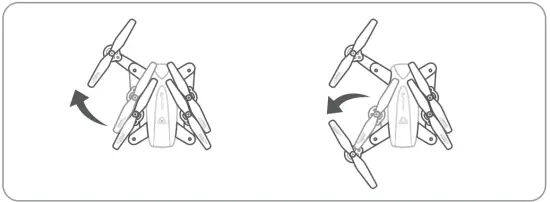
- unfolds the front arms, then the rear arms.
- Install the propeller guards into the drone.
• Remove the small plastic chip from the rotor shell.
Insert the propeller guard into the rotor shell.

- Charge the battery.

Notes:
- Please use the original battery and USB cable provided.
- Keep the battery away from any sharp objects that could puncture into the battery to avoid risks of explosion and fire.
- It’s not recommended to charge the battery from the USB port of PC.
- Flight time may be reduced when flying in low-temperature environments.
- To extend the battery’s lifespan, recharge it at least once every three months if not using it for long periods of time.
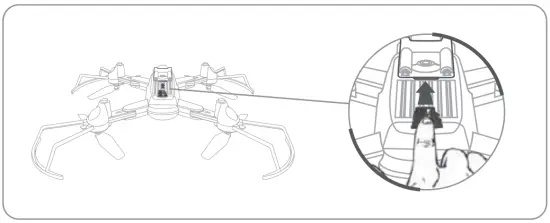
4. Install the battery into the drone after it’s fully charged.

5. Insert a memory card(not included) into the drone.
- FAT 32 format of the memory card is recommended.
6. Charge the remote.
7. unfold the Remote Handle.

8. Unfold the Phone Clamp when using the mobile device to fly the drone.
9. Replace the propeller when it’s needed. (Optional)
 Remove the cap on the propeller.
- Loosen the screw to remove the propeller.
- Fit the spare propeller into the drone. Make sure the mark (A/B) on the propeller is the same as the mark on the arm of the drone.
- Tighten the screw and install the cap.
FLIGHT OPERATION GUIDE
![]() IMPORTANT:
IMPORTANT:
- Make sure your power on the drone first, then the remote in each flight.
- Do repeat the pairing procedure each time when the drone or remote is restarted.
- For all flight functions and modes, the operator and tail of the drone must be aligned.
FLIGHT OPERATION GUIDE C
- We recommend flying in the open air and within the control range for beginners.
- Use the remote and App simultaneously to fly the drone for getting better flying experience.
REMOTE OPERATION GUIDE
PAIR THE REMOTE WITH THE DRONE
Step 1: Turn on the drone, then place it on a flat surface with the head forward. LEDs on the arms of the drone flash slowly.
Step 2: Short press 
![]() Tips:
Tips:
- Press and hold the

- The drone and remote will be turned off automatically after 15 minutes of inactivity.
FLIGHT CALIBRATION
1. Compass Calibration
Press and hold the (
FLIGHT OPERATION GUIDE

 Step 2: Hold the drone vertically and rotate it until the LEDs on the rear arms turn green, which indicates a successful vertical calibration.
• Notes:
- • The LEDs on the arms of the drone may flash quickly after compass calibration. Place the drone on a flat surface and do the
Gyro Calibration.
• Make sure to keep away from ferromagnetic substances and other electronic equipment when calibrating. - Gyro Calibration Put the drone on a flat surface. Press and hold the CI button on the remote for 3s to start calibrating and you will hear a beep from the
FLIGHT OPERATION GUIDE
remote. Gyro Calibration is completed when the LEDs on the arms of the drone stop flashing quickly.

After finishing the compass calibration and gyro calibration, put the drone on a flat surface and go to Captain Nova App to check the GPS Signal (see the detailed information on page 23-25), then wait for minutes. When the GPS signal shows 3 bars or more and the LEDs on the head of the drone turn solid on, the drone has found enough GPS satellites and is ready for taking off.

![]() Note: We strongly recommend GPS Mode for beginners.
Note: We strongly recommend GPS Mode for beginners.
FLIGHT OPERATION GUIDE
FLIGHT INSTRUCTIONS
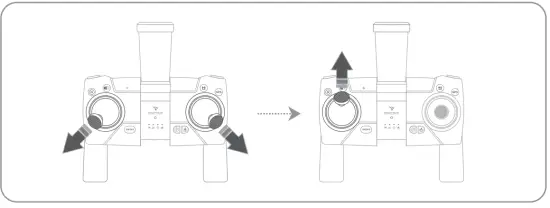
Take-off Option 1: Move the Left Control Stick to the lower left in 45° and the Right Control Stick to lower right in 45° at the same time until four rotor blades start rotating, then short press the 
 Option 2: Move the Left Control Stick to lower left in 45° and the Right Control Stick to the lower right in 45° at the same time until four rotor blades start rotating, then slowly push the Left Control Stick forward to take off.
 FLIGHT OPERATION GUIDEIlL
Option 3:
Press the
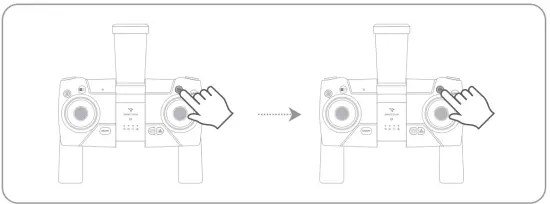 Option 4:
Press the
 • When the App reminds you The compass seriously interfered” and four rotor blades can’t rotate via the operation of the remote (
FLIGHT OPERATION GUIDE
Flight Directions Left Control Stick
 |
Push the Left Control Stick forward and the drone will ascend; pull it backward and the drone will descend. |
 |
Pull the Left Control Stick leftward and the drone will rotate to the left; pull it rightward and the drone will rotate to the right. |
Right Control Stick
 |
Push the Right Control Stick forward and the drone will fly forward; pull it backward and the drone will fly backward. |
 |
Pull the Right Control Stick leftward and the drone will fly leftward; pull it rightward and the drone will fly rightward. |
Return-To-Home(RTH)
The Return-to-Home(RTH) function brings the drone back to the last recorded Home Point where the drone took off last time if the GPS signal shows 3 bars or more, and the compass is functioning normally. Otherwise, this function can not be performed.
Smart RTH.
Press 
RTH Distance: The distance between the drone and the last recorded Home Point where the drone took off last time.
 1. RTH Distance >30M
If the current flight altitude is lower than the preset RTH altitude, the drone will first ascend to the preset RTH altitude, then fly horizontally to above Home Point and descend to land.
FLIGHT OPERATION GUIDE
 If the current flight altitude is higher than the preset RTH altitude, the drone will directly fly back to above Home Point at its current flight altitude and land.
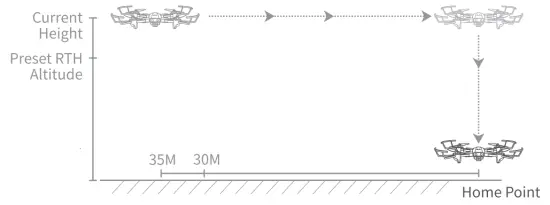 2. RTH Distance 530M The drone will directly fly to above Home Point at its current flight altitude and descend to land.
FLIGHT OPERATION GUIDE 4
• Notes:
- The preset RTH Altitude is 25m by default. You can reset it in the Settings of the Captain Nova App (see on page 26). However, the preset RTH Altitude can not be higher than the Flight Altitude when resetting.
- During the path of Smart RTH, the Smart RTH Indicator on the remote will flash continuously.
Failsafe RTH
Failsafe RTH will be automatically activated when the remote disconnects with the drone for more than 4s. The drone will fly back to the last recorded Home Point under the control of the flight syster itself. If the connection between the remote and drone is re-established, the pilot can regain control of the drone to cancel the RTH process. If no activity is performed by the pilot, the RTH process will continue
• Notes:
- The drone cannot avoid obstacles during the flight path of Failsafe RTH.
- When the remote disconnects with the drone for more than 4s, and the GPS function is not available, the drone will slowly descend from the current altitude till landing.
- During the flight path of Failsafe RTH, the LEDs of the drone will flash quickly.
FLIGHT OPERATION GUIDE
Low Battery RTH
- The Low Battery RTH will be triggered when the drone battery is low and the RTH Distance is over 30m.
 After flying back and when the RTH distance is less than 20m, RTH will be canceled automatically. The drone can not fly beyond 30m anymore no matter how the pilot operates .
Note: After canceling RTH, the Low Battery RTH will not be triggered again unless the battery is critically low. - The Critical Low Battery RTH will be triggered when the drone battery is critically low.
FLIGHT OPERATION GUIDE
The drone will automatically fly back at its current height and land to the last recorded Home Point if the RTH distance is over 15m. The drone will descend and land directly if the RTH distance is within 15m. After landing, the drone can’t take off anymore unless you charge or replace the battery.
• Note: Please land the drone timely, then charge or replace the battery when the battery is low.
Photo/Video
Short press
Press and hold

Headless Mode
Short press the 
 FLIGHT OPERATION GUIDE
Speed Switch
The speed of the drone is set as LOW speed by default. Press the 
 Attitude (ATTI)
Mode Option 1:
Short press the © button to activate ATTI Mode, and there is a long beep from the remote.

ATTI Mode is automatically on when there are not enough satellites connected to put the drone in GPS mode during the outdoor flight. In ATTI mode, the drone will maintain a specific flight altitude, but it will drift around in the wind.
![]() Note: We recommend ATTI Mode only when the pilot has proficient skills in operating the drone.
Note: We recommend ATTI Mode only when the pilot has proficient skills in operating the drone.
FLIGHT OPERATION GUIDE
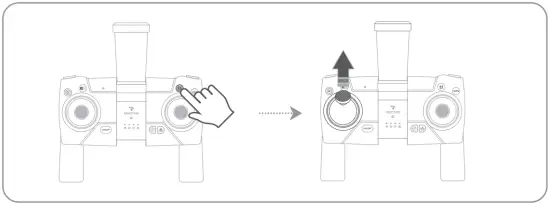
Landing Option 1:
Short press

Slowly pull the Left Control Stick backward to land the drone.


FLIGHT OPERATION GUIDE
![]() Note: Its NOT recommended to use this function during the normal flight, which may result in serious damage to your drone.
Note: Its NOT recommended to use this function during the normal flight, which may result in serious damage to your drone.
APP OPERATION GUIDE
App Downloading and Installation
Download and install Snaptain Nova into your mobile device from App Store/Google Play'” or by scanning the QR code below.
 |
 |
| https://qrs.ly/yd9tawv | https://qrs.ly/b49tay1 |
Note: Google Play`” is a trademark of Google Inc., and App Store” is a trademark of App Inc.
App Launch
Step 1:
Go to the Wifi setting of your mobile device and connect to the Wifi SNAPTAIN-SP500-zoom.
Step 2: Open Snaptain Nova App, and tap Start to enter the App.
FLIGHT OPERATION GUIDE 
![]() Notes:
Notes:
- If the SNAPTAIN-5P500-xxxxm Wifi is not listed in your Wifi list or the App does not show the preview image, please restart the drone and remote, then repeat the pairing and calibration procedures following the sections on page 10-12.
- Make sure the SNAPTAIN-SP500-xxxxxx Wifi is only connected to one mobile device.
- If you can’t see the live map, please disconnect to the drone’s Wifi, then turn on cellular data and location service on your mobile device to preload the map. Next, turn off cellular data and reconnect to the drones Wifi, then launch the App.
- The drone’s Wifi has no Internet access. It’s recommended that you turn off the cellular data when connecting to the drone’s Wifi. Otherwise, your mobile device may automatically switch to cellular data and disconnect with the drone’s Wifi.
FLIGHT OPERATION GUIDE
Function Overview of the App
- Back
- Media Gallery
- VR Mode
- More
- Waypoints
- Flip Image
- Flight Records
- Settings
- GPS Signal
- Wifi Signal
A Smart RTH
B Point of Interest
C Follow Me
D One Key Take-off/Landing
E Gestures for PhotoNideo
F Photo
G Video
H Music
I Drone Battery Status
J Remote Battery Status
K Live Map
L Unlock
M D: Flight Distance H: Flight Altitude DS: Flight Speed VS: Ascent/Descent Speed
FLIGHT OPERATION GUIDE
![]() Tip:
Tip:
Tap to hide or show icons on the screen.
Media Gallery:
Tap to check the photos and videos saved.
VR Mode:
Tap
GPS Signal:
Check the signal of the GPS satellites. When it shows 3 bars, the GPS Mode of the drone is available.
Flip Image:
Tap 
Flight Records:
Check all kinds of flight records here.
Wifi Signal:
Check the Wifi signal strength of the drone to avoid losing control. When it shows low signal strength ( 
Drone Battery Status:
Check the battery status of the drone.
Remote Battery Status:
Check the battery status of the remote.
Settings
Tap (
FLIGHT OPERATION GUIDE
 You can reset the Flight Distance, Flight Altitude and RTH Altitude as needed.
Beginner Mode:
It’s ON by default and all the flight parameters are preset. We recommend this mode for beginners.
Flight Distance:
Tap to reset the maximum flight distance between the drone and last recorded Home Point.
Flight Altitude: Tap to reset the maximum flight altitude of the drone.
RTH Altitude: Tap to reset the RTH altitude when returning home.
Note: RTH Altitude can’t be higher than the Flight Altitude.
FLIGHT OPERATION GUIDE
 IMPORTANT:
- Before flying, please make sure the GPS Signal shows 3 bars or more.
- The maximum flight distance (the maximum distance between the drone and the last recorded Home Point) is set to 30m by default and you can reset it in Settings of App.
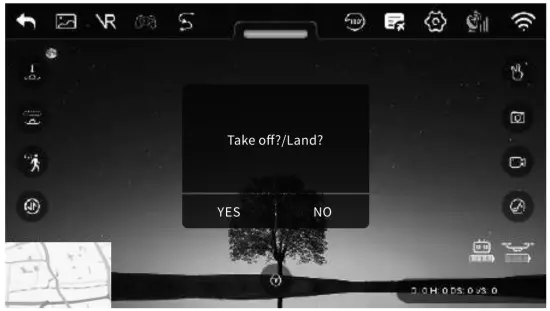
Take-off
Step 1:
Tap> to unlock the drone and four rotor blades start rotating.
Step 2:
Tap ,
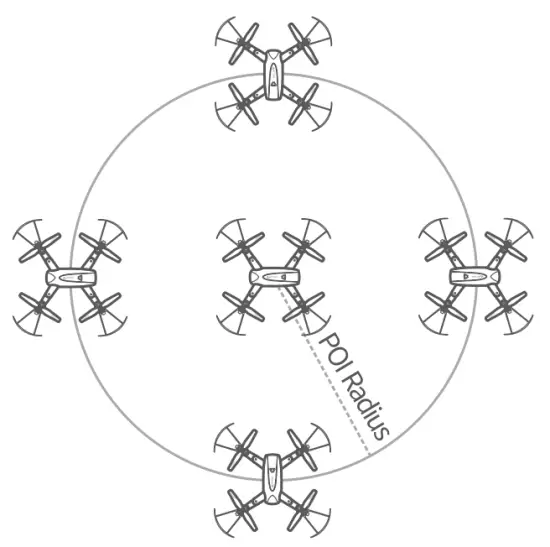
Point of Interest (P01)
Tapto activates POI during the flight, enter the P01 Radius and tap OK to start. The drone will circle around the current point of drone while keeping that point centered in the frame.
FLIGHT OPERATION GUIDE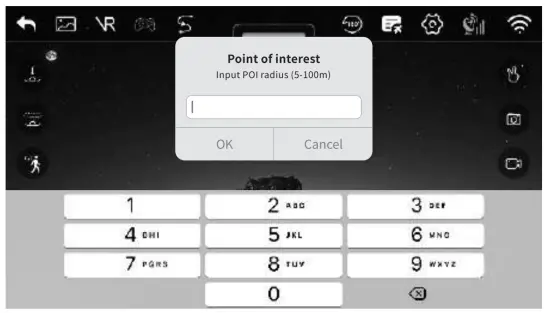
 Tap
Tap
![]() Note: This function can’t be activated when the battery of drone is low (the Drone Battery Status shows 2 Yellow bars and the LEDs of the drone flash slowly).
Note: This function can’t be activated when the battery of drone is low (the Drone Battery Status shows 2 Yellow bars and the LEDs of the drone flash slowly).
FLIGHT OPERATION GUIDE (<
Follow Me
Tap  to enable Follow Me function, then tap Yes on the pop-up window to start. When Follow Me is enabled during flight, the drone’s camera lens will keep pointing at your mobile device and maintain a constant distance from it.
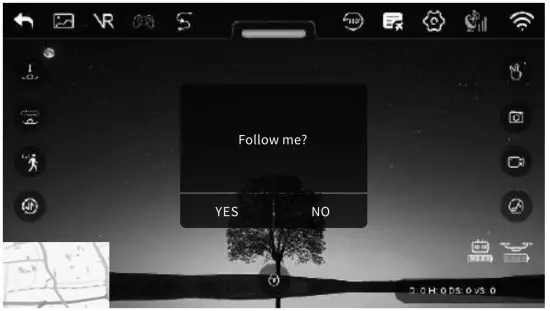
Tap again during the flight to cancel this mode and regain control of the drone.
![]() Notes:
Notes:
- The function of Follow me may have a deviation due to the GPS Signal. Please maintain a safe distance between you and the drone when enabling this function.
- Activate this function only when there is no obstacle around you in case of unexpected accidents.
- This function can’t be activated when the battery of the drone is low (the Drone Battery Status shows 2 Yellow bars and the LEDs of the drone flash slowly).
FLIGHT OPERATION GUIDE
Waypoints
Waypoints function allows you to define an exact flying route on a map during the flight.
Step 1: Tap  then tap some desired waypoints on the map. Tap
 DELET ONE Or DELET ALL to delete waypoint(s) if you want to reset.
Step 2: Tap UPION) to upload waypoint(s).
Step 3: Tap Yes on the pop-up window to start.
 Tap
Tap
![]() • Note: This function can’t be activated when the battery of the drone is low (the Drone Battery Status shows 2 Yellow bars and the LEDs of the drone flash slowly).
• Note: This function can’t be activated when the battery of the drone is low (the Drone Battery Status shows 2 Yellow bars and the LEDs of the drone flash slowly).
FLIGHT OPERATION GUIDE
(< Photo/Video
Tap ® to take one photo.
Tap to start recording, tap again to end, and save the video to your memory card and mobile device.
Gestures for Photo/Video:
Tap 0 to activate this function. Within 3m under light-filled circumstances, please make  gesture with your right hand for taking a photo,
 gestures for starting and ending the recording.
Record Videos with the Preloaded Music
Step 1: Tap Click to select music, and the music provided will be displayed on the screen.
Step 2: Click the background music you prefer and confirm your choice, then tap OK on the pop-up window to start recording videos. Videos will be saved to the Media Gallery after you finish recording videos.
Step 3: Share your video with your friends from Media Gallery by tapping on the upper right corner of the selected video.
Landing
Tap
Smart RTH
Tap  to activate Smart RTH during the flight and have the drone return to the last recorded Home Point. Tap YES on the pop-up
FLIGHT OPERATION GUIDE (<
window to start RTH; tap NO to exit this window.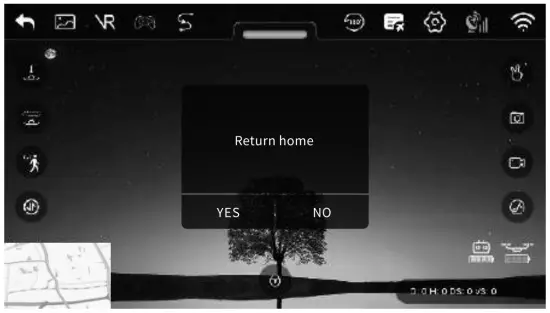
During the path of RTH, tapagain or press the button on the remote to cancel RTH and regain control.
)) LED INDICATORS DESCRIPTION
| LEDs on the Head of the Drone | |
| LEDs Status | Drone Status |
| Off | GPS Mode OFF |
| Flash | Searching Satellites |
| Solid on | Satellites Searched, GPS Mode available |
LED INDICATORS DESCRIPTION
| Function | ‘Front LEDs | Rear LEDs | |
| Color | Red | Green | |
| Power On | Flash slowly | ||
| Pairing | Flash quickly | ||
| Compass Calibration | Start Calibrating: off Horizontal Calibration Completed: light up Vertical Calibration Completed: light up | Start Calibrating: off Horizontal Calibration Completed: off Vertical Calibration Completed: light up | |
| Gyro Calibration | Start Calibrating: Flash quickly for 4s Calibrated: Pulse | ||
| Failsafe RTH | Flash slowly . | ||
| Low Battery Status | Low Battery: Flash slowly Critical Low Battery: Flash quickly | ||
TROUBLESHOOTING
Ql. The motors of the drone don’t spin. ‘
- Make sure that you’ve turned on the drone and the remote.
- Make sure that the drone battery and the remote battery have enough power.
- Make sure that the remote has been paired with the drone successfully.
Q2. The LEDs of the drone flash abnormally. ‘
- Make sure that the drone battery has enough power.
- Try to calibrate the compass.
- Try to calibrate the gyro.
Q3. The drone’s propellers start rotating after I unlock the motor, but the drone fails to take off
- Make sure that the drone battery has enough power.
- Push the Left Control Stick forward to take off after unlocking the motor.
- Make sure that the propellers (A/B) are installed correctly. * Check if the rotating speed of each motor is the same. If not, the motor is broken, please contact us directly.
Q4. The drone tilts to one side after taking off. ” Calibrate the gyro.
- Make sure that the propellers (A/B) are installed correctly.
- Check if the motor is stuck by any small object or if there is a burning smell from the motor. If yes, please remove the small object or contact us directly.
- Check if the wheel of the motor is working well. If not, please contact us directly.
Q5. The drone’s propeller fails to rotate.
- Check if the propeller is over-tightened.
- Check if the motor is stuck by any small object or if there is a burning smell from the motor. If yes, please remove the small object or contact us directly.
- Check if the wheel of the motor is working well. If not, please contact us directly.
Q6. The drone drifts after taking off.
- Make sure that GPS Mode is ON and the GPS signal is strong.
- Please land the drone and calibrate the gyro.
- Please land the drone and calibrate the compass.
Q7. The drone is unresponsive or insensitive to the control of the remote.
- Make sure that the drone flies within control range (C220m).
- Switch the speed of the drone to medium or high speed.
- Make sure that the remote battery has enough power.
Q8. Can’t see the live image on App.
- Make sure that the drone has enough power.
- Make sure that your mobile device has connected to the drone’s wifi.
- Please go to your mobile device’s setting to turn off your cellular data, or disable the function that allows your phone to automatically disconnect to wifi with no Internet access.
- Make sure that the camera isn’t blocked.
- Make sure that the drone flies within FPV range (C220m).
- Make sure that you’ve selected SP500 when launching the App.
- Please try to use another phone to connect to the drone’s wifi.
SPECIFICATIONS
| Operating Temperature | 32°F to 104°F(0°C to 40°C) | |
| USB Cable | ||
| For Remote | For Drone Battery | |
| Input | 5V |
5V |
| Output | 3.7V |
7.4V |
FCC Caution
Any changes or modifications not expressly approved by the party responsible for compliance could void the user’s authority to operate the equipment. This device complies with part 15 of the FCC Rules. Operation is subject to the following two conditions: (1) This device may not cause harmful interference, and (2) this device must accept any interference received, including interference that may cause undesired operation.
Note: This equipment has been tested and found to comply with the limits for Class B digital devices, pursuant to part 15 of the FCC Rules. These limits are designed to provide reasonable protection against harmful interference in a residential installation. This equipment generates, uses, and can radiate radio frequency energy and, if not installed and used in accordance with the instructions, may cause harmful interference to radio communications. However, there is no guarantee that interference will not occur in a particular installation. If this equipment does cause harmful interference to radio or television reception, which can be determined by turning the equipment off and on, the user is encouraged to try to correct the interference by one or more of the following measures:
— Reorient or relocate the receiving antenna.
— Increase the separation between the equipment and receiver.
— Connect the equipment into an outlet on a circuit different from that to which the receiver is connected.
— Consult the dealer or an experienced radio/TV technician for help.
For Remote:
This equipment complies with FCC radiation exposure limits set forth for an uncontrolled environment.
For R/C QUADCOPTER:
This equipment complies with FCC radiation exposure limits set forth for an uncontrolled environment This equipment should be installed and operated with a minimum distance 20cm between the radiator & your body. This transmitter must not be co-located or operating in conjunction with any other antenna or transmitter.
ISEDC Warning
This device complies with Industry Canada licence-exempt RSS standard(s). Operation is subject to the following two conditions: (1) This device may not cause interference, and (2) This device must accept any interference, including interference that may cause undesired operation of the device.
For R/C QUADCOPTER:
The device is in compliance with RF exposure guidelines, users can obtain Canadian information on RF exposure and compliance. The minimum distance from the body to use the device is 20cm. The operation of this device in the band 5150-5250 MHz is restricted to indoor use only.
For Remote: The device is in compliance with RF exposure guidelines, users can obtain Canadian information on RF exposure and compliance.
CAUTION
RISK OF EXPLOSION IF BATTERY IS REPLACED BY AN INCORRECT TYPE DISPOSE OF USED BATTERIES ACCORDING TO THE INSTRUCTIONS
![]() The symbol indicates DC voltage
The symbol indicates DC voltage
RECYCLING
This product bears the selective sorting symbol for waste electrical and electronic equipment (WEEE). This means that this product must be handled pursuant to European directive 2012/19/EU in order to be recycled or dismantled to minimize its impact on the environment. The user has the choice to give his product to a competent recycling organization or to the retailer when he buys new electrical or electronic equipment. This product can be used across EU member states.
 BATTERY MUST BE RECYCLED OR DISPOSED OF PROPERLY
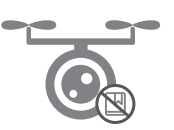
![]() Refer to the user manual and relevant text.
Refer to the user manual and relevant text.
 Operate the product according to the instructions.
Manufacturer
Shenzhen VanTop Technology & Innovation Co., Ltd. Manufacturer address: 502, 5th Flr. BLDG 4, MinQi Technology Park, No. 65 Lishan Road, Taoyuan Street, Nanshan District, Shenzhen, China
 www.snaptain.com www.snaptain.com |
 |
 @snaptain_official @snaptain_official |
| https://qrs.ly/3zbd6ne | https://qrs.ly/kvbd6nc | https://qrs.ly/epbd6na |
EC I REP
C&E Connection E-Commerce (DE) GmbH
Zum Linnegra ben 20, 65933,
Frankfurt am Main, Germany [email protected]
[email protected]