SONOS Beam (Gen 2) Compact Smart Soundbar for TV

SONOS USER GUIDE
The compact smart soundbar for TV, music and more
- Five class-D digital amplifiers perfectly tuned to the drivers and soundbar’s unique acoustic architecture deliver vibrant bass, crystal clear dialogue, and a panoramic soundstage.
- Feel sound all around you with the spacious 3D experience of Dolby Atmos.
- Stream music, radio, podcasts, and audiobooks over WiFi when the TV is off.
- Effortless setup with just two cables and smart Trueplay™ tuning.
- Flexibility to expand your system over time and enjoy true surround sound and multi-room listening. For more information, see Sonos home theater.
- Set up and control with the Sonos app
 (for Android and iOS).
 - See Getting started when you’re ready to add Beam (Gen 2) to your Sonos system.
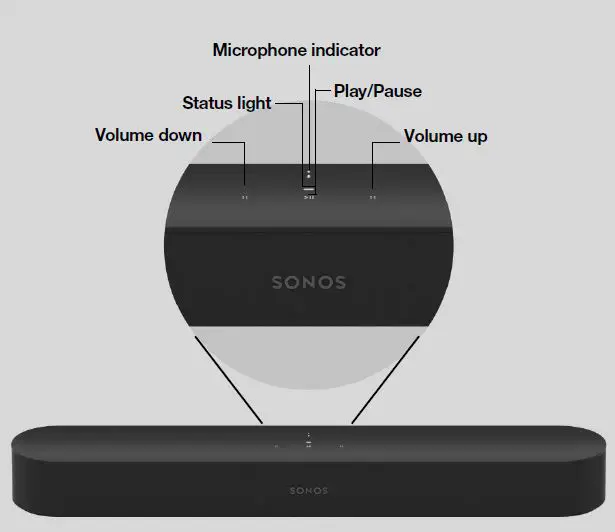
Controls and lights
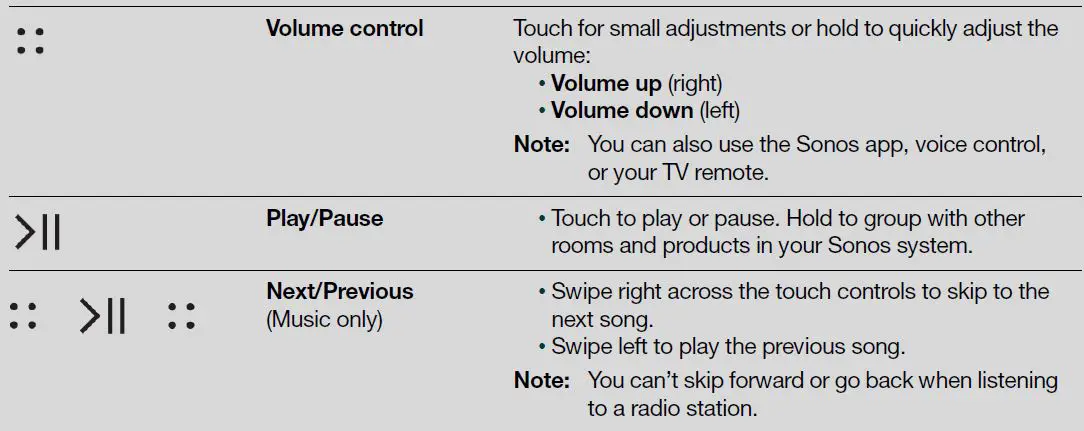
Swipe, touch, tap, or ask—with Sonos Beam you’ve got choices on how to control sound.
- Your existing TV remote
- Beam’s touch controls
- Your voice (when a voice service is set up)
- Sonos S2 app
- AirPlay 2 on Apple devices iOS 11.4 and higher

Note: If you want to disable Beam’s touch controls so playback and volume can’t be controlled from the speaker, go to Settings > System in the Sonos app and choose Beam.
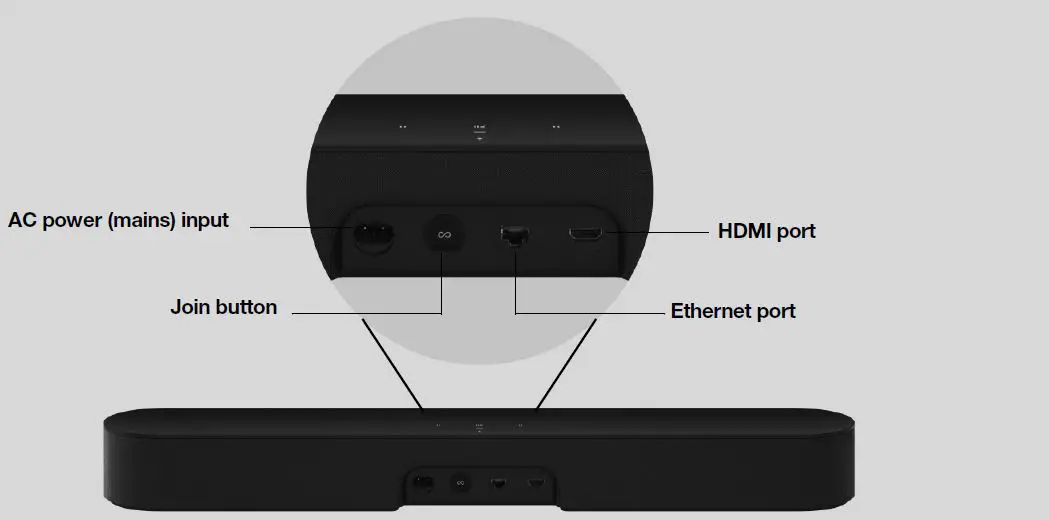
Connector panel
- AC power (mains) input
Use only the supplied power cord (using a third-party power cord will void your warranty).
Note: Insert the power cord firmly until it is flush with the soundbar. - Join button
Press to connect during setup. - Ethernet port
Use an Ethernet cable if you want to connect Beam to your Local Area Network (LAN). - HDMI port
Use to connect the soundbar to your TV.
Select a location
You can wall mount Beam above or below your TV or place it on a credenza.
Place on a credenza
- Place horizontally on a stable and level surface at least 2″ (50 mm) from the TV.
- Don’t place vertically or on its side.
- Don’t block the TV’s IR sensor.
- If put on a shelf, place at the front and keep 2″ (minimum) clearance on both sides for best sound quality.
- Keep 1″ (25 mm) space (minimum) above Beam so you can reach the touch controls.
- For best sound quality, keep both ends of Beam at least 1″ (30 cm) from a wall or other obstruction.
Wall mount
You can secure the soundbar to a wall with a compatible wall mount. We recommend the custom-designed Sonos Beam Wall Mount. See Wall mount for more information.
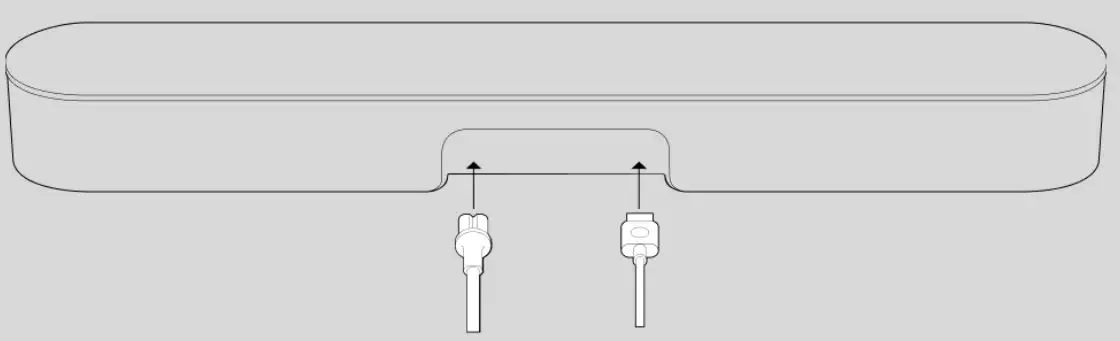
Connect the cables
Before you start
- Disconnect existing home theater or surround sound equipment from your TV.
- Connect any external devices, like a cable box or DVD player, directly to your TV.
- Turn your TV on.
Connect the power cord
- Insert the power cord firmly into Beam’s power port until it is fully connected.
- Plug the other end into a power outlet.
Caution: Use only the supplied power cord (using a third-party power cord will void your warranty).
Connect Beam to your TV
Use the HDMI cable to connect the soundbar to your TV. If your TV doesn’t have an ARC or eARC port, you’ll need to use the optical adapter too (the app guides you through it during setup).
- Fully insert the HDMI cable into Beam’s HDMI port.
- Connect the HDMI cable to your TV:
- If your TV has an HDMI ARC or eARC port, plug the HDMI cable directly into the TV port labeled ARC, eARC, or ARC/eARC.
- If your TV doesn’t have an HDMI ARC port, you’ll need to connect the optical audio adapter (included) to your TV’s Digital audio out instead.
HDMI ARC or eARC
HDMI ARC is a special port that looks like a standard HDMI port—it may be on the back or side of your TV. The ports look similar, but the ARC port will be labeled ARC, eARC, or ARC/eARC. If you connect Sonos Beam to a standard HDMI port instead, you won’t hear any sound.
Note: For TVs that don’t have an ARC port, use the Sonos Optical Audio Adapter (included) to connect Beam to your TV’s Digital audio out.
Digital audio out
If your TV doesn’t have an HDMI ARC or eARC port, you’ll use the Sonos Optical Audio Adapter (included) to connect to your TV’s digital audio out port.
- Remove the protective cap from the adapter.
- Attach the optical adapter to the HDMI cable.
- Connect the optical adapter to the TV’s optical digital OUT port.
 Note: The optical adapter’s port is “D-shaped”—make sure the connector aligns correctly into the port. Inserting the adapter incorrectly may damage the cable.
If you don’t have the free Sonos app, download it from the app store. You’ll use it to set up and control your Sonos system. See Getting started.
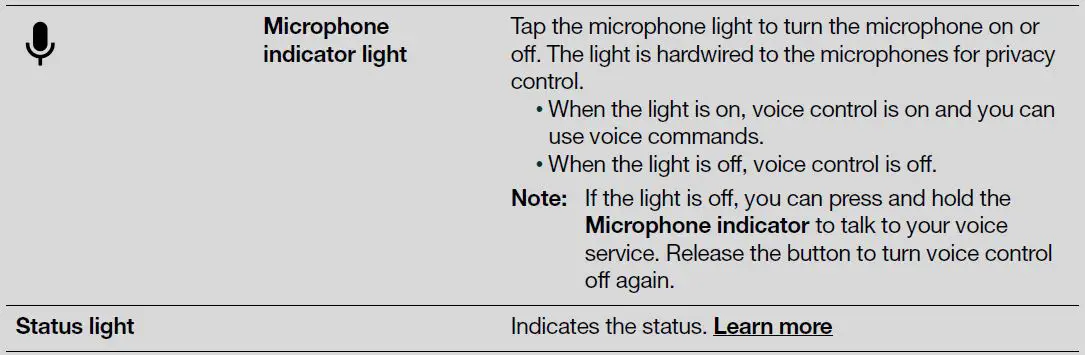
Microphone on/off
Touch 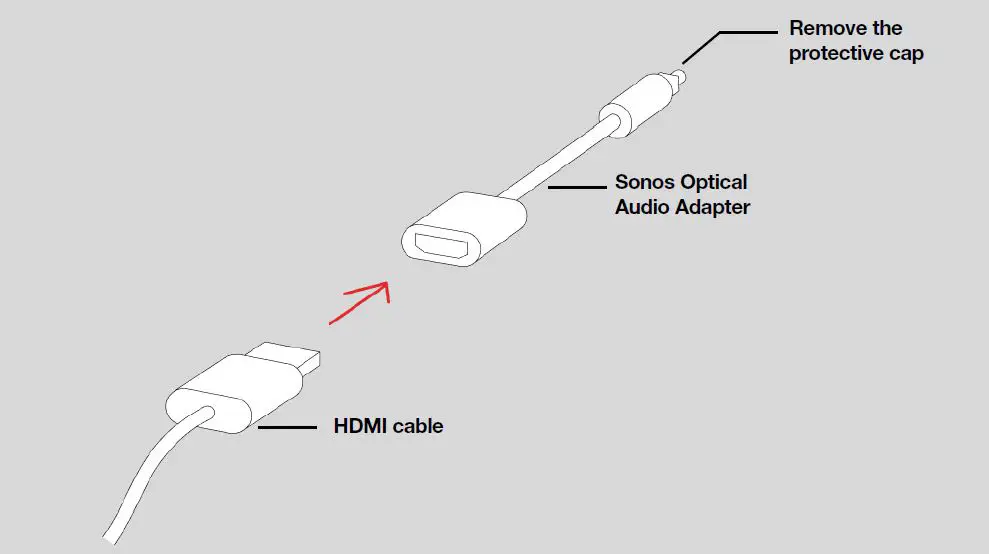 on your Beam to turn the microphone on and off. (If you don’t have a voice service installed, the microphone is inactive.)
When the microphone light is on, voice control is on and your voice assistant is ready to respond. When the microphone light is off, voice control is off.
Note: If you’ve installed a voice service and the microphone is off, you can still use voice commands. press and hold —no need to start with a wake word. When you release the microphone button, voice control turns off again.
Wall mount
Guidelines
- Use the Sonos Beam Wall Mount kit. You can buy it on www.sonos.com. Follow the instructions in the kit.
- Keep 1″ (25 mm) space (minimum) above Beam so you can reach the touch controls.
- If you’re mounting above the TV, make sure you can reach the touch controls.
- For best sound quality, keep both ends of Beam at least 1′ (30 cm) from a wall or other obstruction.
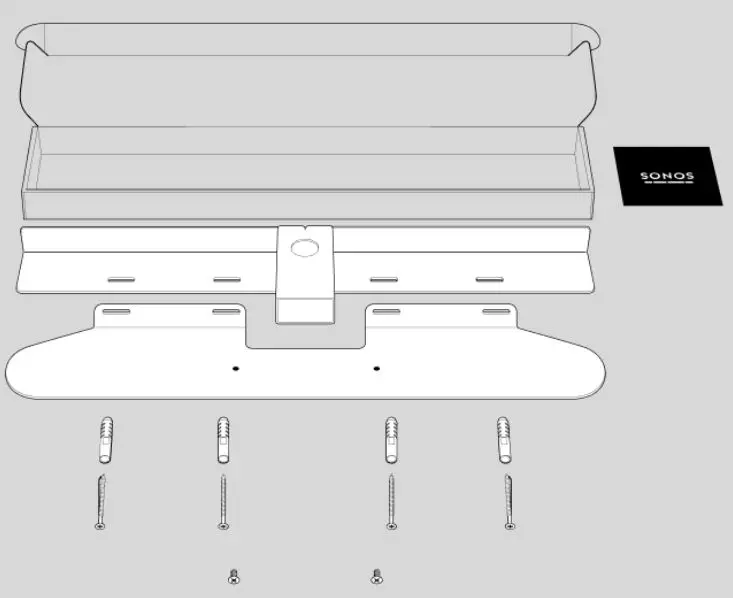
Mount kit contents
- Wall mount bracket
- 4 wall anchors
- 4 wall screws
- 2 screws
Note: Don’t discard the template. It may look like packing material.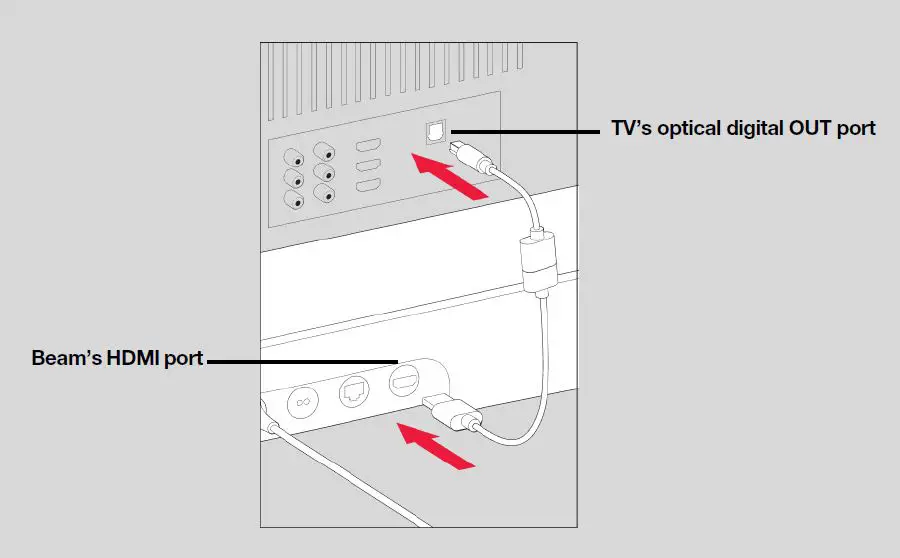
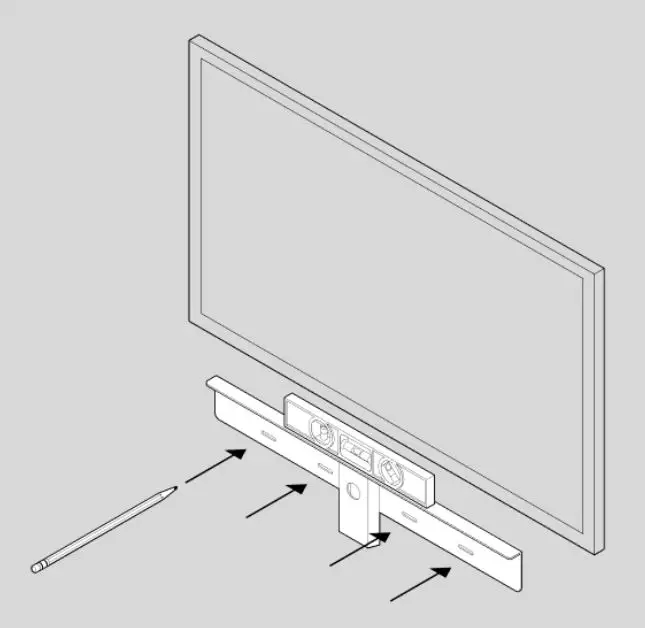
- Tape the cardboard template to the wall above or below your TV. Use a level. Keep 1″ (25 mm) space (minimum) for access to Beam’s touch controls. (Don’t install Beam vertically.)
- Mark the center of the mounting holes and remove the template.

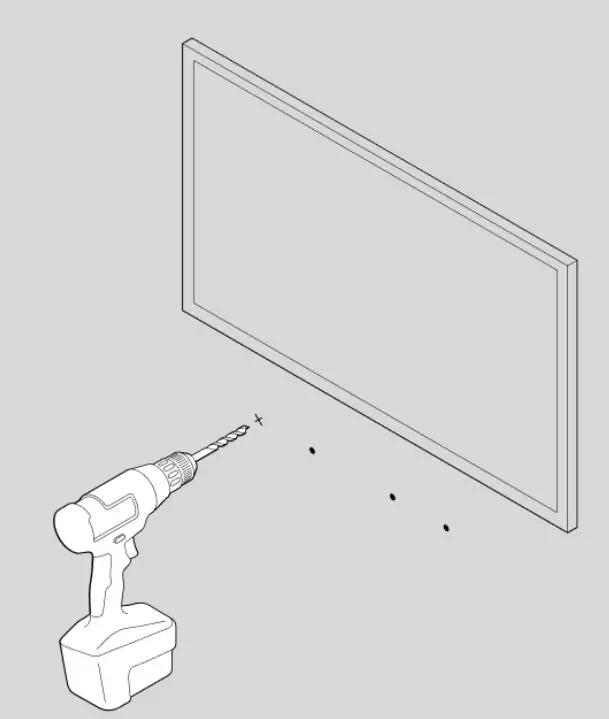
- Use a 5/16″ drill bit to drill pilot holes (see Wall mounting information).
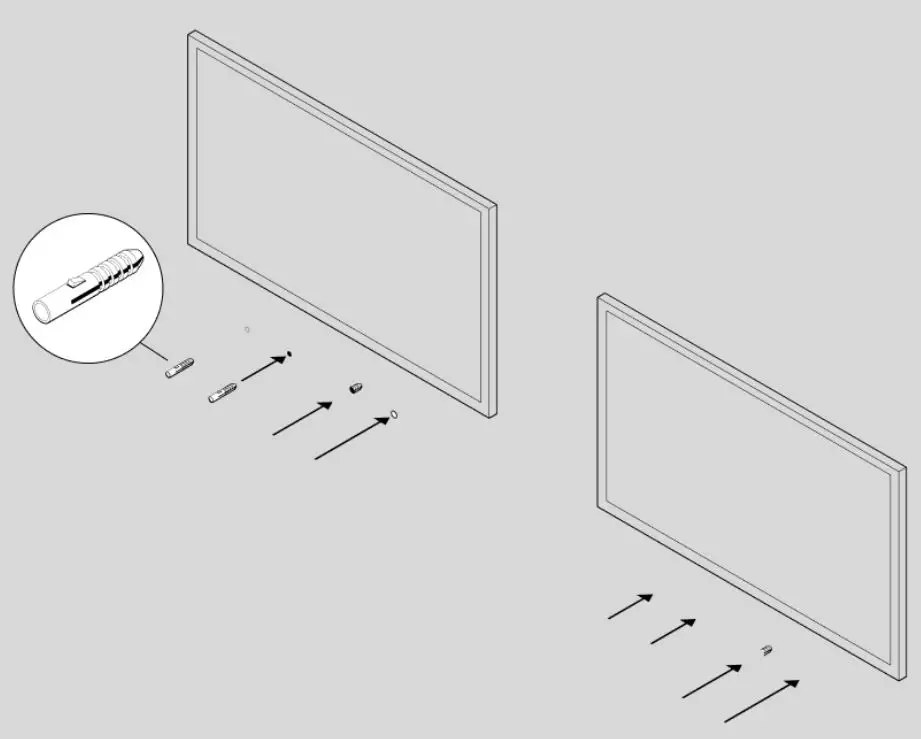
- Insert and secure the wall anchors (don’t use the anchors if drilling into wood).
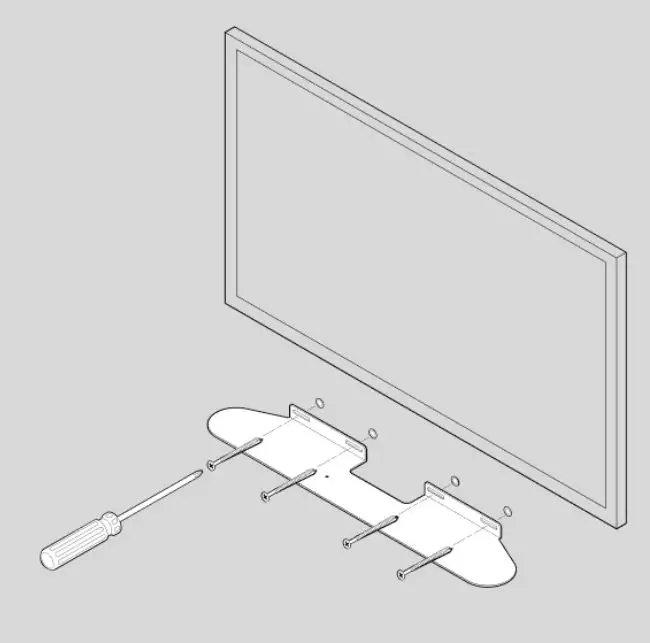
- Place the bracket on the wall and loosely tighten the wall screws to secure the bracket. Check with a level and then tighten the screws.
- Connect the power and HDMI cables to Beam.
- Place Beam on the bracket.
- Insert and tighten Beam to the bracket using the mounting screws.
Wall mounting information
Specifications
Audio
- Amplifier
- Five Class-D digital amplifiers.
- Woofers
- Four full-range woofers ensure you’ll hear the faithful playback of mid-range vocal frequencies plus deep, rich bass.
- Tweeters
- One tweeter creates crisp high frequencies and clear dialogue.
- Adjustable EQ
- Use the Sonos app to adjust bass, treble, and loudness.
- Microphone array
- Five far-field microphone array uses advanced beam forming and multi-channel echo cancellation so your voice assistant can be readily activated.
- Microphone light is hard-wired to voice microphones for privacy control so you know when the microphones are on or off.
- System Requirements
- TV with HDMI ARC / eARC port or optical digital audio output, broadband internet, and the Sonos app.
Software
- Sonos S2
- Set up and control with the latest generation of the Sonos app (for Apple or Android devices).
- Apple AirPlay 2
- Works with AirPlay 2 on Apple devices iOS 11.4 and higher.
- Voice
- Works with Amazon Alexa and Google Assistant.
- Dolby Atmos
- Maps specific sounds in 3D space for a 360° effect.
- Trueplay™
- Dynamically tunes the speaker to the unique acoustics of the room (iOS device required).
- Speech Enhancement
- Turn on in the app to make TV dialogue even clearer.
- Night Sound
- Turn on in the app to reduce the intensity of loud TV sound effects.
General
- Dimensions (H x W x D)
- 2.70 x 25.63 x 3.94 in. (68.6 x 651 x 100 mm)
- Colors
- Black, white
- Finish
- Matte
- Weight
- 6.2 lb (2.8 kg)
- Speaker Status Light
- Located above the logo; displays the speaker’s connection to WiFi, indicates when the volume is muted, and signals errors.
- Microphone Light
- Located on the top panel; hardwired to the microphone array for privacy control so you always know when the microphones are on or off. When the light is off, the microphones are off.
- Operating Temperature
- 32°F to 104° F (0° C to 40° C)
- Storage Temperature
- -4°F to 122° F (-20° C to 50° C)
- Control
- Use your TV remote control, voice, touch controls or the Sonos app.
- CPU
- Quad Core; 1.4 GHz A-53
- Memory
- 1GB SDRAM; 4GB NV
- Mounting
- Threaded mount 0.5 in. (12.7 mm) / 10-32 threaded mounting socket
- Package Contents
- Beam (Gen 2), AC power cord (6 ft/2m), HDMI cable (4.9 ft/1.5m), Sonos Optical Audio Adapter, Quickstart Guide.
Power & Connectivity
- Power Supply
- Auto-switching 100-240 V, 50-60 Hz 2.5A AC universal input.
- WiFi
- Connects to WiFi network with any 802.11b/g/n, 2.4 GHz broadcast-capable router. 802.11n only network configurations are not supported—you can either change the router settings to 802.11 b/g/n or connect a Sonos product to your router.
- HDMI ARC / eARC
Use the included HDMI cable to connect to your TV’s HDMI eARC or HDMI ARC port. - Optical
- Use the included Sonos Optical Audio Adapter to connect the soundbar to your TV if you don’t have an HDMI ARC port.
- Ethernet
- One port for hardwiring to your router (optional).
- Infrared Receiver
- Syncs with your TV remote for streamlined control.
- Supported Devices
- Connects to TV with HDMI cable (with or without an attached optical adapter). Plays sources connected to the TV, including cable boxes and game consoles.
Specifications subject to change without notice.
Important Safety Information
- Read these instructions.
- Keep these instructions.
- Heed all warnings.
- Follow all instructions.
- If your product is wallmounted:
- Improper or inadequate wallmount installation could cause your device to fall, resulting in personal injury.
- Never hang from the Sonos product or the wall bracket.
- Once wall-mounted, periodically check to ensure screws remain securely tightened.
- Do not use this apparatus near water.
- Clean only with dry soft cloth. Household cleaners or solvents can damage the finish on your Sonos components.
- Do not block any ventilation openings. Install in accordance with the manufacturer’s instructions.
- Do not install near any heat sources such as radiators, heat registers, stoves, or other apparatus that produce heat.
- Protect the power cable from being walked on or pinched, particularly at plugs, convenience receptacles, and the point where they exit from the apparatus.
- Only use attachments/accessories specified by the manufacturer.
- Unplug this apparatus during lightning storms or when unused for long periods of time.
- Refer all servicing to Sonos qualified service personnel. Servicing is required when the apparatus has been damaged in any way, such as power-supply cable or plug is damaged, liquid has been spilled or objects have fallen into the apparatus, the apparatus has been exposed to rain or moisture, does not operate normally, or has been dropped.
- The Mains plug should be readily available to disconnect the equipment.
- Warning: To reduce the risk of fire or electric shock, do not expose this apparatus to rain or moisture.
- Do not expose apparatus to dripping or splashing and do not place objects filled with liquids, such as vases, on the apparatus.