![]()
Coolpad Surf
User Guide
Introduction
The following topics describe the basics of using this guide and your new mobile hotspot.
About the User Guide
Thank you for purchasing your new Coolpad Surf. The following topics explain how best to use this guide to get the most out of your mobile hotspot.
Before Using Your Mobile Hotspot
Read the Quick Start Guide that was packaged with your mobile hotspot thoroughly for proper usage.
Accessible services may be limited by subscription contract conditions.
Descriptions in the User Guide
Note that most descriptions in this guide are based on your mobile hotspot’s setup at the time of purchase.
Some operation descriptions may be simplified.
Other Notations
In the user guide, the mobile hotspot may be referred to either as “mobile hotspot” or “device”.
Set Up Your Mobile Hotspot
The following topics give you all the information you need to set up your mobile hotspot and wireless service the first time.
Parts and Functions
These topics illustrate your mobile hotspot’s primary parts and key functions.
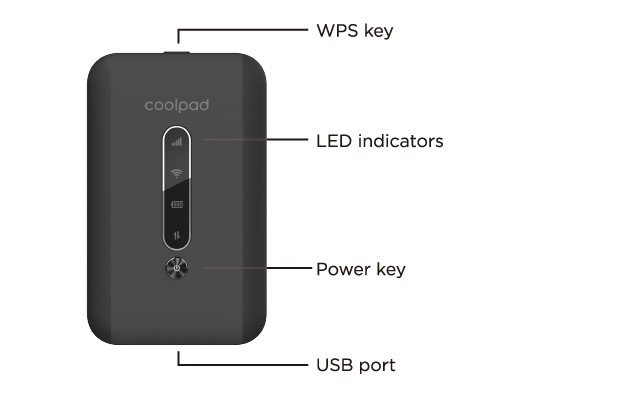
Mobile Hotspot Layout
The following illustration outlines your mobile hotspot’s primary external features and keys.

| Part | Description |
| Power key | Hold the Power key for 3 seconds to power the device on/off. |
| WPS key | Hold the WPS key for 3 seconds to activate the WPS function. Once activated, the Wi-Fi LED indicator will flash every two seconds. If the network is not accessed within 2 minutes, the device will automatically exit WPS (Wi-Fi Protected Setup) mode. |
| LED indicators | Display network signal, Wi-Fi, battery charge, and mobile data status. |
| USB port | Use the USB port to charge your device via the USB cable. |
| Reset | Hold both the Power key and the WPS key simultaneously for 15 seconds. All LED indicators will flash green 4 times to indicate that the device has been reset to factory default settings. |
| Reboot | Hold the Power key for 10 seconds to restart your device. |
Network indicator  |
Displays your current network status. Green light indicates good network connection; yellow light indicates poor network connection; red light indicates no network connection, no SIM card, or no service. |
Wi-Fi indicator  |
Indicates when Wi-Fi is connected. |
Battery indicator  |
Displays your current battery status. A solid green light indicates the battery level is 40%-100%, solid yellow light indicates the battery level is 16%-39%, and a solid red light indicates the battery level is less than 15%; when the device is charging, the indicator will flash red when the battery level is below 15%, will flash yellow when the battery level is 16%-39%, and will flash green when the battery level is 40%-100%. |
Data indicator  |
Displays when your device is communicating with the mobile data network. |
CAUTION! Inserting an accessory into the incorrect jack may damage the mobile hotspot.
Battery Use
The following topics explain how to insert and remove your mobile hotspot’s battery.
Battery Cautions
Storage: Avoid storing or leaving battery with no charge remaining. Battery may become unusable. Charge once every six months before storing or leaving unused for a long period.
Bulges: Depending on use, bulges may appear near end of battery life. This does not affect safety.
Replacing Battery: The battery is a consumable item. It needs to be replaced if operating time shortens noticeably. Purchase a new battery.
Cleaning: Clean soiled terminals between battery and mobile hotspot with a clean, dry cotton swab. Soiled terminals can result in a poor connection and prevent charging, etc.
Insert the Battery
Follow these instructions to insert your mobile hotspot’s battery safely and properly.
- Remove the battery cover.

- Insert the battery.
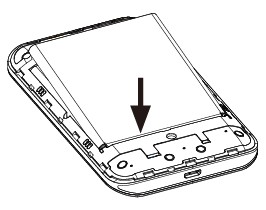
■ Align the contacts of the battery with the contacts in the mobile hotspot. - Attach the battery cover.
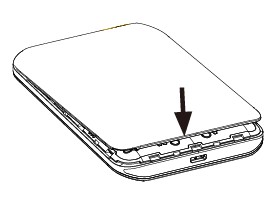


Remove the Battery
Follow these instructions to remove your mobile hotspot’s battery. Always power the mobile hotspot off before removing the battery.
- Remove the battery cover.
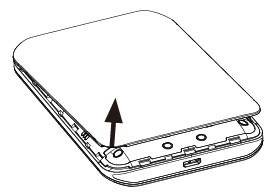
■ Lift gently in the direction shown. - Remove the battery.
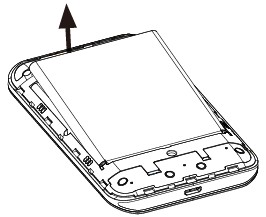
■ Lift upward gently as shown.


Charge the Battery
Follow these instructions to charge your mobile hotspot’s battery using either the included AC adapter or via a USB connection on your computer.
Charge Using the AC Adapter
1. Plug the USB connector into the USB port of your mobile hotspot.
2. Plug the other end of the USB cable into the AC adapter.
3. Plug the AC adapter into an electrical outlet.
4. After charging, disconnect the mobile hotspot from the charger.
■ Unplug the AC adapter from the outlet, and remove the USB cable from the mobile hotspot and the AC adapter.
Charge Using a PC Connection
Before using a PC connection to charge your mobile hotspot, ensure that the computer is turned on.
Depending on the type of connection, your mobile hotspot’s battery may not charge.
1. Insert the small end of the USB cord into the USB port of your mobile hotspot.
2. Insert the large end of the USB cord into an external USB port on your computer.
3. After charging, remove the USB cable from both the mobile hotspot and the computer.
SIM Card
The SIM card is an IC card. Your mobile hotspot’s SIM card is preinstalled and should only be accessed if directed by a customer service representative.
Handling a SIM Card
Keep the following in mind when handling a SIM card.
● You are responsible for any damage caused by inserting the SIM card in another-brand IC card reader, etc. Your carrier is not responsible in such a case.
● Always keep the IC chip clean.
● Wipe clean with a dry, soft cloth.
● Avoid applying labels. May damage SIM card.
● See instructions included with SIM card for handling.
● The SIM card is the property of your carrier.
● The SIM card is replaceable (at cost) in case of loss/damage.
● Return the SIM card to your carrier when canceling your subscription.
● Returned SIM cards are recycled for environmental purposes.
● Note that SIM card specifications and performance may change without notice.
● Always follow emergency procedures to suspend service if your SIM card or mobile hotspot (SIM card inserted) is lost or stolen. For details, contact Customer Service.
● Always power off the mobile hotspot before inserting/removing the SIM card.
Insert SIM Card
Follow these instructions to insert a SIM card. Remember to power off your mobile hotspot before inserting a SIM card.
Note: Your mobile hotspot’s SIM card is preinstalled. These instructions are for reference only.
- Remove the battery cover. (See Remove the Battery.)
- Insert the SIM card.
■ Insert gently with gold IC chip facing downward. - Replace the battery cover. (See Insert the Battery.)
■ Make sure all the tabs are secure and there are no gaps around the cover.
Turn Your Mobile Hotspot On and Off
The instructions below explain how to turn your mobile hotspot on and off.
Turn Your Mobile Hotspot On
■ Press and hold the Power key for 3 seconds.
■ Your mobile hotspot will power on.
Turn Your Mobile Hotspot Off
■ Press and hold the Power key for 3 seconds.
■ Your mobile hotspot will power off.
Connect Your Wi-Fi Device to Your Mobile Hotspot
1. Power on your mobile hotspot.
2. On your computer or other Wi-Fi-enabled device, search for available Wi-Fi networks and select network name (SSID) located on label on back panel of your mobile hotspot.
Note: Wi-Fi name (SSID) and Wi-Fi Password are located on the label inside the back cover of the device.
- From a Windows computer: Left-click Wireless Network Connection on the task bar to view available networks. Choose the SSID from the list of available networks.
- From a Mac computer: Select System Preferences > Network. Choose the SSID from the list of available networks.
- From an iOS device: Go to Settings > Wi-Fi. Choose the SSID from the list of available networks.
- From an Android device: Go to Settings > Wi-Fi. Choose the SSID from the list of available networks.
3. Enter the password located on label on back panel and click OK.
Use the WPS
If your Wi-Fi device supports WPS, you do not have to input the password manually after a WPS connection has been established. Please follow the following steps:
- Power on your Mobile Hotspot and enable the Wi-Fi function from the device you would like to connect.
- Press and hold the WPS key on your device for 3 seconds to start the Wi-Fi Protected Setup authentication process.
- Enable the WPS function on your Wi-Fi device in order to respond to this authentication process.
- Follow the system prompts on your Wi-Fi device to finish the connection.
- If no Wi-Fi device is connected within 2 minutes, the WPS function will automatically turn off.
Manage Your Mobile Hotspot
You can access your Mobile Hotspot device information using an Internet browser or by connecting the device to a computer via the USB cable.

Access Mobile Hotspot Using a Browser
- Connect to your hotspot device through Wi-Fi using the network connection software on your computer. Provide the Wi-Fi network password, if requested.
- Open a browser and enter http://mobile.hotspot or http://192.168.128.1 in the address bar. The Coolpad Surf Mobile Hotspot Web User Interface screen will appear.
- Click Login on the top right of the Web UI screen. The login screen will appear.
- Enter your Password in the field provided. The default password is “admin”.
- Click Login. If you entered the correct password, the Web User Interface screen appears again.
Access Mobile Hotspot Using USB Cable
- Connect your Coolpad Surf Mobile Hotspot to the computer with the USB cable.
- Power on your device.
- The computer operating system detects and recognizes new hardware and finishes the installation automatically.
- Open a browser and enter http://mobile.hotspot or http://192.168.128.1 in the address bar. The Coolpad Surf Mobile Hotspot Web User Interface screen will appear.
- Click Login on the top right of the Web UI screen. The login screen will appear.
- Enter your Password in the field provided. The default password is “admin”.
- Click Login. If you entered the correct password, the Web User Interface screen appears again.
Note: Windows (32 bit & 64 bit) 7/8/8.1/10, Mac OS X 10.6 to 10.11 supported.

Web UI Configuration
Home
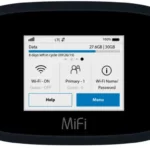
On the Web User Interface screen, click Home to enter the Home screen. Here you can view network status, network name, time connected, data used, etc.
■ Connection: Displays network status, network name, time connected, data used, and more. Click
Connect/Disconnect to connect/disconnect the Internet.
■ Data Usage: Click the website to check data usage in detail.

Connected Devices
On the Web User Interface screen, click Connected Devices to enter the Connected Devices screen.
Here you can view details of the connected device(s), including hostname and MAC address, and you can change the mobile hotspot’s access status.

Change Mobile Hotspot’s Access Status
When the Access Status “Allow all devices to access with password” is selected, users will be allowed to access to the network via the use of a correct password. When the Access Status “Allow only users on Permitted list” is selected, only users that have been granted access by adding a user’s MAC address will be able to connect to the network.
- Log in to the Web User Interface.
- Go to Connected Devices > Access Permissions. The Access Status “Allow all devices to access with password” is selected by default. Any user who inputs the correct password can access the network.
- Select “Allow only users on the Permitted list” and click Add.
- Enter the device name and the MAC address, and click Apply to add a user to the Permitted
Device List. - Click Save Changes.
Note: If you remove a user from the Permitted Device List, such user will no longer be allowed to connect to the network. Click Delete to remove.


Settings
On the Web User Interface screen, click Settings to enter the Settings screen. Here you can view and change Wi-Fi settings, mobile network settings, device settings and advanced router settings.
Wi-Fi
Basic: Manage the basic Wi-Fi settings to personalize the Wi-Fi name, password, authentication method, maximum number of devices connected, and more.

Advanced: Manage the advanced Wi-Fi settings to personalize the TCP NAT timer, UDP NAT timer, 802.11 mode, frequency bandwidth, Wi-Fi channel, WPS, and more.

Change Mobile Hotspot Network Name (SSID)
1. Access http://mobile.hotspot or http://192.168.128.1.
2. Click Settings in the navigation area.
3. Select the Wi-Fi tab and click Basic.
4. Enter a new name in the Wi-Fi Name (SSID) field.
5. Click the On or Off checkbox for Hide SSID to disable or enable broadcasting the hotspot’s Network Name (SSID).
6. Click Save Changes.
Change Mobile Hotspot Wi-Fi Password
1. Access http://mobile.hotspot or http://192.168.128.1.
2. Click Settings in the navigation area.
3. Select the Wi-Fi tab and click Basic.
4. Select WPA2-PSK for the Authentication Method.
5. Enter a new password in the Wi-Fi Password field.
6. Click Save Changes.
WPS
You can enable Wi-Fi Protected Setup (WPS) by PIN (PIN code) or PBC (push-button) mode. If your client device supports WPS, there’s no need to enter the password manually when WPS is available.
■ PIN: Enter the PIN that is generated by the wireless access client.
■ PBC: Select PBC or press the WPS button on the device.
Note: If there is no client connected to the Hotspot within two minutes, WPS will be deactivated.
Mobile Network
Mobile Settings: Manage your mobile broadband data connection, domestic roaming, and international roaming setting.

APN: Set the Access Point Name (APN) including profile, PDP type, profile name, APN, authentication, user name, and password.

Advanced: Reset your device to factory defaults, reset provisioning parameters, view and edit your data profile information.

Device
Sleep Mode: Enter the sleep mode when no devices are connected after a specific time.

Account Management: Change the mobile hotspot admin password.


Backup and Restore: Back up your device settings and preferences to your computer. Reset your device to its factory default settings.

Connection History: Displays the connection history including profile name, start time, end time, duration, uploaded data and downloaded data.

System Logs: Download system logs.

Change Mobile Hotspot Admin Password
- Access http://mobile.hotspot or http://192.168.128.1
- Click Settings in the navigation area.
- Select the Device tab and click Account Management.
- Follow steps under Account Management to update your Password.
- Click Save Changes. If everything is entered correctly, the Success message will appear indicating the password was successfully changed.
Update Software Version
Check the software version currently installed on your mobile hotspot.
- Access http://mobile.hotspot or http://192.168.128.1.
- Within the Web User Interface, go to About > Firmware > Firmware Version to view which software version is currently installed on your device.
Update your mobile hotspot to the most up-to-date software version.
- Access http://mobile.hotspot or http://192.168.128.1.
- Within the Web User Interface, go to Settings > Device > Software Updates.
- Click Update Firmware to update.
Note: Do not remove the battery during software updating. This may cause the software update to fail.
Restore Factory Defaults
1. Access http://mobile.hotspot or http://192.168.128.1.
2. Click Settings in the navigation area.
3. Select the Device tab and click Backup and Restore.
4. Click Restore factory defaults.
5. Click Yes to confirm. The parameters will be reset to factory defaults and the device will be restarted.
Advanced Router
LAN Settings: Manage your mobile broadband data connection.


Firewall: Enable firewall to protect your network from viruses, worms and malicious activities on the Internet. Enable portmapping to enable external computers to access WWW, FTP or other services provided by the LAN.

About
On the Web User Interface screen, click About to enter the About screen. Here you can view MEID, ICCID, IMEI, firmware version, IP address, Wi-Fi name, Wi-Fi password, device model, battery status, and more.
■ Connection: Displays phone number, MEID, ICCID, IMEI, IMEI SV, and IMSI.
■ Firmware: Displays firmware version, firmware build date, and web app version.
■ WWAN Info: Displays provision status, activation date, refurbish date, IP address, IPv6 address, LTE APN NI, and lifetime total transferred.
■ Wi-Fi Details: Displays Wi-Fi details, including MAC address, Wi-Fi name, Wi-Fi password, hide SSID, authentication, encryption, and Wi-Fi devices.
■ Device: Displays device details, including device model, manager, manufacturer, hardware revision, battery charger status, and battery status.


You can also click Debug button on the lower right of the About screen to view detail diagnostic information about your device.

Support
On the Web User Interface screen, click Support to enter the Support screen. Here you can view support page, phone number, software version and copyright information.
Click the support website to find more information about your device.
Specifications
The following tables list your mobile hotspot’s and battery’s specifications.
Mobile Hotspot Specifications
| Item | Description |
| Dimensions | 4.25 inches x 2.60 inches x 0.59 inches |
| Antenna | Built-in |
| SIM Card | Nano SIM |
Battery Specifications
| Item | Description |
| Nominal Voltage | 3.85V |
| Type | Lithium-ion |
| Rated Capacity | 2600mAh |
Copyright Information
©2019 Sprint. Sprint and the logo are trademarks of Sprint. Other marks are trademarks of their respective owners.
©2019 Boost Worldwide, Inc. All rights reserved. Other marks are the property of their respective owners.
Index
About, 25
Access Mobile Hotspot, 10
Change Mobile Hotspot Admin Password, 23
Change Mobile Hotspot Network Name (SSID), 16
Change Mobile Hotspot Wi-Fi Password, 16
Connected Devices, 12
Home, 12
Insert SIM Card, 7
Insert the Battery, 4
LED indicators, 3
Mobile Hotspot Layout, 3
Mobile Hotspot Specifications, 28
Restore Factory Defaults, 23
Settings, 15
Support, 27
Turn Your Mobile Hotspot Off, 8
Turn Your Mobile Hotspot On, 8
Update Software Version, 23
USB port, 4
Use the WPS, 8
WPS key, 3