TCL TTW Remote Control Window Air Conditioner User Manual

Register and protect your purchase
Register easily with your smartphone
Scan or text a photo of the camera icon to 71403
Or register online at www.tclusa.com/register
Need help? Visit photoregister.com/help or text HELP to 71403
Add a TCL Protection Plan when you register your product and be covered from life’s mishaps
Thank you for choosing TCL. We want your ownership experience to bring you as much joy as the product you purchased does, so we’re offering you a special price on TCL Protection Plans when you purchase during registration. Add a TCL Protection Plan within your first 30 days of ownership to receive the best value and we’ll make sure nothing gets in the way of you enjoying your new product.
| Benefits & Description | PROTECT | PLUS |
| Extended Manufacturer Coverage Extended parts & labor coverage for manufacturer defects. | Up To 4 Years | Up To 4 Years |
| Priority Service Free shipping and rapid turn-around time. | 3-5 Days | 3-5 Days |
| Product Replacement Free 1-time replacement if product cannot be fixed. |  |
 |
| TCL Parts & Service Genuine TCL parts & factory certified service. | |
|
| No Deductible $0 out of pocket expense. | |
|
| Accidental Damage Protection Coverage for drops, breaks and spills starts after 30 days. | |
Extended service plans (i.e., “Protect” and “Plus” plans) are only offered in the United States (US). All TCL products continue to offer a limited consumer warranty in both the US and Canada.
Please refer to the warranty section in this guide for additional details on warranty information.
IMPORTANT SAFETY INSTRUCTIONS
Before installing and using your air conditioner, please read owner’s manual carefully. Store this manual in a safe place for future reference. Your safety and the safety of others is very important to us. Please pay attention to all safety messages outlined in this owner’s manual. Take proper precautions to avoid unattended operations. Do not run air conditioner with outside protective cover in place. This could result in mechanical damage to the air conditioner. Do not store or use gasoline or other flammable vapors and liquids in the vicinity of this or any other appliance.
Do not place objects or liquids on top of the unit.
Do not allow children to operate this device.
 WARNING: To reduce the risk of fire, electrical shock or injury when using your air conditioner, follow the following basic precautions:
ELECTRICAL REQUIREMENTS
The electrical ratings for your air conditioner are listed on the model and serial number label located on the front right side of the unit (when facing the front).
To avoid the risk of property damage, personal injury, or fire, only use copper conductors. LCDI or AFCI Power Cords – National Electric Code (NEC) now requires power cords that sense current leakage and can open the electrical circuit to the unit on units rated at 250 volts or less. If the unit does not operate, check the reset button located on or near the head of the power cord as part of the normal troubleshooting procedure. Do not use the reset button as normal means of turning the unit on and off.
REGISTER YOUR APPLIANCE
You can register your appliance online by going to register.tcl.com
Be sure to retain your original sales receipt. A valid proof of purchase is required for all warranty claims.
BATTERY WARNING STATEMENT
Do not mix old and new batteries and do not mix alkaline, standard (carbon-zinc) or rechargeable (ni-cad, ni-mh, etc.) batteries.
Document your model and serial numbers here:
Model #___________________________________
Serial #______________________________
You can locate your 20 digit serial number underneath the bar code (right hand side of the AC).
| WARNING | Specific electrical requirements are shown in the diagram below.
Follow the requirements below for the type of plug on the power supply cord. |
|||
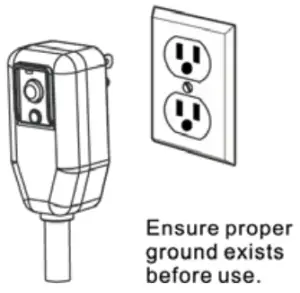
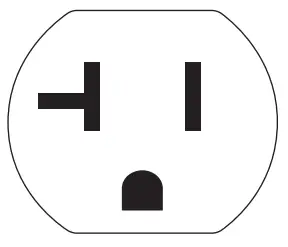
| Electrical Shock Hazard Plug into a grounded 3 prong outlet.
Do not remove the ground prong. Do not use an adapter plug. Do not use an extension cord. Failure to follow these instructions can result in death, fire, or electrical shock Do not use a splitter, daisy chain, or overload an outlet. Doing this can cause electrical fires and/or electrocution. Do not share the outlet being used by the unit with another appliance or electronic device. |
Wiring Requirements | Power Supply Cord | Power Requirements | |
|
 15K BTU 115 Volt 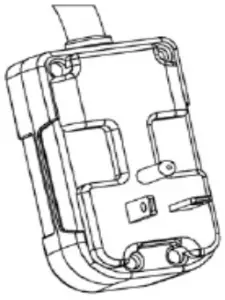 18K – 24K BTU 208/230 Volt |
|
|
|

RECOMMENDED GROUND METHOD
For your personal safety, this air conditioner must be grounded. This air conditioner is equipped with a 3 prong power supply cord with a grounded plug. To minimize the possibility of electrical shock, the cord must be plugged into a 3-prong outlet and grounded in accordance with all local codes and ordinances. If a 3-prong outlet is available, it is the customer’s responsibility to have a properly grounded 3 prong outlet installed by a qualified electrician
BEFORE YOU BEGIN
- To reduce the risk of fire, electric shock, or personal injury, thoroughly read the Manual and all instructions completely and carefully. Follow all local codes and ordinances, which may require HVAC licensed technicians for installation.
- Children are prohibited to unbox the unit.
- Children and pets are prohibited from playing with the product package at risk of suffocation.
- Save these instructions for local inspector’s use
- Observe all governing codes and ordinances
- Note to installer – be sure to leave these instructions with the consumer
- Note to consumer – keep these instructions for future reference
- We recommend 2 people install this product
- Proper installation is the responsibility of the installer
- Product failure due to improper installation is not covered under warranty
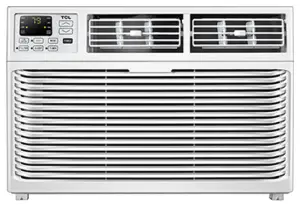
What’s in the box
| NO. | APPEARANCE | PART NAME | QUANTITY |
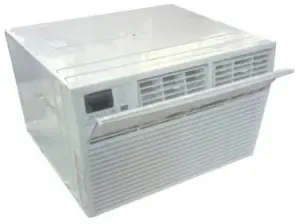
| 1 | 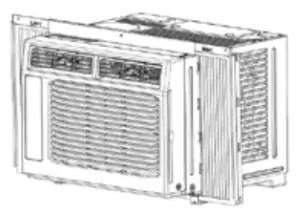 |
Through-The-Wall Air Conditioner | 1 |
| 2 | 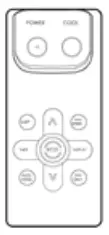 |
Remote Control | 1 |
| 3 | 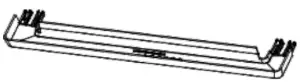 |
Trim Frame 1 (Left & Right legs) |
2 |
| 4 | 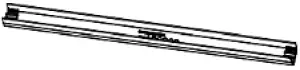 |
Trim Frame 2 (Top & Bottom legs) | 2 |
| 5 | 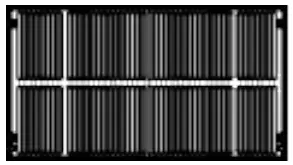 |
Aluminum Grill | 1 |
| 6 | 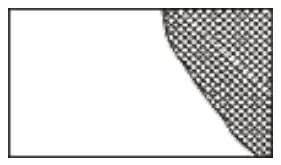 |
Rear Plastic Grill | 1 |
| 7 | 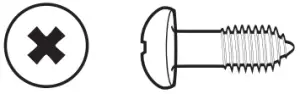 |
1/4” Screw | 4 |
| 8 | 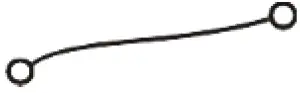 |
Grounding Wire with Tooth Washer | 1 |
| 9 |  |
Battery (AAA) | 2 |
| DIMENSION | PART NAME | QUANTITY |
| 1’’x3/4’’x14’’ | Seal sponge | 2 |
| 1’’x3/8’’x14’’ | Seal sponge | 2 |
| 1’’x3/8’’x25’’ | Seal sponge | 3 |
| 1’’x1 1/2’’x25’’ | Seal sponge | 3 |
| 1’’x1 1/2’’x14’’ | Seal sponge | 2 |
| 1’’x1 1/2’’x84’’ | Seal sponge | 1 |
| 3 3/ 4’’x1 1/2’’x4’’ | Seal cotton | 4 |
| 3/4’’x1 1/2’’x17’’ | Seal cotton | 2 |
Tools needed: Drill and drill bits, Phillips head screwdriver, Flat headed screwdriver, tape measure, level, scissors or knife, pencil.
Let’s get started!
Testing
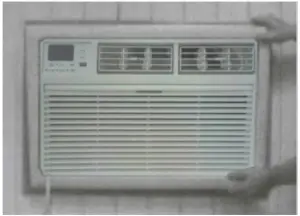
Before you install the AC, let’s test it to make sure it made it safely to your home and your outlet has the proper power output to run your AC. Place it on a flat surface, plug it directly into a wall outlet (do not use a power strip or other device), and turn it on. Next, use the Mode button on your control panel to change the AC into Cool Mode and press the down arrow to set the temperature to the lowest setting. After 3 minutes, the AC should be blowing cool air. If so, please continue to the next step. If not, see detailed troubleshooting tips at support.tcl.com.
Installation
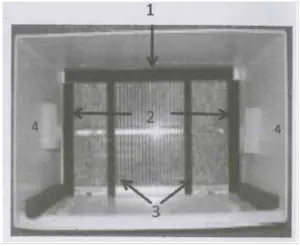
UNIVERSAL WALL-SLEEVE DIMENSIONS
WARNING: High Voltage: Disconnect ALL power before servicing or installing this unit. Multiple power may be present. Failure to do so many cause property damage, personal injury, or death.
WARNING: During installation, it is the responsibility of the installer to make sure the surrounding area, including directly under the unit, is free and clear of objects including but not limited to persons (especially children), pets, and/or other valuable items.
- Identify which brand your wall-sleeve is and ensure its dimensions match those in the chart below.
Type Wall-sleeve Dimension Height Width Depth Standard Dimension 15 3/4” 26” 20” - The wall sleeve used to mount the air conditioner must be in sound structural condition and have a rear grill that is securely attached to the sleeve, or rear flange that serves as a stop for the air conditioner.
- Remove the old air conditioner from the wall sleeve.
- Clean the interior of the wall sleeve, do not disturb the seals.
- Make sure the sleeve is securely installed and in sound structural condition.
- Measure the size of the sleeve to ensure the air conditioner will fit.
- Slope – ensure your unit has a rearward slope to drain any accumulated condensation.
- Repair/repaint the sleeve surface if needed.
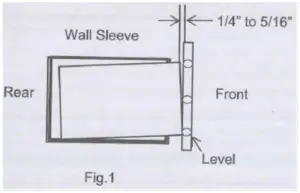
- For best performance, replace the existing rear louver grill with the plastic mesh unit supplied in the package. Measure and cut the plastic grill to fit and place inside the wall sleeve against the rear flange.
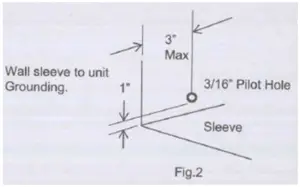
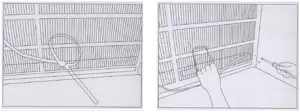
- The ground wire hole does not exist. In a clear area about 3 inches (max) from the front edge, drill a 3/16’’ pilot hole for the grounding screw through the left-hand side of the sleeve as shown below. Pull the loose end of the ground wire out of the front of the sleeve and bend it away from the opening. This should be attached to the air conditioner once installed.
- Install the new unit into the wall sleeve.
- To attach the ground wire to the new unit, remove the screw from the left side on the front.
- Assemble and install the trim frame.
- Make sure there are no curtains, blinds, furniture, or any other objects blocking the front of the air conditioner restricting airflow.
Existing Frigidaire sleeves may have older single sided intake grills, as pictured below.
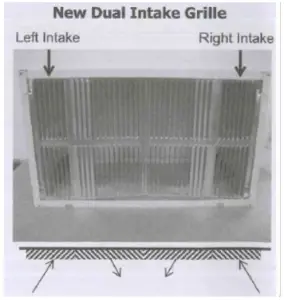
- These grills should be replaced with the dual intake grill type, as pictured below.
- Remove the existing single intake grill and save the mounting screws.
Warning: When removing the grill, protect it from falling by securing with a leash. This can be fastened with a cord or strap looped through the grill and secured with a knot. Holding the grill by the leash with one hand, remove the retaining screws so that the grill can be removed through the front of the sleeve.
- Place the grill included with your new air conditioner towards the inside rear of the sleeve.
- Attach the new grill by aligning the four mounting holes.
- Re-insert the self-tapping screws into the nylon retainers.
- Remove the existing single intake grill and save the mounting screws.
Direct Unit Mounting
In the event that the dual intake grill cannot be mounted directly to the sleeve, it is recommended to attach the grill to the back of the through-the-wall unit with the hole pre-drilled in the unit.
- Attach the 2 seals(1’’x3/8’’x14’’), as Fig. 1.

- Position the grill over the rear of the unit making sure that:
• The double set of screw holes are at the bottom.
• The intake fins on either side are pointed away from the unit. - Align the top of the grill with the top of the unit. Make sure the overhang on each side is equal.
- Install 4-#8 self-tapping screws to affix the grill to the unit.
- Insert the unit into the sleeve.
Seal Installation
- Use 1’’x3/8’’x25’’ long seal in the center at the top of the sleeve. Remove the back paper and press into position.
- Use 1’’x3/8’’x14’’ seal both to the left and right sides of the sleeve.
- Cut the 1’’x3/8’’x25’’ long seals to 14’’ length each and attach to the vertical sections of the grill as shown.
- Take the 1/2’’x3 1/2’’x1 1/2’’ centering blocks (one on each side wall). Place in the center of side wall with the tapered end facing the opening.
Ground Wire Installation
Caution: To avoid the risk of property damage, personal injury, or fire, only use copper conductors. Thoroughly read the Manual and all instructions completely and carefully.
- Install screw end of the ground wire into the inside of the sleeve according to preparation instruction.
- Before sliding the unit all the way back, remove the second screw from left side of unit.
- Remove plastic washer from screw.
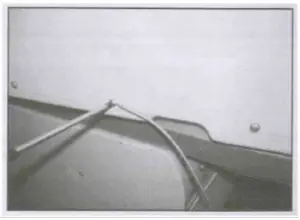
- Screw the other end of the ground wire into the unit as shown. Make sure the toothed washer is against the cabinet.
Trim Kit Installation Instructions
- Install the 1’’x1’’x84’’ long stuffer seal between the wall sleeve and the unit. A flat-bladed screwdriver or putty knife is needed.
- Assemble the trim frame by inserting the top and bottom pieces into the side pieces and snapping them into place.
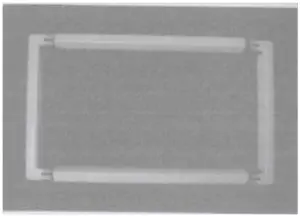
- Pull the cord through the trim frame and slide the trim over the unit until flush with the wall.
How to Control Your AC
All the basics you need to know to stay cool!
For Cooling model
For Heating model
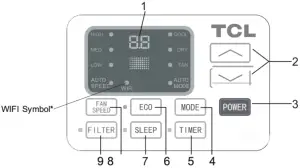
- Digital Display: When the timer is not in use, the operation mode and the set temperature should be displayed. Time should be displayed under the timer setting.
 and
and  Buttons – use these buttons on the control panel or remote control to increase or decrease the desired temperature, or time using the Timer. The temperature range is: 61°-88° Fahrenheit, or 16°-31° Celsius
- Power Button: Turn the air conditioner on and off.
- Modes – Press the Mode button on the control panel to cycle and select a Mode, or select a Mode by pressing the desired button the remote.
- Cool Mode – The cooling function allows the air conditioner to cool the room and reduce air humidity at the same time. Adjust the fan speed and temperature to your desired comfort level. In this mode, if Eco is not enabled, the fan may continue to run after reaching the desired temperature.
- Dry Mode – This function reduces the humidity of the air to make the room more comfortable. Press the Mode button to set to Dry mode – an automatic function of alternating cooling cycles and air fan is activated. This design feature helps remove moisture and increase efficiency. You may hear the thermostat click when the compressor cycles on and off. Water should collect in the base pan on rainy days, or high humidity days. The water may overflow and drip from the unit on the outside. The fan may run, even when the compressor is not on.
- Fan Mode: Fan Mode helps to circulate air in your home, but only works when the air conditioner is vented
- Auto Mode: In Auto mode the unit automatically chooses the fan speed and the mode of operation (Cool, Dry or Fan).In this mode the temperature is set automatically according to the room temperature (tested by the temperature sensor which is incorporated in the indoor unit.).
- Heat Mode: The heating function allows the air conditioner to heat the room. Press the Mode button to activate the heating function. To optimize the function of the air conditioner, adjust the temperature and the speed by pressing the button indicated. Modules with heater only.
- Timer Button – press the Timer button on the panel or the Timer button on the remote to set the timer.
- Set Timer On: With the AC off, press the Timer button and then use the and buttons to set the desired temperature. Press the Timer button again and use the and buttons to set the desired amount of time before the AC turns on. Press the timer button again to start the countdown.
- Set Timer Off: With the AC on, press the Timer button and then use the and buttons to set the length of time before the AC turns off. Press the timer button again to start the countdown.
Note: It can be set to automatically turn off or on in 0.5-24 hours. Each press of the buttons should increase or decrease the timer. The Timer can be set in 0.5 hours increment below 10 hours and 1 hour increment for 10 hours or above. The Set light should turn on while setting.
To cancel the Set function, press the TIMER button again.
- Set Timer On: With the AC off, press the Timer button and then use the
- Eco Mode – In Eco mode, the unit is designed to turn off once the room is cooled to the user set temperature. The unit should turn back on when the room temperature rises above the user-set temperature. While in Eco mode, the fan is designed to occasionally turn on for a few seconds in order to take an accurate temperature reading.
The unit should turn back on when the room temperature rises above the user set temperature.
Before the compressor starts, the fan motor is designed to run for a while, then it should stop for a while. The process should continue to repeat to save energy while creating a comfortable environment. - Sleep Button – In Sleep mode, all of the display lights should turn off after a while, but the Sleep light stays on. In Sleep mode, the air conditioner is designed to automatically adjust the temperature and fan speed to make the room more comfortable during the night. The set temperature should automatically raise every 30-60 minutes, and at most change six times until the set temperature is 81 or 82 degrees.
- Fan Speed – Press the Fan Speed button to choose the fan speed options. You can choose Hi, Med, Lo or auto speed in cool mode and choose Hi, Med, Lo in fan mode.
- Filter Button – After the fan motor has run for 500 total hours, the Filter Check light should turn on to remind the user to clean the filter. After you clean the filter, you can turn off the light by pressing the Filter button.
- Directional Louvers: To direct the airflow horizontal wheel to control the horizontal direction, air deflector to control the vertical direction
Operating Your Air Conditioner
Remote Control
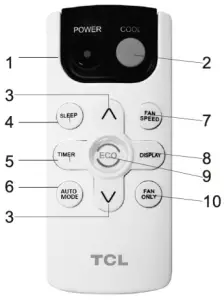
- POWER: Turn the air conditioner on and off.
- COOL: Press the COOL button to start COOL mode.
- Up and Down: Use these buttons to increase or decrease the temperature. The Set light should turn on after selecting the desired temperature. Decrease the Set Temperature or Timer. Temperature range: 61˚ ~88˚ Fahrenheit or 16˚ ~31˚ Celsius.
- SLEEP: Press the Sleep button, all of the display lights should turn off after a while, but the sleep light is always on. In this mode, the air conditioner is designed to automatically adjust the temperature and fan speed to make the room more comfortable during the night. The set temperature should automatically change every 30-60 minutes and at most change six times until the set temperature is 81˚ or 82˚ Fahrenheit for cooling and 75˚ or 76˚ Fahrenheit for heating.
- TIMER: Use these buttons on the control panel and remote to set the Timer.
- Timer Off: The timed stop is programmed by pressing Timer button. Set the rest time by pressing the up and down buttons until the rest time displayed is to your demand then press Timer button again.
- Timer On: Timer On: When the unit is off, press the Timer button once to set the temperature using the Up and Down buttons. Press the Timer button a second time to set the rest time using the Up and Down buttons. Press the Timber button for the third time to confirm the settings.
Note: It can be set to automatically turn off or on in 0.5-24 hours. Each press of the buttons should increase or decrease the timer. The Timer can be set in 0.5 hours increment below 10 hours and 1 hour increment for 10 hours or above. The Set light should turn on while setting.
To cancel the Set function, press the TIMER button again.
- Auto Mode: In AUTO mode the unit automatically chooses the mode of operation(COOL,DRY or FAN). In this mode, the temperature should be set automatically according to the room temperature (tested by the temperature sensor which is incorporated in the indoor unit.).
- Fan Speed: Press the Fan Speed button to choose the fan speed options. You can choose Hi, Med, Lo or auto speed in Cool or Heat mode and choose Hi, Med, Lo in Fan mode.
- Display: To press the Display button, it can switch off/on all lights or LED display.
- Eco: When the unit is in ECO mode, the light should turn on. In Eco mode, the unit is designed to turn-off once the room is cooled to the user set temperature. The unit should turn back on when the room temperature rises above the user set temperature. Before the compressor stars, the fan motor should keep running for a while and stop for a while-and again, to provide much more comfortable feeling, and save the energy.
- Fan Only: Press the Fan Only button to Fan Only mode.
Battery Size: AAA –
NOTE: Do not mix old and new batteries or different types of AAA batteries.
Care And Cleaning
Clean your air conditioner to keep it looking new and to minimize dust build up.
AIR FILTER CLEANING
The air filter should be checked at least once every month to see if it needs cleaning. Trapped particles and dust can build up in the filter and may decrease airflow as well as cause the cooling coils to accumulate frost. To clean the air filter:
- Remove the filter by pulling down on the tab of the filter door on the front of the unit. (See FIG.21)
- Wash the filter using liquid dish soap and warm water. Rinse the filter thoroughly. Gently shake the filter to remove excess water.
- Let the filter dry completely before placing it into the air conditioner.
- If you do not wish to wash the filter, you may vacuum the filter to remove the dust and other particles.
WEAR AND TEAR
To minimize wear and tear on the air conditioner, always wait at least 3 minutes before changing modes. This should help prevent the compressor from overheating and the circuit breaker from tripping. Periodically inspect the unit to ensure it is free of debris, objects, or damage. If damage is observed, make sure professionally inspected prior to use.
CABINET CLEANING
To clean the air conditioner cabinet:
- Unplug the air conditioner to prevent shock or a fire hazard. The cabinet and front panel of the air conditioner may be dusted with an oil free cloth or washed with a cloth dampened in a solution of warm water and mild liquid soap. Rinse thoroughly with a damp cloth and wipe dry.
- Never use harsh cleaners, wax or polish on the cabinet front.
- Be sure to wring excess water from the cloth before wiping around the controls. Excess water in or around the controls may cause damage to the air conditioner. Do not use hydro-carbon-based cleaners (e.g. acetone, benzene, naphtha, gasoline, etc.)
WINTER STORAGE
To store the air conditioner when it is not in use for an extended period of time, remove it carefully from the window according to the installation instructions and cover it with plastic or place it in the original box.
Troubleshooting
Having trouble completing installation? Don’t worry, it’s usually an easy fix.
| PROBLEM | POSSIBLE CAUSES | SOLUTIONS |
| Air Conditioner will not start | The air conditioner is unplugged | • Make sure the air conditioner is plug is pushed completely into the outlet |
| The fuse is blown/circuit breaker is tripped | • Check the house fuse/circuit breaker box and replace the fuse or reset the breaker | |
| Power Failure |
|
|
| The current interrupter device is tripped |
|
|
| Air Conditioner does not cool as it should | Airflow is restricted | Make sure there are no curtains, blinds, or furniture blocking the front of the air conditioner |
| The temperature control may not be set correctly | Lower the set thermostat temperature | |
| The air filter is dirty | Clean the filter. See the Cleaning and Care Section of the manual | |
| The room may be too warm | Please allow time for the room to cool down after turning on the air conditioner | |
| Cold air is escaping | Check for open furnace registers and cold air returns | |
| The Cooling Coils are frozen | See “Air Conditioner Freezing Up” below | |
| Air Conditioner is freezing up | Ice blocks the air flow and stops the air conditioner from cooling the room | Set the MODE to HIGH FAN or HIGH COOL and set the thermostat to a higher temperature |
| Remote Control is not working | The batteries are inserted incorrectly | Check the position of the batteries |
| The batteries may be dead | Replace the batteries | |
| Water is dripping outside | Hot and humid weather | This is normal |
| Water is dripping inside the room | The air conditioner is not correctly tilted outside | For proper water drainage, make sure the air conditioner is slightly tilted downward from the front of the unit to the rear |
| Water collects in the base pan | Moisture removed from the air is draining into the base pan. | This is normal for a short period in areas with low humidity and normal for a longer period in areas with high humidity |
| Digital Display reads “E1”, “E2” | A sensor has failed | Contact customer service |
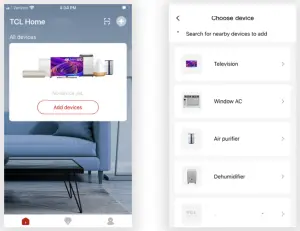
WiFi App Installation
(for WiFi models only)
Download and Install the TCL Home App
Using the camera function on your smartphone, scan the QR code below to be directed to the TCL Home page. If your phone does not have a QR scanner, download one from the app store or manually type in the URL below in your smartphone’s web browser. Then, download and launch the app.


https://tcl.link/homeplusapp
Note: The App only supports the 2.4 GHz WiFi band (all routers have a 2.4 GHz band). Please connect to the 2.4 GHz band before you begin the app setup process.
Create an Account
Once you have opened the app, select “Create account.” You should then be sent a verification code to your email. Input the code and continue.

Add Your Device
Select the “Add Devices” button and follow the in-app instructions to complete the setup.
Troubleshooting
Having trouble completing installation? Don’t worry, it’s usually an easy fix.
| PROBLEM | POSSIBLE CAUSES | SOLUTIONS |
| TCL Home App loses connectivity to AC during setup | Wireless router may be too far from AC | Relocate wireless router closer to AC. |
| Network error | Restart wireless router, AC, and mobile device. | |
| TCL Home App cannot find AC | Network error | Restart wireless router, AC, and mobile device. |
| App & AC are not on the same 2.4GHz channel | Confirm your device is connected to the 2.4GHz channel. | |
| Router blocking TCL Home App | Verify App is not being blocked by the router’s firewall. | |
| Incorrect WiFi Password | Reinput and verify WiFi password. | |
| Unable to find or connect to Wireless Network | App may need permission to location | Give TCL Home App permission to Location in phone settings. |
TCL North America
LIMITED PRODUCT WARRANTY
What your warranty covers: Defects in materials or workmanship to the original owner of this TCL product when purchased as new from an Authorized Dealer of TCL brand products and packaged with this warranty statement.
WARRANTY PERIOD (NON-COMMERCIAL USE):
Labor: Twelve (12) Months from the original date of purchase.
Parts: Twelve (12) Months from the original date of purchase.
WARRANTY PERIOD (COMMERCIAL USE):
Labor: Six (6) Months from the original date of purchase.
Parts: Six (6) Months from the original date of purchase.
Commercial Use includes, but is not limited to, the use of this product in a commercial or business environment, the use of this product in an institution or for institutional purposes, or for other commercial purposes including rental purposes. Should your TCL device prove to be defective in material or workmanship under normal use during the warranty period listed above, effective from the date of original consumer purchase of the product, TCL North America at its sole discretion will, (1) pay an Authorized TCL Service Center for both labor charges and parts to repair your device, or (2) replace your device with a new or refurbished/recertified equivalent product. If repaired at an Authorized TCL Service Center, TCL is not responsible for the transportation costs to the Authorized TCL Service Center. However, TCL will pay for the return shipping. TCL will provide instructions for the packaging and shipping of the unit. Units that are improperly packed and damaged during shipping are not covered under this limited product warranty. This limited product warranty is good only to the original purchaser of the product and effective only when used in North America. You must have your original purchase receipt or proof of purchase (bill of sale or receipted invoice) which states the condition of the unit (new, used), the unit’s date of purchase, place of purchase, and model/serial number.
HOW SERVICE IS HANDLED: Call 1-800-825-6747 and choose the appropriate prompt. Please have product type, model number, serial number, and ZIP code ready. Troubleshooting and prior approval from a TCL representative MUST occur before sending in your product for repair.
Product Registration Information
You can find the model number and serial number on a label on the back or side of the product. Register your product online at register.tcl.com. NO OTHER WARRANTY IS APPLICABLE TO THIS PRODUCT. THIS LIMITED WARRANTY IS IN LIEU OF ANY OTHER WARRANTY, EXPRESS OR IMPLIED, INCLUDING WITHOUT LIMITATION, ANY WARRANTY OF MERCHANTABILITY OR FITNESS FOR A PARTICULAR PURPOSE. TO THE EXTENT ANY IMPLIED WARRANTY IS REQUIRED BY LAW, IT IS LIMITED IN DURATION TO THE EXPRESS WARRANTY PERIOD ABOVE. NEITHER THE MANUFACTURER NOR ITS DISTRIBUTOR SHALL BE LIABLE FOR ANY INCIDENTAL, CONSEQUENTIAL, INDIRECT, SPECIAL, OR PUNITIVE DAMAGES OF ANY NATURE, INCLUDING WITHOUT LIMITATION, LOST REVENUES OR PROFITS, OR ANY OTHER DAMAGE WHETHER BASED IN CONTRACT, TORT, OR OTHERWISE. SOME STATES AND/OR TERRITORIES DO NOT ALLOW THE EXCLUSION OR LIMITATION OF INCIDENTAL OR CONSEQUENTIAL DAMAGES OR LIMITATIONS ON THE LENGTH OF TIME AN IMPLIED WARRANTY LASTS, SO THE ABOVE EXCLUSION OR LIMITATION MAY NOT APPLY TO YOU. THIS LIMITED WARRANTY GIVES YOU, THE ORIGINAL PURCHASER, SPECIFIC LEGAL RIGHTS AND YOU MAY ALSO HAVE OTHER RIGHTS THAT VARY FROM STATE TO STATE OR TERRITORY TO TERRITORY. THIS WARRANTY IS SUBJECT TO CHANGE WITHOUT NOTICE. PLEASE VISIT WWW.TCL.COM/EN TO VIEW THE MOST CURRENT VERSION.
THIS LIMITED WARRANTY DOES NOT APPLY TO:
- Service calls to your home for delivery or pick-up, installation, instruction, replacement of house fuses, connection of house wiring or plumbing, or to correct unauthorized repairs.
- Failure of the product to perform due to signal reception problems not caused by your unit, or due to power failures or interruptions or inadequate electrical service.
- Damage caused by transportation or handling, including damage during shipment from a Retailer (please contact your Retailer for assistance).
- Damage caused to the product by accident, vermin, lightning, wind(s), fire, flood(s), or act(s) of God.
- Damage caused by operating the product in a corrosive or wet atmosphere.
- Repairs when your TCL product is used in other-than-normal, single-family household use, or contrary to the instructions described in the product User’s Guide.
- Damage resulting from accident, alteration, misuse, abuse, neglect, insects, normal wear-and-tear, cosmetic damage, mishandling, power line surges, improper or faulty installation, or improper repair or maintenance. Improper repair includes the use of parts not approved or specified by TCL.
- Markings or images on the product’s LCD/LED panel resulting from viewing fixed images (including but not limited to certain 4:3 images on wide screen televisions, and/or data or images in fixed screen locations from banners, video games, or certain broadcast networks).
- Normal maintenance as described in the User’s Guide (including but not limited to cleaning or replacing filters, cleaning coils, or other normal maintenance).
- Use of accessories or components that are not compatible with this product.
- Products with altered, missing, defaced, unreadable, or removed serial numbers.
- Changes in the appearance of the product that do not affect product performance.
- Increases in utility costs and/or additional utility expenses.
- Products purchased from non-authorized TCL resellers.
- Products sold in any condition other than new from the original manufacturer, or sold outside of North America.
The cost of repair or replacement under these excluded circumstances shall be borne by the consumer.
CONTACT INFORMATION:
TCL North America
1860 Compton Ave Corona, California 92881
1- 800-825-6747
www.tcl.com/en
FCC CAUTION
This device complies with part 15 of the FCC Rules. Operation is subject to the following two conditions: (1) This device may not cause harmful interference, and (2) this device must accept any interference received, including interference that may cause undesired operation. Any Changes or modifications not expressly approved by the party responsible for compliance could void the user’s authority to operate the equipment.
Note: This equipment has been tested and found to comply with the limits for a Class B digital device, pursuant to part 15 of the FCC Rules. These limits are designed to provide reasonable protection against harmful interference in a residential installation. This equipment generates uses and can radiate radio frequency energy and, if not installed and used in accordance with the instructions, may cause harmful interference to radio communications. However, there is no guarantee that interference will not occur in a particular installation. If this equipment does cause harmful interference to radio or television reception, which can be determined by turning the equipment off and on, the user is encouraged to try to correct the interference by one or more of the following measures:
- Reorient or relocate the receiving antenna.
- Increase the separation between the equipment and receiver.
This Class B digital apparatus complies with Canadian ICES-003. This device contains license-exempt transmitter(s)/receiver(s) that comply with Innovation, Science, and Economic Development Canada’s license-exempt RSS(s). Operation is subject to the following two conditions:
- This device may not cause interference.
- This device must accept any interference, including interference that may cause undesired operation of the device.”
This device uses 410a refrigerant
DO NOT RETURN TO STORE
WE ARE READY TO HELP
contact us first with any questions

TCL SUPPORT:
support.tcl.com
1-800-825-6747