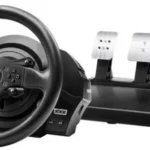
THRUSTMASTER Ferrari Racing Wheel User Manual
Compatible: PlayStation®3 / PC

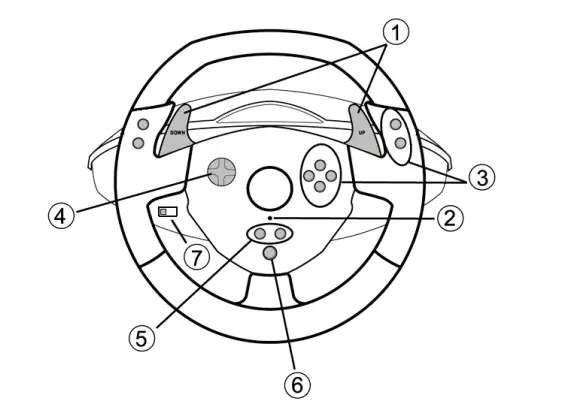
TECHNICAL FEATURES
- 2 digital gearshift levers (UP and DOWN)
- LED
- Action buttons
- D-Pad
- “SE” and “ST” buttons:
– for Select and Start
– for programming - “Home” button for PlayStation®3
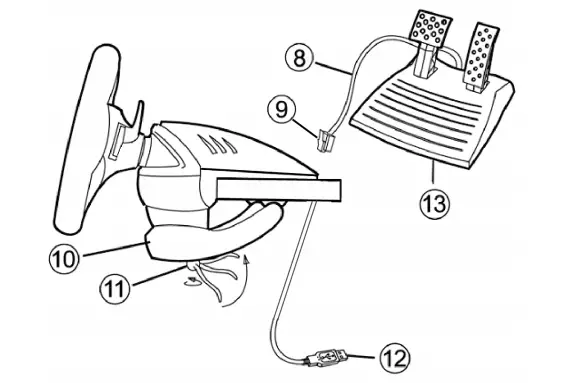
- USB selector (“PC” / “PS3”)
- Pedal cable
- RJ45 connector for pedal set
- Table clamp
- Clamp screw
- USB connector (for PC and PlayStation®3)
- Pedal set
INSTALLING THE WHEEL
Fixing the wheel in place
- Place the wheel on a table or other flat surface.
- Place the clamp screw (11) in the table clamp (10) and then screw the clamping unit into the hole on the underside of the wheel until firmly fixed in place. Do not turn the screw too tightly, as you risk damaging the clamping unit and/or the table.
Connecting the pedal set
- Connect the pedal cable (8) to the wheel’s RJ45 connector (9).
![]()
For safety reasons, never use the pedal set with bare feet or while wearing only socks on your feet.
THRUSTMASTER® DISCLAIMS ALL RESPONSIBILITY IN THE EVENT OF INJURY RESULTING FROM USE OF THE PEDAL SET WITHOUT SHOES.
PLAYSTATION®3
INSTALLATION ON PLAYSTATION®3
- Set the wheel’s USB selector (7) to the “PS3” position.
- Connect the USB connector (13) to a USB port on your console.
- Turn on your console.
- Launch the game.
You are now ready to play!
USING THE “HOME” BUTTON (6)
Your wheel’s “Home” button allows you to exit games and access your PlayStation®3 system’s menus.
IMPORTANT NOTES ON PLAYSTATION®3
- The wheel’s USB selector (7) must always be set to the “PS3” position before connecting your wheel.
- In “1 Player” mode: If your official gamepad is turned on, you will have to switch it to “controller port 2” in order for your wheel to be functional.
- On PlayStation®3, the wheel is only compatible with PlayStation®3 games (and will not function with PlayStation® 2 games).
- In certain racing games, do not hesitate to test out your wheel’s 2 sensitivity modes in order to optimize its precision and responsiveness.
“Gran Turismo® PS3™” configuration procedure for the “Ferrari Racing Wheel: Red Legend edition” racing wheel
By default in this game, acceleration and braking are not assigned to the “R2/L2” buttons and switching gears is not assigned to the “R1/L1” buttons (which is the case for the pedals and Up/Down levers on the “Ferrari Racing Wheel: Red Legend edition” racing wheel).
Procedure to configure and optimize the wheel:
(This procedure only needs to be carried out once, as the changes will then be saved in the game)
- Start up your game.
- Go to the OPTION menu.
- Go to the CONTROLLER SETUP menu
(by clicking the symbol representing the gamepad and the D-Pad). - Configure your controller as follows:
- Accelerate on R2
- Brake on L2
- Shift Up on R1
- Shift Down on L1
- Rear View on L3 and/or R3
- Left & Right View on D-Pad Left & Right
- Click OK (in the lower right part of your screen).
- Return to the main menu to access the track of your choice.
You are now ready to play!
Note: The steering wheel on your “Ferrari Racing Wheel: Red Legend edition” racing wheel features 2 sensitivity modes (normal or high). To achieve optimal precision in “Gran Turismo® PS3™”, we recommend that you enable “high sensitivity” mode.
PC
Installation on PC
- Set the wheel’s USB selector (7) to the “PC” position.
- Go to http://support.thrustmaster.com to download the drivers and the force feedback software for PC. Click Racing Wheels / Ferrari Racing Wheel Red Legend Edition, then select Drivers.
- Connect the USB connector (13) to one of your computer’s USB ports. Windows® will automatically detect the new device.
- Driver installation
Drivers are installed automatically. Follow the on-screen instructions to complete the installation. - Click Start/Settings/Control Panel and then double-click Game Controllers (or Gaming Options, depending on your operating system). The Game Controllers dialog box displays the wheel’s name with OK status.
- In the Control Panel, click Properties to configure your wheel:
- Test device: Allows you to test and visualize the buttons, D-pad and axes of the wheel and pedal set.
You are now ready to play!
IMPORTANT NOTES ON PC
- The wheel’s USB selector (7) must always be set to the “PC” position before connecting your wheel.
- Your wheel and pedals automatically self-calibrate upon connection of the USB connector. In the event of any problems, you can also carry out manual calibration by downloading the “Thrustmaster Calibration Tool” software, available at the following address: http://support.thrustmaster.com
ADVANCED FUNCTIONS
ADJUSTING THE WHEEL’S SENSITIVITY
Your wheel’s steering has 2 sensitivity modes:
- Normal sensitivity (the default mode)
- High sensitivity (must be set)
Setting “High Sensitivity” mode:

Your wheel’s steering is now more sensitive.
(This procedure must be repeated each time you restart or disconnect your wheel)
Setting “Normal Sensitivity” mode (default mode):

Your wheel’s steering has now returned to normal sensitivity (the default mode)
PROGRAMMING THE WHEEL AND PEDALS
Your wheel is fully programmable:
- All buttons as well as the D-Pad can be switched between themselves.
- All buttons as well as the D-Pad can be programmed onto the 2 pedals.
Examples of possible applications:
- On PS3: Programming L2/R2 or L3/R3 onto the 2 UP and DOWN digital levers (L1/R1).
- Programming a button(s) onto one or both pedals.
- Switching different buttons for greater accessibility.
Programming procedure

Your programming has now taken effect.
(You must repeat this procedure each time you restart or disconnect your wheel)
Erasing your programming

Your programming has now been erased.
CONFIGURING THE PEDALS ON PLAYSTATION®3
On PlayStation®3, your wheel’s accelerator and brake controls are in “separate” mode by default, meaning that the pedals function on independent axes:
“Accelerator” = “R2” trigger & “Brake” = “L2” trigger
For a different type of control (to limit skidding, for example), you can switch your wheel to “combined” (2 axes) mode: the pedals then function on a single axis.
“Accelerator and Brake” = Up/Down direction on “Right mini-stick”
Setting “Combined Pedals” mode
Your pedals are now combined
(You must repeat this procedure each time you restart or disconnect your wheel)
To return to “Separate Pedals” mode (the default mode)
Your pedals have now returned to the default mode: “Separate”
CONFIGURING THE PEDALS ON PC
Your wheel’s accelerator and brake controls are in “separate” (3 axes) mode by default, meaning that the pedals function on independent axes.
3 axes mode allows you to considerably improve the precision of your driving. If your game does not support 3 axes mode, your wheel’s pedals will not function properly. You will then have to exit the game and select “combined” (2 axes) mode instead.

- Selecting axes via “Software”
(This setting will be saved even after you restart or disconnect your wheel)
On page 1 of the “Control Panel”: Select the mode you wish to use, then click OK.
- Selecting axes via “Hardware”
(This setting will not be saved: It must be repeated each time you restart or disconnect)
(Allows you to select your mode directly in your game’s “Controls” options)
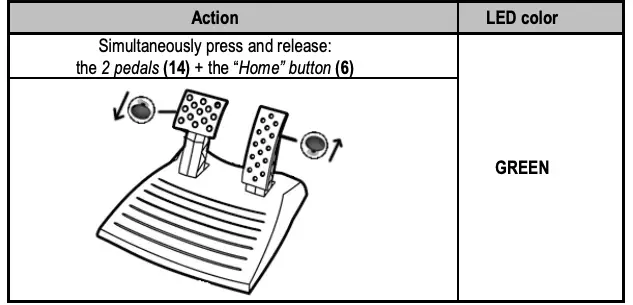
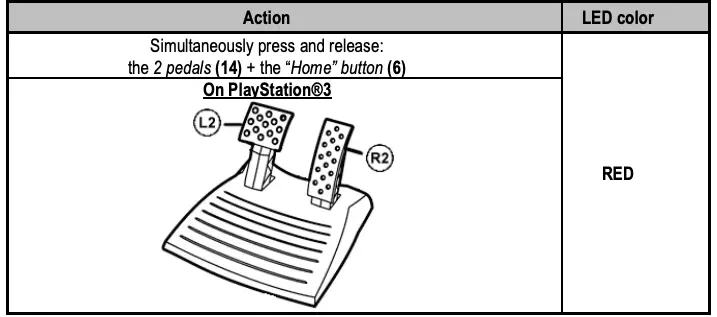
Simultaneously press and release: the 2 pedals (14) + the “Home” button (6)
TROUBLESHOOTING AND WARNINGS
- My wheel doesn’t function correctly or appears to be improperly calibrated:
- Switch off your computer or your console, completely disconnect your wheel including all cables, then reconnect the wheel and restart your game.
- If the problem persists on PC, download the “Thrustmaster Calibration Tool” manual calibration software available at the following address: http://support.thrustmaster.com
- Never move the wheel or pedals when connecting your wheel in order to avoid any calibration problems.
- My pedal set does not work correctly:
- Reconfigure your wheel in your game’s controller options section.
- If the problem persists on PC, exit the game and switch the pedals to “combined” (2 axes) mode. You can then return to your game to reconfigure the wheel with the new axes.
- I can’t configure my wheel:
- On PS3: In your game’s “Options / Controller / Gamepads” menu: select the most appropriate configuration.
- On PC: In your game’s “Options / Controller / Wheels” menu: select the most appropriate configuration.
- Please refer to your game’s user manual or online help for more information.
- You can also use your wheel’s “programming” function to resolve this type of problem.
- On PC or PS3, my wheel does not work correctly:
- Exit your game, disconnect your wheel, verify that the “PC/PS3 ” USB selector (7) is in the proper position, then reconnect everything and try again.
- On PC, my game’s menus scroll by themselves:
- Exit the game and switch the pedals to “combined” (2 axes) mode. Then return to your game to reconfigure the wheel with the new axes.
- My wheel’s steering is not responsive enough:
- Switch your wheel to high sensitivity mode.
COPYRIGHT
© 2017 Guillemot Corporation S.A. All rights reserved. Thrustmaster® is a registered trademark of Guillemot Corporation S.A. All other trademarks are the property of their respective owners. Illustrations not binding. Contents, designs and specifications are subject to change without notice and may vary from one country to another. Made in China.
ENVIRONMENTAL PROTECTION RECOMMENDATION
 In the European Union: At the end of its working life, this product should not be disposed of with standard household waste, but rather dropped off at a collection point for the disposal of Waste Electrical and Electronic Equipment (WEEE) for recycling. This is confirmed by the symbol found on the product, user manual or packaging. Depending on their characteristics, the materials may be recycled. Through recycling and other forms of processing Waste Electrical and Electronic Equipment, you can make a significant contribution towards helping to protect the environment. Please contact your local authorities for information on the collection point nearest you. For all other countries: Please adhere to local recycling laws for electrical and electronic equipment.
Retain this information. Colours and decorations may vary.
Plastic fasteners and adhesives should be removed from the product before it is used.
*Applicable to EU and Turkey only
![]()