![]()
DGTL Ana-Digi 03X Wrist Watch User Guide
DGTL Ana-Digi Model 03X
03X-096000 7.29.19
Register your product at https://www.timex.com/product-registration.html
EXTENDED WARRANTY
Available in U.S. only. Extend your warranty for an additional 4 years from the date of purchase for $5.You can pay with AMEX, Discover, Visa or MasterCard by calling 1 800-448-4639 during normal business hours. Payment must be made within 30 days of purchase. Name, address, telephone number, purchase date, and 5-digit model number required. You can also mail a check for $5 to Timex Extended Warranty, P.O. Box 1676, Dept.EF, Little Rock, AR 72203.
Please read the instructions carefully to understand how to operate your Timex ®watch.
FEATURES AND BASIC OPERATION
- Date with MM-DD format (month/day)
- 24-Hour Stopwatch with Split time
- Daily Alarm and Hourly Chime
- Dual Time (2nd Time Zone)
- INDIGLO® night-light

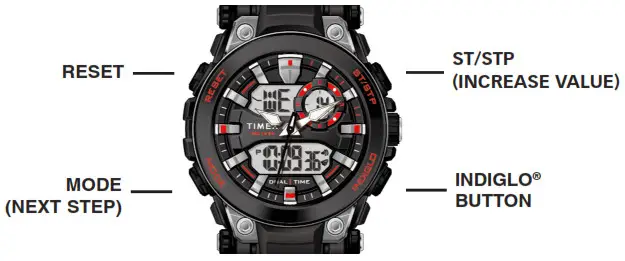
Button functions shown with setting functions in parentheses
TIME
To set time and date
- To start your watch remove the plastic guard from under the crown, then press the crown in against the case. The second hand will begin advancing in one-second intervals.
- Pull the crown out all the way and turn to the correct analog time. Push the crown in to restart the analog watch.
- From Time of Day mode in the digital watch, press and hold RESET. The watch beeps and Seconds can be seen flashing.
- Press ST/STP to set Seconds to zero.
- Press MODE to set Hours, as indicated by its flashing. Press ST/STP to advance the Hours setting. Press and hold to increment quickly.
- Press MODE to set Minutes, as indicated by its flashing. Press ST/STP to advance the Minutes setting. Press and hold to increment quickly.
- Press MODE to set the Year number, as indicated by its flashing. Press ST/STP to advance the Year setting. Press and hold to increment quickly
- Press MODE to set the Month number, as indicated by its flashing. Press ST/STP to advance the Month setting… Press and hold to increment quickly.
- Press MODE to set the Date, as indicated by its flashing… Press ST/STP to advance the Date setting… Press and hold to increment quickly.
- Press RESET to exit Time Set.
- To toggle between 12-Hour (A/P indicator) and 24-Hour time format, press
RESET.
Note: Press and hold ST/STP to peek at Month Number and Year.
ALARM
To turn on/off or to set the Daily alarm, or to turn on/off an hourly chime.
- Press MODE until “AL” appears.
Note: The alarm settings are tied to the primary time zone (T1). - Press ST/STP repeatedly to toggle the Alarm () on/off, to toggle the Hourly Chime (
 ) on/off, or to toggle both on/off.
 - To Set the Alarm, press RESET. The Hour digit flashes and the Alarm ON (
 ) lights.
 - Press ST/STP to advance the Hours setting. Press and hold to increment quickly.
Note: The Hours will be presented in the same format (12- or 24-hour time) as the time setting - Press MODE to set the Minutes as indicated by its flashing. Press ST/STP to advance the Minutes setting. Press and hold to increment quickly.
- Press RESET to exit the Alarm Set.
- When the alarm sounds, press ANY button to silence the alert, or it will stop automatically in about 60 seconds.
STOPWATCH
Use this function for timing events.
- Press MODE until “SP” appears.
- Press ST/STP to start timing.
- With the stopwatch running, press RESET to record the Split time. The display will show the Split time, but the stopwatch will continue timing in the background.
- Press RESET to release the display and show the current running stopwatch time.
- Press RESET to record another Split time.
- Press ST/STP to pause the timing.
- Either press ST/STP to resume timing, or press RESET to reset the Stopwatch to zero.

DUAL TIME
To set the time for a second time zone
- Press MODE until “T2” appears.
- Press RESET.The Hours can be seen flashing. Press ST/STP to advance the Hours setting. Press and hold to increment quickly.
- Press MODE to set Minutes, as indicated by its flashing. Press ST/STP to toggle between the same Minutes setting as Time Mode (T1) or 30 Minutes difference.
- Press RESET to exit Dual Time Set.
Note: The Hours will be presented in the same format (12- or 24-hour time) as the time setting.
INDIGLO® NIGHT-LIGHT
Press the INDIGLO® button to illuminate the watch display for 2-3 seconds. Electroluminescent technology used in the INDIGLO® night-light illuminates the watch face at night and in low light conditions.
WATER AND SHOCK RESISTANCE
If your watch is water-resistant, meter marking or (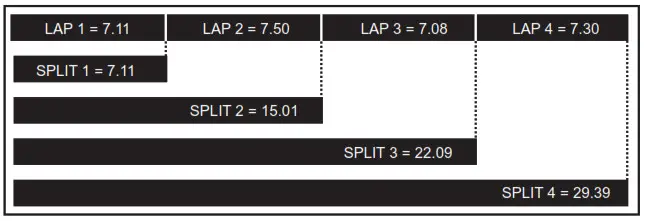 ) is indicated
| Water-Resistance Depth | p.s.i.a. * Water Pressure Below Surface |
| 30m/98ft | 60 |
| 50m/164ft | 86 |
| 100m/328ft | 160 |
*pounds per square inch absolute
WARNING: TO MAINTAIN WATER RESISTANCE, DO NOT PRESS ANY BUTTONS UNDERWATER.
- Watch is water-resistant only as long as a lens, push buttons and case remain intact.
- Watch is not a diver watch and should not be used for diving.
- Rinse watch with fresh water after exposure to saltwater.
- Shock resistance will be indicated on the watch face or case back. Watches are designed to pass the ISO test for shock resistance. However, care should be taken to avoid damaging crystal/lens.
BATTERY
Timex strongly recommends that a retailer or jeweler replace the battery. If applicable, push the reset button when replacing the battery. The battery type is indicated on the case back. Battery life estimates are based on certain assumptions regarding usage; battery life may vary depending on actual usage.
DO NOT DISPOSE OF BATTERY IN FIRE. DO NOT RECHARGE. KEEP LOOSE BATTERIES AWAY FROM CHILDREN.
TIMEX INTERNATIONAL WARRANTY
http://www.timex.com/productWarranty.html
©2019 Timex Group USA, Inc. TIMEX and INDIGLO are registered
trademarks of Timex Group B.V. and its subsidiaries.