CFM100 Thermo Anemometer
User Manual
Introduction
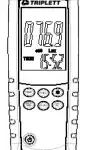
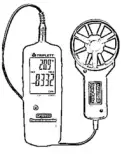
Congratulations on your purchase of the Triplett CFM100 ThermoAnemometer. The CFM/CMM Thermo Anemometer instrument measures Air Velocity, Air Flow (volume) and Temperature. The large, easy-to-read backlit LCD includes primary and secondary displays plus numerous status indicators.
Safety
- Do not operate the meter in environments where the following are present: explosive gases (or materials), combustible gases (or materials), steam, or dust.
- Please replace the battery immediately when the low battery symbol appears on the LCD.
- Do not touch the meter’s circuit board for any reason; static electricity or contamination could damage the sensitive components.
- This instrument was designed for pollution degree 2. Operation Altitude: Up to 2000m (7000′).
Description
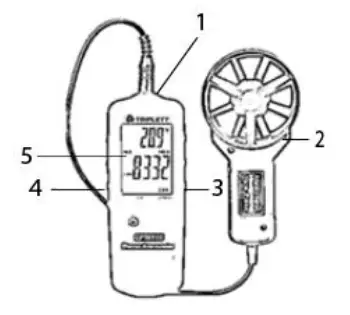
- Vane Anemometer (Sensor) Input Connector
- Vane Anemometer Sensor
- Right Side Function Buttons (°C/F, UNITS, HOLD)
- Left Side Function Buttons (Backlight, MAX/MIN, AREA)
- LCD Display

Display Overview
- VEL: indicates that meter is in air velocity mode
- FLOW: indicates that meter is in air flow mode
- MAX (bottom of LCD): Max Hold for the Air Velocity and Air Flow function
- HOLD (bottom of LCD): Data Hold for the Air Velocity and Air Flow function
- oC / oF: Temperature units of measure
- CFM/CMM: airflow units of measure
- AREA(ft2, m2): units for area dimensions
- m/s, ft/min, km/h, MPH, knots: air velocity units of measure
- X10, X100: multipliers for air flow readings
- AVG: air averaging mode
- REC: indicates that min/max function is running (top for temp, bottom for air)
- Large LCD digits at bottom of display for Air Velocity and Air Flow
- Smaller LCD digits at top, right of display for Probe Temperature
- :Low battery indicator
Operation
Connecting the Vane
1. The vane plug is inserted in the meter’s sensor jack at the top of the meter. The plug and jack are keyed so that the plug can only fit in the jack one way.
2. Turn the plug carefully until it lines up with the jack and then firmly push the plug in place. Do not apply undue force or try to twist the plug side-toside.
3. If the vane is not connected to the meter or if the sensor is defective, the LCD display will indicate OL in place of a Temperature reading.
Air Velocity Measurements (Single Point)
1. Turn on the meter using the ON/OFF button.
2. Press UNITS button to select the desired unit of measure. NOTE: At power up the meter will display the last unit of measure previously entered.
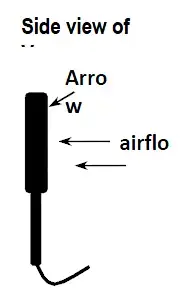
3. Place the sensor in the air stream. Ensure that the air enters the vane as indicated by the arrow sticker placed inside the vane.
4. View the readings on the LCD Display. The large main LCD display shows the Air Velocity reading. The upper right LCD sub-display shows the temperature reading.
Side view of Vane Arrow airflow
Air Flow Measurements (CMM / CFM)
1. Turn on the meter using the ON/OFF button
2. Press the UNITS button to select the desired air flow units: CMM (cubic meters per minute) or CFM (cubic feet per minute). NOTE: At power up the meter will display the last unit of measure previously entered.
3. To begin entering the area in m2 or ft2, press and hold the AREA button until it beeps twice. The leftmost digit of the bottom display will begin to flash.

4. Place the sensor in the air stream. Ensure that the air enters the vane as indicated by the arrow sticker placed inside the vane. Refer to the diagram. The large main LCD display shows the Air Velocity reading. The upper right LCD sub-display shows the temperature reading.
The meter has 2 memory locations (1 for CFM and 1 for CMM) that can be used to store commonly used area sizes that you can recall at anytime.
- Press the AREA button until meter beeps twice. A memory location number will appear in the top right of the display indicating the memory location.
- Use the UNITS button to change the flashing digit
Use the MAX/MIN button to move the decimal
After all of the digits are entered, press and hold the AREA button (until it beeps twice) to save the area into memory and return to CFM or CMM measuring mode.
Data Hold (Air Velocity/Air Flow)
- While taking measurements, press the HOLD button to freeze the air velocity/air flow reading.
- The HOLD indicator will appear in the bottom of the LCD display.
- Press HOLD again to return to normal operation.
MAX/MIN/AVG Record (Air Velocity/Air Flow) This allows the user to record and view the highest (MAX), lowest (MIN) and average (AVG) readings.
- Press the button MAX/MIN button. The MAX indicator and RECORD indicator along with the Max reading will appear on the LCD display and the meter will begin keeping track of the MAX, MIN and Average values.
- Press the MAX/MIN button again to view the minimum reading. The MIN indicator along with the minimum reading will appear on the LCD display.
- Press the MAX/MIN button again to view the average reading. The AVG indicator along with the average reading will appear on the LCD display.
NOTE: Average recording will stop automatically after 2 hours, and the upper LCD sub-display will show an OFF (only in the average mode). - Press the MAX/MIN button again to display current readings. NOTE: the meter will keep recording MAX/MIN/AVG readings.
- To clear and stop MAX/MIN/AVG recording and return to normal operation, press and hold the MAX/MIN button until the meter beeps twice.
Automatic Power OFF
To conserve battery life, the meter automatically turns off after 18 minutes. To defeat this feature:
- Turn the meter OFF.
- Press and hold the (Backlight) key while turning the meter ON.
- “dis APO” will appear in the display. The AUTO POWER OFF feature will now be disabled.
- Note that AUTO POWER OFF is re-enabled each time the meter is turned on.
- Also note that AUTO POWER OFF is disabled in CFM/CMM or Average mode.
Battery Replacement
When 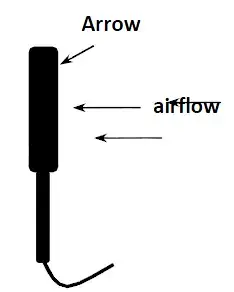 appears on the LCD, the 3*1.5V AA battery must be replaced.
1. Disconnect the sensor.
2. Remove the meter’s rubber protective jacket
3. Use a Phillips screwdriver to open the rear battery compartment
4. Replace the 3*1.5V AA battery
5. Close the battery compartment and replace the meter’s protective jacket
Specifications
|
|
|
|
|
|
|
|
|
|
|
|
|
|
|
|
|
|
|
|
|
|
|
|
|
|
|
|
|
|
|
|
|
|
|
|
|
|
|
|
|
|
|
|
|
|
|
|
|
|
|
|
|
|
General Specifications
| Circuit | Custom LSI microprocessor circuit |
| Display | Dual function 4-digit LCD |
| Sampling rate | 1 reading per second approx. |
| Sensors | Air velocity/flow sensor: Conventional angled vane arms with low-friction ball bearing Temperature sensor: NTC-type precision thermistor |
| Automatic Power off | Auto shut off after 20 minutes to preserve batter |
| Operating Temperature | 32 to 122°F (0 to 50°C) |
| Storage Temperature | 14 to 140oF (-10 to 60oC) |
| Operating Humidity | <80% RH |
| Storage Humidity | <80% RH |
| Operating Altitude | 2000 meters (7000ft) maximum |
| Battery | (3) 1.5V AAA batteries |
| Battery life | 40 hours approx. (if the Backlight is used continuously, battery life will be reduced significantly) |
| Battery Current | 8.3 mA DC approx. |
Useful Equations and Conversions
Area equation for rectangular or square ducts
Height (H) Width (W) Area (A) = Width (W) x Height (H)
Area equation for circular ducts

Radius
Area (A) = x r2 Where = 3.14 and r2 = radius x
radius
Cubic equations
CFM (ft3/min) = Air Velocity (ft/min) x Area (ft2)
CMM (m3/min) = Air Velocity (m/sec) x Area (m2) x 60
NOTE: Measurements made in inches must be converted to feet or meters before using the above formulae.
Unit of Measure Conversion Table
|
|
|
|
|
|
|
|
|
|
|
|
|
|
|
|
|
|
|
|
|
|
|
|
|
|
|
|
|
|
|
|
|
|
|
|
|
|
|
|
|
|
Warranty Information
Triplett / Jewell Instruments extends the following warranty to the original purchaser of these goods for use. Triplett warrants to the original purchaser for use that the products sold by it will be free from defects in workmanship and material for a period of (1) one year from the date of purchase. This warranty does not apply to any of our products which have been repaired or altered by unauthorized persons in any way or purchased from unauthorized distributors so as, in our sole judgment, to injure their stability or reliability, or which have been subject to misuse, abuse, misapplication, negligence, accident or which have had the serial numbers altered, defaced, or removed. Accessories, including batteries are not covered by this warranty
Copyright © 2020 Triplett