
User Manual
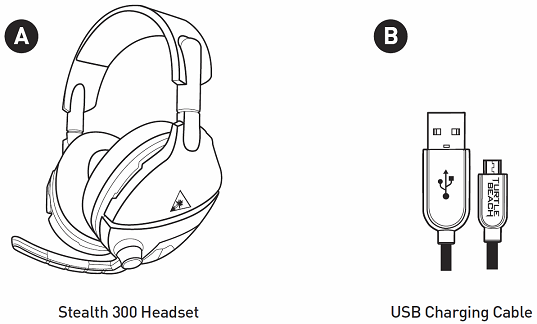
A. Stealth 300 Headset
B. USB Charging Cable
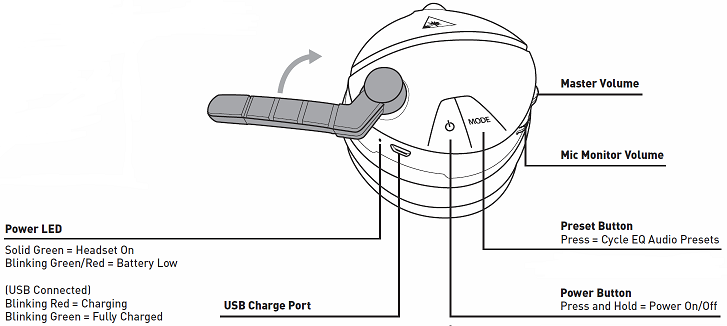
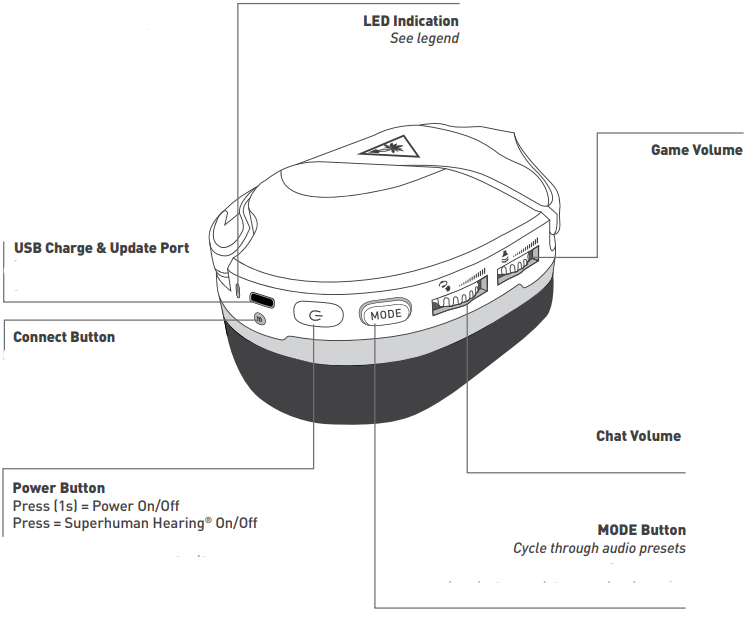
- Power LED
- Solid Green – Headset On
- Blinking Green/Red – Battery Low
- (USB Connected)
- Blinking Red – Charging
- Blinking Green – Fully Charged
- USB Charge Port
- Master Volume
- Mic Monitor Volume
- Preset Button
- Press – Cycle EQ Audio Presets*
- Power Button
- Press and Hold – Power On/Off
*See EQ Presets, below.
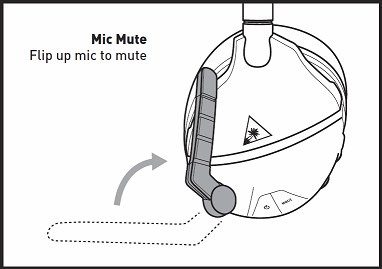
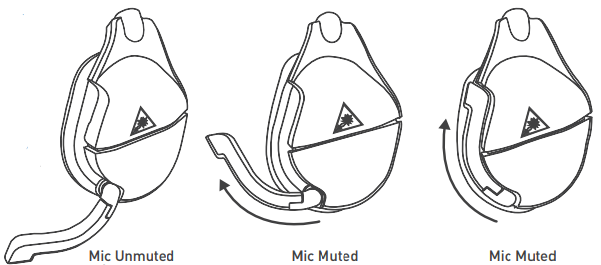
Flip up mic to mute, as shown.
EQ Presets
” alt=”Presets.PNG” width=”360″ height=”252″ data-ezsrc=”https://manuals.plus/ezoimgfmt/turtlebeach–c.na137.content.force.com/sfc/dist/version/download/?oid=00DU0000000Jga6&ids=0684U00000BWL5M&d=%2Fa%2F4U000000smQ9%2Fe6qWypl3SKR2cQnKDVLrRht2Z1HhO7_ApcdostUgkNY&asPdf=false” />
- 1 tone – Signature Sound
- 2 Tones – Bass Boost
- 3 Tones – Bass + Treble Boost
- 4 Tones – Treble Boost
- Press the Xbox Button on your controller.
- Go to the System Tab >> Audio.
- Set Headset Volume to Maximum.
- Set Headset Chat Mixer to the middle setting.
- Set Mic Monitoring to minimum.
- Press the Xbox Button on your controller.
- Go to the System Tab.
- Select Settings >> Display and Sound >> Audio Output.
- Set Headset Format to Windows Sonic for Headphones.
ProSpecs Glasses Friendly Design
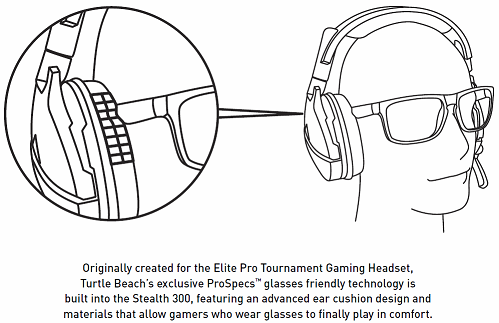
Originally created for the Elite Pro Tournament Gaming Headset, Turtle Beach’s exclusive Pro-Specs™ glasses-friendly technology is built into the Stealth 300, featuring an advanced ear cushion design and materials that allow gamers who wear glasses to finally play in comfort.
PC/Mac & Mobile Setup
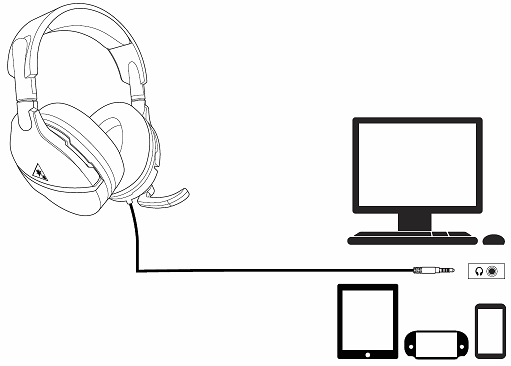
Note: If your PC uses separate Green/Pink connectors for audio, you will need a PC Splitter Cable. This adapter is available here.
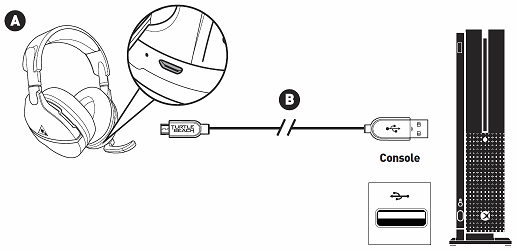
Charging
The Stealth 300 for Xbox One uses a rechargeable battery, and comes with a USB Charge Cable. You can use this included USB Charge Cable to charge the headset with your Xbox One console.
- Plug the Micro-USB end of the USB Charge Cable into the headset.
- Plug the USB end of the USB Charge Cable into a free USB port on the console itself.
- The headset will charge to full within a few hours. When fully charged, the LED will blink Green
The Stealth 300 uses a rechargeable battery. Make sure to charge it regularly.
The headset will charge to full within a few hours.
Once charged, the headset will have a battery life of over 40 hours.
Headset Storage:
Always charge your headset before storing it for any extended period of time (greater than 3 months). Never store the unit in temperatures above 115°F/45°C.
Xbox One Mic Usage/Mic Issues
If other players are unable to hear you in Xbox Live Chat or on your Xbox One console, please perform the following steps.
1. The Headset is Charged/Powered On
The headset must be powered on to be used. Make sure the headset is powered on before use by pressing and holding the Power button on the headset until the LED lights up. You will hear three ascending tones, and the LED will be green.
In addition, make sure the headset is charged. The headset will charge to full within a few hours, and has a battery life of over 40 hours when full. If the battery is low, you will hear a double-tone in the headset, followed by another tone every few minutes. When the headset’s batter is low, the headset’s LED will also blink Green/Red.
2. Mic is Unmuted/Mic Monitor is Working/Headset is Assigned
The Stealth 300 has an adjustable mic. To use the mic, gently push (‘flip’) the mic forwards. You will hear a tone (low high) when the mic itself is unmuted. When the mic is fully pushed forwards, the mic will “Lock” into position.
Raise the Mic Monitor volume by moving the lower volume dial on the headset up. Then, speak directly into the mic. You should be able to hear yourself in the headset when you speak into the mic.
Also, check that the controller is assigned to your profile. To do this:
- Press the Xbox/Home button on the Xbox One controller.
- Go to Settings >> All Settings >> Kinect & Devices >> Devices & Accessories
- You will see an image of the controller you are using. Below this image there will be a “…” Button. Select this “…” Button to bring up the device screen for the controller. On the left side of the screen there will be a sidebar with information; at the bottom of that sidebar, there should be a Headset listed as being assigned to the controller.
If you can see the headset listed as being assigned to the controller, and can hear yourself when you speak into the mic, proceed to the next test. If you do not see that headset listed, please proceed to Step 3. If you cannot hear yourself through the headset, please contact our Support Team.
3. The Headset Works With Another Device
Plug the headset into a smartphone, and make sure that the mic is flipped down/unmuted. Then, make a test call. During that test call, make sure the smartphone itself is kept covered/in a pocket for the duration of the call, so that the phone’s internal microphones do not pick up the sound instead of the headset’s mic.
If you could be heard during that test call, continue to Step 4. If you could not be heard during that test call, please contact our Support Team.
4. Record a Test Message
- Press the Xbox/Home button on the Xbox One controller.
- Scroll to Messages >> New Conversation.
- Choose a friend from the list. You will not be sending this message, so you don’t have to choose a specific person.
- After you choose a person, two options will appear: Write a Message (pencil icon on left) and Record a Message (mic icon on right). Select the Record a Message/Mic icon on the right.
- Select Record, and then speak into the mic. When you are done recording, stop the recording.
- The new recording should appear under the Write a Message/Record a Message icons. Select Play, and listen to that recording you made. This will tell you how your voice will sound to other players. Can you hear your voice clearly?
If you can hear your voice clearly, the mic itself is working well. You may want to check the chat settings and NAT type in the console’s settings menus.
If you cannot hear your voice clearly, please proceed to the next step.
5. Power Cycle Console
To perform a quick power cycle with the console, please do the following, in this order:
- Shut down the console from the menus, and disconnect the headset from the Xbox One controller.
- Unplug any USB Cable going into the controller, turn the controller off, and unplug the Xbox console itself from the wall/outlet it is plugged into. Make sure the console itself is unplugged.
- Let everything sit for a minute, and then:
- Plug the console itself in.
- Turn the console on, and sign into your profile. If your profile automatically signs in, please make sure to sign out and then sign back in.
- Then connect the headset, and assign it to your profile.
To assign the headset to your profile:
- With the headset plugged into the controller, go to Settings >> Kinect & Devices >> Devices & Accessories. Select the controller that you are using; in the controller’s menu, select “Assign to Someone”, and choose the Gamertag/Xbox Live account that you are currently signed into.
If the Power Cycle does not resolve this, please contact our Support Team.
Static In Mic Monitor (Check Settings)
The Stealth 300 is designed with a built-in Mic Monitor. This plays back your voice in the headset so you know how loudly you are speaking while gaming.
The Xbox One also includes a Mic Monitor feature. When gaming on the Xbox One, it is important to turn off the Xbox One Mic Monitor, if both are active you will sometimes hear increased background noise (Static).
Check that your settings are as follows:
- Press the Xbox Button on your controller.
- Go to the System Tab >> Audio.
- Set Headset Volume to Maximum
- Set Headset Chat Mixer to the middle
- Set Mic Monitoring to minimum.
Note: If your headset is connected to a Headset Audio Controller or Headset Audio Controller Plus, turn off Mic Monitoring on the HAC/HAC Plus by holding down the Mic Mute Button on the controls.
PS4 Mic Usage/Mic Issues
If other players are unable to hear you in chat, please check the following:
1. The Headset is Charged/Powered On
The headset must be powered on to be used. Make sure the headset is powered on before use by pressing and holding the Power button on the headset until the LED lights up. You will hear three ascending tones, and the LED will be green.
In addition, make sure the headset is charged. The headset will charge to full within a few hours, and has a battery life of over 40 hours when full. If the battery is low, you will hear a double-tone in the headset, followed by another tone every few minutes. When the headset’s battery is low, the headset’s LED will also blink Green/Red.
2. Mic is Unmuted/Mic Monitor is Working
The Stealth 300 has an adjustable mic. To use the mic, gently push (‘flip’) the mic forwards. You will hear a tone (low high) when the mic itself is unmuted. When the mic is fully pushed forwards, the mic will “Lock” into position.
To mute the mic, just flip the mic back the other way. You will hear a tone (high low) when the mic is muted.
Raise the Mic Monitor volume by moving the lower volume dial on the headset up. Then, speak directly into the mic. You should be able to hear yourself in the headset when you speak into the mic.
If you can hear your voice clearly, skip to Step 4.
If you cannot hear your voice clearly, please contact our Support Team.
3. The Headset Works With Another Device
Plug the headset into a smartphone, and make sure that the mic is flipped down/unmuted. Then, make a test call. During that test call, make sure the smartphone itself is kept covered/in a pocket for the duration of the call, so that the phone’s internal microphones do not pick up the sound instead of the headset’s mic.
If you could be heard during that test call, continue to Step 4. If you could not be heard during that test call, please contact our Support Team.
4. The PS4/PS4 Pro Chat Settings are Configured
If you are able to hear yourself through the headset when you speak into the mic, then the mic itself is working properly, but the settings on your console may not be configured for headset use.
In the PS4 menu, go to Settings >> Devices >> Audio Devices
- Set Input and Output Devices to Headset Connected to Controller
- Set Output to Headphones to All Audio
- Set Volume Control (Headphones) level to Maximum
- Select Adjust Microphone Level and follow the on-screen instructions to calibrate your microphone
If the microphone still isn’t working, or if you don’t see any activity on that Adjust Microphone Level screen when you use the mic, please contact our Support Team.
Voice Chat Issues With Nintendo Switch
If you are experiencing the following symptoms when you use your headset with Fortnite on a Nintendo Switch, please try the steps below:
- Mic Not Working in Chat (you can’t be heard in chat)
- Chat Audio Not Working (you cannot hear other people in chat)
You may need to re-enable the in-game chat. In addition, you may need to disable the Push-to-Talk feature.
To do so:
1. Make sure you are logged in to your profile. Once you are logged in, press the + button on the switch to bring up the Social menu. Scroll down to and then select the gear icon on the bottom of the left sidebar.
” alt=”Gear_Icon_2.png” width=”1920″ height=”1080″ data-ezsrc=”https://manuals.plus/ezoimgfmt/turtlebeach–c.na137.content.force.com/sfc/dist/version/download/?oid=00DU0000000Jga6&ids=0684U00000BWLvs&d=%2Fa%2F4U000000sn2d%2FdQJANkSMaqIsEjnZkBGvVCKXEsLSooCKU9eRwx8A4pA&asPdf=false” />
2. The sidebar will change in appearance from your friends list to a list of several different options. Select the “Settings” option, as shown below.
” alt=”Select_Settings_3.png” width=”1920″ height=”1080″ data-ezsrc=”https://manuals.plus/ezoimgfmt/turtlebeach–c.na137.content.force.com/sfc/dist/version/download/?oid=00DU0000000Jga6&ids=0684U00000BWLgZ&d=%2Fa%2F4U000000sn6Q%2Fs7HvdtT.4LGsIufzsRd1PvfmZ2uURoHeIWuSFnZnIkc&asPdf=false” />
3. You will see several tabs on the top of the screen. Scroll to the Speaker tab – this is the Audio Settings tab. Then, scroll down to section labelled “Voice Chat”.
There will be two toggle settings: Voice Chat and Voice Chat Method.
- Voice Chat is ON by default. To be able to hear and be heard in chat, this setting needs to be ON. If this setting is turned off, you will not be able to hear the chat audio, and you will not be able to be heard in chat.
- Voice Chat Method is set to PUSH-TO-TALK by default. To be able to be heard in chat whenever you speak, this setting needs to be OPEN MIC. If this setting is set to PUSH-TO-TALK, you will not be heard in chat unless you press a specific button when you speak into the mic.
” alt=”Voice_Chat_Settings_4.png” width=”1920″ height=”1080″ data-ezsrc=”https://manuals.plus/ezoimgfmt/turtlebeach–c.na137.content.force.com/sfc/dist/version/download/?oid=00DU0000000Jga6&ids=0684U00000BWLSN&d=%2Fa%2F4U000000smvr%2FUGz0WB35GL58TFGCU5p52qlaBdzdPxl25RmDok6hk7Q&asPdf=false” />
Make sure that the Voice Chat is On and the Voice Chat Method is set to Open Mic, and then test the headset again. You should be able to hear and be heard in the chat.
PlayStation Setup
This article details the best way to set up your Stealth 300 for Xbox One headset for use with a PS4 or PS5 console.
To set your headset up for use with a PS4 console, please do the following.
- Press and Hold the Power button on the headset. The Power LED should light up solid, and you should hear a series of three ascending tones.
- Plug the headset’s 3.5mm plug into the PS4 controller.
- Flip the mic down to unmute the mic. You should hear a tone (low high) to indicate the mic has been unmuted.
- In the PS4 menu, go to Settings >> Devices >> Audio Devices
-
-
-
- Set Input and Output Devices to Headset Connected to Controller
- Set Output to Headphones to All Audio
- Set Volume Control (Headphones) level to Maximum
- Select Adjust Microphone Level and follow the on-screen instructions to calibrate your microphone
-
-
-
- Make sure that the Game/Chat audio and the Mic Monitoring are adjusted to your liking by moving the upper and lower volume dials, respectively.
If you navigate through the console menus, play a game, or enter a chat, you should now be able to hear those navigation tones, game audio, and chat audio.
If you instead have a PS5 console, please do the following.
- Power the headset on, and then plug the headset into the aux port in the DualSense controller. Once you do this, the microphone function will automatically switch from the controller’s integrated mic to your headset.
- Go to Settings >> Sound >> Audio Output >> Output Device
-
-
-
- Select Headset Connected To Controller for Output Device
- Set Output to Headphones to All Audio
-
-
-
- Go to Settings >> Sound >> Volume >> Headphones
-
-
-
- Set Volume Control (headphones) level to Maximum
-
-
-
- Adjust your microphone levels by going to Settings >> Sound >> Microphone >> Adjust Mic Level >> Microphone Level
*As desired, you can enable the 3D Audio function to enhance the audio through your headset. Then, go to Adjust 3D Audio Profile to select the best profile option for your game.
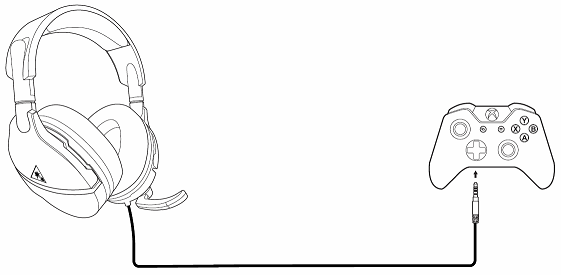
To set your wired headset up for use with an Xbox console, please do the following. Please note that these instructions will apply to both the Xbox One and the Xbox Series X|S consoles.
1. Plug the headset into the Xbox controller, and power the headset on.
2. While in the Home screen, press the Xbox button on the controller. Scroll down to the buttons on the bottom of the left sidebar, and then select the Speaker icon (Audio).
” alt=”Audio_2_-_Audio.png” width=”1920″ height=”1080″ data-ezsrc=”https://manuals.plus/ezoimgfmt/turtlebeach–c.na137.content.force.com/sfc/dist/version/download/?oid=00DU0000000Jga6&ids=0684U00000BWKkF&d=%2Fa%2F4U000000smrS%2F1AiafUjTYE9vRyJRvqqITS9yvexj_Mkq5LSFOkuhf18&asPdf=false” />
3. Configure your settings as shown:
- Set Headset Volume to Maximum
- Set Headset Chat Mixer to the Middle Setting
- Set Mic Monitor to Minimum
” alt=”Audio_3_-_Mic_Mic_Min.png” width=”1920″ height=”1080″ data-ezsrc=”https://manuals.plus/ezoimgfmt/turtlebeach–c.na137.content.force.com/sfc/dist/version/download/?oid=00DU0000000Jga6&ids=0684U00000BWM97&d=%2Fa%2F4U000000sn2n%2FP3ncbv.p1C7njLiJimzlpRE0jUhO4.zeMjUY3RxGz40&asPdf=false” />
4. Make sure that the Game/Chat audio and the Mic Monitoring are adjusted to your liking by moving the upper and lower volume dials, respectively.
If you navigate through the console menu, play a game, or enter a party chat, you should now be able to hear the navigation tones, game audio and chat audio.
WINDOWS SONIC SURROUND SOUND
1. While in the Home screen, press the Xbox button on the controller. You’ll see the following screen:
” alt=”Sonic_1_-_Home_Screen.png” width=”1920″ height=”1080″ data-ezsrc=”https://manuals.plus/ezoimgfmt/turtlebeach–c.na137.content.force.com/sfc/dist/version/download/?oid=00DU0000000Jga6&ids=0684U00000BWMA5&d=%2Fa%2F4U000000smqd%2FOJ2qMQyoRZYXXeVVhAnxv4fiogWWaYG9oo2JFom_x80&asPdf=false” />
2. Navigate to the Profile & System Tab, and select “Settings“.
” alt=”Sonic_2_-_Profile___System.png” width=”1920″ height=”1080″ data-ezsrc=”https://manuals.plus/ezoimgfmt/turtlebeach–c.na137.content.force.com/sfc/dist/version/download/?oid=00DU0000000Jga6&ids=0684U00000BWM1R&d=%2Fa%2F4U000000smuh%2FrbwxVJYjoxsbg5oRfHaTLto6b.qYt9zKcRSUrt1RHqM&asPdf=false” />
3. Go to General >> Volume & Audio Output
” alt=”Sonic_3_-_Volume__Audio_Output.png” width=”1920″ height=”1080″ data-ezsrc=”https://manuals.plus/ezoimgfmt/turtlebeach–c.na137.content.force.com/sfc/dist/version/download/?oid=00DU0000000Jga6&ids=0684U00000BWLjg&d=%2Fa%2F4U000000sn2A%2FuPKBq4Wb9hZf3lf9UIXSwCCTHUFAstIv2y1A97aYlSg&asPdf=false” />
4. In the Headset Audio column (right side of the screen), set Headset Format to Windows Sonic For Headphones.
” alt=”Sonic_4_-_Windows_Sonic.png” width=”1920″ height=”1080″ data-ezsrc=”https://manuals.plus/ezoimgfmt/turtlebeach–c.na137.content.force.com/sfc/dist/version/download/?oid=00DU0000000Jga6&ids=0684U00000BWLec&d=%2Fa%2F4U000000smrH%2FO5T8d33vuYFNV8D.vm8lWFsr09bwdnePQSagWWgP5uE&asPdf=false” />
Frequently Asked Questions (FAQ)
Here are some of the most frequently asked questions regarding the Stealth 300 for Xbox One model headset.
1. What devices can I use my Stealth 300 for Xbox One with?
The Stealth 300 for Xbox One is a wired headset that can be used with:
- Xbox One controllers
- Xbox Series X|S controllers
- PlayStation 4 controllers
- PlayStation 5 controllers
- Nintendo Switch consoles
- Laptops and PCs equipped with a 3.5 mm combo jack (one jack for Audio and Microphone purposes).
- Smartphones and Tablets equipped with a 3.5 mm jack.
If you have a laptop or PC that has separate jacks for Audio and Microphone purposes, you would need an additional cable known as a PC splitter cable.
1. Does the Stealth 300 for Xbox One require charging? Can the headset be used while charging? Can I charge my headset with my cell phone’s USB wall adapter?
- Yes, this a powered headset with a rechargeable battery. When its battery has been depleted, the headset would need to be recharged prior to its next use.
- Yes! You can use the headset’s USB charging cable to charge the headset while it is in use.
- While we usually suggest charging the headset via a USB port on your console, a USB wall adapter can be used to charge the headset.
For more information regarding charging this headset, please click here.
1. Is the Stealth 300 for Xbox One a surround sound headset?
The Stealth 300 for Xbox One is a stereo headset. There are features available on certain that can provide this headset with surround sound.
- When used with an Xbox console or on a PC, it is compatible with Windows Sonic for Headphones and Dolby Atmos.
- When used with on a PS5, it is compatible with Sony’s 3D Audio feature.
2. Does the Stealth 300 for Xbox One require any firmware updates? It is not being recognized by the Audio Hub!
There is no need to worry about updating your headset. The Stealth 300 for Xbox One is a wired headset and does not have any sort of updateable firmware. Due to that, it will not be recognized by any version (mobile or desktop) of the Audio Hub.
3. I can hear my own voice when I speak, or I can hear some background noises being played in my headset. Is that normal?
You may be referring to the headset’s Microphone Monitoring feature, which allows you to hear your voice when you speak.
It’s possible that the headset’s Mic Monitor control is turned up too high and is playing back noises from the room you’re in. This can result in you hearing echoes, hiss and/or static in your headset while you’re using it.
You can adjust the intensity of the Mic Monitoring feature on the Stealth 300 for Xbox One via the lower rotating dial on the headset itself.
If you continue to have the same inconvenience after adjusting your headset’s Microphone Monitoring volume level; please reach out to our support team for further assistance.
4. My headset’s lower dial is for Mic Monitoring, but why is it not lowering my outbound microphone volume level?
The Microphone Monitoring feature allows you to hear your own voice in the headset when you speak, in order to help you avoid inadvertently shouting at other players. The headset itself is not equipped with any sort of volume control for the outbound volume level of its microphone — therefore, the Mic Monitor volume control will adjust only how loud you hear your own voice through the headset when you speak into the mic, not how loud other people will hear your voice when you speak.
5. My Stealth 300 for Xbox One is plugged in and is not showing up as a separate device within my PC’s sound control panel. Am I doing something wrong?
The Stealth 300 for Xbox One is an analog headset and will not be recognized as a separate device by your PC. Your PC will only recognize the jack/port that your headset is connected to. Your PC may refer to those jacks/ports as a “High Definition Audio Device” or “Realtek Audio Device” depending on your PC’s audio drivers.
If you need assistance in getting your headset set up properly on your PC, please reach out to our support team for further assistance.
TROUBLESHOOTING
1. I can only hear audio out of one side of the headset. How can I clear that up?
First, ensure that your headset is fully charged and that the microphone is rotated to the unmute position.
Also, if possible, try testing the headset away from the device you’re using it with. If you are using it with your console’s controller, try using the headset with a device like a smartphone or tablet. If you do not have access to a smartphone, you can perform this test with a different device, as detailed here.
If the headset continues to have the same inconvenience when tested with another device, please reach out to our support team for further assistance.
2. The audio in my headset is distorted (pops, clicks, crackles, static, etc.). Is there anything I can do about that?
Please test your headset with a smartphone or mobile tablet, as suggested in the question above. If you do not have access to a smartphone, you can perform this test with a different device, as detailed here.
If the distortion continues when tested with another device, please reach out to our support team for further assistance.
3. No one can hear me when I try to chat. What should I do?
Testing your headset with another device, like a smartphone, would be the best course of action here. If you do not have access to a smartphone, you can perform this test with a different device, as detailed here.
If you’re experiencing this inconvenience in Fortnite specifically, please double check your Fortnite settings — we have a guide to do so available here. (Please note that while that article does mention Xbox, the settings within the game would be the same regardless of which console/platform the game is being played on.)
NOTE 1: These suggestions would be applicable to all versions of Fortnite (Xbox/PlayStation/Nintendo Switch/PC)
If you’re experiencing this inconvenience specifically in Call of Duty: Modern Warfare or Call of Duty: Warzone, please check your in-game settings and ensure they match up with what we have suggested in the applicable article below:
Xbox/PC Recommended Call of Duty Settings
PlayStation Recommended Call of Duty Settings
NOTE 2: For Call of Duty: Modern Warfare or Call of Duty: Warzone, the “Open Mic Recording Threshold” setting should be set as low as possible. Setting that too high can cause your voice to cut out completely.
If you need further assistance, please reach out to our support team for further assistance.
]]>![]()
QUICK START GUIDE
IMPORTANT READ BEFORE USING
Any questions?
Model: Stealth™600 Gen 2 para
IMPORTANT
PLEASE MAKE SURE YOUR HEADSET IS UPDATED WITH THE LATEST FIRMWARE.
Connect to the Turtle Beach Audio Hub for Windows or Mac® to update the firmware.

https://es.turtlebeach.com/pages/audio-hub
CONTENTS
A Stealth™ 600 Gen 2 Headset
B USB-C Charging Cable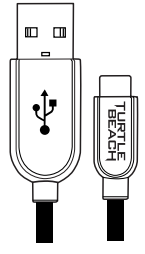 HEADSET CONTROLS
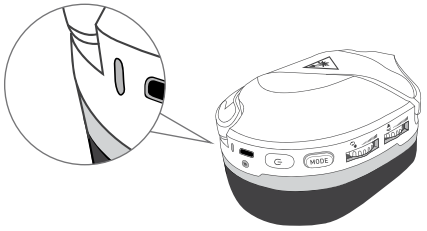
![]() Use Superhuman Hearing®Mode to pinpoint quiet audio cues like enemy footsteps and weapon reloads.
Use Superhuman Hearing®Mode to pinpoint quiet audio cues like enemy footsteps and weapon reloads.
During gameplay, you can activate and deactivate Superhuman Hearing®by pressing the POWER button once, quickly.
Microphone Mute
Flip-up mic to mute. There is an audible tone when the mic is muted or unmuted.
 EQ PRESETS
Signature Sound
Bass Boost
Bass + Treble Boost
Vocal Boost
SETUP FOR XBOX
For new Xbox console-setup instructions, go to:
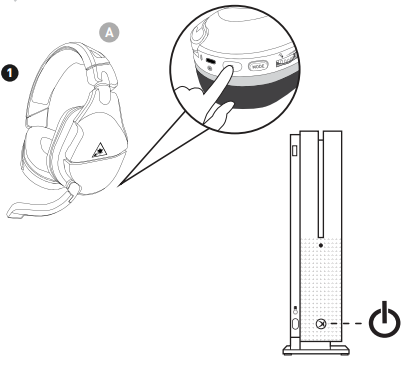
COMPATIBLE WITH
Xbox Series X
Xbox One
Windows 10 with Xbox Adapter, sold separately
SURROUND SOUND FOR XBOX (ONLY AVAILABLE ON XBOX)
- Go to Settings > General > Volume & Audio Output
- Set Headset Audio to Windows Sonic for Headphones
For updated setup instructions visit:
turtlebeach.com/sonic
CHARGING
The Stealth™600 Gen 2 gives you 15 hours of rechargeable battery life. Make sure to charge it regularly before storing it.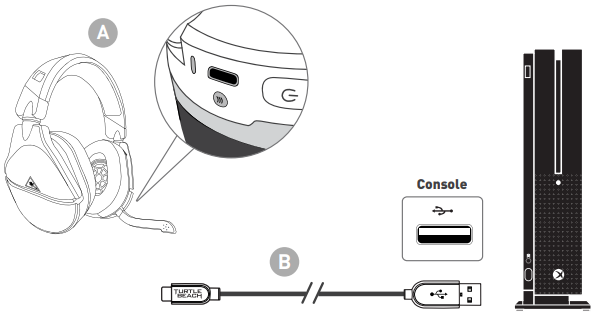
Headset Storage
Always charge your headset before storing it for an extended period of time (greater than 3 months). Never store the unit in temperatures above 113°F/45°C.
HEADSET LED
| HEADSET LED | MEANING |
| Solid Green | Headset and Console Paired |
| Breathing Green | (While Charging) Battery Full |
| Double-Blink Green | Not Paired |
| Solid Red | (While Charging) Battery Charging |
| Breathing Red | Battery Low |
SETUP FORPC USE
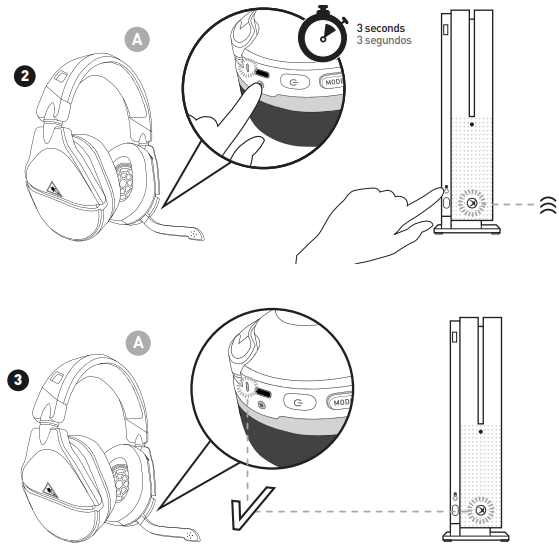
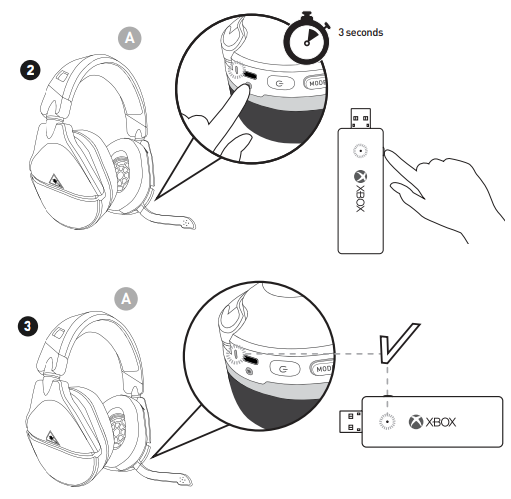
SYNCING YOUR HEADSET (XBOX WIRELESS ADAPTER)*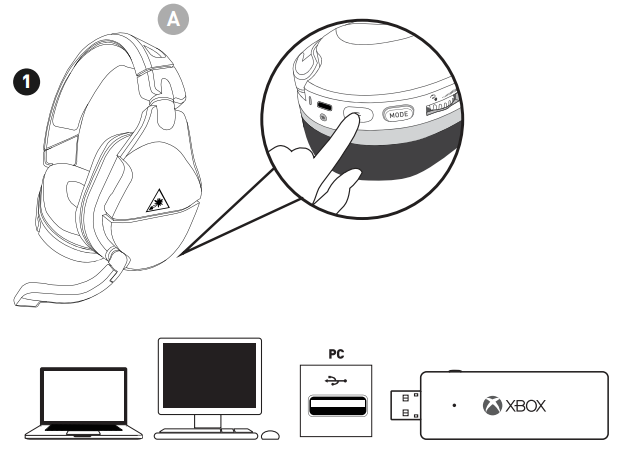
*Xbox Wireless Adapter not included
Headset volume is controlled through Windows 10 when used on a PC. Volume controls on the headset have no effect.
SYNCING YOUR HEADSET BUILT-IN XBOX WIRELESS)
- On your PC, go to Settings > Devices > Connected Devices.
a. Choose to Add a device. Windows search for the headset. - Press the connect button on your headset. Windows finds and adds the headset.
- When your Stealth™ 600 headset appears in the list under Other devices, it is ready to use.
- Configuring your settings > On the Windows Taskbar, right-click the Speaker Icon, Select Playback Devices
a. Set TURTLE BEACH Stealth 600 ™ as your default device.
b. Select Recording Devices, Set TURTLE BEACH Stealth 600 ™as your default device.
Regulatory Compliance Statements for the Stealth™600X Gen 2
Local Restrictions on 802.11a, 802.11b, 802.11g and 802.11n Radio Usage
Caution: Due to the fact that the frequencies used by 802.11a, 802.11b, 802.11g, and 802.11n wireless LAN devices may not yet be harmonized in all countries, 802.11a, 802.11b, 802.11g, and 802.11n products are designed for use only in specific countries, and are not allowed to be operated in countries other than those of designated use. As a user of these products, you are responsible for ensuring that the products are used only in the countries for which they were intended and for verifying that they are configured with the correct selection of frequency and channel for the country of use. Any deviation from the permissible power and frequency settings for the country of use is an infringement of national law and may be punished as such.
To determine whether you are allowed to use your wireless network device in a specific country, please check to see if the radio type number that is printed on the identification label of your device is listed in the manufacturer’s OEM Regulatory Guidance document at the following URL: http://www.turtlebeach.com/homologation or contact Turtle Beach directly.
Federal Communications Commission (FCC) Compliance Notices
This section includes the following FCC statements for the Stealth™600X Gen 2:
- FCC ID: XGB-TB2315
- Class B Interference Statement
- RF Radiation Exposure & Hazard Warning
- Non-Modification Statement
- Unlicensed National Information Infrastructure Bands Operation Statement
Class B Interference Statement
This equipment has been tested and found to comply with the limits for a Class B digital device, pursuant to Part 15 of the FCC Rules.
These limits are designed to provide reasonable protection against harmful interference in a residential installation. This equipment generates, uses, and can radiate radio frequency energy and, if not installed and used in accordance with the instructions, may cause harmful interference to radio communications. However, there is no guarantee that interference will not occur in a particular installation.
If this equipment does cause harmful interference to radio or television reception, which can be determined by turning the equipment off and on, the user is encouraged to try to correct the interference by one or more of the following measures:
- Reorient or relocate the receiving antenna.
- Increase the separation between the equipment and receiver.
- Connect the equipment into an outlet on a circuit different from that to which the receiver is connected.
- Consult the dealer or an experienced radio/TV technician for help.
FCC Caution:
his device complies with Part 15 of the FCC Rules. Operation is subject to the following two conditions: (1) This device may not cause harmful interference, and (2) this device must accept any interference received, including interference that may cause undesired operation.
RF Radiation Exposure & Hazard Statement
To ensure compliance with FCC RF exposure requirements, this device must be installed in a location such that the antenna of the device will be greater than 2 cm (0.8 in.) from all persons. Using higher gain antennas and types of antennas not covered under the FCC certification of this product is not allowed. Installers of the radio and end-users of the product must adhere to the installation instructions provided in this manual. This transmitter must not be co-located or operated in conjunction with any other antenna or transmitter.
Non-Modification Statement
Use only the supplied internal antenna. Unauthorized antennas, modifications, or attachments could damage the Stealth™ 600X Gen 2 and violate FCC regulations. Any changes or modifications not expressly approved by the party responsible for compliance could void the user’s authority to operate this equipment. Please contact Turtle Beach for a list of approved 2.4 GHz and 5.0 GHz antennas.
Unlicensed National Information Infrastructure (U-NII) Bands Operation Statement
Within the 5.25-5.35 GHz band, U-NII devices will be restricted to indoor operations to reduce any potential for harmful interference to co-channel MSS operations.
The U-NII devices shall accept any interference from legal communications and shall not interfere with the legal communications. If interference is caused, the user must stop operating the device immediately and cannot resume operation until the harmful interference is clear.
Manufacturers of U-NII devices are responsible for ensuring frequency stability such that emission is maintained within the band of operation under all conditions of normal operation as specified in this user manual.
Dynamic Frequency Selection (DFS)
U-NII devices operating in the 5.25-5.35 GHz and 5.47-5.725 GHz bands shall employ a DFS radar detection mechanism to detect the presence of radar systems and to avoid co-channel operation with radar systems in order to reduce the likelihood of interference to radar.
The modification of wireless broadband and other transceiver devices to operate on unauthorized frequencies or the disabling of DFS capabilities is a violation of FCC rules and may result in unlawful interference to radio communications services critical to public safety This product is compliant with the Consumer Product Safety Improvement Act of 2008, Public Law 110-314 (CPSIA)
Canadian ICES Statements IC: 3879A-2315 (Stealth™600X Gen 2)
This device complies with ICES-003 and RSS-247 of Industry Canada. Operation is subject to the following two conditions:
- This device may not cause interference, and
- This device must accept any interference, including interference that may cause undesired operation of the device.
To prevent radio interference to the licensed service (i.e. co-channel Mobile Satellite systems) this device is intended to be operated indoors and away from windows to provide maximum shielding. Equipment (or its transmit antenna) that is installed outdoors is subject to licensing and not supported by Stealth™ 600X Gen 2 Models.
RF Radiation Exposure & Hazard Statement
To ensure compliance with RSS-102 RF exposure requirements, this device must be installed in a location such that the antenna of the device will be greater than 2 cm (0.8 in.) away from all persons. Using higher gain antennas and types of antennas not covered under the IC certification of this product is not allowed. Installers of the radio and end-users of the product must adhere to the installation instructions provided in this manual. This transmitter must not be co-located or operated in conjunction with any other antenna or transmitter.
Deployment Statement
This product is certified for indoor deployment only in the 5150-5250 MHz band. Do not install or use this product outdoors in that frequency band in Canada.
Operation in the Frequency Bands 5470-5725-MHz and 5725-5850-MHz
Until further notice, devices subject to this section shall not be capable of transmitting in the band from 5600-5650-MHz. This restriction is for the protection of Environment Canada’s weather radars operating in this band. Users are advised that high-power radars are allocated as primary users (i.e. priority users) of the bands 5250-5350 MHz and 5650-5850 MHz and that these radars could cause interference and/or damage to LE-LAN devices.
European Union and European Fair Trade Association Regulatory Compliance
This equipment may be operated in the countries that comprise the member countries of the European Union and the European Fair Trade Association. These countries, listed below, are referred to as The European Community throughout this document:
AUSTRIA, BELGIUM, BULGARIA, CYPRUS, CZECH REPUBLIC, DENMARK, ESTONIA, FINLAND, FRANCE,, GERMANY, GREECE, HUNGARY,
IRELAND, ITALY, LATVIA, LITHUANIA, LUXEMBOURG, MALTA, NETHERLANDS, POLAND, PORTUGAL, ROMANIA, SLOVAKIA, SLOVENIA, SPAIN, SWEDEN, UNITED KINGDOM, ICELAND, LICHTENSTEIN, NORWAY, SWITZERLAND
![]() Declaration of Conformity
Declaration of Conformity
Marking by this symbol:
indicates compliance with the Essential Requirements of the Radio Equipment Directive (RED) of the European Union (2014/53/EU). This equipment meets the following conformance standards:
Safety: EN 60950-1: 2006 + A11: 2009 + A1: 2010 + A12: 2011 + A2: 2013 (T-Mark License),
EN 62368-1: 2014 + A11 (T-Mark License),
EN 50332-1: 2013, EN 50332-2: 2013, EN 71-3: 2013
Additional licenses issued for specific countries available on request
EMC:
EN 301 489-1 V2.1.1 (2017-02), EN 301 489-17 V3.1.1 (2016-11)
EN 61000-4-2: 2009, EN 61000-4-3: 2006 + A1: 2008 + A2: 2010, EN 61000-4-8: 2010
The products are licensed, as required, for additional country-specific standards for the International Marketplace. Additional issued licenses are available upon request.
Radio: EN 300 328 V2.1.2 (2019-07), EN 301 893 V2.1.1 (2017-05)
SAR: EN 62311: 2008
Environmental: RoHS 2015/863 amending Annex II to 2011/65/EU, WEEE 2012/19/EU, REACH 2006/1907/EC, Packaging 94/62/EC, Battery 2006/66/EC, Toys Safety Directive 2009/48/EC
Warning! This is a Class B product. In a domestic environment, this product may cause radio interference, in which case, the user may be required to take appropriate measures.
National Restrictions
Indoor Operation The Stealth™600X Gen 2 operates in the 5150 to 5350 MHz frequency band and is restricted to indoor use only! Antenna The Stealth™
600X Gen 2 has integrated antennas that cannot be replaced.
Power Level Control The Stealth™600X Gen 2 does not allow for customized power level control.
Operating Frequency The operating frequency of the Stealth™600X Gen 2 is determined by the host console system. As such, it is important that the host console system is correctly configured to meet the local regulations.
![]() This symbol on the product or its packaging indicates that this product must not be disposed of with your other household waste. Instead, it is your responsibility to dispose of your waste equipment by handing it over to the designated collection point for the recycling of waste electrical and electronic equipment. The separate collection and recycling of your waste equipment at the time of disposal will help conserve natural resources and ensure that it is recycled in a manner that protects human health and the environment. For more information about where you can drop off your waste for recycling, please contact your local authority, or where you purchased your product.
This symbol on the product or its packaging indicates that this product must not be disposed of with your other household waste. Instead, it is your responsibility to dispose of your waste equipment by handing it over to the designated collection point for the recycling of waste electrical and electronic equipment. The separate collection and recycling of your waste equipment at the time of disposal will help conserve natural resources and ensure that it is recycled in a manner that protects human health and the environment. For more information about where you can drop off your waste for recycling, please contact your local authority, or where you purchased your product.
Turtle Beach Europe Ltd is obligated as a producer with a main activity of selling under The Producer Responsibility Obligations (Packaging Waste) Regulations 2007. To fulfill our obligation we are registered with Comply Direct and their Recycling Room. Here you will find advice and information on packaging waste management, recycling symbols, and the waste hierarchy principles of reducing, reusing, and recycling.
https://www.complydirect.com/the-recycling-room/
Please visit the following URL for a complete copy of the Declaration of Conformity: http://www.turtlebeach.com/homologation
Mexican IFT-008 Compliance Statement
To access the rating label:
- Remove the left ear pad by pulling the ear pad straight up using your thumb.
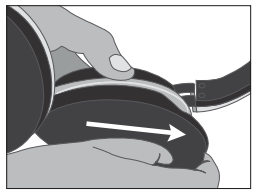
- Once you’ve released the cloth from the lip on top, pull the earpad straight back and it should slip right off.
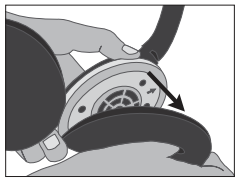 To replace the ear pad, follow the same process in reverse.
Not seeing what you’re looking for here?
Visit turtlebeach.com/support for the latest Tech Support information.
]]>
User Manual
- Elite Pro 2 Headset (A)
- Mic Boom (B)
- Elite SuperAmp (C)
- Headset Audio Cable (D)
- USB Power & Audio Cable (E)

Important: Update Before Using
Make sure to update to the newest firmware for the best audio experience. Connect to the Turtle Beach Audio Hub for Windows or Mac to update firmware, and for iOS and Android to customize your sound further.
HEADSET SETUP

IN-LINE CONTROLS

- Mic Mute Switch
- Switch to mute the microphone. Mic is muted when red line is visible on Mic Mute Switch.
CONTROLS AND FEATURES

- USB Power & Audio
- Stream-Out for Recording Streaming Audio on PC

- Master Volume Control
- Headset Connection
- Bluetooth Multi-Function Button
SETUP FOR XBOX ONE

- Set the SuperAmp to Xbox One Mode (Green Center LED On) – (Xbox One Mode is the Default Setting)
- Press the Xbox button on your controller.
- Go to the System tab (gear icon) >> Settings >> Display and Sound >> Volume.
- Set Party Chat Output to Headset.
SURROUND SOUND SETUP
- Press the Xbox button on your controller.
- Go to the System Tab (gear icon) >> Settings >> Display and Sound >> Audio Output.
- Set Headset Format to Windows Sonic for Headphones.
Xbox/PC mode can be selected using the Audio Hub for Android/iOS.
PC SETUP

- Set the SuperAmp to PC Mode – (PC Mode can be set using the Android/iOS Audio Hub)
- Right-Click the Speaker icon in your Toolbar and select Playback Devices.
- Right-Click Elite SuperAmp PC and select Set As Default Device.
- Right-Click Elite SuperAmp PC and select Set As Default Communication Device.
- Select the Recording Tab.
- Right-Click Elite SuperAmp PC and select Set As Default Device.
MOBILE SETUP

For those who game with glasses, adjust the ProSpecs™ Glasses Friendly System for added comfort.
1. The ProSpecs Glasses Relief System creates a channel in the ear cushion to help reduce pressure on your glasses frame. In order to adjust this, you must firmly remove the magnetic ear cushion. Hold the ear cushion firmly and pull it away from the speaker. The ear cushion is held there magnetically and should come off with minimal effort.

2. Depending on the size of your glasses frame, use the tab adjustment to create the appropriate sized channel in the ear cushion. By default, the adjustment tab is set to the shallowest setting. To increase the size/depth of the channel in the ear cushion, simply pull the tab and attach it to the post based on your preference.

3. After you’ve adjusted the glasses-friendly channel to your liking, place the ear cushion back on the speaker. The ear cushion is held there magnetically and should snap back into place with minimal effort. Please make sure to line up the magnets on the ear cushion with the magnets on the headset itself, as shown.

PAIRING

- Hold down Bluetooth Button until the LEDs begin to pulse Green.
- Connect to your headphones in your phone or Tablet Bluetooth settings.
BLUETOOTH FUNCTIONS
| FUNCTION | ACTION |
| Play/Pause Skip Forward Fast Forward Skip Back Rewind |
Press Once Press Twice Quickly Press Twice Quickly and Hold Press Three Times Quickly Press Three Times Quickly and Hold |
| Answer Call End Call Reject Incoming Call |
Press Once Press Once Press and Hold |
| Activate Voice Recognition (if available) | Press and Hold When not in a Call |
Mic/Audio Not Working – Check Setup
If your headset is experiencing any of the following symptoms, please review the instructions below:
- SuperAmp volume control has no effect
- Center (“Palm Tree”) logo is always red
- You can’t be heard in chat
If you are experience any of the above, it’s possible the headset is not set up correctly. If you are having the above issues, please confirm the following to ensure that the headset is set up properly.
Make sure the headset is set up as shown below.
NOTES:
- The headset’s main cable should be connected to the “Headset” jack in the front of the SuperAmp. This jack will have an icon of a headset above it. If the headset’s cable is plugged into the jack with the word “Out” above it (located on the back of the SuperAmp), the headset is plugged into the wrong jack. The jack with the word “Out” above it is the Stream Out jack. The headset would need to be plugged into the “Headset” jack in order to hear the game and chat audio.
- The headset’s main cable ends are not interchangeable. The plug with three black stripes should be plugged into the Headset jack on the front of the SuperAmp. The plug with four black stripes should be plugged into the headset jack on the headset itself. Both of these jacks — on the SuperAmp and the headset itself — will have icons of a headset just above them.
- Make sure to fully insert the cable into the jack on the headset. It is a snug fit, and you should feel the plug slide into place twice. The cable is not fully inserted/plugged in until the plug slides into place the second time. An easy way to check if your headset cable is plugged in all the way is to make sure that the headset and mic icons (located on the headset and mic boom, respectively) are lined up with each other.
- The mic should be plugged into the mic jack on the headset itself. This jack will have the image of a mic just above it.
- The mic mute on the headset’s main cable will have a red line showing when the mic is muted. If you can see that red line, the mic is muted; move the mic mute switch so that you cannot see that red line. The mic will be unmuted, and you should be able to be heard.
Party Chat Echo
Symptoms:
- Audio Issues
- Echoing (Other people in chat can hear themselves echoing)
To avoid echoing in the party chat, please do the following.
1. Headset/Mic Are Connected Securely
Make sure to set the headset up as shown below:
SUPERAMP CONNECTIONS:
The headset’s main cable ends are not interchangeable. The plug with three black stripes should be plugged into the audio jack on the front of the SuperAmp.
This jack will have an icon of a headset above it. If the headset’s cable is plugged into the jack with the word “Out” above it (located on the back of the SuperAmp), the headset is plugged into the wrong jack. The jack with the word “Out” above it is the Stream Out jack.
The headset would need to be plugged into the “Headset” jack in order to hear the game and chat audio.
HEADSET CONNECTIONS
The headset’s main cable ends are not interchangeable. The plug with four black stripes should be plugged into the headset jack on the headset itself. Like the SuperAmp, this jack will have an icon of a headset just above it.
Make sure to fully insert the cable into the jack on the headset. It is a snug fit, and you should feel the plug slide into place twice. The cable is not fully inserted/plugged in until the plug slides into place the second time. An easy way to check if your headset cable is plugged in all the way is to make sure that the headset and mic icons (located on the headset and mic boom, respectively) are lined up with each other.
2. Lower The Volume, Adjust Game/Chat Balance
If the volume is set too high, there may be some echoing in the game chat. Lowering the volume can help to avoid echoing. To lower the volume, move the dial on the SuperAmp itself counter-clockwise.
In addition, make sure the Game/Chat balance is set more in favor of the game. In the Turtle Beach Audio Hub, adjust the Game/Chat balance slider until there is no echo. An image of the slider in question is shown below:
If you are still having issues with echoing in the Party chat, please contact our support team.
PC Setup
To set up your Elite Pro 2 + SuperAmp for Xbox One for use with a PC, please do the following.
First, plug the mic into the headset. To do so, make sure the keyed parts of the mic boom and mic jack line up, and then gently plug the mic in until you hear a click.
Then, plug the headset into the SuperAmp with the included cable. Make sure the end of the cable with the “Connect This End to Headset” is the side that is plugged into the headset; the other side will need to be plugged into the port on the SuperAmp with the headset icon next to it.
Make sure to fully insert the cable into the jack on the headset. It is a snug fit, and you should feel the plug slide into place twice. The cable is not fully inserted/plugged in until the plug slides into place the second time. An easy way to check if your headset cable is plugged in all the way is to make sure that the headset and mic icons (located on the headset and mic boom, respectively) are lined up with each other.
Then, plug the Mini-USB end of the included USB Cable into the SuperAmp, and plug the USB end of the same cable into a USB Port on your PC, as shown below.
” alt=”PC_Setup.PNG” width=”620″ height=”407″ data-ezsrc=”https://manuals.plus/ezoimgfmt/turtlebeach–c.na137.content.force.com/sfc/dist/version/download/?oid=00DU0000000Jga6&ids=0684U00000BWLTK&d=%2Fa%2F4U000000smsA%2F8qjWtTNYQnhaPm2pF8nq46flB6Y2cuOh1JqfZ63dfcE&asPdf=false” />
Then, set the SuperAmp to PC Mode in mobile version of the Turtle Beach Audio Hub (available here for Android and iOS).
Right-click the Speaker Icon in your Toolbar. If you have Windows 10, select “Open Sound Settings”; otherwise, select “Playback Devices”.
Set the Elite SuperAmp PC as the Default Recording Device and Default Playback Device.
Then, scroll down; under “Related Settings”, select “Sound Control Panel”. Go to the Recording Devices tab, right-click the Elite SuperAmp PC, and set the Elite SuperAmp PC as the Default Communication Device.
You are now ready to use your Elite Pro 2 + SuperAmp for Xbox One headset with a PC!
Setup For Xbox Series X|S
Our current lineup of “Designed For Xbox” headsets — which are all currently available for Xbox One — will be compatible for the next generation of Xbox: Xbox Series X and Xbox Series S.
To set your wired headset up for use with an Xbox Series X or Xbox Series S console, please do the following:
1. Plug the headset and SuperAmp in, as shown below.
Then, configure the Windows Sonic Surround Sound by following the steps below.
1. While in the Home screen, press the Xbox button on the controller. You’ll see the following screen:
2. Navigate to the Profile & System Tab, and select “Settings“.
3. Go to General >> Volume & Audio Output
4. In the Headset Audio column (right side of the screen), set Headset Format to Windows Sonic For Headphones.
Xbox One Setup
To set up your Elite Pro 2 + SuperAmp for Xbox One for use with a Xbox One console, please do the following.
First, plug the mic into the headset. To do so, make sure the keyed parts of the mic boom and mic jack line up, and then gently plug the mic in until you hear a click.
Then, plug the headset into the SuperAmp with the included cable. Make sure the end of the cable with the “Connect This End to Headset” is the side that is plugged into the headset; the other side will need to be plugged into the port on the SuperAmp with the headset icon next to it.
Make sure to fully insert the cable into the jack on the headset. It is a snug fit, and you should feel the plug slide into place twice. The cable is not fully inserted/plugged in until the plug slides into place the second time. An easy way to check if your headset cable is plugged in all the way is to make sure that the headset and mic icons (located on the headset and mic boom, respectively) are lined up with each other.
Then, plug the Mini-USB end of the included USB Cable into the SuperAmp, and plug the USB end of the same cable into a USB Port on your Xbox One console.
If the SuperAmp is not set to Xbox One Mode, go to the Turtle Beach Audio Hub, and switch the SuperAmp to Xbox One Mode.
Then, press the Xbox button on your controller, and go to the System tab (gear icon) >> Settings >> General >> Voice & Audio Output.
- Set Party Chat Output to Headset
- Set Headset Format to Windows Sonic for Headphones
Once the headset and surround sound are configured, you’re ready to use your Elite Pro 2 + SuperAmp for Xbox One headset with your Xbox One console!
Mac Setup
To set up your Elite Pro 2 + SuperAmp for Xbox One for use with a Mac computer, please do the following.
First, plug the mic into the headset. To do so, make sure the keyed parts of the mic boom and mic jack line up, and then gently plug the mic in until you hear a click.
Then, plug the headset into the SuperAmp with the included cable. Make sure the end of the cable with the “Connect This End to Headset” is the side that is plugged into the headset; the other side will need to be plugged into the port on the SuperAmp with the headset icon next to it.
Make sure to fully insert the cable into the jack on the headset. It is a snug fit, and you should feel the plug slide into place twice. The cable is not fully inserted/plugged in until the plug slides into place the second time. An easy way to check if your headset cable is plugged in all the way is to make sure that the headset and mic icons (located on the headset and mic boom, respectively) are lined up with each other.
Then, plug the Mini-USB end of the included USB Cable into the SuperAmp, and plug the USB end of the same cable into a USB Port on your Mac, as shown below.
” alt=”PC_Setup.PNG” width=”620″ height=”407″ data-ezsrc=”https://manuals.plus/ezoimgfmt/turtlebeach–c.na137.content.force.com/sfc/dist/version/download/?oid=00DU0000000Jga6&ids=0684U00000BWLTK&d=%2Fa%2F4U000000smsA%2F8qjWtTNYQnhaPm2pF8nq46flB6Y2cuOh1JqfZ63dfcE&asPdf=false” />
Then, set the SuperAmp to PC Mode in the mobile version of the Turtle Beach Audio Hub (available here for Android and iOS).
Open System Preferences, and then click on “Sound” to open the Sound Settings.
In the Input tab, select “Elite SuperAmp PC“.
In the Output tab, select “Elite SuperAmp PC“.
You are now ready to use your Elite Pro 2 + SuperAmp for Xbox One headset with a Mac!
Turtle Beach Audio Hub – Increase Volume With Custom Preset
Please note that this article applies only to the mobile version of the Turtle Beach Audio Hub; these customizations cannot be made through the desktop version of the Turtle Beach Audio Hub.
The Elite Pro 2 + SuperAmp comes with 4 presets for both Game and Stream: Superhuman Hearing; Bass Boost; Bass and Treble Boost; Vocal Boost
You can use one of these presets, or you can create your own new custom Preset to further enhance and customize your audio experience. To learn how to create custom Presets, please click here.
Want louder audio? More bass, or more treble? Create a custom Preset to boost the Bass, the Treble, or simply raise all of the audio to your liking!
Increase the Volume
To increase the volume, please do the following:
Tap the current Game Preset in the Home Screen of the Audio Hub; in the following example, the current Game Preset is “Signature Sound”.
In the Create Game Preset banner, select “Create”.
Set the Treble, Bass, and Mid sliders all the way to the right, and tap “Save”.
Name the Preset, and tap “Store”.
Select the new preset in the list of available presets. The volume will be louder, and the Bass, Treble, and Mid will be boosted.
Turtle Beach Audio Hub Features & Controls
The Elite Pro 2 + SuperAmp for Xbox One offers features that can be customized with the Turtle Beach Audio Hub for both Android and iOS.
Please note that this article applies only to the mobile version of the Turtle Beach Audio Hub; these customizations cannot be made through the desktop version of the Turtle Beach Audio Hub. The desktop version of the Turtle Beach Audio Hub would be for firmware updates only.
You can download the Turtle Beach Audio Hub app here.
Once the Turtle Beach Audio Hub is downloaded on your smartphone/mobile device, and the SuperAmp is paired via Bluetooth to that device, you’ll be able to use all of the features of the Turtle Beach Audio Hub, including customizing the audio, the headset controls, and even creating presets to use with your Elite Pro 2 headset!
Please note: While the screenshots in this article are of the Android version of the Audio Hub app, the screens shown for the iOS version of the App will appear either the same or similar.
- Game/Chat Mix
- This will control the balance between the amount of Game audio you hear, and the amount of Chat audio you hear. If this is set closer to the word Chat, you’ll hear more Chat audio than Game audio; if this is set closer to the word Game, you’ll hear more Game audio than Chat audio. If this set all the way to one side or the other, you will hear only the Game audio, or only the Chat audio. For an equal balance of Game and Chat audio, set this in the middle.
- Mic Monitor
- The Mic Monitor feature allows you to hear yourself through the headset when you speak into the mic. This setting allows you to adjust the volume of your own voice in the headset when you speak into the mic. If this is set all the way to the left, you will not hear your own voice. If this is set all the way to the right, you will hear your own voice loudly.
- Superhuman Hearing
- This toggle allows you to engage Superhuman Hearing, which allows you to hear far-off noises like enemy footsteps or weapons reloads in crucial moments — and then disengage Superhuman Hearing when you no longer need it.
- Chat Boost
- When engaged, Chat Boost automatically raises the chat audio when the Game audio is raised/gets louder.
- Game Preset
- This adjusts the game audio you hear through the headset. The headset comes with the following four Presets: Signature Sound; Bass Boost; Bass + Treble Boost; Vocal Boost.
- You can also create custom Game Presets to use. See Presets Customization below, or click here for more information.
- This adjusts the game audio you hear through the headset. The headset comes with the following four Presets: Signature Sound; Bass Boost; Bass + Treble Boost; Vocal Boost.
- Voice Prompt Level
- This setting controls how loud the voice prompts that you hear in your headset play. These prompts play when powering the Bluetooth on, and when pairing the Bluetooth. If you turn this all the way down, you will not hear the Voice Prompts at all. (You will also get a message telling you that you have muted the Voice Prompts and will not be able to hear them.)
- Tones Level
- This setting controls how loud the tones that you hear in your headset play. These tones play when engaging and disengaging certain features. If you turn this all the way down, you will not hear the Tones at all. (You will also get a message telling you that you have muted the Tones and will not be able to hear them.)
- Do Not Disturb (Android Only)
- If your phone supports this feature this will turn on/off its Do Not Disturb function. This will prevent your phone from ringing/vibrating when receiving calls/texts when you’re trying to take a game seriously.
- Mic Noise Gate
- This makes it easier to ensure your voice is coming through the mic, instead of background noise.
- LED Mode
- This control allows you to cycle the SuperAmp’s LEDs through the three available modes: Normal (LEDs are lit solid); Stealth (LEDs are off); Audio Meter (the volume LED will vary depending on the amount and volume of the incoming audio).
- LED Color
- When the mic is disconnected/muted, this LED will be Red. When the mic is connected and unmuted, you can change the color of the SuperAmp’s center LED. You can also create custom colors.
- See Presets Configuration below for more information on custom LED colors.
- When the mic is disconnected/muted, this LED will be Red. When the mic is connected and unmuted, you can change the color of the SuperAmp’s center LED. You can also create custom colors.
- LED Brightness
- Set this all the way to the right, and the SuperAmp LEDs will light up brightly. Set this all the way to the left, and the SuperAmp LEDs will be very dim/off.
- Stream Preset
- Use the Stream Presets to adjust your outgoing audio when you stream. The headset comes with the following four Presets: Signature Sound; Bass Boost; Bass + Treble Boost; Vocal Boost.
- You can also create custom Stream Presets to use. See Presets Customization below, or click here for more information.
- Use the Stream Presets to adjust your outgoing audio when you stream. The headset comes with the following four Presets: Signature Sound; Bass Boost; Bass + Treble Boost; Vocal Boost.
- Stream Out Game Level
- Adjust how much of your stream audio is Game audio.
- Stream Out Mic Level
- Adjust the volume of your mic in your stream audio.
The information screen will have some important information about your headset. This will include the version number for both the mobile app, as well as for the SuperAmp’s firmware.
The Configuration toggle allows you to easily switch between PC Mode and Xbox Mode.
The FAQ option leads to our support site (which you are reading right now!)
At the top left of the screen, you’ll see a button, which opens the sidebar menu.
This menu will include the following options: First Person Shooter; Streamer; Indie; Battle Royale; Racing
Each option will bring up a front screen with controls specifically chosen for these experiences. You’ll also see a message that this screen will keep your phone display open. This is for easy access to those controls.
To get back to the main Audio Hub pages, simply press that Sidebar button, and then select “Home”. If your phone has a “Back” button, you can also press that button to go back to the main pages of the Audio Hub.
First Person Shooter
- Superhuman Hearing Toggle
- Game/Chat Mix
- Mic Monitor
- Chat Boost
- Game Preset
Streamer
- Game/Chat Mix
- Mic Monitor
- Stream Out Mic Level
- Stream Out Game Level
- Stream Preset
Indie
- Game/Chat Mix
- Mic Monitor
- Game Preset
Battle Royale
- Superhuman Hearing Toggle
- Game/Chat Mix
- Mic Monitor
- Chat Boost
- Game Preset
Racing
- Game/Chat Mix
- Mic Monitor
- Chat Boost
The Elite Pro 2 + SuperAmp comes with 4 presets for both Game and Stream: Superhuman Hearing; Bass Boost; Bass and Treble Boost; Vocal Boost
You can use one of these presets, or you can create your own new custom Preset to further enhance your audio experience. Customize your gaming experience even further by creating a custom LED color for your SuperAmp!
The process to create a new custom Preset or custom LED color is as follows:
In the screen that includes the kind of Preset you want to create, click on the Preset that is currently set. Then, adjust the levels to your liking, give your new Preset a name, and save that Preset.
You can then use your new custom Preset by selecting it in the list of available Presets.
Below, you can find a deeper look at creating new custom Presets and LED Colors.
Game Preset
In the screen below, the current Game Preset is “Signature Sound”. To change the preset, or to create a new custom preset, tap “Signature Sound”.
Doing so will take you to the following page:
You will see a list of available presets. Below the Game Preset banner, there is a “Custom Preset” banner, with a “Create” button. Tap that “Create” button to bring up the Custom Game Preset screen.
The Custom Game Preset will have three sliders: Treble, Mid, and Bass. Adjust these three sliders to adjust the levels of the Treble, Mid, and Bass audio. Setting a slider all the right will turn that particular setting all the way up, while setting a slider all the way to the left will turn that particular setting all the way down. When you have adjusted the levels to your liking, click “Save”.
Then, name your custom Preset, and click “Store”.
Your new custom Preset will appear in the list of available presets.
If you need to delete a custom Game Preset, swipe the Preset to the left of the screen. A delete button will appear. Simply tap the delete button (Android), or swipe the delete button to the left (iOS), and the Preset will be deleted.
Stream Preset
In the screen below, the current Stream Preset is “Signature Sound”. To change the preset, or to create a new custom preset, tap “Signature Sound”.
Doing so will take you to the following page:
You will see a list of available presets. Below the Stream Preset banner, there is a “Custom Preset” banner, with a “Create” button. Tap that “Create” button to bring up the Custom Stream Preset screen.
The Custom Stream Preset will have three sliders: Treble, Mid, and Bass. Adjust these three sliders to adjust the levels of the Treble, Mid, and Bass audio. Setting a slider all the right will turn that particular setting all the way up, while setting a slider all the way to the left will turn that particular setting all the way down. When you have adjusted the levels to your liking, tap “Save”.
Then, name your custom Preset, and tap “Store”.
Your new custom Preset will appear in the list of available presets.
If you need to delete a custom Stream Preset, swipe the Preset to the left of the screen. A delete button will appear. Simply tap the delete button (Android), or swipe the delete button to the left (iOS), and the Preset will be deleted.
Create Custom LED Colors
You can also manage the color of — and create new colors for — the SuperAmp’s central LED.
Please keep in mind that if the mic is disconnected, or is muted, the SuperAmp LED will be red, even if a different color is selected as the current color.
In the screen below, the color is set to “Green”. To change the LED color, or to create a new color, tap “Green”.
Doing so will take you to the following page:
You will see a list of available colors. Below the LED Color Preset banner, there is a “Custom Preset” banner, with a “Create” button. Tap that “Create” button to bring up the Custom LED Color Preset screen.
You’ll then see three sliders, one each for Red, Green, and Blue.
Adjust each slider to change the color of the LED itself. Setting a slider all the right will turn that particular setting all the way up, while setting a slider all the way to the left will turn that particular setting all the way down. When you have adjusted the color to your liking, tap the “Save” button.
Then, name and Store your new custom LED color.
It will appear in the list of available LED colors.
If you need to delete a custom LED color Preset, swipe the Preset to the left of the screen. A delete button will appear. Simply tap the delete button (Android), or swipe the delete button to the left (iOS), and the Preset will be deleted.
Turtle Beach Audio Hub – Create and Manage Presets
Please note that this article applies only to the mobile version of the Turtle Beach Audio Hub; these customizations cannot be made through the desktop version of the Turtle Beach Audio Hub.
The Elite Pro 2 + SuperAmp comes with 4 presets for both Game and Stream: Superhuman Hearing; Bass Boost; Bass and Treble Boost; Vocal Boost
You can use one of these presets, or you can use the Turtle Beach Audio Hub to create your own new custom Preset to further enhance your audio experience. Customize your gaming experience even further by creating a custom LED color for your SuperAmp!
The process to create a new custom Preset or custom LED color is as follows:
You can download the Turtle Beach Audio Hub app here.
In the Audio Hub screen that includes the kind of Preset you want to create, click on the Preset that is currently set. Then, adjust the levels to your liking, give your new Preset a name, and save that Preset.
You can then use your new custom Preset by selecting it in the list of available Presets.
Below, you can find a deeper look at creating new custom Presets and LED Colors.
Create a Custom Game Preset
Creating a new custom Game Preset is simple and easy. To create a new custom Game Preset, please do the following.
In the screen below, the current Game Preset is “Signature Sound”. Tap “Signature Sound”.
Doing so will take you to the following page:
You will see a list of available presets. Below the Game Preset banner, there is a “Custom Preset” banner, with a “Create” button. Tap that “Create” button to bring up the Custom Game Preset screen.
The Custom Game Preset will have three sliders: Treble, Mid, and Bass. Adjust these three sliders to adjust the levels of the Treble, Mid, and Bass audio.
The closer the slider is to the right-side of the screen, the louder that particular setting will be. If the Treble, Mid, and Bass are all set to the right-side of the screen, all three of those settings will be turned all the way up. With the sliders set all the way up, the volume will be louder, and the level of Treble, Mid, and Bass will be boosted.
When you have adjusted the levels to your liking, click “Save”.
Then, name your custom Preset, and click “Store”.
Your new custom Preset will appear in the list of available presets.
If you need to delete a custom Game Preset, swipe the Preset to the left of the screen. A delete button will appear. Simply tap the delete button (Android), or swipe the delete button to the left (iOS), and the Preset will be deleted.
Create A Custom Stream Preset
In the screen below, the current Stream Preset is “Signature Sound”. To change the preset, or to create a new custom preset, tap “Signature Sound”.
Doing so will take you to the following page:
You will see a list of available presets. Below the Stream Preset banner, there is a “Custom Preset” banner, with a “Create” button. Tap that “Create” button to bring up the Custom Stream Preset screen.
The Custom Stream Preset will have three sliders: Treble, Mid, and Bass. Adjust these three sliders to adjust the levels of the Treble, Mid, and Bass audio. Setting a slider all the right will turn that particular setting all the way up, while setting a slider all the way to the left will turn that particular setting all the way down. When you have adjusted the levels to your liking, tap “Save”.
Then, name your custom Preset, and tap “Store”.
Your new custom Preset will appear in the list of available presets.
If you need to delete a custom Stream Preset, swipe the Preset to the left of the screen. A delete button will appear. Simply tap the delete button (Android), or swipe the delete button to the left (iOS), and the Preset will be deleted.
Create Custom LED Colors
You can also manage the color of — and create new colors for — the SuperAmp’s central LED.
Please keep in mind that if the mic is disconnected, or is muted, the SuperAmp LED will be red, even if a different color is selected as the current color.
In the screen below, the color is set to “Green”. To change the LED color, or to create a new color, tap “Green”.
Doing so will take you to the following page:
You will see a list of available colors. Below the LED Color Preset banner, there is a “Custom Preset” banner, with a “Create” button. Tap that “Create” button to bring up the Custom LED Color Preset screen.
You’ll then see three sliders, one each for Red, Green, and Blue.
Adjust each slider to change the color of the LED itself. Setting a slider all the right will turn that particular setting all the way up, while setting a slider all the way to the left will turn that particular setting all the way down. When you have adjusted the color to your liking, tap the “Save” button.
Then, name and Store your new custom LED color.
It will appear in the list of available LED colors.
If you need to delete a custom LED color Preset, swipe the Preset to the left of the screen. A delete button will appear. Simply tap the delete button (Android), or swipe the delete button to the left (iOS), and the Preset will be deleted.
FAQ
Is the Elite Pro 2 + Elite SuperAmp for Xbox One wired/wireless?
The Elite Pro 2 + Elite SuperAmp for Xbox One connects wired to the Xbox One Console via USB. You can then connect to your phone wireless through Bluetooth to listen to music and make phone-calls while gaming.
Are there controls on the cable?
The Elite Pro 2 cable includes a Mic Mute switch. Volume and all other features are either controlled on the Elite SuperAmp 2 or the Audio Hub for iOS/Android
Is the mic removable?
Yes, the microphone is removable.
Is the Elite Pro 2 + Elite SuperAmp for Xbox One surround sound?
Yes, the Elite Pro 2 + Elite SuperAmp for Xbox One supports the Xbox One console’s available Surround/Spatial Sound formats: Windows Sonic for Headphones & Dolby Atmos for Headphones.
More information on these audio formats may be found here: https://support.xbox.com/en-US/xbox-one/console/windows-sonic-and-dolby-atmos-headset-options-and-help-on-xbox-one
Can I use the Elite Pro 2 + SuperAmp with Bluetooth?
Yes, the Elite SuperAmp has built-in Bluetooth. Simply pair the SuperAmp to your desired Bluetooth-compatible device, plug the headset into the SuperAmp, and you can listen to music and take calls while you’re gaming. You can also control and configure your Audio using the Turtle Beach Audio Hub mobile app.
Will I be able to use this wirelessly with Xbox One?
While specifically designed to be use with a wired connection to the console via the included Elite SuperAmp, the headset itself (without the Elite SuperAmp) can also be used with devices featuring a 3.5mm headset jack, including wireless Xbox One controllers.
How are the black and white Elite Pro 2 + SuperAmps different?
The Black Elite Pro 2 + SuperAmp is designed for PlayStation 4. The White Elite Pro 2 + SuperAmp is designed for Xbox One. The Headset themselves are functionally the same but the Elite SuperAmps were specifically designed for their respective consoles, and as such use different methods for USB Connections and Audio Processing. As a result it is important that you buy the correct one for your console, as the Elite SuperAmps themselves are not compatible for the alternate console.
Elite Pro 2 + SuperAmp for PS4
Elite Pro 2 + SuperAmp for Xbox One
Does the Elite Pro 2 + Elite SuperAmp for Xbox One work with the PlayStation 4?
The Elite Pro 2 + Elite SuperAmp for Xbox One is designed specifically for the Xbox One. However, the Elite Pro 2 Headset (without the Elite SuperAmp) uses a standard 3.5mm headset connector. This means that just the headset can be connected to many devices like phones, tablets or PS4 Controllers. When used this way you will not be able to take advantage of all the features of the Elite SuperAmp.
Is the Elite Pro 2 + SuperAmp for Xbox One compatible with PC/Mac?
Yes, the Elite SuperAmp has two different modes. One is meant for use on Xbox One and the other PC/Mac. Both the Xbox One mode and the PC/Mac mode use the USB Path for Game, Chat, and Mic Audio. Please note that Windows 10 in particular is required for Windows Sonic Surround Sound.
SuperAmp Quick Start Guide
You can also view the contents of that guide below.
- Elite SuperAmp For Xbox One (A)
- USB Power & Audio Cable (B)
Important: Update Before Using
Update your headset with the Turtle Beach Audio Hub for Windows and Mac for the latest features.
- USB Power & Audio
- Stream Out For Recording Streaming Audio on PC
- Master Volume Control
- Bluetooth Multifunction Button
- Headset Connection
- Set the SuperAmp to Xbox One Mode (Green Center LED On) — Default Setting
- Press the Xbox Button on your controller
- Go to the System tab (gear icon) >> Settings >> Display & Sound >> Volume
- Set Party Chat Output to Headset
SURROUND SOUND SETUP
- Press the Xbox Button on your controller
- Go to the System tab (gear icon) >> Settings >> Display & Sound >> Audio Output
- Set Headset Format to Windows Sonic For Headphones
Xbox/PC Mode can be selected using the Audio Hub for Android/iOS.
- Set the SuperAmp to PC Mode (Green Center LED On) — Set using the Android/iOS Audio Hub
- Right-Click the Speaker icon in your Toolbar and select Playback Devices
- Right-Click Elite SuperAmp PC and select Set As Default Device
- Right-Click Elite SuperAmp PC and select Set As Default Communication Device
- Select the Recording Tab
- Right-Click Elite SuperAmp PC and select Set As Default Device
Xbox/PC Mode can be selected using the Audio Hub for Android/iOS.
- Hold down the Bluetooth Button until the LEDs begin to pulse Green
- Connect to your headphones in your phone or tablet Bluetooth settings
FUNCTIONS
| FUNCTION | ACTION |
| Play/Pause Skip Forward Fast Forward Skip Back Rewind |
Press Once Press Twice Quickly Press Twice Quickly and Hold Press Three Times Quickly Press Three Times Quickly and Hold |
| Answer Call End Call Reject Incoming Call |
Press Once Press Once Press and Hold |
| Activate Voice Recognition (if available) | Press and Hold When not in a Call |
]]>
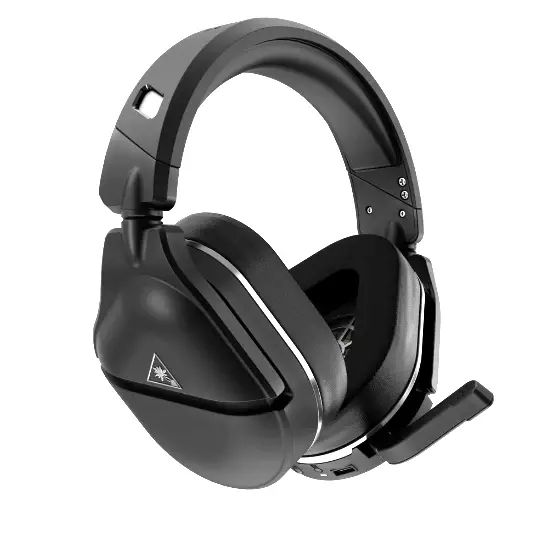
User Manual
- Stealth 700 Gen 2 Headset (A)
- Stealth 700 Gen 2 Mini Transmitter (B)
- USB-C Charging Cable (C)
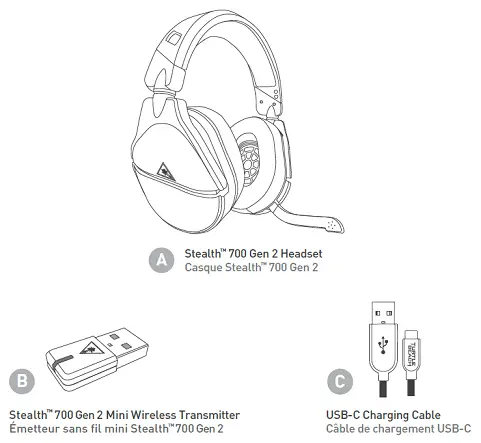
Please make sure your headset is updated with the latest firmware.
Connect to the Turtle Beach Audio Hub for Windows or Mac to update firmware.
Customize your settings with the Turtle Beach Audio Hub mobile app for Android and iOS.

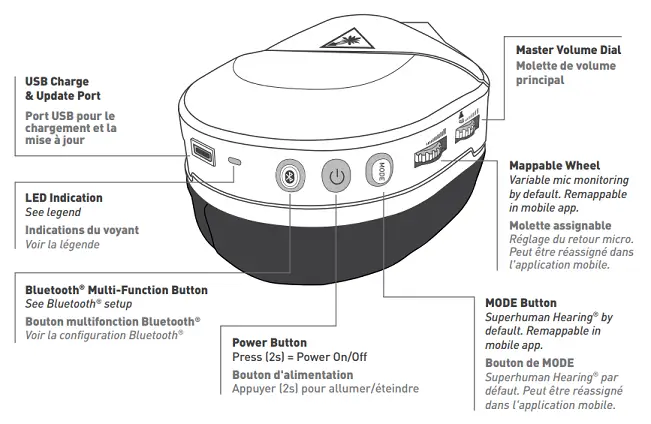
- USB Charge & Update Port
- LED Indication
- See legend
- Bluetooth Multi-Function Button
- See Bluetooth Setup
- Power Button
- Press (2s) – Power On/Off
- Mode Button
- Default function: Engage/Disengage Superhuman Hearing. Remappable in mobile app.
- Mappable Wheel
- Default function: Variable Mic Monitor Volume Control. Remappable in mobile app.
- Master Volume Dial

Use Superhuman Hearing Mode to pinpoint quiet audio cues like enemy footsteps and weapon reloads.
During gameplay, you can activate and deactivate Superhuman Hearing by pressing the MODE button once, quickly.
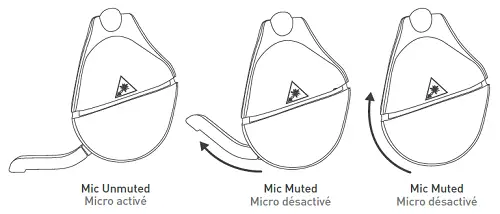
Flip up mic to mute. There is an audible tone when the mic is muted (high low) or unmuted (low high).
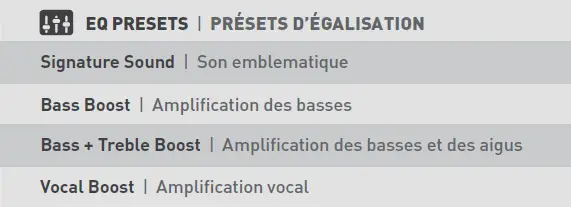
EQ Presets are available through the Turtle Beach Audio Hub mobile app, available here. The EQ Presets include the following:
- Signature Sound
- Bass Boost
- Bass + Treble Boost
- Vocal Boost

The Mode Button and Mappable Wheel can be assigned to a new function based on your gaming style.
To change the button’s assignment, follow these steps:
- Download the Turtle Beach Audio Hub mobile app on your iOS or Android device.
- Enable Bluetooth on your selected device, and pair with your headset to access the app.
- Swipe to the second settings screen to assign new functions.
- Once selected, your headset will save this configuration.
1. Connect Mini-Transmitter to USB Port on the console.
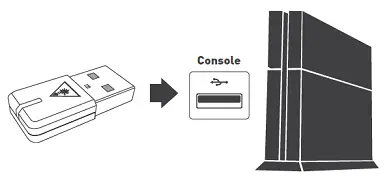
2. Power the headset on.
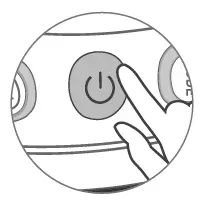
3. Go to Settings >> Devices >> Audio Devices
- Select Stealth 700 Gen 2 for Input and Output Device
- Set Output to Headphones to All Audio
- Set Volume Control (Headphones) level to maximum
- Select Adjust Microphone Level and follow the on-screen instructions to calibrate your microphone
The Stealth 700 Gen 2 gives you 20 hours of rechargeable battery life. Make sure to charge it regularly, and before storing.
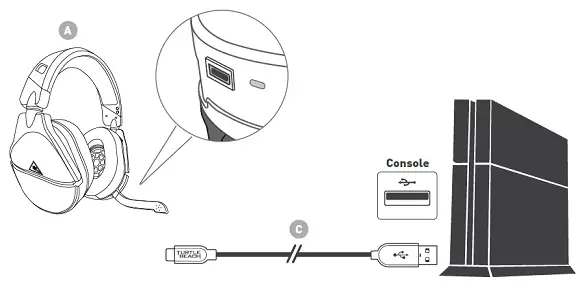
Headset Storage
Always charge your headset before storing it for any extended period of time (greater than 3 months). Never store the unit in temperatures above 113°F/45°C.
PAIRING
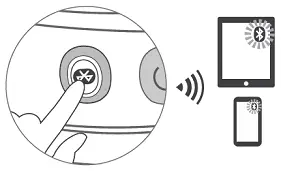
Your Stealth 700 Gen 2 will enter Bluetooth pairing mode once powered on. If no Bluetooth connection is made within 2 minutes, Bluetooth pairing mode will stop. To put your headset into Bluetooth pairing mode, follow these steps:
- Hold down the Bluetooth button on your headset until the “Bluetooth Pairing” prompt plays.
- Select the headset in your phone or tablet’s Bluetooth settings. The headset and device will pair via Bluetooth.
CONTROLS
| FUNCTION | ACTION |
| Play/Pause | Press Once |
| Skip Forward | Press Twice Quickly |
| Fast Forward | Press Twice Quickly And Hold |
| Skip Back | Press Three Times Quickly |
| Rewind | Press Three Times Quickly And Hold |
| Answer Call | (With Call Incoming) Press Once |
| End Call | (When In A Call) Press Once |
| Reject Incoming Call | (With Call Incoming) Press and Hold |
| Activate Voice Recognition (if available) | (When Not In A Call) Press and Hold |

The headset and transmitter are paired out of the box; this is indicated by a solid LED on the transmitter.
If your transmitter’s LED is double-blinking, do the following to pair your headset and transmitter.
1. Connect the Mini Transmitter into a free USB port on your console. The LED will double-blink blue as it searches for the headset.
2. Press and hold the Power button on the headset to power it on. The LED will double-blink blue as it searches for the transmitter.
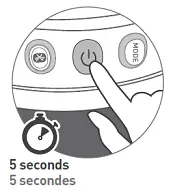
3. Within 10 seconds, the LEDs on the transmitter and headset will turn solid, indicating a successful pairing.
If your headset and transmitter are not able to pair after 30 seconds, your transmitter will begin to search for a new Stealth 700 Gen 2 PS headset to pair to.
TRANSMITTER
| TRANSMITTER LED | MEANING |
| Solid Blue | Headset And Mini Transmitter Paired |
| Double-Blink Blue | Not Paired |
| Breathing Red | Microphone Muted |
HEADSET
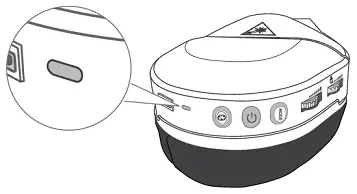
No Mic Audio
PLEASE NOTE: As of 11/25/2020, we are aware of an issue with the Stealth 700 Gen 2 PS mic, as follows: If the headset is powered on with the mic in the muted position (flipped up), the mic will not unmute.
We have released a firmware update to resolve this. Please use the Turtle Beach Audio Hub to perform that firmware update for your headset.
The Stealth 700 for Gen 2 PS has an adjustable mic. To use the mic, gently push (‘flip’) the mic forwards. You will hear a tone (low high) when the mic itself is unmuted. When the mic is fully pushed forwards, the mic will lock into position. To mute the mic, just flip the mic back the other way. You will hear a tone (high low) when the mic is muted.
” alt=”Mic_Mute.PNG” width=”500″ height=”214″ data-ezsrc=”https://manuals.plus/ezoimgfmt/turtlebeach–c.na137.content.force.com/sfc/dist/version/download/?oid=00DU0000000Jga6&ids=0684U00000BWLGf&d=%2Fa%2F4U000000smcG%2FklBhBZCJJ78cn12ZcVFacUZ5hAywaEGfK_g2rRCA_iQ&asPdf=false” />
1. Check that the Headset And Transmitter Are Paired
The Headset and Transmitter need to be paired to each other in order for the mic to work. Make sure that the Headset and Transmitter have been successfully paired.
To check if the headset and transmitter are paired, take a look at the LED on the headset and transmitter. If those LEDS are solid blue, the headset and transmitter are paired. If the LED on either is not solid, the headset may not be paired to the transmitter. Please review the following to determine whether the headset and transmitter are paired:
| TRANSMITTER LED | MEANING |
| Solid Blue | Headset and Mini Transmitter Paired |
| Double-Blink Blue | Not Paired |
| Breathing Red | Mic Muted |
| HEADSET LED | MEANING |
| Solid Blue | Headset and Mini Transmitter Paired |
| Breathing Blue | (While Charging) Battery Full |
| Double-Blink Blue | Not Paired |
| Solid Red | (While Charging) Battery Charging LED Turns Off When Battery Is Fully Charged (If Headset Is Off) |
| Breathing Red | Battery Low |
If those LEDs are double-blinking blue, please perform the following process to re-pair your headset and transmitter.
- Connect the headset’s mini-transmitter to a free USB port on the console. The LED will double-blink blue as it searches for the headset.
- Press and hold the Power Button on the headset to power it on. The LED will double-blink blue as it searches for the transmitter.
- Within 10 seconds, the LEDs on the transmitter and headset will turn solid, indicating a successful pairing.
**PLEASE NOTE: The headset’s Mic Monitoring will still continue to function even if the headset and console are not paired. You may be able to hear yourself through the headset when you speak into the mic, but if the headset itself is not paired to the console, other people would not be able to hear you until the headset and console were paired again.**
If the LEDs on both headset and transmitter are solid, but you still cannot be heard in chat, please continue to step 2.
2. The Settings are Configured
If the headset and transmitter LEDs are both solid, but you cannot be heard in chat, the settings on your console or in the game itself may not be configured for headset use.
- PS4: Go to Settings > Devices > Audio Devices and select USB Headset (Stealth 700). Go back one screen to “Adjust Microphone Level” and follow the on-screen calibration instructions. If the bar moves when you speak into the mic, you have verified that the mic is working properly.
- In addition, make sure that the settings within the actual game are configured correctly: Ensure that chat is enabled, Push-To-Talk is disabled, and that any Recording Thresholds are at the minimum settings.
If the microphone still isn’t working even with those settings configured correctly, please continue to Step 3.
3. Bluetooth Test Call
*For this test, you will need a Bluetooth-compatible smartphone.
- Hold down the headset’s Bluetooth button until you hear the “Bluetooth Pairing” voice prompt.
- Connect to your headset in your phone’s Bluetooth Settings.
- Make a test call on the phone. Be sure to keep the phone covered and away from you, to make sure that the headset’s mic is the mic picking up the sound, and not the internal microphones in the smartphone itself.
- During that test call, could you be heard clearly when you spoke into the mic?
If you can be heard clearly during that test call, the mic itself is working well.
If you cannot be heard clearly during that test call, please contact our Support Team.
4. Power Cycle Headset.
- Unplug the USB Transmitter from the console.
- Press and Hold the Power Button on the Headset until you hear the “Powering Off” voice prompt.
- Let everything sit for a few seconds.
- Press and Hold the Power Button on the Headset, until you hear the “Powering On” voice prompt.
- Plug the USB Transmitter back into the console.
- Then, re-pair the headset and transmitter.
To pair the headset:
- Connect the headset’s mini-transmitter to a free USB port on the console. The LED will double-blink blue as it searches for the headset.
- Press and hold the Power Button on the headset to power it on. The LED will double-blink blue as it searches for the transmitter.
- Within 10 seconds, the LEDs on the transmitter and headset will turn solid, indicating a successful pairing.
If the Power Cycle does not resolve this issue, please contact our Support Team.
Background Noise In PS4, PS5 Menu
Symptom:
- Audible background noise while in console menu, when used with either a PS4 or a PS5 console.
If you are experiencing audible background noise while in the console menu (either the PS4 menu or the PS5 menu), please perform a firmware update, as detailed below:
- If you have not yet done so, download the desktop version of the Turtle Beach Audio Hub. This is available for Windows and Mac here.
- Open the Audio Hub program, and plug both the transmitter and headset into free USB ports on the computer.
- The Audio Hub will automatically recognize the headset, and search for any available firmware updates. If one is available, you will be prompted to perform that update. Do not move the computer or the USB cable/headset or transmitter during this process.
- When the update process is complete, you’ll see a message that the headset’s firmware is fully up to date. Disconnect the headset and transmitter from the computer; you can now connect the headset and transmitter back to the console, and use the headset as normal.
Once the headset’s firmware update has been performed, you should be able to use the headset without issue.
Recovery Tool (Headset Unresponsive, LED/Headset Don’t Power On)
If your Stealth 700 Gen 2 PS headset is showing all of the following symptoms, it may need to be recovered:
- Headset is unresponsive
- Dark LED/LED does not light up
- Headset does not power on
- This process applies only to the Stealth 700 Gen 2 PS model. If you have a Stealth 700 Gen 2 Xbox model, please click here. If you have a Stealth 700 Gen 2 Xbox model headset, but you have used this Stealth 700 Gen 2 PS Recovery Tool with your headset, please contact our support team for further assistance.
- In order to recover your headset, you will need to download our recovery tool, available for 64-bit Windows computers only.
- This Recovery Tool is not the same as the Turtle Beach Audio Hub. A headset recovery process is unrelated to any kind of firmware update; this recovery tool is a completely different application from the Turtle Beach Audio Hub.
- During this process, the recovery tool will download and execute several large files; this can take up to five minutes to complete. Please be patient, and let the program fully execute this process. Do not close out of any of the recovery tool windows until you are notified that the process is fully complete.
To recover the headset, please do the following:
1. Download the Stealth 700 Gen 2 PlayStation recovery tool, available here.
2. Use the headset’s included USB-C cable to plug your headset into your computer. Do not connect your Turtle Beach USB transmitter to the computer for this process. If at all possible, use a different (compatible) USB cable for this process — if there is an issue with the cable itself, that can affect the results of this process.
3. Double-click the tool you downloaded to run it: “Stealth700_PlayStation_Gen2_Recovery-v2.0.6.EXE”.
4. A new window will appear, asking you to make sure your headset is connected via USB, and asking “Ready to start?” Click “Yes“. If Windows Defender asks for permission, click the “Allow Access” button to proceed. This process will take 5 minutes and will open different windows. Do not interact with any other pop-ups that appear while the recovery process is underway, and do not unplug your headset during this process.
5. Once the tool displays, “Programming Complete. Please unplug and restart your headset,” the process is complete! Unplug your headset and click “OK“.
6. Then, reconnect the headset and transmitter to the computer, and open the Turtle Beach Audio Hub. If you have not yet downloaded/installed the Turtle Beach Audio Hub, you can do so here.
The Audio Hub will detect that the headset and transmitter have been connected, and will prompt you to update the headset’s firmware. Perform that firmware update; please note that this may take a few minutes. Do not touch or move the headset or computer until that process is complete.
7. Now, once the headset’s firmware has been fully updated, you will need to pair your headset to its USB transmitter. To do so:
- Plug the USB transmitter into your PlayStation console. (The transmitter’s LED will double-blink blue as it searches for the headset.)
- Press and hold the headset’s power button to power on the headset, then release. (The headset’s LED will double-blink blue as it searches for the transmitter.)
- Within several seconds, the LEDs on the transmitter and headset will turn solid, indicating a successful pairing, and the headset will announce “Headset Paired.” (In some environments, pairing may take a couple minutes.)
8. When you power on your headset after running this tool, the headset will also announce “Pairing Bluetooth” and automatically begin Bluetooth Pairing mode (headset blinking white). It will be necessary to re-pair any Bluetooth connections you had made before running the tool.
- First, go into your smartphone/tablet’s Bluetooth settings and have it “unpair” or “forget” any Turtle Beach devices that are listed.
- Then, have your phone scan for Bluetooth devices again, and select “Stealth 700 G2 PlayStation.” For details on Bluetooth pairing, click here.
Update Firmware
For the best experience, we recommend always running the most up-to-date firmware on your headset.
| MODEL | FIRMWARE VERSION | DATE | NOTES |
| Stealth 700 Gen 2 PS | v 2.0.6 | 5/25/2021 | • Fixes general console audio bug |
Connect to the Turtle Beach Audio Hub for Windows or Mac to update the firmware.
To update your headset’s firmware, please do the following:
1. First, download the Turtle Beach Audio Hub; this is available for both Windows and Mac.
2. Once the Audio Hub has been downloaded/installed, open the program.
3. Plug the mini transmitter and the headset itself into two free USB ports on the computer. The Audio Hub program will automatically detect that the headset/mini transmitter have been connected, and will search for any available updates. If there is an available update, you will be prompted to perform that update.
In addition to updating the headset’s firmware,
you can also adjust the volume of the Tones that play when some features are engaged, such as when the mic is muted, or when the EQ preset is changed. You can do this by adjusting the Tones volume slider in the main screen of the Turtle Beach Audio Hub, when the headset/transmitter are connected to the computer.
Hard Reset Process
You may need to hard-reset your Stealth 700 Gen 2 PS headset as a part of the troubleshooting process.
To do so, please do the following:
- Hold down the Bluetooth and Mode buttons for 20 seconds. These buttons are highlighted in the image below.
” alt=”Hard-Reset.png” width=”317″ height=”117″ data-ezsrc=”https://manuals.plus/ezoimgfmt/turtlebeach–c.na137.content.force.com/sfc/dist/version/download/?oid=00DU0000000Jga6&ids=0684U00000BWKBl&d=%2Fa%2F4U000000smTT%2FfTmhM0v8ic4aYCGaAHYrW_ON1.E9HCb28O.QiO_Jfd0&asPdf=false” />
- This is a very long press — make sure that you do not release the buttons too early. Holding the buttons down for too long is better than for too short. This will hard-reset the headset, which may clear up what you are experiencing.
**If the LED remains red, please try this process again. This “long press” should force the headset to power off regardless of the state it is in.**
2. After the headset powers off completely, power the headset back on.
3. Re-pair the headset.
To re-pair the headset, please do the following:
-
Connect the Mini Transmitter into a free USB port on your console. The LED will double-blink blue as it searches for the headset.
-
Press and hold the Power button on the headset to power it on. The LED will double-blink blue as it searches for the transmitter.
-
Within 10 seconds, the LEDs on the transmitter and headset will turn solid, indicating a successful pairing.
Nintendo Switch Setup
Please follow the instructions below to get your Stealth 700 for PS4/PS4 Pro headset set up for use with a Nintendo Switch console.
- Power the headset on, and plug the USB transmitter into the console, while the console is docked.
- Make sure the headset and transmitter are paired. The LEDs on the transmitter and the headset should be lit solid. If the LED on the transmitter is double-blinking, you’ll need to pair the headset and transmitter again.
- You should see the volume bar and the word “USB” appear on the screen, to confirm the transmitter has been connected.
” alt=”Nintendo_Switch_USB.png” width=”768″ height=”432″ data-ezsrc=”https://manuals.plus/ezoimgfmt/turtlebeach–c.na137.content.force.com/sfc/dist/version/download/?oid=00DU0000000Jga6&ids=0684U00000BWLFp&d=%2Fa%2F4U000000smxL%2F7g5FvzS3V4VvqJ2rm4_FoLwPp7I1wvODGlcdq9kXKDA&asPdf=false” />
Once you see those icons, you should be able to hear the game/chat audio. You may still need to configure the settings for the specific game you’re using the headset with.
Please Note: These settings will vary from game to game. In addition, there are a limited number of games that support in-chat capability.
You can find the instructions for configuring the settings for Fortnite below:
1. Make sure you are logged in to your profile. Once you are logged in, press the + button on the switch to bring up the Social menu. Scroll down to and then select the gear icon on the bottom of the left sidebar.
” alt=”Gear_Icon_2.png” width=”1920″ height=”1080″ data-ezsrc=”https://manuals.plus/ezoimgfmt/turtlebeach–c.na137.content.force.com/sfc/dist/version/download/?oid=00DU0000000Jga6&ids=0684U00000BWMBx&d=%2Fa%2F4U000000sn87%2FmUVjA8uWqWBIQnicV0YSFSyhK5XXMpsnI.JHl8SUDrQ&asPdf=false” />
2. The sidebar will change in appearance from your friends list to a list of several different options. Select the “Settings” option, as shown below.
” alt=”Select_Settings_3.png” width=”1920″ height=”1080″ data-ezsrc=”https://manuals.plus/ezoimgfmt/turtlebeach–c.na137.content.force.com/sfc/dist/version/download/?oid=00DU0000000Jga6&ids=0684U00000BWM25&d=%2Fa%2F4U000000smsk%2FkueuetHTksiXOAk8vNhek75NfIefj_ivd6eOmi6X__4&asPdf=false” />
3. You will see several tabs on the top of the screen. Scroll to the Speaker tab – this is the Audio Settings tab. You can configure the Volume sliders to your liking. Then, scroll down to section labelled “Voice Chat”.
There will be two toggle settings: Voice Chat and Voice Chat Method.
- Voice Chat is ON by default. To be able to hear and be heard in chat, this setting needs to be ON. If this setting is turned off, you will not be able to hear the chat audio, and you will not be able to be heard in chat.
- Voice Chat Method is set to PUSH-TO-TALK by default. To be able to be heard in chat whenever you speak, this setting needs to be OPEN MIC. If this setting is set to PUSH-TO-TALK, you will not be heard in chat unless you press a specific button when you speak into the mic.
” alt=”Voice_Chat_Settings_4.png” width=”1920″ height=”1080″ data-ezsrc=”https://manuals.plus/ezoimgfmt/turtlebeach–c.na137.content.force.com/sfc/dist/version/download/?oid=00DU0000000Jga6&ids=0684U00000BWLnk&d=%2Fa%2F4U000000smuy%2FkHCcZWu8ssl1c_Ley9tKkSahDSdqUBjkQdEFiJDRKQc&asPdf=false” />
Make sure that the Voice Chat is On and the Voice Chat Method is set to Open Mic. You should be able to hear and be heard in the chat.
While the Stealth 700 Gen 2 PS headset was designed for use with PlayStation consoles, this headset can also be used with a PC.
To set up your Stealth 700 Gen 2 PS headset for use with a PC, please do the following.
1. Plug the transmitter into a free USB port on the computer. The headset and transmitter should already be paired — and the LED on the transmitter should be solid. If the LED on the transmitter is double-blinking, please perform the pairing process.
2. Right-click the speaker icon on the bottom-right of the Taskbar, and select “Open Sound Settings”. In the sound settings window, set Speakers (Turtle Beach Stealth 700 G2) as the default Output device. Then, set Microphone (Turtle Beach Stealth 700 G2) as the default Input device.
Please Note: Some games and programs do have audio settings that are independent from the computer settings. You may need to adjust the audio settings for both those games/programs and the computer itself. If you are having issues with the audio, please first double-check the audio settings for both the computer itself and the game/program the headset is being used with.
If those issues persist, even when the settings for both the game/program and computer are configured correctly, please contact our support team.
PlayStation Setup
This article details the best way to set your Stealth 700 Gen 2 PS headset up for use with a PS4 or PS5 console.
PS4 SETUP
If you have a PS4/PS4 Pro Console, please do the following.
1. Connect Mini-Transmitter to USB Port on the console.
” alt=”PS_Setup.PNG” width=”389″ height=”179″ data-ezsrc=”https://manuals.plus/ezoimgfmt/turtlebeach–c.na137.content.force.com/sfc/dist/version/download/?oid=00DU0000000Jga6&ids=0684U00000BWKdt&d=%2Fa%2F4U000000smZL%2FcaMsa.MfMWA6hOvkRz3QQWJ3RYlrPbEAonqM6R4dEAE&asPdf=false” />
2. Power the headset on.
” alt=”PS_Setup_Step_2.PNG” width=”207″ height=”204″ data-ezsrc=”https://manuals.plus/ezoimgfmt/turtlebeach–c.na137.content.force.com/sfc/dist/version/download/?oid=00DU0000000Jga6&ids=0684U00000BWKhU&d=%2Fa%2F4U000000smf4%2FmYoLCFtLNs51hyWNb5oV5Ne0BKYNeDFCI6.G5QvLJrg&asPdf=false” />
3. Go to Settings >> Devices >> Audio Devices
-
- Select Stealth 700 Gen 2 for Input & Output Device
- Set Output to Headphones to All Audio
- Set Volume Control (headphones) level to maximum
4. Select Adjust Microphone Level and follow the on-screen instructions to calibrate your microphone.
Please Note: This headset does not contain its own onboard surround processing. The PlayStation 4 does not provide surround sound processing through its USB path. As such, the Stealth 700 Gen 2 PS cannot play surround sound from a PS4 console. The only exception to this is if the game itself has its own surround sound track that will play through the PS4’s (stereo) USB connection.
PS5 SETUP
If you instead have a PS5 console, please do the following.
1. Plug the transmitter for your headset into a free USB port on the console, and then power the headset on. The headset and transmitter should pair to each other, and the LEDs on both transmitter and headset will be lit solid.
2. Go to Settings >> Sound >> Audio Output >> Output Device
- Select Stealth 700 for Output Device
- Set Output to Headphones to All Audio
- Set Volume Control (headphones) level to Maximum
3. Adjust your microphone levels by going to Settings >> Sound >> Microphone >> Adjust Mic Level >> Microphone Level
Please Note: While this headset does not contain its own onboard surround processing, Sony has indicated that the PlayStation 5 will deliver ‘3D Audio‘ to any headset that connects to its controller or USB Port. Is this is desired, after the headset is configured, you can enable the 3D Audio function to enhance the audio through your headset. Then, go to Adjust 3D Audio Profile to select the best profile option for your game.
Mappable Buttons
The MODE Button and Mappable Wheel on your Stealth 700 Gen 2 PS headset can be assigned to a new function based on your gaming style.
” alt=”Mappable_Buttons.PNG” width=”311″ height=”139″ data-ezsrc=”https://manuals.plus/ezoimgfmt/turtlebeach–c.na137.content.force.com/sfc/dist/version/download/?oid=00DU0000000Jga6&ids=0684U00000BWKfj&d=%2Fa%2F4U000000smTS%2FRHcnde3fBQsdroy84GgL9inguKIHwDphu70vQhfJTU0&asPdf=false” />
Out of the box, the Mappable Wheel will adjust the headset’s Mic Monitor feature, which allows you to hear yourself through the headset when you speak into the mic — helping you to avoid inadvertently shouting at other players.
PLEASE NOTE: The lower volume dial is re-mappable, and thus will spin freely, where the top volume dial cannot be re-mapped, and will not spin freely.
Out of the box, pressing the Mode button will engage or disengage the Superhuman Hearing feature, which will adjust the audio to allow you to pinpoint quiet audio cues like enemy footsteps and weapon reloads.
To change the buttons’ assignments, follow these steps:
1. Download the Turtle Beach Audio Hub mobile app on your iOS or Android device.
2. Enable Bluetooth on your selected device, and pair with your headset to access the app.
3. Swipe to the second settings screen, and click the arrow next to the control you’d like to re-assign.
” alt=”Second_Screen.jpg” width=”378″ height=”596″ data-ezsrc=”https://manuals.plus/ezoimgfmt/turtlebeach–c.na137.content.force.com/sfc/dist/version/download/?oid=00DU0000000Jga6&ids=0684U00000BWLcG&d=%2Fa%2F4U000000smwr%2FxwWlN2inlH4Tzg9o29XyRnMZTRBKxVebuMOOv5XAPxA&asPdf=false” />
4. Select the new setting/control you’d like to re-assign that wheel or button to.
” alt=”Reassign_Mappable_Wheel.jpg” width=”378″ height=”597″ data-ezsrc=”https://manuals.plus/ezoimgfmt/turtlebeach–c.na137.content.force.com/sfc/dist/version/download/?oid=00DU0000000Jga6&ids=0684U00000BWL5p&d=%2Fa%2F4U000000sn07%2FZLyCztFlkRaWiegmDup.WTatC.XBFk6HRfCKiabfSl0&asPdf=false” />
” alt=”Reassign_Mode_Button.jpg” width=”378″ height=”597″ data-ezsrc=”https://manuals.plus/ezoimgfmt/turtlebeach–c.na137.content.force.com/sfc/dist/version/download/?oid=00DU0000000Jga6&ids=0684U00000BWLHJ&d=%2Fa%2F4U000000sn36%2F3EPvxEyazhr9DV0dsXtHEXqRoN4tw.wVzcRHGvUXyoc&asPdf=false” />
5. Once selected, your headset will save this configuration.
Create Custom Game Preset
You can create a custom Game preset for your Stealth 700 Gen 2 PS headset in the mobile version of the Turtle Beach Audio Hub app, which is available here.
To create your new preset, open the Turtle Beach Audio Hub app. On the home page, click the arrow next to the current preset.
” alt=”Home_Screen.jpg” width=”378″ height=”597″ data-ezsrc=”https://manuals.plus/ezoimgfmt/turtlebeach–c.na137.content.force.com/sfc/dist/version/download/?oid=00DU0000000Jga6&ids=0684U00000BWKt3&d=%2Fa%2F4U000000smvu%2Fqrsz18Dy2.9i.LfPoCa2JbPqyRi9JbbAf7w_gNTsxko&asPdf=false” />
Swipe left or long-press on Custom to edit a new Preset.
” alt=”Preset_List.jpg” width=”378″ height=”596″ data-ezsrc=”https://manuals.plus/ezoimgfmt/turtlebeach–c.na137.content.force.com/sfc/dist/version/download/?oid=00DU0000000Jga6&ids=0684U00000BWL2j&d=%2Fa%2F4U000000smcd%2Fl8_heDKHQu76604Hthqaq24wGff.a0wZUP_7flXRTTE&asPdf=false” />
You will see the following. Adjust the sliders to your liking, and then click Save.
” alt=”Make_Custom_Preset.jpg” width=”377″ height=”598″ data-ezsrc=”https://manuals.plus/ezoimgfmt/turtlebeach–c.na137.content.force.com/sfc/dist/version/download/?oid=00DU0000000Jga6&ids=0684U00000BWLDi&d=%2Fa%2F4U000000snC8%2Ffvb8AUqJsHukpECNzxshzCSFfxlTlvuZDOyaWjftbN8&asPdf=false” />
Your custom Preset will then show up in the list of available Presets.
Mobile Turtle Beach Audio Hub App
The Stealth 700 Gen 2 PS headset has a variety of features that can be controlled through the mobile version of the Turtle Beach Audio Hub, available here.
After installing the Audio Hub app from your phone’s app store, you’ll need to Bluetooth pair your headset to your phone. The Bluetooth connection is separate from the wireless connection your headset has to its wireless transmitter. With a Bluetooth connection, you can take phone calls or listen to music while you’re gaming.
Bluetooth pairing instructions are available here.
Note: If the app does not detect your headset, please try the following:
- Power off your headset. Then. power off your phone.
- Once both the headset and phone are completely powered off, power on your phone.
- Open the Turtle Beach Audio Hub app, and let it open and load completely.
- Then, power the headset on, and let the headset connect to the phone. The phone should now be detected.
Once your headset and phone are paired via Bluetooth, open the Turtle Beach Audio Hub app.
(As your headset is being detected, you may see a notification that your headset has a firmware update available. If this is the case, go to the Turtle Beach Audio Hub, so that you can update your headset with the Windows or macOS Audio Hubs.)
This is the first screen you’ll see when you open the Audio Hub app.
This screen will feature different settings and controls that can be customized.
” alt=”Home_Screen.jpg” width=”378″ height=”597″ data-ezsrc=”https://manuals.plus/ezoimgfmt/turtlebeach–c.na137.content.force.com/sfc/dist/version/download/?oid=00DU0000000Jga6&ids=0684U00000BWLc1&d=%2Fa%2F4U000000smye%2FTx9mSxFsG_GZYBJZXGVsPXH1Wmzw6Ydl.jy6_.hXJyk&asPdf=false” />
Master Volume – This slider will control the Master (Overall) Volume of the Game and Chat audio.
Superhuman Hearing – This feature adjusts the incoming audio to allow you to pinpoint quiet audio cues, like enemy footsteps or weapon reloads. Toggle the Superhuman Hearing On, and then adjust the level of Superhuman Hearing with the slider below.
Game Preset – The Stealth 700 Gen 2 PS headset comes with four EQ Presets. You can pick from those EQ Presets here. To change the preset you are using, click the arrow next to the preset shown. You will see a list of available presets, as shown below:
” alt=”Preset_List.jpg” width=”378″ height=”596″ data-ezsrc=”https://manuals.plus/ezoimgfmt/turtlebeach–c.na137.content.force.com/sfc/dist/version/download/?oid=00DU0000000Jga6&ids=0684U00000BWLLj&d=%2Fa%2F4U000000smNo%2F9.uuf9uHFHRpFFzdVB4xN0DYzuRzkJEnMpW8pt4tYTA&asPdf=false” />
Those EQ Presets are as follows:
- Signature Sound
- Bass Boost
- Bass + Treble Boost
- Vocal Boost
You can also create a Custom Preset. For more information, please click here.
Mic Monitor – This is a feature that allows you to hear yourself through the headset when you speak into the mic. This helps to avoid inadvertently shouting at other players. Toggle the Mic Monitor On, and then adjust the volume of your voice in the headset when you speak.
This screen includes the controls for mappable buttons, as well as for the voice prompts/tones.
” alt=”Second_Screen.jpg” width=”378″ height=”596″ data-ezsrc=”https://manuals.plus/ezoimgfmt/turtlebeach–c.na137.content.force.com/sfc/dist/version/download/?oid=00DU0000000Jga6&ids=0684U00000BWLcL&d=%2Fa%2F4U000000sn2J%2FWUsBvzu1fCG2uGc_Vn.WvKcUttMHPgRqg54lcn1W1tE&asPdf=false” />
Mappable Wheel – This is the lower volume dial on the headset itself. Out of the box, it controls the Mic Monitor volume. While the upper volume dial is not mappable, this lower volume dial is, and thus will spin freely, unlike the upper volume dial. For information on re-mapping this wheel, please click here.
Mappable Button – This is the button on the headset labelled “Mode”. Out of the box, it will toggle the Superhuman Hearing feature. This button can be remapped to control other features. For information on re-mapping this button, please click here.
Noise Gate – This feature helps to ensure that your voice is what is transmitted by the mic, not ambient or background noise.
Voice Prompts Level – Control the volume of the vocal prompts that play in your headset, including when the headset is powered on, Bluetooth is powered on/pairing, and the headset pairs with the transmitter. If you set this to the lowest setting you will not hear any voice prompts at all!
Tones Level – Control the volume of the audio tones that play in your headset when some features are engaged, or when the mic is muted/unmuted. Like the Voice Prompts level, if this is set to the lowest setting, you will not hear any indicator tones at all!
These screens will have some essential information and details about the headset itself. This information may be needed when troubleshooting an issue or when talking with Customer Support. The links lead to Turtle Beach social media pages, and to the Support section of the Turtle Beach website — which you are currently reading right now!
You will also see an image of the headset, as well as the name of the headset, and the version numbers for both the mobile Audio Hub app and the headset’s firmware.
” alt=”Info_Screen.jpg” width=”380″ height=”599″ data-ezsrc=”https://manuals.plus/ezoimgfmt/turtlebeach–c.na137.content.force.com/sfc/dist/version/download/?oid=00DU0000000Jga6&ids=0684U00000BWLbm&d=%2Fa%2F4U000000smns%2FD7eU3ZKBEyCsfD_gAsfoffsGX0MFTYfMuthYL9lcsI0&asPdf=false” />
Headset Controls And Audio Features
The Stealth 700 Gen 2 PS headset comes with some unique headset controls and audio features.
On the back of the Left earcup, there are two volume dials. One is for the Master volume, and the other is a Mappable Wheel that, by default, controls the variable Mic Monitor volume.
The Master Volume dial will control the volume of both game and chat audio. The Mappable Wheel can control various functions (as set in the Turtle Beach Audio Hub); out of the box, this wheel will adjust the headset’s Mic Monitor feature, which allows you to hear yourself through the headset when you speak into the mic — helping you to avoid inadvertently shouting at other players.
**PLEASE NOTE: There is a limit to the amount the Master Volume/upper dial will move. The Mappable Wheel/lower dial will spin freely, with no stopping point. This is intentional; if your Mappable Wheel/lower dial spins freely, your headset is working as intended.**
Below those dials is the Mode Button. Like the variable Mic Monitor dial, this can be re-mapped if needed, to control other features. Out of the box, pressing this button will engage and disengage the Superhuman Hearing feature, which adjusts the audio so you can pinpoint quiet audio cues like enemy footsteps and weapon reloads.
PLEASE NOTE: Superhuman Hearing is disengaged by default. When Superhuman Hearing is engaged, you’ll hear an ascending tone. When Superhuman Hearing is disengaged, you’ll hear a descending tone. In addition, when Superhuman Hearing is engaged, your EQ Presets will be disengaged.
For more information about re-mapping the Mappable Wheel and Mode Button, please click here.
Next to the Mode Button is the Power Button. Press and hold this button to power the headset on and off.
Next to the Power Button is the Bluetooth Multi-Function Button. Press and hold this button to put the headset into the Bluetooth Pairing Mode, which will allow it to connect to a Bluetooth-enabled device like a smartphone or mobile tablet. (For more information about Bluetooth, please click here.)
Once the headset is paired with a Bluetooth-enabled device, you can use this button for music and calls, as detailed below:
| FUNCTION | ACTION |
| Play/Pause | Press Once |
| Skip Forward | Press Twice Quickly |
| Fast Forward | Press Twice Quickly And Hold |
| Skip Back | Press Three Times Quickly |
| Rewind | Press Three Times Quickly And Hold |
| Answer Call | (With Call Incoming) Press Once |
| End Call | (When In A Call) Press Once |
| Reject Incoming Call | (With Call Incoming) Press and Hold |
| Activate Voice Recognition (if available) | (When Not In A Call) Press and Hold |
Next to the Bluetooth Multi-Function Button is the LED Indicator. This LED Indicator will inform you of things like the battery level of the headset, its current pairing status (in regards to both the Bluetooth and to the headset’s mini transmitter), and whether the headset is currently charging.
For more information, please check out the pairing and charging articles for this headset.
| HEADSET LED | MEANING |
| Solid Blue | Headset And Mini Transmitter Paired |
| Fast-Blinking White | Bluetooth Pairing |
| Solid White Stays White For Two Seconds Then Goes Back To Blue |
Bluetooth Paired |
| Breathing Blue | (While Charging) Battery Full |
| Double-Blink Blue | Not Paired |
| Solid Red | (While Charging) Battery Charging LED turn off when battery is fully charged (if headset is off) |
| Breathing Red | Battery Low |
The Mini Transmitter also has an LED Indicator; this will inform you of things like the pairing status of the headset/transmitter (in the same way the headset would), but also whether the headset’s mic is muted.
| TRANSMITTER LED | MEANING |
| Solid Blue | Headset And Mini Transmitter Paired |
| Double-Blink Blue | Not Paired |
| Breathing Red | Microphone Muted |
Next to the headset’s LED Indicator, is the USB Charge And Update Port. Plug the headset in via the included cable to charge the headset, or to update the headset’s firmware, as covered in further detail here.
Finally, after the LED indicator is the flip-to-mute Microphone. Flip the mic all the way forward to unmute the mic. The mic will stop at the second position shown in the image below, and you will hear a tone (low high) to indicate that the mic has been unmuted. Flip the mic to the first position to use the mic itself.
Frequently Asked Questions
Here are some of the most frequently asked questions regarding the Stealth 700 Gen 2 PS model headset.
COMPATIBILITY
1. Does the headset offer Bluetooth compatibility?
- Yes! The headset is equipped with a Bluetooth connection that is designed for use with smartphones and tablets.
2. How do I pair my headset to my phone using Bluetooth?
- We have a guide to the full Bluetooth pairing process for this headset available here.
NOTE: On the available devices screen within your device, you may see TWO Stealth 700 names listed. Make sure to select the one with the headphone/audio icon (the Media device). The “LE” device is the “low energy” connection, for data transfer only—not to be used for audio connection.
3. My headset won’t connect to my PC via Bluetooth or isn’t working right when connected. What’s happening?
- The Bluetooth feature for the Stealth 700 Gen 2 is designed for use on mobile devices and tablets. We do not recommend using this connection with a PC, as you may experience compatibility issues.
Please refer to the Stealth 700 Gen 2 PS – PC Compatibility article for PC set up instructions.
4. Which PlayStation consoles can this headset be used with?
- This headset is compatible with any variation of the PlayStation 4 and PlayStation 5 consoles.
5. Can I use my Stealth 700 Gen 2 PS on a PC?
- Customers have reported success using the headset as a standard USB headset on their PC or laptops.
- To do that:
-
- You would want to power the headset off, lower its Game Audio dial, and connect its USB transmitter to an open USB port on your PC.
- After doing that, you would want to ensure that the Stealth 700 Gen 2 PS’s transmitter is set as your default input & output device within your operating system’s Sound menu.
- Once you have set the headset as the default input and output device, you can power on the headset itself. The headset and transmitter should pair together within 30 seconds or so, and you can adjust the volume level on the headset itself to your liking.
-
For more information regarding PC compatibility for this headset, please click here.
- As a note: the headset’s Bluetooth connection would not be recommended for PC use.
If you need further assistance getting your Stealth 700 Gen 2 PS working on your PC, please reach out to our support team.
6. Can I use my Stealth 700 Gen 2 PS with a Nintendo Switch or an Xbox?
- The Stealth 700 Gen 2 PS would not offer any sort of compatibility with Xbox consoles.
- However, the headset can be used with a Nintendo Switch while it is docked. You can find Nintendo Switch installation instructions for your headset here.
If you require a helping hand during the set-up process; please reach out to our support team.
CHARGING
1. Can the headset be used while charging? Can I charge my headset with my cell phone’s USB wall adapter?
- Yes! You can use the headset’s USB charging cable to charge the headset while it is in use.
- While we usually suggest charging the headset via a USB port on your console, a USB wall adapter can be used to charge the headset.
2. When charging my headset, the headset’s LEDs turn off after a minute or two. Is that normal?
- When the battery is low, the headset LED will “breathe” red. Plug the headset in to charge and the LED will change to solid red. Please note that the LED will display differently depending on whether the headset is powered on or powered off while charging.
- If the headset is powered ON while charging, the headset LED will change to “breathing” blue when its battery is fully charged. If the headset is powered OFF while charging, the LED will turn off completely (no light) when the headset battery is fully charged.
You can find the most up to date information for your headset’s LEDs in the “LED Behaviors” section of the product’s Quick Start Guide, available here.
HEADSET FEATURES
1. Why am I unable to adjust Game and Chat audio independently?
- The Stealth 700 Gen 2 PS uses a transmitter that has a single USB connection. The PlayStation consoles can only output All Audio or Chat Audio Only via their USB ports. There is no way to split Game and Chat Audio into two separately adjustable streams via the console’s USB ports.
2. How do I update my headset and its transmitter?
- In order to update your headset and transmitter, you would need access to a PC or laptop that is operating on Windows or MacOS so you can install our Audio Hub program.
- Updates for this model can only be performed via a desktop or laptop. The mobile version of the Audio Hub cannot be used to update the headset’s firmware; this version can only be used to adjust and customize the headset’s various audio features and controls. The Audio Hub would not be available for ChromeOS.
You can read more about the update process for your headset here.
3. I can hear my own voice when I speak, or I can hear some background noises being played in my headset. Is that normal?
- You may be referring to the headset’s Microphone Monitoring feature, which allows you to hear your voice when you speak.
- It’s possible that the headset’s Mic Monitor control is turned up too high and is playing back noises from the room you’re in. This can result in you hearing echoes, hiss and/or static in your headset while you’re using it.
- You can adjust the intensity of the Mic Monitoring feature on the Stealth 700 Gen 2 PS via the lower rotating dial on the headset itself.
If you continue to have the same inconvenience after adjusting your headset’s Microphone Monitoring volume level; please reach out to our support team for further assistance.
4. My headset’s lower dial is for Mic Monitoring, but why is it not lowering my outbound microphone volume level?
- The Microphone Monitoring feature allows you to hear your own voice in the headset when you speak, in order to help you avoid inadvertently shouting at other players. The headset itself is not equipped with any sort of volume control for the outbound volume level of its microphone — therefore, the Mic Monitor volume control will adjust only how loud you hear your own voice through the headset when you speak into the mic, not how loud other people will hear your voice when you speak.
5. Is the lower volume dial on my headset supposed to spin freely/indefinitely?
- Yes! The bottom volume control thumbwheel is a ‘digital encoder’ that can be re-programmed to control different aspects of your headset via the mobile Audio Hub for Android or iOS. This dial will spin freely, without end-stops. This is intentional, so you have nothing to worry about!
6. Is the Stealth 700 Gen 2 PS headset surround sound?
- This headset does not contain its own onboard surround processing.
- For PS5: Sony has indicated that the PlayStation 5 will deliver ‘3D Audio‘ to any headset that connects to its controller or USB port.
- For PS4: The PlayStation 4 does not provide surround sound through its USB connection. The Stealth 700 Gen 2 PS headset cannot play surround sound from a PS4 console. The only exception is if the game itself has its own surround soundtrack that will play through the PS4’s (stereo) USB connection.
7. How do I replace the ear cushions on my headset?
- We have an article with illustrations of the best way to replace our ear cushions available here.
- Replacement ear cushions are available on the Turtle Beach Webstore.
TROUBLESHOOTING
1. My Stealth 700 Gen 2 PS did not come with a transmitter. How can I get a replacement? I have misplaced my Stealth 700 Gen 2 PS’s transmitter. Am I able to buy a replacement?
- If a part or accessory was missing from your headset’s packaging; please reach out to our support team for assistance in getting a replacement transmitter under your product’s warranty with us.
- If you have lost your headset’s transmitter, we have replacements available for purchase at the link below.
-
- If that part is out of stock, please contact our Sales Team to see if they can provide you with any sort of information regarding replenishment of that part’s stock. To do so, please send a direct email to [email protected] with your inquiry.
-
Stealth 700 Gen 2 PS Replacement Transmitter
2. My headset’s LED will not light up at all, even when charged. It seems completely dead. What can I do about that?
- If possible, please try a different cable and a different charging source. If you’ve already tried that, please attempt to restore your Stealth 700 Gen 2 for PS via the process described at the link below.
Stealth 700 Gen 2 PS Headset Recovery
If you continue to have the same inconvenience or are unable, to perform the recovery process, please reach out to our support team for further assistance.
3. My headset sounds are abnormal, it didn’t sound like this before. What could be going on here?
- Please double check to ensure you have not left the Superhuman Hearing option on. Superhuman Hearing (SHH) is a situational feature designed to prioritize certain sounds to give you the edge in intense gaming scenarios. This should not be left on all the time.
- Please connect your headset to your preferred version of the Audio Hub. From there, please check to see if you have the option for SHH enabled. Disabling this feature should return your audio back to its preferred state.
If turning off the SHH feature does not clear up your inconvenience, please reach out to our support team for assistance with troubleshooting.
4. My headset won’t work at all, the light is stuck red or green. How can I get it functioning properly again?
- Press and hold down the Bluetooth Button + Mode Button on the headset at the same time for 20 seconds. This is a very long press, please make sure that you do not release it early, holding it down too long is better than too short.
- This should hard reset the headset and may clear up what you are experiencing. After performing these steps, make an attempt at updating the headset via the Audio Hub for Windows or MacOS.
If you continue to have the same inconvenience, please reach out to our support team.
5. My audio/mic has connection issues and produces static or other abnormalities. What’s going on here?
- A common cause of this is having your wireless router close to your console, or other wireless devices close as well. Even if you console is hardwired, the router is still broadcasting a wireless signal, which can cause network congestion and audio/mic glitching, as well as connection issues. We recommend keeping a minimum distance of 10 feet between your router/wireless- devices and console to avoid issues.
For further assistance with this; please reach out to our support team.
6. My headset keeps shutting off on its own when no audio is playing.
- In order to conserve battery life, your headset will power off after no audio is played through it for 10 consecutive minutes. This is a fixed feature and cannot be adjusted.
- This feature helps to save battery life – if you forget to power the headset off for the night after a long gaming session, you will only lose a few minutes of battery life, not a whole night’s worth.
- To easily avoid the Auto-Shutdown feature, you can keep some music playing in the background, like the game’s soundtrack. The headset will detect the audio and will not engage the Auto-Shutdown feature. Please note that mic input alone will not avoid the Auto-Shutdown feature.
If your headset keeps shutting off while audio is being played, please reach out to our support team for further assistance.
Parts And Accessories
Note: Parts in italics are not sold separately. Availability of replacement parts is subject to change at any time.
- Stealth 700 Gen 2 PS Headset
- Stealth 700 Gen 2 Mini Wireless Transmitter
- USB-C Charging Cable
]]>
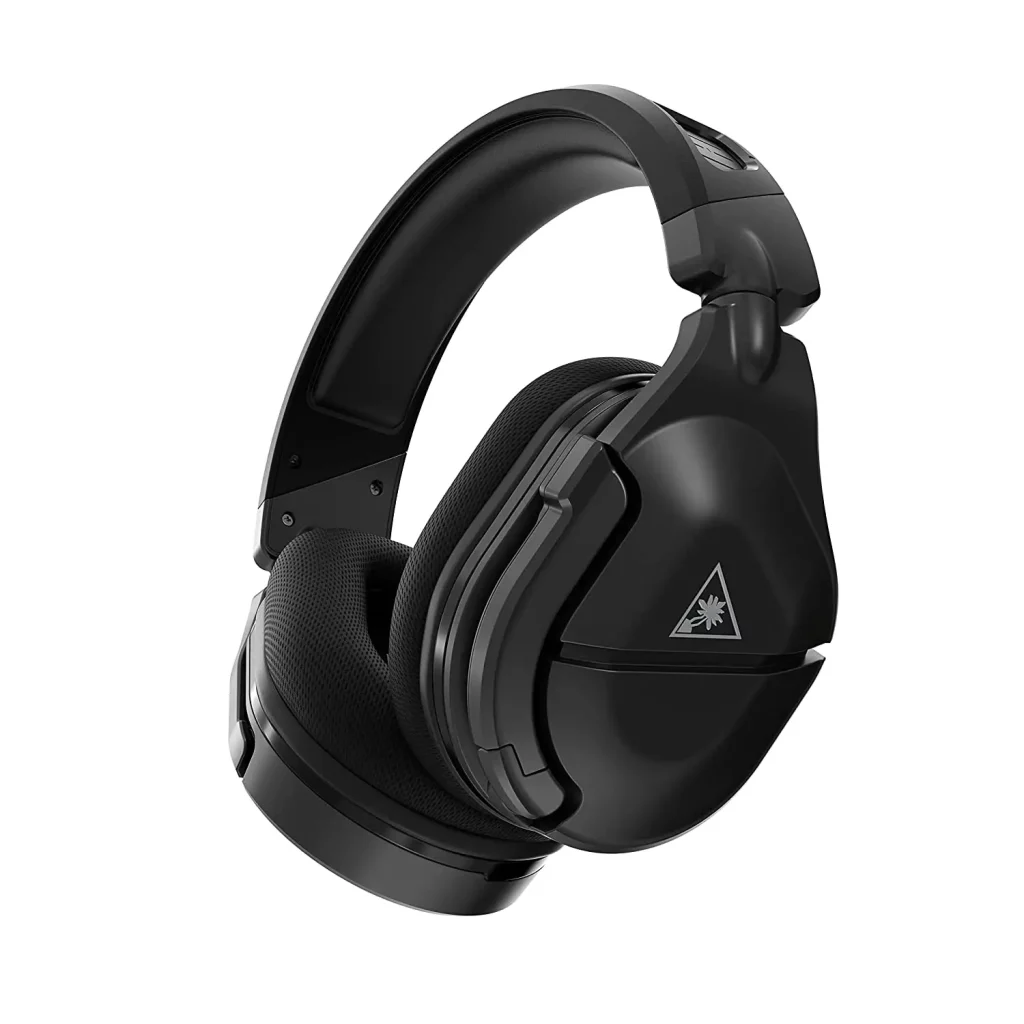
User Manual
About This Model
PACKAGE CONTENTS
- Stealth 600 Gen 2 MAX Headset (A)
- USB-A Transmitter (B)
- USB-C Charging Cable (C)
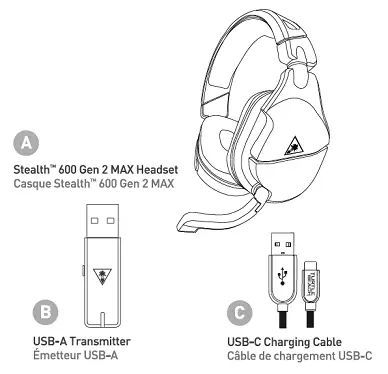
HEADSET CONTROLS
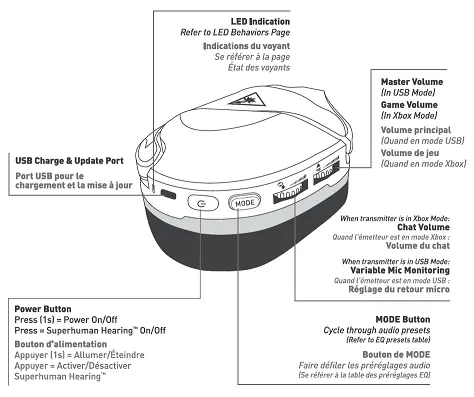
- LED Indicators
- See LED Indicators
- USB Charge & Update Port
- Power Button
- Press (1 sec) – Power On/Off
- Press – Superhuman Hearing On/Off
- MODE Button
- Cycle through audio presets
- See EQ Presets
- Cycle through audio presets
- Lower Volume Dial
- When transmitter is in XBOX mode
- Chat Volume
- When transmitter is in USB mode
- Variable Mic Monitoring
- When transmitter is in XBOX mode
- Game Volume Dial
Superhuman Hearing
Use Superhuman Hearing Mode to pinpoint quiet audio cues like enemy footsteps and weapon reloads. During gameplay, you can activate/deactivate Superhuman Hearing by pressing the POWER button once quickly.
Microphone Mute
Flip up mic to mute. There is an audible tone when the mic is muted or unmuted.
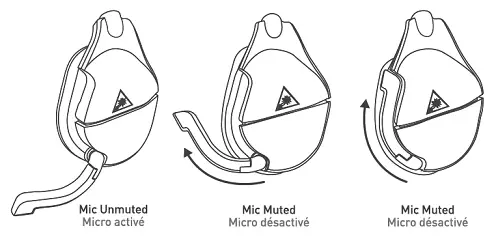
EQ Presets
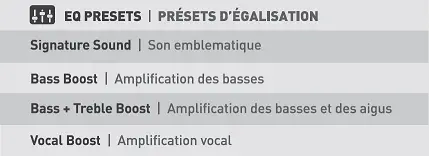
SETUP FOR XBOX
1. Put the transmitter into the Xbox Mode.

2. Connect the transmitter to the USB port on the console.

3. Power the headset on by pressing and holding the headset’s Power button.

4. Wait for headset and transmitter to pair.
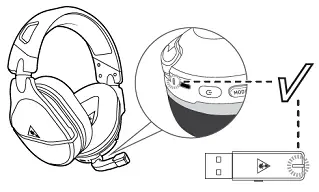
SURROUND SOUND FOR XBOX (ONLY AVAILABLE ON XBOX)
- Go to Settings >> General >> Volume & Audio Output
- Set Headset Format to Windows Sonic for Headphones
CHARGING
The Stealth 600 Gen 2 MAX gives you 40+ hours of rechargeable battery life. Make sure to charge it regularly, and to fully charge the headset before storing.
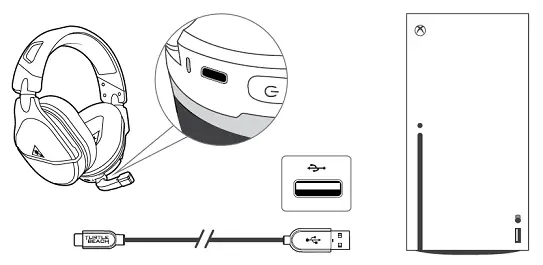
Headset Storage
Always charge your headset before storing it for any extended period of time (greater than 3 months). Never store the unit in temperatures above 113°F/45°C.
USB TRANSMITTER COMPATIBILITY
The USB-A transmitter is equipped with a switch that allows you to change compatibility modes.
![]()
Here are the headset compatibilities listed by transmitter mode:
| XBOX MODE | USB MODE |
| Xbox Series X|S | PlayStation (PS5, PS4) |
| Xbox One | Windows PC, Mac |
| Nintendo Switch** | |
| **Nintendo Switch wireless compatibility is supported while in docked mode only. Chat audio is available for games that support in-game chat compatibilities. | |
SETUP FOR USB MODE
1. Put the transmitter into USB Mode.

2. Connect the transmitter to the USB port on your platform.
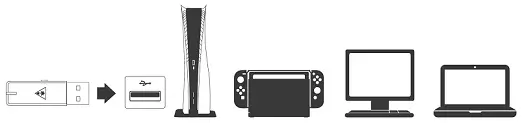
3. Power the headset on by pressing and holding the headset’s Power button.
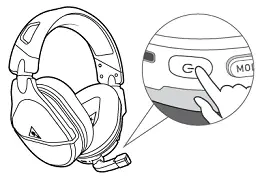
4. Wait for headset and transmitter to pair.
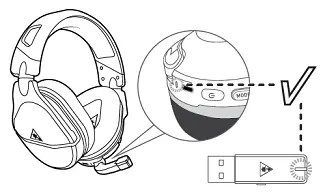
LED BEHAVIORS
| HEADSET LED | MEANING |
| Solid Green | Headset and Transmitter Paired |
| Breathing Green (While Charging And Headset Is On) | Battery Full** |
| Double-Blink Green | Not Paired |
| Solid Red (While Charging) | Battery Charging** |
| Breathing Red | Battery Low |
| **If headset is powered off, LED will turn off when headset is fully charged. |
TRANSMITTER LED
| TRANSMITTER LED | MEANING |
| Solid Green | Headset And Transmitter Paired |
| Double-Blink Green | Headset And Transmitter Not Paired |
| Breathing Red | Mic Muted |
RE-PAIRING THE HEADSET AND TRANSMITTER
- Start with the headset powered OFF. Connect your transmitter to an available USB port on your console. Make sure the transmitter is in the Xbox mode. Your transmitter will flash rapidly as it searches to pair with your headset.
- Power on your Stealth 700 Gen 2 MAX for Xbox headset; the LED indication on the headset will flash rapidly as it searches for your transmitter.
- After a few moments, the LED indications on the headset and transmitter should turn a solid green to indicate a successful pairing.
Manual Pairing Instructions
Your headset and transmitter will already be paired out of the box. If the headset/transmitter LEDs are double-blinking green, the headset and transmitter may need to be re-paired. To do so, please do the following:
1. Start with the headset powered OFF. Make sure the transmitter is in the Xbox mode.
2. Press and hold the power button on the headset until the headset’s LED starts “breathing” green..
3. Insert the transmitter into the console. Wait until the transmitter’s LED starts to double-blink.
4. After a few moments, your headset and transmitter LEDs should become solid green — if your mic is muted, the transmitter LED will instead be breathing red.
If the LEDs still double-blink green after this process is performed, or if the headset and transmitter otherwise do not pair after this process, please contact our support team for further assistance.
Pairing
The pairing process for the Stealth 600 Gen 2 MAX is similar no matter which Mode the transmitter is set to, but for the best audio experience, it is important to make sure that the transmitter is set to the correct Mode for your specific platform.
o pair your headset to the transmitter:
1. Put the transmitter into the correct Mode.
If you are using the headset with an Xbox console – either Xbox Series X|S or Xbox One — move the transmitter’s switch to Xbox.
If you are using the headset with a different USB device – a PS5 or PS4 console, a Windows or Mac PC, or a Nintendo Switch (in docked mode) – move that switch to USB.
2. Connect the transmitter to the USB port on your platform.
3. Power the headset on by pressing and holding the headset’s Power button.
4. Wait for headset and transmitter to pair. The LEDs on both headset and transmitter will turn solid when the headset and transmitter pair successfully.
RE-PAIRING
You may — very sparingly — need to re-pair the headset. This would most likely happen following a firmware update. Please note that you will need a paperclip or something similar for this process.
To re-pair the headset and transmitter:
- Start with the headset powered OFF. Make sure the transmitter is in the Xbox mode.
- Press and hold the power button on the headset until the LED starts flashing rapidly.
- Insert the transmitter into the console.
- After a few moments, the headset and transmitter LEDs will become solid, indicating a successful pairing.
Again, this process would need to be performed sparingly, most likely after a firmware update is performed. Generally the headset and transmitter should be able to pair to each other on their own.
Turtle Beach Audio Hub
With the desktop version of the Turtle Beach Audio Hub — available for Windows and Mac here — you can adjust and control some of the headset’s features.
**PLEASE NOTE: The headset MUST be powered on, and the headset and transmitter MUST be paired, for the Turtle Beach Audio Hub to recognize the headset/transmitter. If the headset is not powered on, or the headset and transmitter are not paired, the Turtle Beach Audio Hub will NOT recognize your device, and you will see an error message. If this happens, disconnect and reconnect the headset and transmitter, and power the headset on. The headset and transmitter will pair, and the Audio Hub will then recognize your device.**
The home page will show an image of the headset on the left sidebar, as well as options to Restore or Update the firmware. On the top-right of that page, you’ll see the version of the Audio Hub written in gray.
There will also be two slider settings. One will be labeled “Mic Monitor Level“. The other will be labeled “Tones Level“.
Mic Monitor Level will control the volume of the Mic Monitor feature — this is how loud you hear yourself through the headset when you speak into the mic. The aim of this feature is to help you avoid inadvertently yelling at other people and/or players.
- Please Note: The headset itself is not equipped with any sort of volume control for the outbound volume level of its microphone — therefore, the Mic Monitor volume control will adjust only how loud you hear your own voice through the headset when you speak into the mic, not how loud other people will hear your voice when you speak.
Tones Level will control the volume of indicator tones — these are the tones that play when the headset is powered on, the mic is muted or unmuted, or a feature (like Superhuman Hearing) is engaged or disengaged. This also controls the volume of the tones that play when the EQ Preset is switched via the Mode button.
The second page of the Turtle Beach Audio Hub is the Information page. This will provide the following information:
- Headset Model
- Audio Hub Version Number
- Firmware Version Number (for both headset and transmitter)
- Links to FAQ and the Technical Support Site
Multiplatform Compatibility
The USB-A transmitter is equipped with a switch that allows you to change compatibility modes, and use the headset with a variety of different platforms and consoles. This switch is shown (set to the Xbox mode) in the image below:
In the Xbox mode, the headset can be used with an Xbox Series X|S or Xbox One console.
In the USB mode, the headset can be used with a PS5 or PS4 console, a Windows PC or Mac computer, or a Nintendo Switch that is in the docked mode. (Please note that this headset cannot be used with a Nintendo Switch that is in the handheld mode – the Switch must be in the dock.)
Here are the headset compatibilities listed by transmitter mode:
| XBOX MODE | USB MODE |
| Xbox Series X|S | PlayStation (PS4, PS5) |
| Xbox One | Windows PC, Mac |
| Nintendo Switch** | |
| **Nintendo Switch wireless compatibility is supported while the Switch is in the docked mode only. Chat is available only for games that support in-game chat compatibilities. | |
PLEASE NOTE: The headset controls WILL change depending on which mode the transmitter is set to. This is detailed below:
| HEADSET CONTROL | XBOX MODE XBOX SERIES X|S XBOX ONE |
USB MODE PS4/PS5, PC/MAC NINTENDO SWITCH** |
| UPPER Volume Dial | Game Audio Volume | Master (Game + Chat) Volume |
| LOWER Volume Dial | Chat Audio Volume | Variable Mic Monitor Volume*** |
**Nintendo Switch wireless compatibility is supported while the Switch is in the docked mode only. Chat is available only for games that support in-game chat compatibilities.
***Mic Monitor is a feature that allows you to hear your own voice when you speak into the mic, to help you avoid inadvertently yelling at other people and players. This does NOT control how loud other people hear you speak, only how loud you hear yourself
No Mic Audio
The Stealth 600 Gen 2 MAX headset has an adjustable, flip-to-mute mic. To use the mic, gently push/”flip” the mic forwards. You will hear a tone (low high) to indicate the mic is now unmuted. To mute the mic, just push/”flip” the mic back the other way. You will hear a tone (high low) to indicate that the mic is now muted.
If other players are unable to hear you in chat when using the headset – no matter which platform the headset is being used with, please double-check the following.
WHEN IN XBOX MODE
1. The Headset And Transmitter Are Paired/Transmitter Is In Correct Mode/Headset Is Detected By Console.
The headset and transmitter must be paired, and the transmitter in the correct mode, in order for the mic to work, so first make sure that the headset and transmitter have been successfully paired.
Please note that the transmitter must be plugged in to a USB port on the console for this pairing to occur. To double-check the status of the headset and transmitter’s pairing, just take a look at the LEDs on the headset and transmitter themselves. If both LEDs are lit up solid green, the headset and transmitter are successfully paired.
If the LEDs are both solid green, double-check that the transmitter is in the correct mode. The transmitter can be put in to two different modes: Xbox and USB. If the transmitter is in the USB mode but is connected to an Xbox console you may have audio issues even if the headset and transmitter are paired successfully.
As an additional test to see if the console itself is recognizing the headset:
- Press the Xbox/Home button on the Xbox One controller.
- Go to Settings >> All Settings >> Kinect & Devices >> Devices & Accessories.
- You will see the controller you are currently using; you should be able to scroll to the right to see other devices being used with the Console. The headset will appear in this list as “Headset”.
Do you see the headset in that list?
If the headset and console are paired, the transmitter is in the correct mode, and you can see the headset in that list, but you cannot be heard, please proceed to step 2.
If you do not see that headset listed even if the headset and transmitter are paired and the transmitter is in the correct mode, please contact our Support Team.
2. Party Test – Check Icon Ring
- Press the Xbox/Home button on the Xbox One controller.
- Scroll to the Party & Chats tab, then and select “Start A Party”. You do not need to invite any other players to this party; you can perform this test even if you are the only member in the party.
- Speak into the mic. When you speak into the mic, does a ring light up around your icon next to your Gamertag (in the list of party members)?
Please note whether you see that ring, and then proceed to Step 3.
3. Record a Test Message
- Press the Xbox/Home button on the Xbox One Controller.
- Scroll to the Party & Chats tab, and then select “New Chat”.
- Select someone from the list – you do not need to select anyone in particular, as you will not actually be sending a message. Once you have selected someone, tap the Menu button to complete selection.
- Two options will then appear: Write A Message (pencil icon, on the left) and Record A Message (mic icon, on the right). Select the Record A Message icon on the right.
- Select Record, and then speak into the mic. When you are done recording, stop the recording.
- You should see the new recording under the Write A Message/Record A Message icons. Select Play, and listen to that recording you made. This will tell you how your voice will sound to other players. Can you hear your voice clearly?
If you can hear your voice clearly when you play back that recording you’ve just made, the mic itself is working well – there could be an issue with the settings, or the way the headset and console are interacting. Please proceed to Step 4.
If you cannot hear your voice clearly when you play back that recording you’ve just made, please contact our Support Team with the results of Steps 2 and 3.
4. Power Cycle Headset/Console
To perform a quick power cycle with the Headset/Console, please do the following, in this order:
- Press and hold the Power Button on the headset until the Power LED turns off.
- Disconnect the transmitter from the console.
- Power down the Xbox console. When it has fully powered down, unplug the console from the wall outlet.
- Let everything sit for a minute.
- Plug the console back in, and power the console on again.
- After the console has fully powered on and loaded up, reconnect the transmitter to the console.
- Press and hold the Power button on the headset until the Power LED lights up.
- Re-pair the headset and transmitter.
To pair the headset:
- Connect the transmitter to the USB port on the Xbox console.
- Press and hold the power button to power the headset on.
- Wait for the headset and transmitter to pair. When the headset and transmitter are successfully paired, the LEDs on both will turn solid green.
If the mic issues persist even after a power cycle is performed, please contact the support team for additional assistance.
WHEN IN USB MODE
1. Headset Is Paired/Transmitter Is In USB Mode
The headset and transmitter must be paired in order for the mic to work, so first make sure that the headset and transmitter have been successfully paired.
Please note that the transmitter must be plugged in to a USB port on the console for this pairing to occur. To double-check the status of the headset and transmitter’s pairing, just take a look at the LEDs on the headset and transmitter themselves. If both LEDs are lit up solid green, the headset and transmitter are successfully paired.
If the LEDs are both solid green, double-check that the transmitter is in the correct mode. The transmitter can be put in to two different modes: Xbox and USB. If the transmitter is in the Xbox mode but is connected to a different USB device (not an Xbox console), you may have audio issues, even if the headset and transmitter are paired successfully.
2. Check Platforms/Game Settings
For some platforms (a PlayStation console, a PC), the headset will need to be set as the default device in the platform settings. In addition, the game or program itself will likely have its own audio settings, which may include an independent setting for input and output device.
To check these settings, you’ll need to go into the settings menu for the specific platform you are looking to use the headset with. This will vary depending on your platform, as indicated here.
3. Recording Test
If the headset and transmitter are paired, the transmitter is in the correct mode, and the settings (for the game/program and the platform being used) are configured correctly, try a recording test.
To do this, you’ll need to use the recording option available to you on the platform in question. For a PC, you can use an application like Sound Recorder or Voice Recorder; for a console, you can record a test message.
When you play back that recording you made, can you hear what you had recorded clearly and consistently?
If you cannot hear your voice clearly when you play back that recording you’ve just made, please contact our Support Team.
USB Setup (For PC, PS, Nintendo Switch In Docked Mode)
The Stealth 600 Gen 2 MAX For Xbox headset can be used with either an Xbox console, or with a different USB device, including PlayStation consoles, a Windows PC, or a Nintendo Switch (while the Switch itself is in docked mode).
To set your headset up for use with one of these USB platforms (not with an Xbox console), please do the following.
1. Put the transmitter into USB Mode.
2. Connect the transmitter to the USB port on your platform.
3. Power the headset on by pressing and holding the headset’s Power button.
4. Wait for the headset and transmitter to pair.
Once the headset and transmitter are paired, you may need to configure the settings for your specific platform, as detailed below.
Some games and programs have their own audio settings, independent of the computer’s settings. Please be sure to double-check the audio settings for the game/program you are using the headset with, to ensure that the audio settings for both the computer and the game are set properly.
To set the headset as the default device, right-click the speaker icon in the Taskbar (at the bottom-right of the screen), and then click “Open Sound Settings”. You’ll then be able to set the Input and Output device to the headset, if needed.
The settings for the game itself would be found in within the game’s menus. Make sure the headset is the default input and output device, that voice chat is enabled, and that any Push-To-Talk feature is disabled.
PLAYSTATION
PS4 SETUP
1. Go to Settings >> Devices >> Audio Devices
- Select Stealth 600 Gen 2 MAX for Input & Output Device
- Set Output to Headphones to All Audio
- Set Volume Control (headphones) level to maximum
2. Select Adjust Microphone Level and follow the on-screen instructions to calibrate your microphone.
- Please Note: At this point, if desired, you can enable the 3D Audio function to enhance the audio. Then, go to Adjust 3D Audio Profile to select the best profile option for your game.
With the headset set as the default device in the console settings, please go into the audio settings for the games/programs you will be using the headset with. Make sure the headset is set as the default device in the game. You’ll also want to confirm that voice chat is enabled within the audio settings of the game, and that any Push-to-Talk features are disabled.
PS5 SETUP
1. Go to Settings >> Sound >> Audio Output >> Output Device
- Select Stealth 600 Gen 2 MAX for Output Device
- Set Output to Headphones to All Audio
- Set Volume Control (headphones) level to Maximum
2. Adjust your microphone levels by going to Settings >> Sound >> Microphone >> Adjust Mic Level >> Microphone Level
- Please Note: At this point, if desired, you can enable the 3D Audio function to enhance the audio. Then, go to Adjust 3D Audio Profile to select the best profile option for your game.
With the headset set as the default device in the console settings, please go into the audio settings for the games/programs you will be using the headset with. Make sure the headset is set as the default device in the game. You’ll also want to confirm that voice chat is enabled within the audio settings of the game, and that any Push-to-Talk features are disabled.
NINTENDO SWITCH
For the Nintendo Switch, you’ll need to set the headset as the default device only in the game itself. You’ll also want to make sure that the game you are using the headset with supports chat capabilities. Again, you’ll also want to confirm that voice chat is enabled within the audio settings of the game, and that any Push-To-Talk features are disabled.
Frequently Asked Questions (FAQ)
Here are the most frequently asked questions regarding the Stealth 600 Gen 2 MAX For Xbox headset.
COMPATIBILITY
1. What platforms can this headset be used with?
- When the transmitter is in XBOX Mode: Xbox Series X|S, Xbox One
- When the transmitter is in USB Mode: PS5, PS4, Windows PCs, Mac, Nintendo Switch in docked mode only.
2. Does this headset offer Bluetooth compatibility?
- No. This headset does not have any Bluetooth capability, and will not pair to any Bluetooth-enabled device at all.
CHARGING
1. Can the headset be used while charging? Can I charge my headset with my cell phone’s USB Wall Adapter?
- We recommend charging the headset between uses for the best experience.
- While we recommend using the console to charge the headset for convenience, you certainly can use a USB Wall Adapter to charge the headset.
HEADSET FEATURES
1. Does this headset offer independent game and chat audio/volume control?
- IN XBOX MODE: Yes! The upper volume dial will control game audio, and the lower volume dial will control chat audio.
- IN USB MODE: No. When used in USB Mode, the upper volume dial will control the overall audio volume (game and chat). The lower volume dial will control the volume of the variable mic monitor feature.
Please Note: If the volume of the Mic Monitor is adjusted in USB Mode, the volume will stay at that level/volume even if the transmitter is switched back to Xbox Mode. This allows you to make quick adjustments to your Mic Monitor volume as needed.
This is detailed below:
| HEADSET CONTROL | XBOX MODE XBOX SERIES X|S XBOX ONE |
USB MODE PS4/PS5, PC/MAC NINTENDO SWITCH* |
| UPPER Volume Dial | Game Audio Volume | Master (Game + Chat) Volume |
| LOWER Volume Dial | Chat Audio Volume | Variable Mic Monitor Volume** |
*Nintendo Switch wireless compatibility is supported while in docked mode only. Chat audio is available for games that support in-game chat compatibilities.
**Mic Monitor is a feature that allows you to hear your own voice when you speak into the mic, to help you avoid inadvertently yelling at other people and players. This does NOT control how loud other people hear you speak, only how loud you hear yourself.
2. I can hear my own voice when I speak, or I can hear some background noises being played in my headset. Is that normal?
- You may be referring to the headset’s Microphone Monitoring feature, which allows you to hear your voice when you speak.
- It’s possible that the headset’s Mic Monitor control is turned up too high and is playing back noises from the room you’re in. This can result in you hearing echoes, hiss and/or static in your headset while you’re using it.
3. How do I adjust the Mic Monitor volume?
- If you are using the headset in Xbox Mode: Move the switch on the transmitter to USB Mode. Then, use the lower volume dial to adjust the Mic Monitoring volume to your preferred level, and move the transmitter switch back to Xbox Mode.
- If you’re using the headset in USB Mode: You can use the lower volume dial to adjust the Mic Monitor volume.
4. My headset’s lower dial is for Mic Monitoring, but why is it not lowering my outbound microphone volume level?
- The Microphone Monitoring feature allows you to hear your own voice in the headset when you speak, to help you avoid inadvertently shouting at other players. The headset itself is not equipped with any sort of volume control for the outbound volume level of its microphone — therefore, the Mic Monitor volume control will adjust only how loud you hear your own voice through the headset when you speak into the mic, not how loud other people will hear your voice when you speak.
TROUBLESHOOTING
1. My headset sounds are abnormal, it didn’t sound like this before. What could be going on here?
- Please double check to ensure you have not left the Superhuman Hearing option on. Superhuman Hearing (SHH) is a situational feature designed to prioritize certain sounds to give you the edge in intense gaming scenarios. This should not be left on all the time.
- Please quick-press the power button on the headset. If you hear a descending tone (high low), the Superhuman Hearing was on, but has now been disengaged. Do you hear a change in the audio?
If turning off the SHH feature does not clear up your inconvenience, please reach out to our support team for assistance with troubleshooting.
2. My headset keeps shutting off on its own when no audio is playing.
- To conserve battery life, your headset will power off after no audio is played through it for 10 consecutive minutes. This is a fixed feature and cannot be adjusted.
- This feature helps to save battery life – if you forget to power the headset off for the night after a long gaming session, you will only lose a few minutes of battery life, not a whole night’s worth.
- To easily avoid the Auto-Shutdown feature, you can keep some music playing in the background, like the game’s soundtrack. The headset will detect the audio and will not engage the Auto-Shutdown feature. Please note that mic input alone will not avoid the Auto-Shutdown feature.
If your headset keeps shutting off while audio is being played, please reach out to our support team for assistance with troubleshooting.
3. I’ve set up my headset for use with my PC, but I cannot hear any audio through the headset.
- First, click on the Speaker icon in the bottom-right corner of the screen. What device name shows up? If this device name is “Xbox Controller”, make sure the transmitter’s console switch is set to USB, not Xbox. The headset should then show up properly within the settings.
- In addition, please make sure the headset is set as the default Input and Output device in the settings for both the PC and the game that you’re using the headset with.
If the transmitter is in the USB mode, and the headset is set as the default device in the settings for both the computer and game themselves, but you still cannot hear the audio, please reach out to our support team for assistance with troubleshooting.
]]>
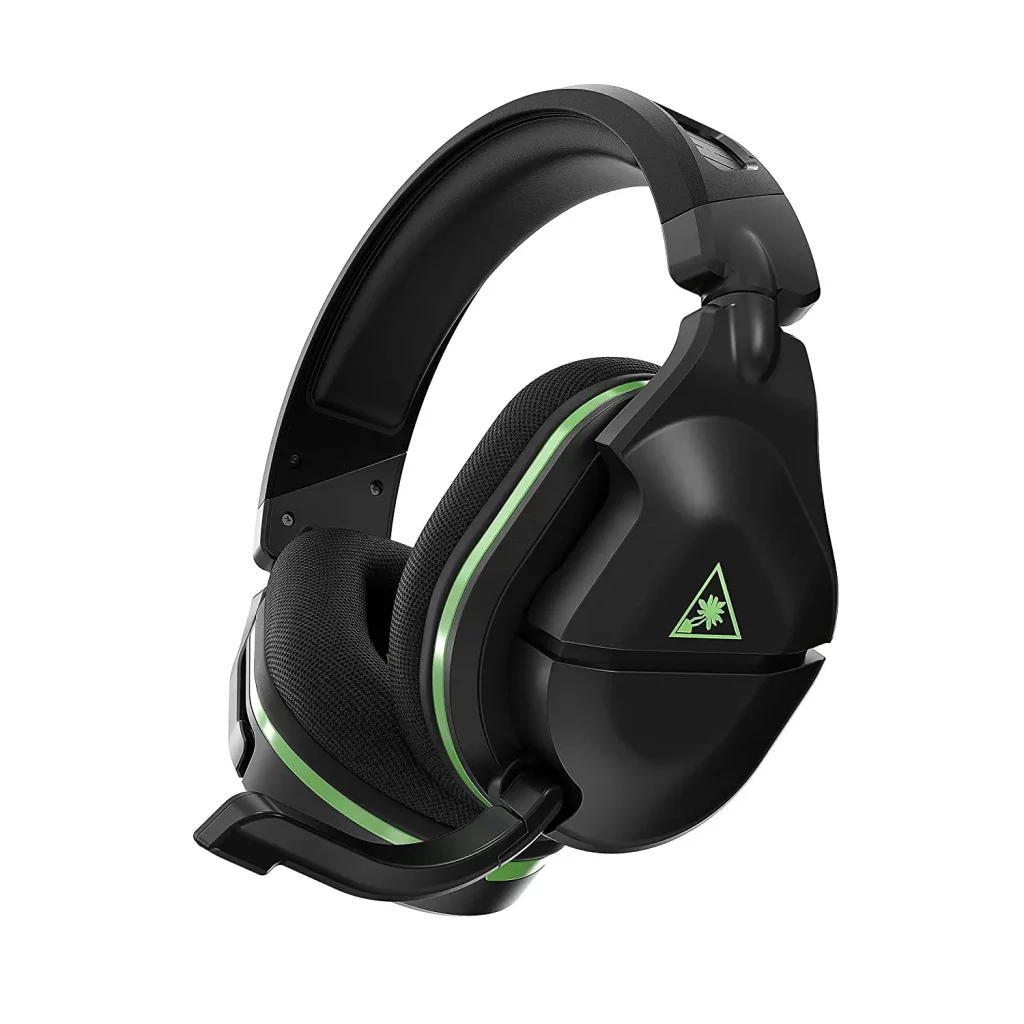
User Manual
- Stealth 600 Gen 2 Xbox Headset (A)
- USB-C Charge Cable (B)
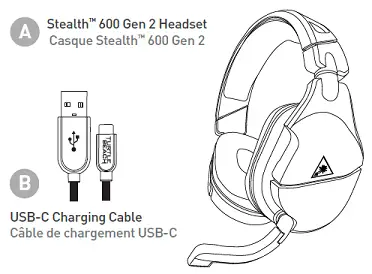
Please make sure your headset is updated with the latest firmware.
Connect to the Turtle Beach Audio Hub for Windows or Mac to update the firmware.

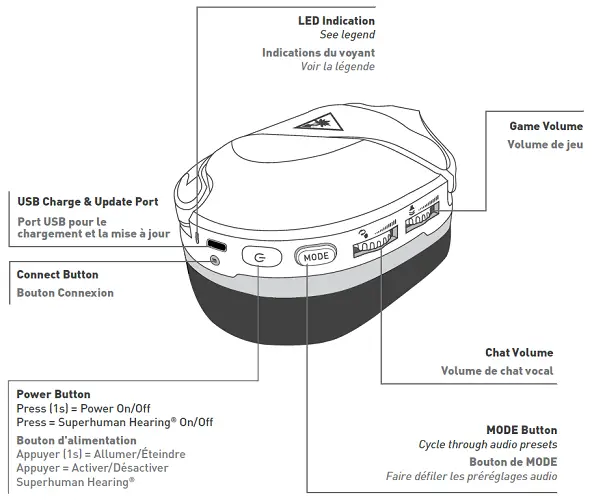
- LED Indication
- See legend
- USB Charge & Update Port
- Connect Button
- Power Button
- Press (1s) – Power On/Off
- Press – Superhuman Hearing On/Off
- Mode Button
- Cycle through audio presets
- Chat Volume
- Game Volume

Use Superhuman Hearing Mode to pinpoint quiet audio cues like enemy footsteps and weapons reloads.
During gameplay, you can activate and deactivate Superhuman Hearing by pressing the POWER button once, quickly.
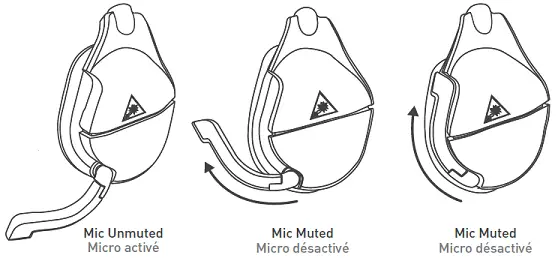
Flip up microphone to mute. There is an audible tone when the mic is muted or unmuted.
To cycle through EQ Audio Presets, press the Mode button. EQ Presets include:
- Signature Sound
- Bass Boost
- Bass + Treble Boost
- Vocal Boost
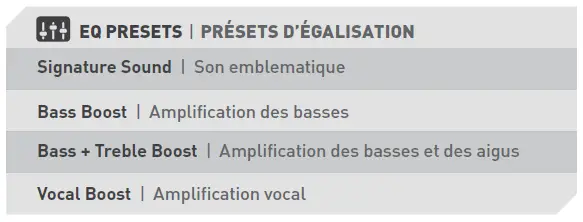
This headset is compatible for use with
- Xbox Series X
- Xbox One
- Windows 10 with Xbox Adapter (sold separately)
CONSOLE SETUP
To set your headset up for use with an Xbox One console, please do the following:
1. Power on both the headset and the console. The LEDs should light up.
2. Press the Enroll button on the Xbox console until it blinks rapidly. Then, press and hold the Connect button on the headset, until the LED on the headset begins to flash rapidly as well.
3. Within a couple of seconds, the headset and console LEDs will turn solid, indicating that the headset and console have been paired.
SURROUND SOUND FOR XBOX (ONLY AVAILABLE ON XBOX)
- Go to Settings >> General >> Volume & Audio Output
- Set Headset Audio to Windows Sonic for Headphones
The Stealth 600 Gen 2 Xbox headset gives you 15 hours of rechargeable battery life. Make sure to charge it regularly before storing.
Headset Storage
Always charge your headset before storing it for any extended period of time (greater than 3 months). Never store the unit in temperatures above 113°F/45°C.
The behavior of the headset LED will indicate charging and pairing status, as detailed in the following chart:
| HEADSET LED | MEANING |
| Solid Green | Headset And Console Paired |
| Breathing Green | (While Charged) Battery Full |
| Double-blink Green | Not Paired |
| Solid Red | (While Charging) Battery Charging LED Turns Off When Battery Is Fully Charged (If Headset Is Off) |
| Breathing Red | Battery Low |
SYNCING YOUR HEADSET
(XBOX WIRELESS ADAPTER)*
*Xbox Wireless Adapter not included.
1. Plug the Xbox Wireless Adapter into a free USB port on the computer.

Then, power the headset on by pressing and holding the Power button down.
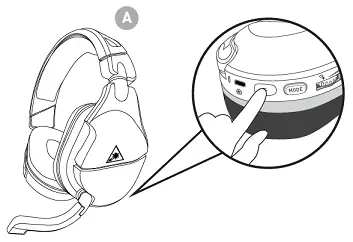
2. Press and hold the Enroll button on the Adapter until the LED on the Adapter flashes. Then, press and hold the Connect button on the headset until the LED on the headset flashes.
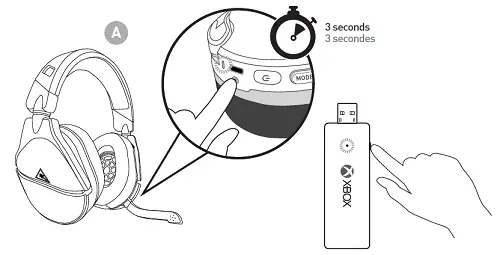
3. Within a few seconds, the LEDs on both the headset and the Adapter will turn solid, indicating the headset and Adapter have been successfully synced.
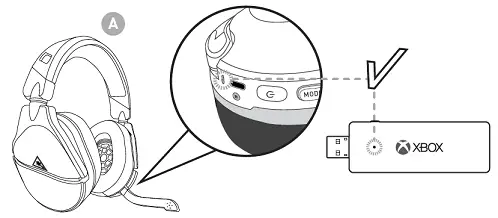
PLEASE NOTE: The Xbox Wireless Adapter is not included with the headset purchase, and is sold separately. In addition: When used on a PC, the headset volume is controlled through Windows 10. The volume controls on the headset will have no effect.
(BUILT-IN XBOX WIRELESS)
- On your PC, go to Settings >> Devices >> Connected Devices.
- Choose Add A Device. Windows will search for the headset.
- Press and hold the Connect button on the headset until the LED on the headset flashes rapidly. Windows will find and add the headset.
- When your Stealth 600 headset appears in the list under Other Devices, it is ready to use.
- On the Windows Taskbar, right-click the Speaker icon and select “Sounds“. From there, go to the Playback tab of that window.
- Set TURTLE BEACH Stealth 600 as your default device.
- Go to the Recording tab of that window.
- Set TURTLE BEACH Stealth 600 as your default device.
Headset Not Responding (Hard Reset And Firmware Update)
If your headset will not respond to button presses and is displaying a solid Red LED, please follow the below steps to reset your headset.
Part 1. Hard-Reset Your Headset
To hard-reset your Stealth 600 Gen 2 Xbox headset, please do the following:
Hold down the Connect and Mode buttons for 20 seconds. These buttons are highlighted in the image below.
” alt=”Hard_Reset_Buttons.PNG” width=”287″ height=”96″ data-ezsrc=”https://manuals.plus/ezoimgfmt/turtlebeach–c.na137.content.force.com/sfc/dist/version/download/?oid=00DU0000000Jga6&ids=0684U00000BWKp9&d=%2Fa%2F4U000000smQT%2FRSnLG6KWBpRTKhvc7.qlgPAOotsIvOV8ojaf_hZP_EM&asPdf=false” />
This is a very long press — make sure that you do not release the buttons too early. Holding the buttons down for too long is better than for too short. This will hard-reset the headset, which may clear up what you are experiencing.
**If the LED remains red, please try this process again. This “long press” should force the headset to power off regardless of the state it is in.**
After the headset powers off completely, press the headset’s Power button to power it back on as normal.
Part 2: Update The Headset’s Firmware
Applying the firmware update will be necessary to prevent the headset from getting stuck in an unresponsive Red-LED state again.
To apply the firmware update: After the headset powers on, use the included USB cable to plug your headset into a free USB port on your computer, with the Turtle Beach Audio Hub running. The Audio Hub will detect the headset, search for available firmware updates, and prompt you to install those updates.
The firmware update will prevent this issue from repeating itself. For firmware update instructions, click here.
Part 3: Hard-Reset the Console, Then Pair The Headset To Your Xbox Console
Once that firmware update has been performed, please perform a hard-reset of the console, as well.
1. Hold down the Power button on the console for several seconds, until the console itself fully shuts down. Do not quick-press this button, as that will only put the console into Sleep mode. To perform this process properly, the console itself will need to power down completely.
2. Once the console has powered off completely, press the power button on the console to turn it back on. You should see the Xbox logo display, and hear a sound effect.
3. If you power on the console and it does an “Instant Boot” into the Dashboard, the hard-reset process was not performed correctly. You will need to perform this process again, starting with Step 1.
4. Once you are sure that the console has been hard-reset properly, please verify that your headset is assigned to the correct profile when powered on.
To re-pair the headset, please do the following:
- Power on both the headset and the console. The LEDs should light up.
- Press the Enroll button on the Xbox console until it blinks rapidly. Then, press and hold the Connect button on the headset, until the LED on the headset begins to flash rapidly as well.
- Within a couple of seconds, the headset and console LEDs will turn solid, indicating that the headset and console have been paired.
**Please Note: In case this issue was caused by a conflict with the USB Port you were using, please try charging your headset with a USB Power Adapter instead. These adapters are often included with new phones and will work fine to charge your headset.**———————
No Mic Audio
The Stealth 600 Gen 2 Xbox has an adjustable mic. To use the mic, gently push (“flip”) the mic forwards. You will hear a tone (low high) when the mic itself is unmuted. When the mic is fully flipped forwards, it will “lock” into position. To mute the mic, just flip the mic back the other way. You will hear a tone (high low) when the mic is muted.
If other players are unable to hear you in Xbox Live Chat or on your Xbox One console, please check the following.
1. Check That The Headset And Console Are Paired/Headset Is Detected By Console
The Headset and Console need to be paired to each other in order for the mic to work. Make sure that the Headset and Console have been successfully paired.
To check if the headset and console are paired, take a look at the LED on the headset. If it is solid green, the headset and console are paired. If the LED on the headset is not solid, the headset may not be paired to the console. Please review the following to determine whether the headset and console are paired:
| HEADSET LED | MEANING |
| Solid Green | Headset And Console Paired |
| Breathing Green | (While Charged) Battery Full |
| Double-Blink Green | Not Paired |
| Solid Red | (While Charging) Battery Charging LED Turns Off When Battery Is Fully Charged (If Headset Is Off) |
| Breathing Red | Battery Low |
**PLEASE NOTE: The headset’s Mic Monitoring will still continue to function even if the headset and console are not paired. You may be able to hear yourself through the headset when you speak into the mic, but if the headset itself is not paired to the console, other people would not be able to hear you until the headset and console were paired again.**
As an additional test to see if the console itself is recognizing the headset:
- Press the Xbox/Home button on the Xbox One controller.
- Go to Settings >> All Settings >> Kinect & Devices >> Devices & Accessories.
- You will see the controller you are currently using; you should be able to scroll to the right to see other devices being used with the Console. The headset will appear in this list as “Headset”.
Do you see the headset in that list?
If the headset and console are paired, and you can see the headset in that list, but you cannot be heard, please proceed to step 2.
If you do not see that headset listed, please contact our Support Team.
2. Party Test – Check for Icon Ring
- Press the Xbox/Home button on the Xbox One controller.
- Scroll to the Party tab, and select “Start A Party“. You do not need to invite other players to this party; you can perform this test alone in the party.
- Speak into the mic. When you speak into the mic, does a ring light up around the icon next to your Gamertag (in the list of party members)?
If so, continue to the Test Message.
If you don’t see that ring, please contact our Support Team.
3. Record a Test Message
- Press the Xbox button while in the home screen.
- Go to Parties & Chats tab, and select New Chat
- Select someone from the list (you do not have to select anyone in particular, as you will not be sending this message), and then tap the Menu button to complete the selection.
- After you choose a person, two options will appear: Write a Message (pencil icon on left) and Record a Message (mic icon on right). Select the Record a Message/Mic icon on the right.
- Select Record, and then speak into the mic. When you are done recording, stop the recording.
- The new recording should appear under the Write a Message/Record a Message icons. Select Play, and listen to that recording you made. This will tell you how your voice will sound to other players. Can you hear your voice clearly?
If you can hear your voice clearly when you play back that recording you made, the mic itself is working well.
If you cannot hear your voice clearly when you play back that recording, please contact our Support Team.
4. Power Cycle Headset/Console
To perform a quick power cycle with the Headset/Console, please do the following, in this order:
- Press and hold the Power Button on the Headset until the Power LED turns off.
- Power down the Xbox One Console. When it has fully powered down, unplug the Console from the wall outlet.
- Let everything sit for a minute.
- Plug the Console back in, and power the Console on again.
- Press and hold the Power button on the Headset until the Power LED lights up.
- Re-pair the Headset and Console.
To pair the headset:
- With the headset powered on, press the Enroll button on the console. The LED should blink rapidly.
- Then, press and hold the Connect button on the headset. The LED will begin to flash rapidly.
- Within a couple of seconds, the headset and console LEDs will turn solid, indicating a successful pairing.
If the Power Cycle does not resolve this, please contact our Support Team.
PC Compatibility
While the Stealth 600 Gen 2 Xbox headset was designed to be used with an Xbox console directly, it can be used with a Windows PC, using a specific setup.
Please Note: This headset can be used with Windows PCs only.
For most PCs, you will need to pair the headset to an Xbox Wireless Adapter. This will give you the same wireless connection with the PC that you would have when you use the headset with an Xbox — but please note that the controls will be different.**
To set your headset up for use with a PC that does not have Xbox Wireless built-in, please do the following.
1. Plug the Xbox Wireless Adapter into a free USB port on the computer.
” alt=”PC_Setup.png” width=”498″ height=”97″ data-ezsrc=”https://manuals.plus/ezoimgfmt/turtlebeach–c.na137.content.force.com/sfc/dist/version/download/?oid=00DU0000000Jga6&ids=0684U00000BWKaJ&d=%2Fa%2F4U000000smNH%2Fgs2yX4QbgxnoxIblNW4bCI2X20FL8gWG24TdPodueto&asPdf=false” />
Then, power the headset on by pressing and holding the Power button down.
” alt=”PC_Setup_1.PNG” width=”353″ height=”242″ data-ezsrc=”https://manuals.plus/ezoimgfmt/turtlebeach–c.na137.content.force.com/sfc/dist/version/download/?oid=00DU0000000Jga6&ids=0684U00000BWL9Y&d=%2Fa%2F4U000000smWd%2F736jwk8bzvcoTENiWh5WIaZbgqiesGHooorYDGXyuX0&asPdf=false” />
2. Press and hold the Enroll button on the Adapter until the LED on the Adapter flashes. Then, press and hold the Connect button on the headset until the LED on the headset flashes.
” alt=”PC_Setup_2.PNG” width=”497″ height=”255″ data-ezsrc=”https://manuals.plus/ezoimgfmt/turtlebeach–c.na137.content.force.com/sfc/dist/version/download/?oid=00DU0000000Jga6&ids=0684U00000BWL8l&d=%2Fa%2F4U000000smcM%2FTb_U9YK77X_PCnHGCDGJja4xGdMR83wDNrg42Xq33Fc&asPdf=false” />
3. Within a few seconds, the LEDs on both the headset and the Adapter will turn solid, indicating the headset and Adapter have been successfully synced.
” alt=”PC_Setup_3.PNG” width=”498″ height=”218″ data-ezsrc=”https://manuals.plus/ezoimgfmt/turtlebeach–c.na137.content.force.com/sfc/dist/version/download/?oid=00DU0000000Jga6&ids=0684U00000BWKq9&d=%2Fa%2F4U000000smS9%2FWUclxjcJo1pG4uzT3yn6V9.vsyPLmG1kxRuTMsRqo0c&asPdf=false” />
PLEASE NOTE: The Xbox Wireless Adapter is not included with the headset purchase, and is sold separately.
**In addition: When used on a PC, the volume controls will differ from when used with an Xbox console. You will need to first turn down the lower Volume Control on your headset to the minimum value. Then, use the upper volume control on the headset to control the volume of the audio from your PC. These controls will not work on PC as they do on an Xbox One console; as a result you cannot control Game and Chat audio separately.**
A limited number of computers do have Xbox Wireless built in. For those computers, an Xbox Wireless Adapter is not necessary to use the headset. Since those PCs already have Xbox Wireless built in, you would just need to pair the headset with your PC.
PLEASE NOTE: Not all PCs have built-in Xbox Wireless. If you are not sure if your PC has this feature, check your PC’s specifications, or check with the manufacturer of your PC.
Once you have confirmed that your PC has built-in Xbox Wireless, please do the following to pair your headset to the PC for use:
- On your PC, go to Settings >> Devices >> Connected Devices.
- Choose Add A Device. Windows will search for the headset.
- Press and hold the Connect button on the headset until the LED on the headset flashes rapidly. Windows will find and add the headset.
- When your Stealth 600 headset appears in the list under Other Devices, it is ready to use.
CONFIGURING YOUR SETTINGS
- On the Windows Taskbar, right-click the Speaker icon and select “Sounds“. From there, go to the Playback tab of that window.
- Set TURTLE BEACH Stealth 600 as your default device.
- Go to the Recording tab of that window.
- Set TURTLE BEACH Stealth 600 as your default device.
Xbox Setup
To set your Stealth 600 Gen 2 Xbox headset up for use with an Xbox console, please do the following. Please note that the information in this article applies to both the Xbox One and the Xbox Series X|S consoles.
First, power the headset on, and make sure the headset and console are paired.
Once the headset is paired to the console, configure the Windows Sonic Surround Sound:
1. While in the Home screen, press the Xbox button on the controller. You’ll see the following screen:
” alt=”Sonic_1_-_Home_Screen.png” width=”1920″ height=”1080″ data-ezsrc=”https://manuals.plus/ezoimgfmt/turtlebeach–c.na137.content.force.com/sfc/dist/version/download/?oid=00DU0000000Jga6&ids=0684U00000BWLqU&d=%2Fa%2F4U000000smqZ%2FIgfHHsOR_UV8tswlnOBD.AcfceVPgXmCW.GixYKMZJA&asPdf=false” />
2. Navigate to the Profile & System Tab, and select “Settings“.
” alt=”Sonic_2_-_Profile___System.png” width=”1920″ height=”1080″ data-ezsrc=”https://manuals.plus/ezoimgfmt/turtlebeach–c.na137.content.force.com/sfc/dist/version/download/?oid=00DU0000000Jga6&ids=0684U00000BWLfh&d=%2Fa%2F4U000000smsj%2FxWwOWKRasieYeGMFgWU.iN6LR4kRPc8G4HSffqaHwzg&asPdf=false” />
3. Go to General >> Volume & Audio Output.
” alt=”Sonic_3_-_Volume__Audio_Output.png” width=”1920″ height=”1080″ data-ezsrc=”https://manuals.plus/ezoimgfmt/turtlebeach–c.na137.content.force.com/sfc/dist/version/download/?oid=00DU0000000Jga6&ids=0684U00000BWLZI&d=%2Fa%2F4U000000smnM%2FAesZ3TB_K1IsgaS1Ym_ziEal1dc.wWY6Z.6hvFPANR0&asPdf=false” />
4. In the Headset Audio column (right side of the screen), set Headset Format to Windows Sonic For Headphones.
” alt=”Sonic_4_-_Windows_Sonic.png” width=”1920″ height=”1080″ data-ezsrc=”https://manuals.plus/ezoimgfmt/turtlebeach–c.na137.content.force.com/sfc/dist/version/download/?oid=00DU0000000Jga6&ids=0684U00000BWLxT&d=%2Fa%2F4U000000sn6L%2FGz8HWhZHhBZevTXDVAE3Zg7H3Ad9Up0evg7UJYceDkI&asPdf=false” />
Turtle Beach Audio Hub (Update Firmware And Customize Controls)
For the best experience, we recommend always running the most up-to-date firmware on your headset.
There is an important firmware update available for the Stealth 600 Gen 2 Xbox, which will prevent it from getting locked in an unresponsive state, with the LED stuck on solid red. If your Stealth 600 Gen 2 Xbox headset is unresponsive, click here.
Connect to the Turtle Beach Audio Hub for Windows or Mac to update the firmware.
To update your headset’s firmware, please do the following:
1. First, download the Turtle Beach Audio Hub; this is available for both Windows and Mac.
2. Once the Audio Hub has been downloaded/installed, open the program.
3. Plug the headset itself into a free USB port on the computer. The Audio Hub program will automatically detect that the headset has been connected, and will search for any available updates. If there is an available update, you will be prompted to perform that update.
Once that firmware update has been performed, please perform a hard-reset of the console, as well.
1. Hold down the Power button on the console for several seconds, until the console itself fully shuts down. Do not quick-press this button, as that will only put the console into Sleep mode. To perform this process properly, the console itself will need to power down completely.
2. Once the console has powered off completely, press the power button on the console to turn it back on. You should see the Xbox logo display, and hear a sound effect.
3. If you power on the console and it does an “Instant Boot” into the Dashboard, the hard-reset process was not performed correctly. You will need to perform this process again, starting with Step 1.
4. Once you are sure that the console has been hard-reset properly, please verify that your headset is assigned to the correct profile when powered on.
You can now use your fully-updated headset with your console.
In addition to updating the headset’s firmware, you can also adjust the following settings:
- Mic Monitor
-
- This slider will adjust the volume of the headset’s Mic Monitor feature — which allows you to hear your own voice through the headset when you speak into the mic.
-
- Tones
-
- This slider will adjust the volume of the Tones that play when some features of the headset are engaged, including the Mic Mute/Unmute, and EQ Preset changes.
-
” alt=”S600Xv2_WEFAH_P1.PNG” width=”800″ height=”600″ data-ezsrc=”https://manuals.plus/ezoimgfmt/turtlebeach–c.na137.content.force.com/sfc/dist/version/download/?oid=00DU0000000Jga6&ids=0684U00000BWLHs&d=%2Fa%2F4U000000snCB%2Fk6diBj2JBWHS1KWhEyzGbFO.Vkz0XeFicqqqS7n6YZw&asPdf=false” />
Pairing
The Stealth 600 Gen 2 Xbox headset pairs directly with the Xbox console. The Headset will need to be paired with the console prior to the Headset’s first use.
**PLEASE NOTE: This article covers pairing the headset directly with an Xbox One Console. If you are looking to use this headset with an Xbox Wireless Adapter, please click here.**
Please do the following to pair the headset and console:
1. Power on both the headset and the console. The LEDs should light up.
” alt=”Xbox_Setup_1.PNG” width=”452″ height=”252″ data-ezsrc=”https://manuals.plus/ezoimgfmt/turtlebeach–c.na137.content.force.com/sfc/dist/version/download/?oid=00DU0000000Jga6&ids=0684U00000BWL4U&d=%2Fa%2F4U000000smdp%2FTNKDGj2YK7HM8Ygtcxes25tSSLXJr7pfAwKA5EMvce8&asPdf=false” />
2. Press the Enroll button on the Xbox console until it blinks rapidly. Then, press and hold the Connect button on the headset, until the LED on the headset begins to flash rapidly as well.
” alt=”Xbox_Setup_2.PNG” width=”510″ height=”255″ data-ezsrc=”https://manuals.plus/ezoimgfmt/turtlebeach–c.na137.content.force.com/sfc/dist/version/download/?oid=00DU0000000Jga6&ids=0684U00000BWL80&d=%2Fa%2F4U000000smLL%2FDuUy1FaoYzjAZWS9iBZGGOx3g3gKo6K5W7Bg0MRtsQI&asPdf=false” />
3. Within a couple of seconds, the headset and console LEDs will turn solid, indicating that the headset and console have been paired.
” alt=”Xbox_Setup_3.PNG” width=”510″ height=”250″ data-ezsrc=”https://manuals.plus/ezoimgfmt/turtlebeach–c.na137.content.force.com/sfc/dist/version/download/?oid=00DU0000000Jga6&ids=0684U00000BWLQQ&d=%2Fa%2F4U000000smgR%2FKryzbGGzYBi8qnt9TJC2vGkmECCii.9y95v22EdG42s&asPdf=false” />
Charging
The Stealth 600 Gen 2 Xbox headset gives you 15 hours of rechargeable battery life. Make sure to charge it regularly before storing.
Please note that in order to conserve battery life, your headset will power off after no audio is played through it for 10 consecutive minutes. This is a fixed feature, and cannot be adjusted. This feature helps to save battery life – if you forget to power the headset off for the night after a long gaming session, you will only lose a few minutes of battery life, not a whole night’s worth.
To easily avoid the Auto-Shutdown feature, you can keep some music playing in the background, like the game’s soundtrack. The headset will detect the audio, and will not engage the Auto-Shutdown feature.
When the battery is low, the headset LED will “breathe” red. That LED will change to solid red when the headset is plugged in and charging; when the headset is plugged in, powered on, and has finished charging, the headset LED will “breathe” green. If the headset is plugged in, powered off, and has finished charging, the LED will turn off.
Headset Storage
Always charge your headset before storing it for any extended period of time (greater than 3 months). Never store the unit in temperatures above 113°F/45°C.
Frequently Asked Questions (FAQ)
Here are some of the most frequently asked questions regarding the Stealth 600 Gen 2 Xbox model headset.
1. Does the headset offer Bluetooth compatibility?
- No. The Stealth 600 Gen 2 Xbox does not provide any sort of Bluetooth compatibility. The headset is not capable of pairing to Bluetooth devices.
2. Which Xbox consoles can this headset be used with?
- This headset is compatible with any variation of the Xbox One and Xbox Series X|S consoles.
3. Can I use my Stealth 600 Gen 2 Xbox on a PC?
- Yes, in certain circumstances. The Stealth 600 Gen 2 Xbox would provide compatibility with Windows 10 PCs via an additional adapter available from Microsoft. That adapter is known as the Xbox Wireless Adapter for Windows 10. You can read more about setting your headset up with that adapter for PC use here.
4. Can I use my Stealth 600 Gen 2 Xbox with a Nintendo Switch or PlayStation?
- No. The Stealth 600 Gen 2 Xbox would not offer any sort of compatibility with a Nintendo Switch or a PlayStation console.
1. Can the headset be used while charging? Can I charge my headset with my cell phone’s USB wall adapter?
- Yes! You can use the headset’s USB charging cable to charge the headset while it is in use.
- While we usually suggest charging the headset via a USB port on your console, a USB wall adapter can be used to charge the headset.
For more information on the charging this headset, please click here.
2. When charging my headset, the headset’s LEDs turn off after a minute or two. Is that normal?
- When the battery is low, the headset LED will “breathe” red. Plug the headset in to charge and the LED will change to solid red. Please note that the LED will display differently depending on whether the headset is powered on or powered off while charging.
- You can find the most up to date information for your headset’s LEDs in the “LED Behaviors” section of the products Quick Start Guide, available here.
1. Where is my Stealth 600 Gen 2 Xbox headset’s transmitter?
- The Stealth 600 Gen 2 Xbox uses the Microsoft proprietary wireless connection known as Xbox Wireless and pairs to your Xbox console directly like the official controllers do. It does not require a transmitter for use with your Xbox console. You can find step-by-step pairing instructions for the Stealth 600 Gen 2 Xbox headset here.
2. How do I update my headset?
- In order to update your headset, you would need access to a PC or laptop that is operating on Windows or MacOS so you can install our Audio Hub program.
- Updates for this model can only be performed via a desktop or laptop, as there would be no way to go about pairing the headset using the mobile Audio Hub for iOS or Android. The Audio Hub is not be for ChromeOS.
You can read more about the update process for your headset here.
3. The pairing button on my Xbox console is broken, is there any other way to pair my headset?
- No. Unfortunately, there is not a way currently. The headset would need to be paired via the button on the headset and the console itself. If a solution does become available, we will update this section.
4. I can hear my own voice when I speak or hear some background noises being played in my headset. Is that normal?
- Yes. You may be referring to the headset’s Microphone Monitoring feature, which allows you to hear your voice through the headset when you speak into the mic.
- It’s possible that the headset’s Mic Monitor control is turned up too high and is playing back noises from the room you’re in. This can result in you hearing echoes, hiss and/or static in your headset while you’re using it. You can adjust the intensity of the Mic Monitoring feature, or disable it completely, using the mobile Audio Hub for Windows or MacOS.
If you continue to have the same inconvenience after adjusting your headset’s Microphone Monitoring volume level; please reach out to our support team for further assistance.
5. How do I replace the ear cushions on my headset?
- We have an article with illustrations of the best way to replace our ear cushions available here.
- Replacement ear cushions are available on the Turtle Beach Webstore.
TROUBLESHOOTING
1. Party Chat members are complaining about my outbound microphone volume level being too low or too high. Is there something wrong with my headset?
- On a recent release for Xbox, you can now control the individual volume of people in your party. Please have your party members check to see if they have your volume level set too low or too high. Sometimes people who have this level turned up too high or too low are experiencing inconveniences like this. However, if you continue to have the same experience even after checking that setting, please reach out to our support team.
2. My lower dial is no longer controlling the volume of incoming chat audio. Is there anything I can do about this?
- If the lower dial on your Stealth 600 Gen 2 Xbox is not functioning as it should, please reach out to our support team for assistance with troubleshooting.
3. My headset sounds are abnormal, it didn’t sound like this before. What could be going on here?
- Please double check to ensure you have not left the Superhuman Hearing option on. Superhuman Hearing (SHH) is a situational feature designed to prioritize certain sounds to give you the edge in intense gaming scenarios. This should not be left on all the time.
- Please connect your headset to your preferred version of the Audio Hub. From there, please check to see if you have the option for SHH enabled. Disabling this feature should return your audio back to its preferred state.
If turning off the SHH feature does not clear up your inconvenience, please reach out to our support team for assistance with troubleshooting.
4. My headset’s LED will not light up at all, even when charged. It seems completely dead. What can I do about that?
- If possible, please use a different USB cable and a different USB port — including any USB Wall Adapters — to charge the headset. Leave the headset to charge for an extended period, ideally overnight.
If you continue to have the same inconvenience or are unable to charge the headset with a different USB cable and/or USB port, please reach out to our support team.
5. My audio/mic has connection issues and produces static or other abnormalities. What’s going on here?
- A common cause of this is having your wireless router close to your console, or other wireless devices close as well. Even if you console is hardwired, the router is still broadcasting a wireless signal, which can cause network congestion and audio/mic glitching, as well as connection issues. We recommend keeping a minimum distance of 10 feet between your router/wireless- devices and console to avoid issues.
For further assistance with this; please reach out to our support team.
6. My headset keeps shutting off on its own when no audio is playing.
- In order to conserve battery life, your headset will power off after no audio is played through it for 10 consecutive minutes. This is a fixed feature and cannot be adjusted.
- This feature helps to save battery life – if you forget to power the headset off for the night after a long gaming session, you will only lose a few minutes of battery life, not a whole night’s worth.
- To easily avoid the Auto-Shutdown feature, you can keep some music playing in the background, like the game’s soundtrack. The headset will detect the audio and will not engage the Auto-Shutdown feature. Please note that mic input alone will not avoid the Auto-Shutdown feature.
If your headset keeps shutting off while audio is being played, please reach out to our support team for further assistance.
7. My Stealth Stealth 600 Gen 2 Xbox headset is stuck with its LED always on, but I can’t turn it off and I get no sound. What can I do to get it working again?
Please try out the following:
- Press and hold down the Xbox Pairing Button + Mode Button on your headset for 20 seconds. This is a very long press, so please make sure that you do not release it early. Holding that button down too long is better than too short.
-
- This should hard reset the headset and may clear up what you are experiencing.
-
- After performing that hard-reset, make an attempt at updating the headset via the Audio Hub for Windows or MacOS.
If you continue to have the same inconvenience; please reach out to our support team for further assistance.
]]>
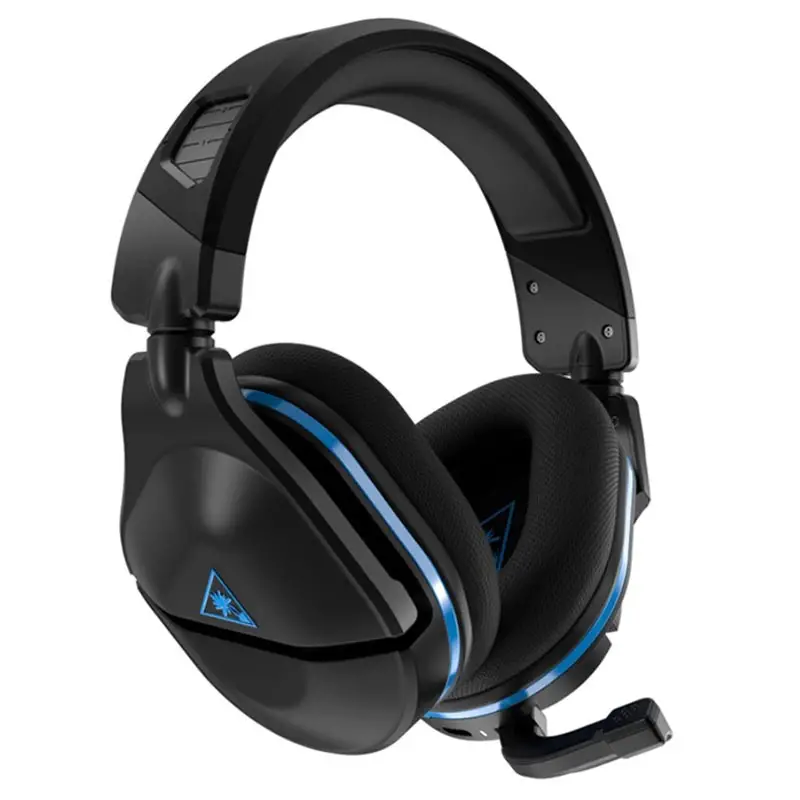
User Manual
- Stealth 600 Gen 2 Headset (A)
- Stealth 600 Gen 2 Wireless Mini Transmitter (B)
- USB-C Charging Cable (C)
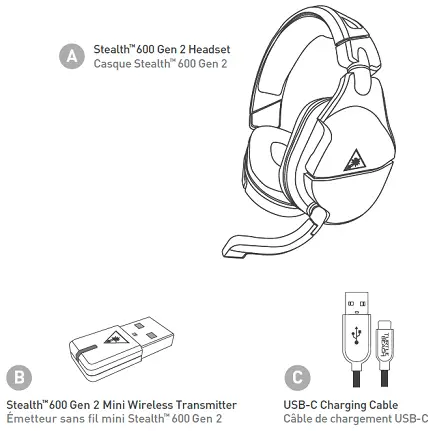
Please make sure your headset is updated with the latest firmware.
Connect to the Turtle Beach Audio Hub for Windows or Mac to update the firmware.

- LED Indication
- See legend
- USB Charge & Update Port
- Power Button
- Press (1s) – Power On/Off
- Press – Superhuman Hearing On/Off
- Mode Button
- Cycle through EQ Audio Presets
- Variable Mic Monitoring
- Adjust Mic Monitoring levels
- Master Volume Dial

Use Superhuman Hearing Mode to pinpoint quiet audio cues like enemy footsteps and weapons reloads.
During gameplay, you can activate and deactivate Superhuman Hearing by pressing the POWER button once, quickly.
Flip up mic to mute. There is an audible tone when the mic is muted or unmuted.

To cycle through EQ Audio Presets, press the Mode button. EQ Presets include
- Signature Sound
- Bass Boost
- Bass + Treble Boost
- Vocal Boost
1. Connect Mini-Transmitter to USB Port on the console.

2. Power the Headset on.
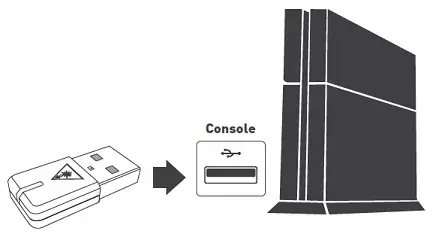
3. Go to Settings >> Devices >> Audio Devices
- Select Stealth 600 Gen 2 for Input & Output Device
- Set Output to Headphones to All Audio
- Set Volume Control (headphones) level to maximum
- Select Adjust Microphone Level and follow the on-screen instructions to calibrate your microphone.
*This headset is not compatible for use with PSVR.
Please note: If the headset is powered off, but the transmitter is plugged in, the console will recognize the transmitter as an available audio device. To avoid this, unplug the transmitter when the headset is powered off/not in use.
The Stealth 600 Gen 2 gives you 15 hours of rechargeable battery life. Make sure to charge it regularly before storing.
Please note that in order to conserve battery life, your headset will power off after no audio is played through it for 10 consecutive minutes. This is a fixed feature, and cannot be adjusted. This feature helps to save battery life – if you forget to power the headset off for the night after a long gaming session, you will only lose a few minutes of battery life, not a whole night’s worth.
To easily avoid the Auto-Shutdown feature, you can keep some music playing in the background, like the game’s soundtrack. The headset will detect the audio, and will not engage the Auto-Shutdown feature.
When the battery is low, the headset LED will “breathe” red. That LED will change to solid red when the headset is plugged in and charging; when the headset is plugged in, powered on, and has finished charging, the headset LED will “breathe” blue. If the headset is plugged in, powered off, and has finished charging, the LED will turn off.
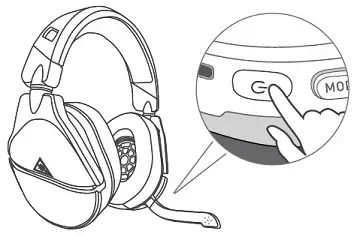
Headset Storage
Always charge your headset before storing it for any extended period of time (greater than 3 months). Never store the unit in temperatures above 113°F/45°C.
Auto-Shutdown
In order to conserve battery life, your headset will power off after no audio is played through it for 10 consecutive minutes. This is a fixed feature, and cannot be adjusted. This feature helps to save battery life – if you forget to power the headset off for the night after a long gaming session, you will only lose a few minutes of battery life, not a whole night’s worth.
To easily avoid the Auto-Shutdown feature, you can keep some music playing in the background, like the game’s soundtrack. The headset will detect the audio, and will not engage the Auto-Shutdown feature.
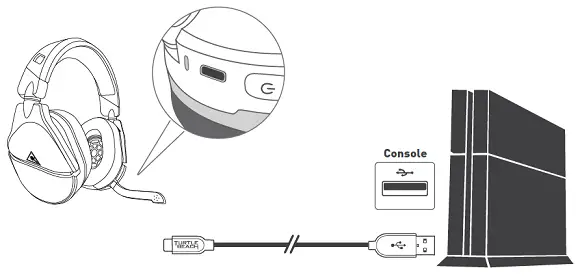

| TRANSMITTER LED | MEANING |
| Solid Blue | Headset and Mini Transmitter Paired |
| Double-Blink Blue | Not Paired |
| Breathing Red | Mic Muted |


| HEADSET LED | MEANING |
| Solid Blue | Headset and Mini Transmitter Paired |
| Breathing Blue | (While Charging) Battery Full |
| Double-Blink Blue | Not Paired |
| Solid Red | (While Charging) Battery Charging LED Turns Off When Battery Is Fully Charged (If Headset Is Off) |
| Breathing Red | Battery Low |

The headset and transmitter are paired out of the box. This is indicated by a solid LED on the transmitter.
If your transmitter’s LED is double-blinking, follow these steps to pair your headset and transmitter.
1. Connect your Stealth 600 Gen 2 for PlayStation Transmitter into an available USB port on your PlayStation 4 console. Your Transmitter will begin to double-blink blue as it searches for your headset.
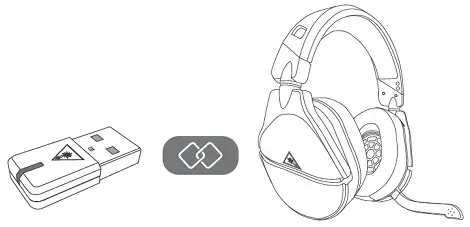
2. Power on your Stealth 600 Gen 2 for PlayStation Headset; the LED will begin to double-blink blue as it searches for your transmitter.
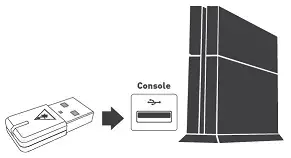
3. Within 10 seconds, the Transmitter’s and Headset’s LEDs remain solid, indicating a successful pairing.
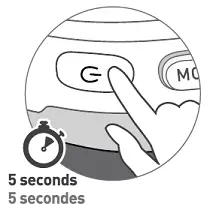
Please Note: After 30 seconds, your transmitter will search for both the previously paired headset, or any available Stealth 600 Gen 2 headset to pair to. Bring the two units closer together to ensure faster pairing. If this pairing seems to take longer than 10 seconds, do not move either the headset or transmitter or otherwise interrupt the pairing process. As long as both headset and transmitter are in the pairing mode and are near each other, the headset and transmitter should pair without issue.
Background Noise In PS4, PS5 Menu
Symptom:
- Audible background noise while in console menu, when used with either a PS4 or a PS5 console.
If you are experiencing audible background noise while in the console menu (either the PS4 menu or the PS5 menu), please perform a firmware update, as detailed below:
- If you have not yet done so, download the desktop version of the Turtle Beach Audio Hub. This is available for Windows and Mac here.
- Open the Audio Hub program, and plug both the transmitter and headset into free USB ports on the computer.
- The Audio Hub will automatically recognize the headset, and search for any available firmware updates. If one is available, you will be prompted to perform that update. Do not move the computer or the USB cable/headset or transmitter during this process.
- When the update process is complete, you’ll see a message that the headset’s firmware is fully up to date. Disconnect the headset and transmitter from the computer; you can now connect the headset and transmitter back to the console, and use the headset as normal.
Once the headset’s firmware update has been performed, you should be able to use the headset without issue.
No Mic Audio
The Stealth 600 Gen 2 PS headset has a flip-to-mute mic. When flipped all the way forward, the mic is unmuted.
To mute the mic, flip it up and towards the back of the headset. There will be an audible tone (low high) when the mic becomes muted.
Flip the mic to the second position shown in the following image to mute the mic as needed during chats. Flip the mic to the third position in that image to mute the mic when it is not needed.
If you are having issues being heard in chat, please do the following:
1. Make Sure Headset Is Charged/Powered On, Updated
First, charge the headset using its included USB Charge Cable. Then, make sure to hold the Power button to power the headset on. Once the headset is powered on, update the headset’s firmware if you have not yet done so.
Once the headset is fully charged/powered on, and the headset’s firmware is up to date, test the headset again. Are you still having issues? If so, please move on to step 2.
2. Double-Check Headset is Paired To Transmitter/Detected By Console, Settings are Configured
The headset and transmitter need to be paired in order to use the headset for chat. To make sure the headset is paired to the transmitter, please disconnect the transmitter and power the headset off completely. Then, perform the pairing process as indicated in this article — but be sure to connect the transmitter to a different USB port.
After the headset and transmitter are paired, do you see a prompt on the screen to let you know that a headset was assigned?
If you go to Settings >> Devices >> Audio Devices, is Stealth 600 Gen 2 set as the Default Input and Output Device? If you select Adjust Microphone Level and then follow the on-screen instructions, do you see any activity on that screen?
If you do not see any activity on that screen, contact our support team.
If you do see activity on that screen, please move on to step 3.
3. Check Game Settings
If you’re having issues only with a specific game — like Fortnite, Call of Duty: Modern Warfare, or Call of Duty: Warzone, make sure the settings for the game itself are configured correctly.
In Fortnite, make sure that Voice Chat is Enabled, and that the Voice Chat Method is not set to Push-To-Talk (it should be set to Open Mic).
You can see the correct settings for Call of Duty: Modern Warfare/Call of Duty: Warzone here.
In addition, if you’re in a Party while playing a game, make sure that your audio is prioritizing the group you’re using for chat. You can do this by opening the Party window, and then going to Party Settings. Select either Prioritize Game or Prioritize Chat, depending on which you are using for chat.
If these steps do not resolve the issue, but the headset works well with other games or in the Adjust Microphone Level screen, the issue may be game-specific; in that case, you may want to contact the support team for the game itself.
4. Power Cycle Headset/Console
To perform a quick power cycle with the Headset/Console, please do the following, in this order:
- Press and hold the Power Button on the Headset until the Power LED turns off.
- Power down the Xbox One Console. When it has fully powered down, unplug the Console from the wall outlet.
- Let everything sit for a minute.
- Plug the Console back in, and power the Console on again.
- Press and hold the Power button on the Headset until the Power LED lights up.
- Re-pair the Headset and Console.
To pair the headset:
- With the headset powered on, press the Enroll button on the console. The LED should blink rapidly.
- Then, press and hold the Connect button on the headset. The LED will begin to flash rapidly.
- Within a couple of seconds, the headset and console LEDs will turn solid, indicating a successful pairing.
If the Power Cycle does not resolve this, please contact our Support Team.
Nintendo Switch Setup
Please follow the instructions below to get your Stealth 600 Gen 2 PS headset set up for use with a Nintendo Switch console.
- Power the headset on, and plug the USB transmitter into the console, while the console is docked.
- Make sure the headset and transmitter are paired. The LEDs on the transmitter and the headset should be lit solid. If the LED on the transmitter is double-blinking, you’ll need to pair the headset and transmitter again.
- You should see the volume bar and the word “USB” appear on the screen, to confirm the transmitter has been connected.

Once you see those icons, you should be able to hear the game/chat audio. You may still need to configure the settings for the specific game you’re using the headset with.
Please Note: These settings will vary from game to game. In addition, there are a limited number of games that support in-chat capability.
You can find the instructions for configuring the settings for Fortnite below:
1. Make sure you are logged in to your profile. Once you are logged in, press the + button on the switch to bring up the Social menu. Scroll down to and then select the gear icon on the bottom of the left sidebar.

2. The sidebar will change in appearance from your friends list to a list of several different options. Select the “Settings” option, as shown below.

3. You will see several tabs on the top of the screen. Scroll to the Speaker tab – this is the Audio Settings tab. You can configure the Volume sliders to your liking. Then, scroll down to section labelled “Voice Chat”.
There will be two toggle settings: Voice Chat and Voice Chat Method.
- Voice Chat is ON by default. To be able to hear and be heard in chat, this setting needs to be ON. If this setting is turned off, you will not be able to hear the chat audio, and you will not be able to be heard in chat.
- Voice Chat Method is set to PUSH-TO-TALK by default. To be able to be heard in chat whenever you speak, this setting needs to be OPEN MIC. If this setting is set to PUSH-TO-TALK, you will not be heard in chat unless you press a specific button when you speak into the mic.

Make sure that the Voice Chat is On and the Voice Chat Method is set to Open Mic. You should be able to hear and be heard in the chat.
PlayStation Setup
This article details the best way to set your Stealth 600 Gen 2 PS headset up for use with a PS4 or PS5 console.
PLEASE NOTE: This headset is not compatible for use with PSVR.
PS4 SETUP
If you have a PS4/PS4 Pro console, please do the following.
1. Connect Mini-Transmitter to USB Port on the console.

2. Power the Headset on.

3. Go to Settings >> Devices >> Audio Devices, and then:
- Select Stealth 600 Gen 2 for Input & Output Device
- Set Output to Headphones to All Audio
- Set Volume Control (headphones) level to maximum
- Select Adjust Microphone Level and follow the on-screen instructions to calibrate your microphone.
PS5 SETUP
If you instead have a PS5 console, please do the following.
1. Plug the transmitter for your headset into a free USB port on the console, and then power the headset on. The headset and transmitter should pair, and the LEDs on both headset and transmitter will turn solid.
2. Go to Settings >> Sound >> Audio Output >> Output Device
-
-
- Select Stealth 600 for Output Device
- Set Output to Headphones to All Audio
- Set Volume Control (headphones) level to Maximum
-
3. Adjust your microphone levels by going to Settings >> Sound >> Microphone >> Adjust Mic Level >> Microphone Level
*As desired, you can enable the 3D Audio function to enhance the audio through your headset. Then, go to Adjust 3D Audio Profile to select the best profile option for your game.
Turtle Beach Audio Hub (Update Firmware And Customize Controls)
For the best experience, we recommend always running the most up-to-date firmware on your headset.
Connect to the Turtle Beach Audio Hub for Windows or Mac to update the firmware.
To update your headset’s firmware, please do the following:
1. First, download the Turtle Beach Audio Hub; this is available for both Windows and Mac.
2. Once the Audio Hub has been downloaded/installed, open the program.
3. Plug the mini transmitter and the headset itself into two free USB ports on the computer. The Audio Hub program will automatically detect that the headset/mini transmitter have been connected, and will search for any available updates. If there is an available update, you will be prompted to perform that update.
LATEST FIRMWARE:
| Firmware Version | Date | Notes |
| v.1.2.8 | 9/272021 | – Improvements made to audio and mic functionality. |
In addition to updating the headset’s firmware, you can also adjust the following setting:
- Tones
-
- This slider will adjust the volume of the Tones that play when some features of the headset are engaged, including the Mic Mute/Unmute, and EQ Preset changes.
-

Headset Recovery Process
Please note: This process requires the use of the Turtle Beach Audio Hub program and a computer. Please make sure that you are running the latest version of the Turtle Beach Audio Hub program. The best way to ensure this is to download the latest version, which is available here.
To perform a Headset Recovery Process, please do the following:
- Start this process with the headset powered OFF and the transmitter disconnected.
- Connect the transmitter to a free USB port on your PC.
- Connect the headset via USB cable to a free USB port on your PC.
- Use a paperclip or similar device, press the pinhole button on the side of the transmitter. The LED should blink Red once per second; when this happens, release the button.
- Open the Turtle Beach Audio Hub program.
- The Audio Hub will prompt you to update the headset. Select the option to update the headset.
If the Audio Hub does not prompt you to perform that update, please try steps 1-5 again, exactly as indicated above.
Please note that this process will take a few minutes complete. During this process, do not move the headset or jostle the USB connections.
Once you have completed this process:
- Disconnect the transmitter from the PC, and plug it into a different USB port on the console.
- Power on the headset.
- Wait 1 minute, and allow the headset and transmitter to re-pair after the recovery process. This may take some time.
- The LED on the headset should turn solid. As long as the mic boom is unmuted/flipped fowards, the LED on the transmitter should also turn solid as well.
Headset Controls And Audio Features
The Stealth 600 Gen 2 PS headset comes with some unique headset controls and features.
On the back of the Left earcup, there are two volume dials. One is for Master volume, and the other is for variable Mic Monitor volume.
The Master volume dial will control the volume of both game and chat audio, while the Mic Monitor volume dial will adjust how volume of the headset’s Mic Monitor feature, which allows you to hear yourself through the headset when you speak into the mic — helping you to avoid inadvertently shouting at other players.
The Mic Monitor will be active whenever the headset is powered on and the mic is unmuted, even if the headset and transmitter are not paired. If the Mic Monitor is up all the way, you may hear ambient noise through the headset; if this happens, simply lower the Mic Monitor volume using that lower headset dial.
Below those dials is the Mode Button. Pressing this will allow you to cycle through the headset’s four EQ Presets, which are detailed below:
- Signature Sound (1 beep)
- Bass Boost (2 beeps)
- Bass + Treble Boost (3 beeps)
- Vocal Boost (4 beeps)
When you press the Mode button, tones will play to indicate which EQ Preset has been activated, as noted above.
Next to the Mode Button is the Power Button. Press and hold this button to power the headset on and off. Quick-press this button to engage Superhuman Hearing Mode, which adjusts the audio to allow you to pinpoint quiet audio cues like enemy footsteps and weapon reloads.
PLEASE NOTE: Superhuman Hearing is disengaged by default. When Superhuman Hearing is engaged, you’ll hear an ascending tone. When Superhuman Hearing is disengaged, you’ll hear a descending tone. In addition, when Superhuman Hearing is engaged, your EQ Presets will be disengaged.
Next to the Power Button is the USB Charge And Update Port. Plug the headset in via the included cable to charge the headset, or to update the headset’s firmware, as covered in further detail here.
The LED Indicator is next to the USB port on the headset. This LED indicator will inform you of things like the battery level of the headset, its current pairing status, and whether the headset is currently charging.
(For more information, please check out the pairing and charging articles for this headset.)
| HEADSET LED | MEANING |
| Solid Blue | Headset and Mini Transmitter Paired |
| Breathing Blue | (While Charging) Battery Full |
| Double-Blink Blue | Not Paired |
| Solid Red | (While Charging) Battery Charging LED Turns Off When Battery Is Fully Charged (If Headset Is Off) |
| Breathing Red | Battery Low |
The Mini Transmitter also has an LED indicator; this will inform you of things like the pairing status of the headset/transmitter (in the same way the headset would), but also whether the headset’s mic is muted.
| TRANSMITTER LED | MEANING |
| Solid Blue | Headset and Mini Transmitter Paired |
| Double-Blink Blue | Not Paired |
| Breathing Red | Mic Muted |
Finally, after the LED indicator is the flip-to-mute Microphone. Flip the mic all the way forward to unmute the mic. The mic will stop at the second position shown in the image below, and you will hear a tone (low high) to indicate that the mic has been unmuted. Flip the mic to the first position to use the mic itself.
You can also bend the mic closer to you; the mic itself has a hinge that will allow limited horizontal movement to offer a better position for speaking, if necessary.
Frequently Asked Questions (FAQ)
Here are some of the most frequently asked questions regarding the Stealth 600 Gen 2 PS model headset.
COMPATIBILITY
1. Does the headset offer Bluetooth compatibility?
- No. The Stealth 600 Gen 2 PS would not provide any sort of Bluetooth compatibility. The headset is not capable of pairing to Bluetooth devices.
2. Which PlayStation consoles can this headset be used with?
- This headset is compatible with any variation of the PlayStation 4 and PlayStation 5 consoles.
3. Can I use my Stealth 600 Gen 2 PS on a PC?
- Customers have reported success using the headset as a standard USB headset on their PC or laptops.
To do that:
-
-
- You would want to power the headset off, lower its Game Audio dial, and connect its USB transmitter to an open USB port on your PC.
- After doing that, you would want to ensure that the Stealth 600 Gen 2 PS’s transmitter was set as your default input & output device within your operating system’s Sound menu.
- Once you have set the headset as the default input and output device, you can power on the headset itself. The headset and transmitter should pair together within 30 seconds or so, and you can adjust the volume level on the headset itself to your liking.
-
If you need further assistance getting your Stealth 600 Gen 2 PS working on your PC, please reach out to our support team for further assistance.
4. Can I use my Stealth 600 Gen 2 PS with a Nintendo Switch or an Xbox?
- The Stealth 600 Gen 2 PS would not offer any sort of compatibility with Xbox consoles.
- With that being said, the headset can be used with a Nintendo Switch while it is docked. You can find Nintendo Switch installation instructions for your headset here.
If you require a helping hand during the set-up process; please reach out to our support team.
CHARGING
1. Can the headset be used while charging? Can I charge my headset with my cell phone’s USB wall adapter?
- Yes! You can use the headset’s USB charging cable to charge the headset while it is in use.
- While we usually suggest charging the headset via a USB port on your console, a USB wall adapter can be used to charge the headset.
2. When charging my headset, the headset’s LEDs turn off after a minute or two. Is that normal?
- When the battery is low, the headset LED will “breathe” red. Plug the headset in to charge and the LED will change to solid red. Please note that the LED will display differently depending on whether the headset is powered on or powered off while charging.
- You can find the most up to date information for your headset’s LEDs in the “LED Behaviors” section of the product’s Quick Start Guide, available here.
HEADSET FEATURES
1. Why am I unable to adjust Game and Chat audio independently?
- The Stealth 600 Gen 2 PS uses a transmitter that has a single USB connection. The PlayStation consoles can only output All Audio or Chat Audio Only via their USB ports. There’d be no way to split Game and Chat Audio into two separately adjustable streams via the console’s USB ports.
2. How do I update my headset and its transmitter?
- In order to update your headset and transmitter, you would need access to a PC or laptop that is operating on Windows or MacOS so you can install our Audio Hub program.
- Updates for this model can only be performed via a desktop or laptop, as there would be no way to go about pairing the headset using the mobile Audio Hub for iOS or Android. The Audio Hub would not be available for ChromeOS.
You can read more about the update process for your headset here.
3. I can hear my own voice when I speak, or I can hear some background noises being played in my headset. Is that normal?
- Yes. You may be referring to the headset’s Microphone Monitoring feature, which allows you to hear your voice when you speak.
- It’s possible that the headset’s Mic Monitor control is turned up too high and is playing back noises from the room you’re in. This can result in you hearing echoes, hiss and/or static in your headset while you’re using it. You can adjust the intensity of the Mic Monitoring feature on the Stealth 600 Gen 2 PS via the lower rotating dial on the headset itself.
If you continue to have the same inconvenience after adjusting your headset’s Microphone Monitoring volume level; please reach out to our support team for further assistance.
4. My headset’s lower dial is for Mic Monitoring, but why is it not lowering my outbound microphone volume level?
- The Microphone Monitoring feature allows you to hear your own voice in the headset when you speak, in order to help you avoid inadvertently shouting at other players. The headset itself is not equipped with any sort of volume control for the outbound volume level of its microphone — therefore, the Mic Monitor volume control will adjust only how loud you hear your own voice through the headset when you speak into the mic, not how loud other people will hear your voice when you speak.
5. How do I replace the ear cushions on my headset?
- We have an article with illustrations of the best way to replace our ear cushions available here.
- Replacement ear cushions are available on the Turtle Beach Webstore.
TROUBLESHOOTING
1. My Stealth 600 Gen 2 PS did not come with a transmitter. How can I get a replacement? I have misplaced my Stealth 600 Gen 2 PS’s transmitter. Am I able to buy a replacement?
- If a part or accessory was missing from your headset’s packaging; please reach out to our support team for assistance in getting a replacement transmitter under your product’s warranty with us.
- If you have lost your headset’s transmitter, we have replacements available for purchase at the links below.
If that part is out of stock, please contact our Sales Team to see if they can provide you with any sort of information regarding replenishment of that part’s stock. To do so, please send a direct email to [email protected] with your inquiry.
Stealth 600 Gen 2 PS Replacement Transmitter (BLACK)
Stealth 600 Gen 2 PS Replacement Transmitter (WHITE)
NOTE: The color of the transmitter would have no effect on functionality. A white transmitter can be used with a black headset, and a black transmitter can be used with a white headset.
2. My headset’s LED will not light up at all, even when charged. It seems completely dead. What can I do about that?
- If possible, please use a different USB cable and a different USB port — including any USB Wall Adapters — to charge the headset. Leave the headset to charge for an extended period, ideally overnight.
If you continue to have the same inconvenience or are unable to charge the headset with a different USB cable and/or USB port, please reach out to our support team.
3. My headset sounds are abnormal, it didn’t sound like this before. What could be going on here?
- Please double check to ensure you have not left the Superhuman Hearing option on. Superhuman Hearing (SHH) is a situational feature designed to prioritize certain sounds to give you the edge in intense gaming scenarios. This should not be left on all the time.
- Please connect your headset to your preferred version of the Audio Hub. From there, please check to see if you have the option for SHH enabled. Disabling this feature should return your audio back to its preferred state.
If turning off the SHH feature does not clear up your inconvenience, please reach out to our support team for assistance with troubleshooting.
4. My headset won’t work at all, the light is stuck red or blue. How can I get it functioning properly again?
- Please reach out directly to our dedicated support team for assistance with troubleshooting this issue.
5. My audio/mic has connection issues and produces static or other abnormalities. What’s going on here?
- A common cause of this is having your wireless router close to your console, or other wireless devices close as well. Even if you console is hardwired, the router is still broadcasting a wireless signal, which can cause network congestion and audio/mic glitching, as well as connection issues. We recommend keeping a minimum distance of 10 feet between your router/wireless- devices and console to avoid issues.
For further assistance with this; please reach out to our support team.
6. My headset keeps shutting off on its own when no audio is playing.
- In order to conserve battery life, your headset will power off after no audio is played through it for 10 consecutive minutes. This is a fixed feature and cannot be adjusted.
- This feature helps to save battery life – if you forget to power the headset off for the night after a long gaming session, you will only lose a few minutes of battery life, not a whole night’s worth.
- To easily avoid the Auto-Shutdown feature, you can keep some music playing in the background, like the game’s soundtrack. The headset will detect the audio and will not engage the Auto-Shutdown feature. Please note that mic input alone will not avoid the Auto-Shutdown feature.
If your headset keeps shutting off while audio is being played, please reach out to our support team for further assistance.
]]>