
User Manual
About This Model
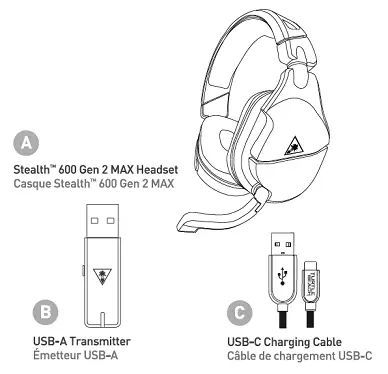
PACKAGE CONTENTS
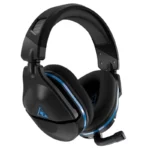
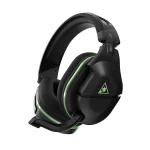
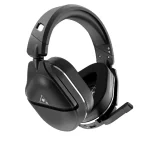
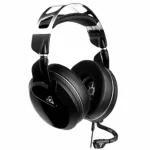
- Stealth 600 Gen 2 MAX Headset (A)
- USB-A Transmitter (B)
- USB-C Charging Cable (C)
HEADSET CONTROLS
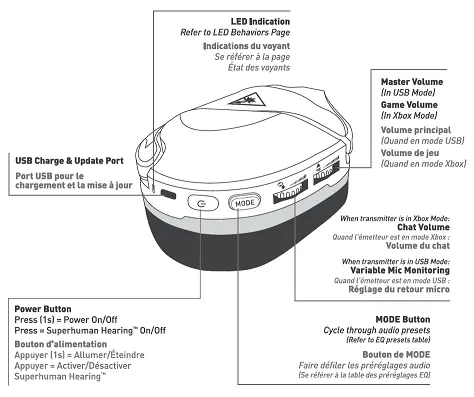
- LED Indicators
- See LED Indicators
- USB Charge & Update Port
- Power Button
- Press (1 sec) – Power On/Off
- Press – Superhuman Hearing On/Off
- MODE Button
- Cycle through audio presets
- See EQ Presets
- Cycle through audio presets
- Lower Volume Dial
- When transmitter is in XBOX mode
- Chat Volume
- When transmitter is in USB mode
- Variable Mic Monitoring
- When transmitter is in XBOX mode
- Game Volume Dial
Superhuman Hearing
Use Superhuman Hearing Mode to pinpoint quiet audio cues like enemy footsteps and weapon reloads. During gameplay, you can activate/deactivate Superhuman Hearing by pressing the POWER button once quickly.
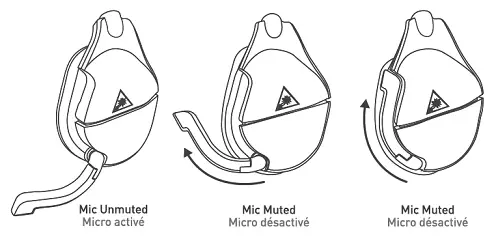
Microphone Mute
Flip up mic to mute. There is an audible tone when the mic is muted or unmuted.
EQ Presets
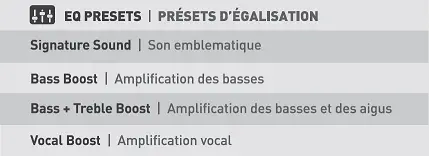
SETUP FOR XBOX
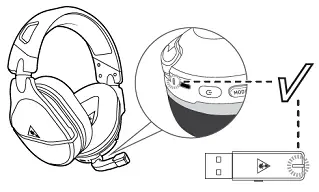
1. Put the transmitter into the Xbox Mode.
2. Connect the transmitter to the USB port on the console.

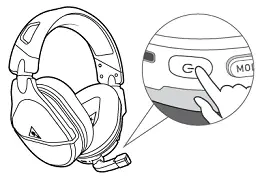
3. Power the headset on by pressing and holding the headset’s Power button.

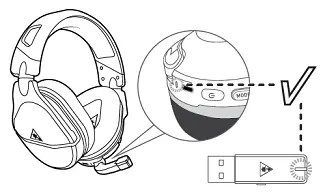
4. Wait for headset and transmitter to pair.
SURROUND SOUND FOR XBOX (ONLY AVAILABLE ON XBOX)
- Go to Settings >> General >> Volume & Audio Output
- Set Headset Format to Windows Sonic for Headphones
CHARGING
The Stealth 600 Gen 2 MAX gives you 40+ hours of rechargeable battery life. Make sure to charge it regularly, and to fully charge the headset before storing.
Headset Storage
Always charge your headset before storing it for any extended period of time (greater than 3 months). Never store the unit in temperatures above 113°F/45°C.
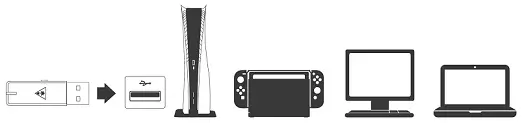
USB TRANSMITTER COMPATIBILITY
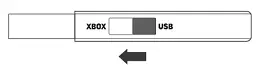
The USB-A transmitter is equipped with a switch that allows you to change compatibility modes.
![]()
Here are the headset compatibilities listed by transmitter mode:
| XBOX MODE | USB MODE |
| Xbox Series X|S | PlayStation (PS5, PS4) |
| Xbox One | Windows PC, Mac |
| Nintendo Switch** | |
| **Nintendo Switch wireless compatibility is supported while in docked mode only. Chat audio is available for games that support in-game chat compatibilities. | |
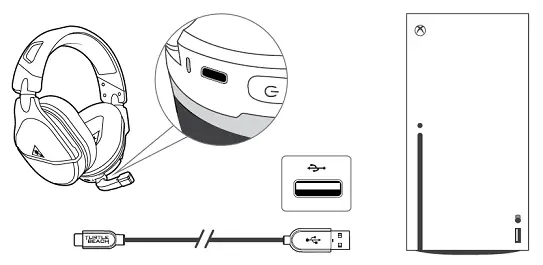
SETUP FOR USB MODE
1. Put the transmitter into USB Mode.

2. Connect the transmitter to the USB port on your platform.
3. Power the headset on by pressing and holding the headset’s Power button.
4. Wait for headset and transmitter to pair.
LED BEHAVIORS
| HEADSET LED | MEANING |
| Solid Green | Headset and Transmitter Paired |
| Breathing Green (While Charging And Headset Is On) | Battery Full** |
| Double-Blink Green | Not Paired |
| Solid Red (While Charging) | Battery Charging** |
| Breathing Red | Battery Low |
| **If headset is powered off, LED will turn off when headset is fully charged. |
TRANSMITTER LED
| TRANSMITTER LED | MEANING |
| Solid Green | Headset And Transmitter Paired |
| Double-Blink Green | Headset And Transmitter Not Paired |
| Breathing Red | Mic Muted |
RE-PAIRING THE HEADSET AND TRANSMITTER
- Start with the headset powered OFF. Connect your transmitter to an available USB port on your console. Make sure the transmitter is in the Xbox mode. Your transmitter will flash rapidly as it searches to pair with your headset.
- Power on your Stealth 700 Gen 2 MAX for Xbox headset; the LED indication on the headset will flash rapidly as it searches for your transmitter.
- After a few moments, the LED indications on the headset and transmitter should turn a solid green to indicate a successful pairing.
Manual Pairing Instructions
Your headset and transmitter will already be paired out of the box. If the headset/transmitter LEDs are double-blinking green, the headset and transmitter may need to be re-paired. To do so, please do the following:
1. Start with the headset powered OFF. Make sure the transmitter is in the Xbox mode.
2. Press and hold the power button on the headset until the headset’s LED starts “breathing” green..
3. Insert the transmitter into the console. Wait until the transmitter’s LED starts to double-blink.
4. After a few moments, your headset and transmitter LEDs should become solid green — if your mic is muted, the transmitter LED will instead be breathing red.
If the LEDs still double-blink green after this process is performed, or if the headset and transmitter otherwise do not pair after this process, please contact our support team for further assistance.
Pairing
The pairing process for the Stealth 600 Gen 2 MAX is similar no matter which Mode the transmitter is set to, but for the best audio experience, it is important to make sure that the transmitter is set to the correct Mode for your specific platform.
o pair your headset to the transmitter:
1. Put the transmitter into the correct Mode.
If you are using the headset with an Xbox console – either Xbox Series X|S or Xbox One — move the transmitter’s switch to Xbox.
If you are using the headset with a different USB device – a PS5 or PS4 console, a Windows or Mac PC, or a Nintendo Switch (in docked mode) – move that switch to USB.
2. Connect the transmitter to the USB port on your platform.
3. Power the headset on by pressing and holding the headset’s Power button.
4. Wait for headset and transmitter to pair. The LEDs on both headset and transmitter will turn solid when the headset and transmitter pair successfully.
RE-PAIRING
You may — very sparingly — need to re-pair the headset. This would most likely happen following a firmware update. Please note that you will need a paperclip or something similar for this process.
To re-pair the headset and transmitter:
- Start with the headset powered OFF. Make sure the transmitter is in the Xbox mode.
- Press and hold the power button on the headset until the LED starts flashing rapidly.
- Insert the transmitter into the console.
- After a few moments, the headset and transmitter LEDs will become solid, indicating a successful pairing.
Again, this process would need to be performed sparingly, most likely after a firmware update is performed. Generally the headset and transmitter should be able to pair to each other on their own.
Turtle Beach Audio Hub
With the desktop version of the Turtle Beach Audio Hub — available for Windows and Mac here — you can adjust and control some of the headset’s features.
**PLEASE NOTE: The headset MUST be powered on, and the headset and transmitter MUST be paired, for the Turtle Beach Audio Hub to recognize the headset/transmitter. If the headset is not powered on, or the headset and transmitter are not paired, the Turtle Beach Audio Hub will NOT recognize your device, and you will see an error message. If this happens, disconnect and reconnect the headset and transmitter, and power the headset on. The headset and transmitter will pair, and the Audio Hub will then recognize your device.**
The home page will show an image of the headset on the left sidebar, as well as options to Restore or Update the firmware. On the top-right of that page, you’ll see the version of the Audio Hub written in gray.
There will also be two slider settings. One will be labeled “Mic Monitor Level“. The other will be labeled “Tones Level“.
Mic Monitor Level will control the volume of the Mic Monitor feature — this is how loud you hear yourself through the headset when you speak into the mic. The aim of this feature is to help you avoid inadvertently yelling at other people and/or players.
- Please Note: The headset itself is not equipped with any sort of volume control for the outbound volume level of its microphone — therefore, the Mic Monitor volume control will adjust only how loud you hear your own voice through the headset when you speak into the mic, not how loud other people will hear your voice when you speak.
Tones Level will control the volume of indicator tones — these are the tones that play when the headset is powered on, the mic is muted or unmuted, or a feature (like Superhuman Hearing) is engaged or disengaged. This also controls the volume of the tones that play when the EQ Preset is switched via the Mode button.
The second page of the Turtle Beach Audio Hub is the Information page. This will provide the following information:
- Headset Model
- Audio Hub Version Number
- Firmware Version Number (for both headset and transmitter)
- Links to FAQ and the Technical Support Site
Multiplatform Compatibility
The USB-A transmitter is equipped with a switch that allows you to change compatibility modes, and use the headset with a variety of different platforms and consoles. This switch is shown (set to the Xbox mode) in the image below:
In the Xbox mode, the headset can be used with an Xbox Series X|S or Xbox One console.
In the USB mode, the headset can be used with a PS5 or PS4 console, a Windows PC or Mac computer, or a Nintendo Switch that is in the docked mode. (Please note that this headset cannot be used with a Nintendo Switch that is in the handheld mode – the Switch must be in the dock.)
Here are the headset compatibilities listed by transmitter mode:
| XBOX MODE | USB MODE |
| Xbox Series X|S | PlayStation (PS4, PS5) |
| Xbox One | Windows PC, Mac |
| Nintendo Switch** | |
| **Nintendo Switch wireless compatibility is supported while the Switch is in the docked mode only. Chat is available only for games that support in-game chat compatibilities. | |
PLEASE NOTE: The headset controls WILL change depending on which mode the transmitter is set to. This is detailed below:
| HEADSET CONTROL | XBOX MODE XBOX SERIES X|S XBOX ONE |
USB MODE PS4/PS5, PC/MAC NINTENDO SWITCH** |
| UPPER Volume Dial | Game Audio Volume | Master (Game + Chat) Volume |
| LOWER Volume Dial | Chat Audio Volume | Variable Mic Monitor Volume*** |
**Nintendo Switch wireless compatibility is supported while the Switch is in the docked mode only. Chat is available only for games that support in-game chat compatibilities.
***Mic Monitor is a feature that allows you to hear your own voice when you speak into the mic, to help you avoid inadvertently yelling at other people and players. This does NOT control how loud other people hear you speak, only how loud you hear yourself
No Mic Audio
The Stealth 600 Gen 2 MAX headset has an adjustable, flip-to-mute mic. To use the mic, gently push/”flip” the mic forwards. You will hear a tone (low high) to indicate the mic is now unmuted. To mute the mic, just push/”flip” the mic back the other way. You will hear a tone (high low) to indicate that the mic is now muted.
If other players are unable to hear you in chat when using the headset – no matter which platform the headset is being used with, please double-check the following.
WHEN IN XBOX MODE
1. The Headset And Transmitter Are Paired/Transmitter Is In Correct Mode/Headset Is Detected By Console.
The headset and transmitter must be paired, and the transmitter in the correct mode, in order for the mic to work, so first make sure that the headset and transmitter have been successfully paired.
Please note that the transmitter must be plugged in to a USB port on the console for this pairing to occur. To double-check the status of the headset and transmitter’s pairing, just take a look at the LEDs on the headset and transmitter themselves. If both LEDs are lit up solid green, the headset and transmitter are successfully paired.
If the LEDs are both solid green, double-check that the transmitter is in the correct mode. The transmitter can be put in to two different modes: Xbox and USB. If the transmitter is in the USB mode but is connected to an Xbox console you may have audio issues even if the headset and transmitter are paired successfully.
As an additional test to see if the console itself is recognizing the headset:
- Press the Xbox/Home button on the Xbox One controller.
- Go to Settings >> All Settings >> Kinect & Devices >> Devices & Accessories.
- You will see the controller you are currently using; you should be able to scroll to the right to see other devices being used with the Console. The headset will appear in this list as “Headset”.
Do you see the headset in that list?
If the headset and console are paired, the transmitter is in the correct mode, and you can see the headset in that list, but you cannot be heard, please proceed to step 2.
If you do not see that headset listed even if the headset and transmitter are paired and the transmitter is in the correct mode, please contact our Support Team.
2. Party Test – Check Icon Ring
- Press the Xbox/Home button on the Xbox One controller.
- Scroll to the Party & Chats tab, then and select “Start A Party”. You do not need to invite any other players to this party; you can perform this test even if you are the only member in the party.
- Speak into the mic. When you speak into the mic, does a ring light up around your icon next to your Gamertag (in the list of party members)?
Please note whether you see that ring, and then proceed to Step 3.
3. Record a Test Message
- Press the Xbox/Home button on the Xbox One Controller.
- Scroll to the Party & Chats tab, and then select “New Chat”.
- Select someone from the list – you do not need to select anyone in particular, as you will not actually be sending a message. Once you have selected someone, tap the Menu button to complete selection.
- Two options will then appear: Write A Message (pencil icon, on the left) and Record A Message (mic icon, on the right). Select the Record A Message icon on the right.
- Select Record, and then speak into the mic. When you are done recording, stop the recording.
- You should see the new recording under the Write A Message/Record A Message icons. Select Play, and listen to that recording you made. This will tell you how your voice will sound to other players. Can you hear your voice clearly?
If you can hear your voice clearly when you play back that recording you’ve just made, the mic itself is working well – there could be an issue with the settings, or the way the headset and console are interacting. Please proceed to Step 4.
If you cannot hear your voice clearly when you play back that recording you’ve just made, please contact our Support Team with the results of Steps 2 and 3.
4. Power Cycle Headset/Console
To perform a quick power cycle with the Headset/Console, please do the following, in this order:
- Press and hold the Power Button on the headset until the Power LED turns off.
- Disconnect the transmitter from the console.
- Power down the Xbox console. When it has fully powered down, unplug the console from the wall outlet.
- Let everything sit for a minute.
- Plug the console back in, and power the console on again.
- After the console has fully powered on and loaded up, reconnect the transmitter to the console.
- Press and hold the Power button on the headset until the Power LED lights up.
- Re-pair the headset and transmitter.
To pair the headset:
- Connect the transmitter to the USB port on the Xbox console.
- Press and hold the power button to power the headset on.
- Wait for the headset and transmitter to pair. When the headset and transmitter are successfully paired, the LEDs on both will turn solid green.
If the mic issues persist even after a power cycle is performed, please contact the support team for additional assistance.
WHEN IN USB MODE
1. Headset Is Paired/Transmitter Is In USB Mode
The headset and transmitter must be paired in order for the mic to work, so first make sure that the headset and transmitter have been successfully paired.
Please note that the transmitter must be plugged in to a USB port on the console for this pairing to occur. To double-check the status of the headset and transmitter’s pairing, just take a look at the LEDs on the headset and transmitter themselves. If both LEDs are lit up solid green, the headset and transmitter are successfully paired.
If the LEDs are both solid green, double-check that the transmitter is in the correct mode. The transmitter can be put in to two different modes: Xbox and USB. If the transmitter is in the Xbox mode but is connected to a different USB device (not an Xbox console), you may have audio issues, even if the headset and transmitter are paired successfully.
2. Check Platforms/Game Settings
For some platforms (a PlayStation console, a PC), the headset will need to be set as the default device in the platform settings. In addition, the game or program itself will likely have its own audio settings, which may include an independent setting for input and output device.
To check these settings, you’ll need to go into the settings menu for the specific platform you are looking to use the headset with. This will vary depending on your platform, as indicated here.
3. Recording Test
If the headset and transmitter are paired, the transmitter is in the correct mode, and the settings (for the game/program and the platform being used) are configured correctly, try a recording test.
To do this, you’ll need to use the recording option available to you on the platform in question. For a PC, you can use an application like Sound Recorder or Voice Recorder; for a console, you can record a test message.
When you play back that recording you made, can you hear what you had recorded clearly and consistently?
If you cannot hear your voice clearly when you play back that recording you’ve just made, please contact our Support Team.
USB Setup (For PC, PS, Nintendo Switch In Docked Mode)
The Stealth 600 Gen 2 MAX For Xbox headset can be used with either an Xbox console, or with a different USB device, including PlayStation consoles, a Windows PC, or a Nintendo Switch (while the Switch itself is in docked mode).
To set your headset up for use with one of these USB platforms (not with an Xbox console), please do the following.
1. Put the transmitter into USB Mode.
2. Connect the transmitter to the USB port on your platform.
3. Power the headset on by pressing and holding the headset’s Power button.
4. Wait for the headset and transmitter to pair.
Once the headset and transmitter are paired, you may need to configure the settings for your specific platform, as detailed below.
Some games and programs have their own audio settings, independent of the computer’s settings. Please be sure to double-check the audio settings for the game/program you are using the headset with, to ensure that the audio settings for both the computer and the game are set properly.
To set the headset as the default device, right-click the speaker icon in the Taskbar (at the bottom-right of the screen), and then click “Open Sound Settings”. You’ll then be able to set the Input and Output device to the headset, if needed.
The settings for the game itself would be found in within the game’s menus. Make sure the headset is the default input and output device, that voice chat is enabled, and that any Push-To-Talk feature is disabled.
PLAYSTATION
PS4 SETUP
1. Go to Settings >> Devices >> Audio Devices
- Select Stealth 600 Gen 2 MAX for Input & Output Device
- Set Output to Headphones to All Audio
- Set Volume Control (headphones) level to maximum
2. Select Adjust Microphone Level and follow the on-screen instructions to calibrate your microphone.
- Please Note: At this point, if desired, you can enable the 3D Audio function to enhance the audio. Then, go to Adjust 3D Audio Profile to select the best profile option for your game.
With the headset set as the default device in the console settings, please go into the audio settings for the games/programs you will be using the headset with. Make sure the headset is set as the default device in the game. You’ll also want to confirm that voice chat is enabled within the audio settings of the game, and that any Push-to-Talk features are disabled.
PS5 SETUP
1. Go to Settings >> Sound >> Audio Output >> Output Device
- Select Stealth 600 Gen 2 MAX for Output Device
- Set Output to Headphones to All Audio
- Set Volume Control (headphones) level to Maximum
2. Adjust your microphone levels by going to Settings >> Sound >> Microphone >> Adjust Mic Level >> Microphone Level
- Please Note: At this point, if desired, you can enable the 3D Audio function to enhance the audio. Then, go to Adjust 3D Audio Profile to select the best profile option for your game.
With the headset set as the default device in the console settings, please go into the audio settings for the games/programs you will be using the headset with. Make sure the headset is set as the default device in the game. You’ll also want to confirm that voice chat is enabled within the audio settings of the game, and that any Push-to-Talk features are disabled.
NINTENDO SWITCH
For the Nintendo Switch, you’ll need to set the headset as the default device only in the game itself. You’ll also want to make sure that the game you are using the headset with supports chat capabilities. Again, you’ll also want to confirm that voice chat is enabled within the audio settings of the game, and that any Push-To-Talk features are disabled.
Frequently Asked Questions (FAQ)
Here are the most frequently asked questions regarding the Stealth 600 Gen 2 MAX For Xbox headset.
COMPATIBILITY
1. What platforms can this headset be used with?
- When the transmitter is in XBOX Mode: Xbox Series X|S, Xbox One
- When the transmitter is in USB Mode: PS5, PS4, Windows PCs, Mac, Nintendo Switch in docked mode only.
2. Does this headset offer Bluetooth compatibility?
- No. This headset does not have any Bluetooth capability, and will not pair to any Bluetooth-enabled device at all.
CHARGING
1. Can the headset be used while charging? Can I charge my headset with my cell phone’s USB Wall Adapter?
- We recommend charging the headset between uses for the best experience.
- While we recommend using the console to charge the headset for convenience, you certainly can use a USB Wall Adapter to charge the headset.
HEADSET FEATURES
1. Does this headset offer independent game and chat audio/volume control?
- IN XBOX MODE: Yes! The upper volume dial will control game audio, and the lower volume dial will control chat audio.
- IN USB MODE: No. When used in USB Mode, the upper volume dial will control the overall audio volume (game and chat). The lower volume dial will control the volume of the variable mic monitor feature.
Please Note: If the volume of the Mic Monitor is adjusted in USB Mode, the volume will stay at that level/volume even if the transmitter is switched back to Xbox Mode. This allows you to make quick adjustments to your Mic Monitor volume as needed.
This is detailed below:
| HEADSET CONTROL | XBOX MODE XBOX SERIES X|S XBOX ONE |
USB MODE PS4/PS5, PC/MAC NINTENDO SWITCH* |
| UPPER Volume Dial | Game Audio Volume | Master (Game + Chat) Volume |
| LOWER Volume Dial | Chat Audio Volume | Variable Mic Monitor Volume** |
*Nintendo Switch wireless compatibility is supported while in docked mode only. Chat audio is available for games that support in-game chat compatibilities.
**Mic Monitor is a feature that allows you to hear your own voice when you speak into the mic, to help you avoid inadvertently yelling at other people and players. This does NOT control how loud other people hear you speak, only how loud you hear yourself.
2. I can hear my own voice when I speak, or I can hear some background noises being played in my headset. Is that normal?
- You may be referring to the headset’s Microphone Monitoring feature, which allows you to hear your voice when you speak.
- It’s possible that the headset’s Mic Monitor control is turned up too high and is playing back noises from the room you’re in. This can result in you hearing echoes, hiss and/or static in your headset while you’re using it.
3. How do I adjust the Mic Monitor volume?
- If you are using the headset in Xbox Mode: Move the switch on the transmitter to USB Mode. Then, use the lower volume dial to adjust the Mic Monitoring volume to your preferred level, and move the transmitter switch back to Xbox Mode.
- If you’re using the headset in USB Mode: You can use the lower volume dial to adjust the Mic Monitor volume.
4. My headset’s lower dial is for Mic Monitoring, but why is it not lowering my outbound microphone volume level?
- The Microphone Monitoring feature allows you to hear your own voice in the headset when you speak, to help you avoid inadvertently shouting at other players. The headset itself is not equipped with any sort of volume control for the outbound volume level of its microphone — therefore, the Mic Monitor volume control will adjust only how loud you hear your own voice through the headset when you speak into the mic, not how loud other people will hear your voice when you speak.
TROUBLESHOOTING
1. My headset sounds are abnormal, it didn’t sound like this before. What could be going on here?
- Please double check to ensure you have not left the Superhuman Hearing option on. Superhuman Hearing (SHH) is a situational feature designed to prioritize certain sounds to give you the edge in intense gaming scenarios. This should not be left on all the time.
- Please quick-press the power button on the headset. If you hear a descending tone (high low), the Superhuman Hearing was on, but has now been disengaged. Do you hear a change in the audio?
If turning off the SHH feature does not clear up your inconvenience, please reach out to our support team for assistance with troubleshooting.
2. My headset keeps shutting off on its own when no audio is playing.
- To conserve battery life, your headset will power off after no audio is played through it for 10 consecutive minutes. This is a fixed feature and cannot be adjusted.
- This feature helps to save battery life – if you forget to power the headset off for the night after a long gaming session, you will only lose a few minutes of battery life, not a whole night’s worth.
- To easily avoid the Auto-Shutdown feature, you can keep some music playing in the background, like the game’s soundtrack. The headset will detect the audio and will not engage the Auto-Shutdown feature. Please note that mic input alone will not avoid the Auto-Shutdown feature.
If your headset keeps shutting off while audio is being played, please reach out to our support team for assistance with troubleshooting.
3. I’ve set up my headset for use with my PC, but I cannot hear any audio through the headset.
- First, click on the Speaker icon in the bottom-right corner of the screen. What device name shows up? If this device name is “Xbox Controller”, make sure the transmitter’s console switch is set to USB, not Xbox. The headset should then show up properly within the settings.
- In addition, please make sure the headset is set as the default Input and Output device in the settings for both the PC and the game that you’re using the headset with.
If the transmitter is in the USB mode, and the headset is set as the default device in the settings for both the computer and game themselves, but you still cannot hear the audio, please reach out to our support team for assistance with troubleshooting.