ULINE Adjustable Height Desk User Manual
H-7033, H-7034, H-7035 H-7598, H-7599, H-8362
1-800-295-5510
uline.com

TOOLS NEEDED

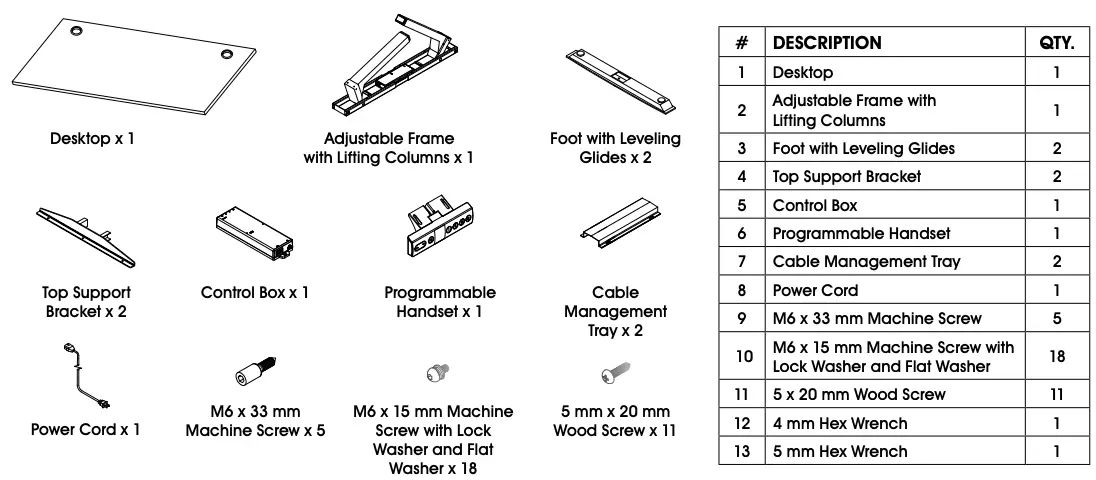
PARTS
ASSEMBLY
 NOTE: Count and inspect all pieces before disposing of any carton or packing materials.
NOTE: Two-person assembly is recommended.
 CAUTION! Adjustable frame is heavy and care should be used when moving it during assembly.
1. Place adjustable frame with lifting columns on a smooth, non-marring surface to prevent scratching.
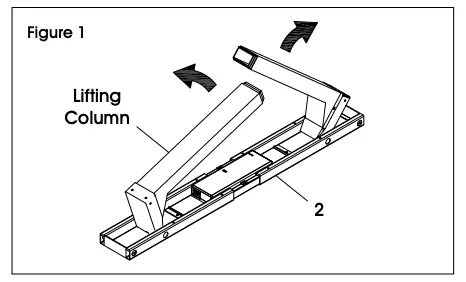
NOTE: Lifting columns are pre-installed to adjustable frame and are folded down toward center of adjustable frame for shipping.
2. Unfold the lifting columns to an upright position. (See Figure 1)
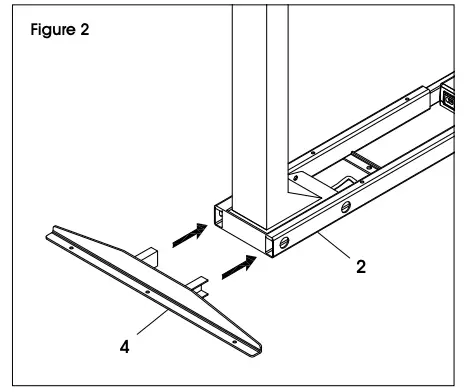
3. Insert top support bracket (4) into outside of adjustable frame (2). Repeat this step on the opposite side. (See Figure 2)
NOTE: Steel lip with three holes on top support bracket should be facing down.
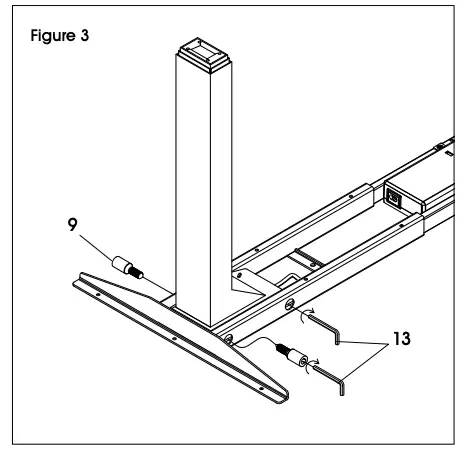
4. Insert two M6 x 33 mm machine screws (9) into holes on end of adjustable frame to connect adjustable frame with lifting columns and top support bracket and lightly tighten using 5 mm hex wrench (13). Then lightly tighten two pre-installed M6 x 33 mm machine screws (9) to secure lifting column. Repeat this step on the opposite side. (See Figure 3)
NOTE: To prevent alignment issues during this step, do not tighten completely until all four machine screws are inserted.
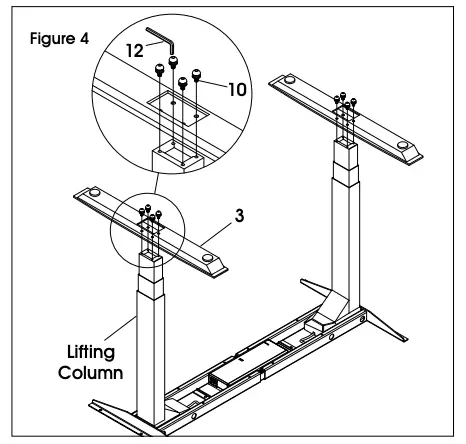
5. Attach foot (3) to lifting column using four M6 x 15 mm machine screws (10). Tighten using 4 mm hex wrench (12). (See Figure 4)
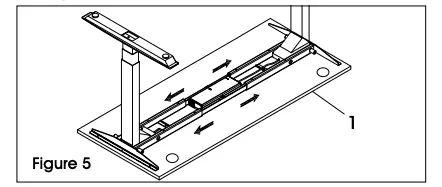
6. Place desktop (1) upside down on a smooth, non-marring surface to prevent scratching. Grommets should be facing down.
7. Place adjustable frame on top of desktop (1). Adjust position of adjustable frame so that it is centered on the desktop. (See Figure 5)
NOTE: Adjustable frame is designed to fit desktops that are 48-72″ long and 24-30″ wide. Extend adjustable frame as needed to position desktop.
For 48 x 24″ and 60 x 24″ desks, top support brackets should be approximately 1½” from side edges of desktop and approximately 2½” from front and back edges of desktop.
For 48 x 30″ and 60 x 30″ desks, top support brackets should be approximately 1½” from side edges of desktop and approximately 5½” from front and back edges of desktop.
For 72 x 24″ desks, top support brackets should be approximately 6″ from side edges of desktop and approximately 2½” from front and back edges of desktop.
For 72 x 30″ desks, top support brackets should be approximately 6″ from side edges of desktop and approximately 5½” from front and back edges of desktop.
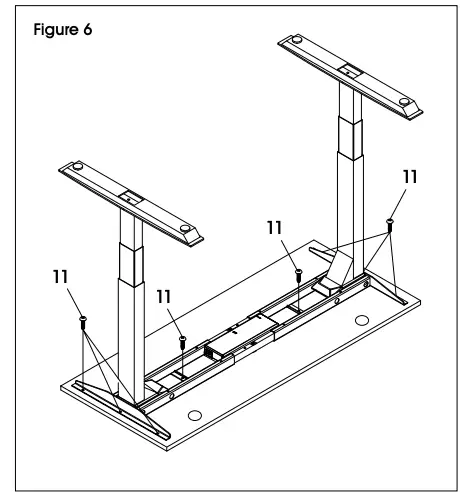
8. Attach top support brackets and adjustable frame to desktop using drill and eight 5 x 20 mm wood screws (11). (See Figure 6)
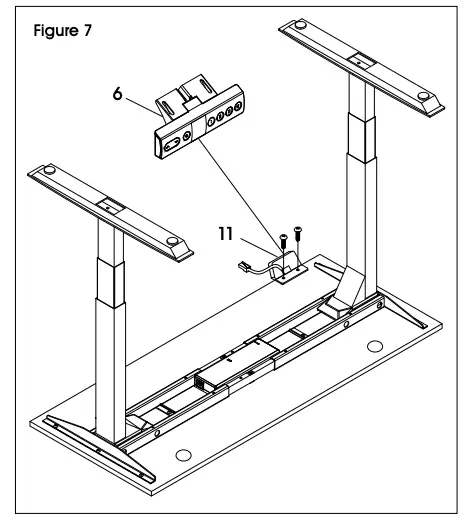
9. Place programmable handset (6) in desired location on front edge of desktop. Attach using a drill and two 5 x 20 mm wood screws (11). (See Figure 7)
NOTE: Back of desktop has two grommet holes. Front of desktop is the opposite side.
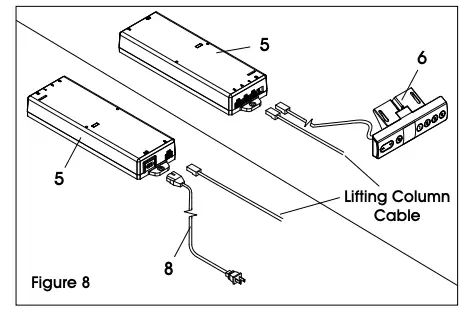
10. Connect the power for the control box (5) using the power cord (8). Connect the programmable handset (6) and lifting column cables into the control box. (See Figure 8)
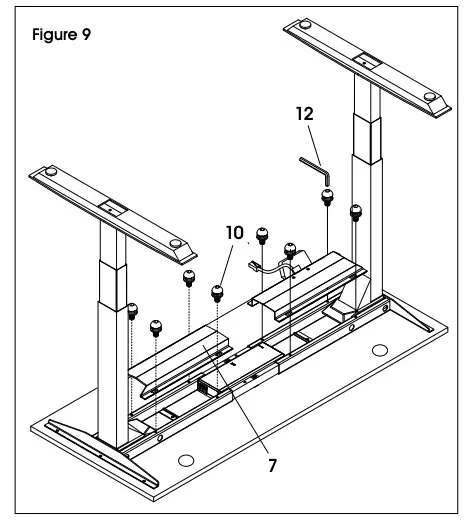
11. Position loose cords underneath the cable management trays (7). Attach the cable management trays to the adjustable frame using eight M6 x 15 mm machine screws (10). Tighten using 4 mm hex wrench (12). (See Figure 9)
12. Desk is now fully assembled. Using two people, carefully flip the desk onto the feet.
13. Plug power cord into outlet. Follow operation instructions to initialize the desk prior to first use.
OPERATION
CONTROLS
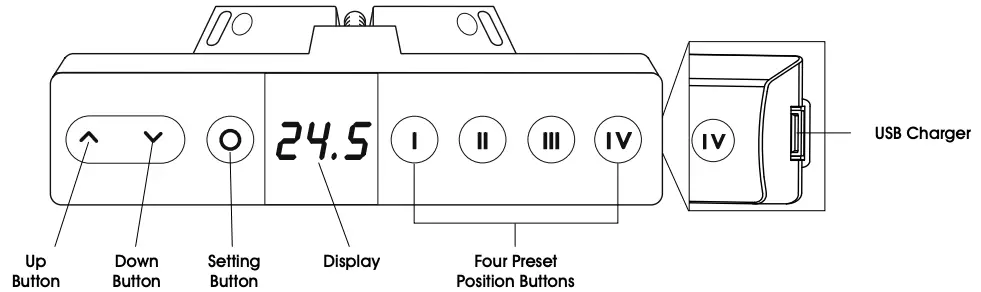
NOTE: The desk must be initialized prior to first use.
- To initialize, press and hold the down button on the handset until the desk reaches its lowest height, slightly raises and stops.
- Release the down button. The desk is now ready to use.
NOTE: The desk may need to be reset from time to time to work properly. Unplug the power cord for 20 seconds, plug back in and follow the initialization process to reset desk.
CAUTION! Make sure there are no obstacles in the desk’s height adjustment path, and make sure the desk is not touching any walls.
CAUTION! Make sure all cords are at the appropriate length to accommodate changes in height.
HEIGHT ADJUSTMENT
- Press the up button to raise the desktop.
- Press the down button to lower the desktop.
- Release button to stop movement.
CAUTION! To avoid overheating, do not move the desk up and down continuously for over two minutes within any 20 minute period. If the heater overheats,  will be displayed on the handset. Stop using the desk for 20 minutes and let it cool down.
PROGRAMMING PRESET HEIGHT
- Use up and down buttons to move desk to the desired position.
- Press and hold the setting button and one of the four preset position buttons simultaneously.
- The handset will display
 and
and  for each preset when complete.
 - Up to four presets can be programmed.
PROGRAMMING HEIGHT LIMITS
NOTE: Desk is equipped with a height limit function. This function allows upper and lower height limits to be programmed. This can be used to prevent collisions with objects above and below the desk, such as file pedestals and overhead cabinets.
- Use up and down buttons to move desk to the desired upper height limit. Press and hold the setting button and up button simultaneously. The upper limit is set when
 is displayed. To cancel, press the same buttons again. The upper limit is cancelled when
  is displayed.
 - Repeat the process to set the lower limit. The lower limit is set when
 is displayed. The lower limit is cancelled when
  is displayed.
 - Always program height limits before programming preset heights.
SWITCHING BETWEEN INCHES AND CENTIMETERS
- Press the setting button for seven seconds until SET is displayed, and then press the first preset position button. The default unit of measurement will be displayed. Press the up and down button to change between inches and centimeters.
PROGRAMMING ANTI-COLLISION SENSITIVITY
NOTE: Desk is equipped with a gyroscope with an anti-collision feature. This feature allows for various levels of sensitivity to prevent collisions with objects above or below the desk.
- Press and hold the setting button for seven seconds until
 is displayed, and then press the third preset position button to enter the sensitivity setting mode.
 - Press the up or down buttons to switch sensitivity levels. Levels range from 1 to 8 where the higher levels result in higher sensitivity. The default level is 5.
- Press the setting button to confirm the selection.
LOCKING OPERATION OF DESK
NOTE: Desk is equipped with a locking feature to prevent operation.
- Press and hold the first and second preset position buttons simultaneously for seven seconds until LoC is displayed. The desk is now locked.
- Repeat the process to unlock.
TROUBLESHOOTING

If the troubleshooting section does not resolve your problem, contact Uline Customer Service at 1-800-295-5510.
![]()
1-800-295-5510
uline.com