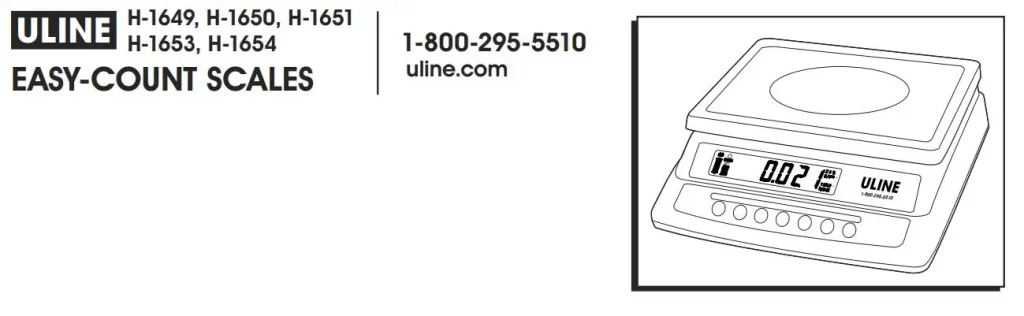
ULINE Easy Count Scales Instruction Manual
GENERAL INFORMATION
AVOID PLACING THE SCALE IN LOCATIONS THAT MAY HURT ACCURACY:
- Temperature extremes Do not place in direct sunlight or near air heat/cooling vents.
- The mounting surface must be firm and level Do not place on uneven or wobbly surfaces or near vibrating machinery.
- Unstable power sources Keep away from big electricity-using machines, like welding equipment or large motors.
- Keep scale dry Do not place in high humidity, damp or wet locations.
- Keep away from air movers, like fans or open doors and windows.
- Keep scale clean and dry.
- Do not stack items on the scale when not in use.
![]() CAUTION! Scale is not waterproof. Avoid direct contact with water, high humidity, and condensation. Do not spray or immerse the scale in water. Data may become unstable or the scale may malfunction. Turn the power off and allow the scale to dry before reuse.
CAUTION! Scale is not waterproof. Avoid direct contact with water, high humidity, and condensation. Do not spray or immerse the scale in water. Data may become unstable or the scale may malfunction. Turn the power off and allow the scale to dry before reuse.
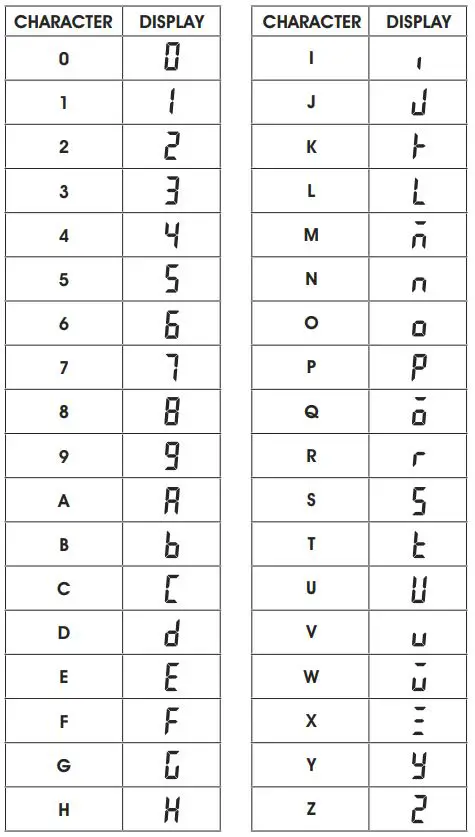
LCD DISPLAY

DISPLAY CHARACTERS
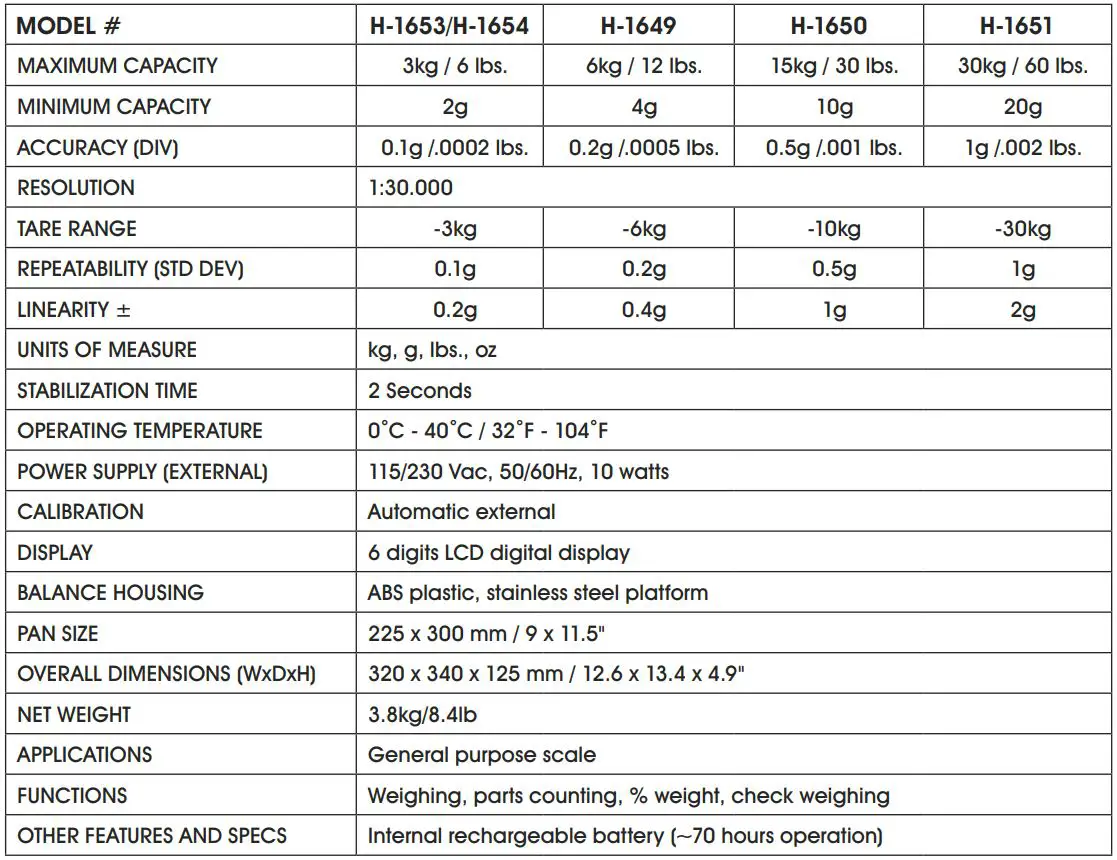
SPECIFICATIONS
CONTROLS
 Primary Function
 Secondary Function
 Unit Key (UNIT) — Selects weighing units: pounds, ounces, kilograms, grams.
 Accumulate Key (ACC) — Adds a value to the ACC accumulated total if the accumulation function is not automatic.
 ESC Escape Key (ESC) — Used to return the scale to normal operating mode.
 Function Key (FUNC) — Allows switching from parts weighing to parts counting.
![]() Clear Key (C) — Used to reset parameters or other functions.
Clear Key (C) — Used to reset parameters or other functions.
 Percent Key (%) — Enters the percent weighing function. Allows weight, unit weight, and count to show when counting parts.
 Space Left (<) — Used to change different numbers on the display. Also used to set parameters or other functions.
 Limit Key (LIMIT) — Sets limits for check weighing. Limit Set high or low limit or both.
 Space Right (>) Used to change different numbers on the display. Also used to set parameters or other functions.
 Tare Key (TARE) — Deducts the container weight from pieces’ weight.
 Number Key (^) — Used to set parameters and other functions.
 Zero Key (ZERO) — Zeros display for next weight.
 ENTER Key — Used to set parameters and other functions.
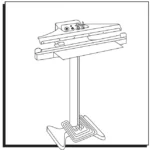
INSTALLATION
The stainless steel platform is packed separately.
- Remove the set screw on the bottom of the scale.
- Level the scale. Adjust the four feet and reference bubble on top of the scale to level.
- Set platform in locating holes in the top cover.
- Attach the AC adapter to the power jack on the bottom of the scale.

- The power switch is located on the bottom right side of the scale.

OPERATION
ZEROING THE DISPLAY
1. Press the ZERO/ENTER key to reset the display to 0 before weighing or counting.
![]() NOTE: Scale has an automatic re-zero to handle minor drifting or material accumulation on the weighing platform. If the display shows a weight while the platform is empty, press the ZERO/ENTER key to zero the scale.
NOTE: Scale has an automatic re-zero to handle minor drifting or material accumulation on the weighing platform. If the display shows a weight while the platform is empty, press the ZERO/ENTER key to zero the scale.
TARE
Before weighing items, weigh the container so its weight can be deducted from the accumulated item weight:
- Press ZERO/ENTER to re-zero the display.
- Place the container to be used on the weighing platform. The display will show its weight. Press the TARE key. Container weight will be stored as the tare value and is subtracted from the display. The display shows 0.
- The net indicator is on. When adding items to the platform, only the item weight will be displayed.
![]() NOTE: Scale can be tared a second time to show only the weight of the items added after you press the TARE key Tare again. The display will show a negative (-) value if the container is removed. ZERO indicators will also be on.
NOTE: Scale can be tared a second time to show only the weight of the items added after you press the TARE key Tare again. The display will show a negative (-) value if the container is removed. ZERO indicators will also be on.
WEIGHING A SAMPLE
To determine the weight of a sample:
- Place an empty container on the platform.
- Press the TARE key to subtract container weight.
- Place the sample in a container. The display shows the weight of the sample less than the weight of the container.
PERCENT WEIGHING
The scale allows the sample weight to be shown as 100%. Then, any other weight placed on the scale displays as a percentage of the original sample.
For example:
- 350g is placed on the scale.
- Press % key.
- The display shows 100.00%.
- Remove the 350g weight, then place a 300g weight on the platform.
- The display shows 85.71% (300g is 85.71% of 350g).
- Press the FUNC key to return the scale to weighing mode.
![]() NOTE: Scale may jump by large amounts if small weights are used to set the 100% level.
NOTE: Scale may jump by large amounts if small weights are used to set the 100% level.
PARTS COUNTING
While the display is showing a weight, pressing the FUNC key starts the parts counting function.
- Before starting, tare the weight of the container used and leave the empty container on the platform.
- Place the number of samples on the scale. The number should match the predetermined sample sizes: 10, 20, 50, 100, or 200 pieces.
- Press the FUNC key. The display shows P 10 (looking for a sample size of 10 parts.)
- To change the sample size, press the TARE key. The display will cycle through 10, 20, 50, 100, 200, and back to 10. 0621 IH-1649
- Press the ZERO/ENTER key when the displayed number matches the number of items used in the sample. As more weight is added, the display shows the number of pieces (pcs).
- Press the % key to display the unit weight (g/pcs), total weight (kg), or the count (pcs).
- Press the FUNC key to return to weighing mode.
![]() NOTE: See uline.com for parts counting instructional video.
NOTE: See uline.com for parts counting instructional video.
CHECK WEIGHING
Check weighing sounds an alarm when the weight on the scale exceeds limits stored in the memory. High and low limits can be set and can be used individually or together.
Setting the High Limit:
- Press the LIMIT key. The display shows the current high limit. The left-most number is flashing and the HI icon is on.
- To change the high limit, press the %/< and the LIMIT/>keys to select which number to change.
- Press the TARE/^key to change the flashing number.
- Press the ZERO/ENTER key to set the number.
- If you need to reset the number to zero, press the FUNC/C key.
Setting the Low Limit:
- After pressing the ZERO/ENTER key, the display then shows the low limit, LO will be on (left side of the display).
- To change the low limit, press the %/< and the LIMIT/> to select which number to change.
- Press the TARE/^key to change the flashing number.
- Press the ZERO/ENTER key to set the number.
- If you need to reset the number to zero, press the FUNC/C key.
- After pressing the ZERO/ENTER key, the scale returns to weighing mode with the check-weighing function turned on.
- When a weight is placed on the scale, arrows indicate if the weight is over or under the limits, and a beeper sounds.
Both Limits Set:
- The display shows OK when the weight is within the limits.
Low Limit Set, High Limit Set to Zero:
- The display shows OK when the weight is under the limit. Shows HI when above the Low Limit.
High Limit Set, Low Limit Set to Zero:
- The display shows LO when the weight is less than the high limit. Above the high limit, the display shows OK.
Both Limits Set, Low is Set Greater than High:
- The beeper will never sound and the display shows LO if the weight is less than the LO limit. The display shows HI if the weight is greater than the LO Limit.
![]() NOTE: The weight must be greater than 20 scale divisions for check weighing to operate.
NOTE: The weight must be greater than 20 scale divisions for check weighing to operate.
To Disable Check Weighing:
1. Press the LIMIT key to display current limits.
2. Press the FUNC/C key to enter zero into both limits when the current limits are shown, then press the ZERO/ENTER key to store the zero values.
ACCUMULATED TOTAL
Scale can be set to accumulate automatically or manually. To set automatic or manual accumulation:
- Press FUNC and ACC keys simultaneously.
- Press LIMIT/> key to scroll through options until AU ON or AU OFF is displayed.
- AU ON means automatic accumulation is on.
- AU OFF means the scale is set for manual accumulation.
- Press the TARE/^ key to toggle between AU ON and AU OFF.
- Press the ZERO/ENTER key to set your selection.
- Press the FUNC key to exit.
![]() NOTE: Even when the scale is set to display grams or ounces, the accumulated function still keeps weight in kilograms or pounds.
NOTE: Even when the scale is set to display grams or ounces, the accumulated function still keeps weight in kilograms or pounds.
MANUAL ACCUMULATION
When the scale is set for manual accumulation:
- Press the ACC key to store the displayed weight in the memory when the weight is stable.
- The display shows ACC 1 and then the total stored in memory for two seconds before returning to normal.
- Remove the weight and allow the scale to return to zero, then add a second weight.
- Press ACC, the display shows ACC 2 and the new total.
- Continue to remove and add weights and press ACC until all weights have been added.
- To view the totals in memory, press ACC when the scale shows zero. The display shows the total number of items ACC xx and the total weight and then returns to zero.
To clear the memory:
- Press ACCto display the totals.
- Press the FUNC/C key to clear the memory.
 NOTE: ACC function is only available when the stable indicator “O” is on.
AUTOMATIC ACCUMULATION
When the scale is set for automatic accumulation:
- Add a weight to the scale. The beeper sounds when the weight is stable to indicate the weight is added. Remove the weight.
- The display shows ACC 1 and totals the memory when the scale returns to zero.
- Add the next weight to continue the process.
NOTE: While weight is on the scale, you can also press ACC to store the value immediately. In this instance, the scale will not store the value when the weight is removed. - Press ACC to display the accumulated totals.
NOTE: The scale must return to zero or display a negative number before another sample can be added to the memory. More items can be added and ACC pressed again, up to 99 entries or until you exceed the weight capacity displayed. - To return to normal weighing mode, turn AU off.
FUNCTIONS
To set functions, press the FUNC and ACC keys at the same time. Scroll through functions by pressing %/< or LIMIT/> the scale will go through the
functions in this order:
CHANGE SCALE WEIGHT INCREMENT
To minimize the effects of vibration, wind, or other conditions:
• Example: If the scale normally weighs in increments of 0.5g, the value can be changed to 1.0g or 2.0g to get a more stable reading.
- The display shows Inc xx. The first value shown is the default weight increment.
- Press the TARE/^ key to change the default.
- Press ZERO/ENTER to set the new weight increment.
BACKLIGHT CONTROL
Backlight is set to operate automatically, turning off when the scale is not being used. Turning the backlight off helps maximize battery life.
PAGE 5 OF 27
- Press TARE/^to select EL On (manual on), EL Au (automatic on/off), or EL Off (turns off backlight)
- Press ZERO/ENTERto set your selection.
ACCUMULATED TOTAL
Scale can be set to accumulate manually or automatically. (Refer to ACCUMULATED TOTAL in OPERATION section.)
CHANGE THE BAUD RATE
The display shows b xxx this is the current baud rate.
- Press TARE/^to select: 600bps, 1200bps, 4800bps or 9600bps.
- Press ZERO/ENTERto set your selection.
AUTO ZERO RANGE TRACKING
Set to 0.5d, 1d, 2d, and 4d.
- Press TARE/^to select.
- Press ZERO/ENTER to set your selection.
CHANGE UNIT OF WEIGHT DISPLAYED
Select kilograms, grams, ounces, or pounds.
- Press TARE/^to select.
- Press ZERO/ENTERto set your selection.
CHANGE CHECK-WEIGHT BEEPER ALARM
The display shows beep x, select:
- Beep 1 Beeper sounds when weight is between the high and low limit range.
- Beep 2 Beeper sounds when weight is out of high and low limit range.
- Beep 0 Beeper will not sound whether in or out of high and low limit range.
- Press TARE/^to select.
- Press ZERO/ENTERto set your selection.
CHANGE THE AUTOMATIC POWER-OFF DELAY
The display shows power auto-off time, select one of the following:
- Turns auto-off function.
- Powers off after 3 minutes with no weight changes or key presses.
- Powers off after 5 minutes with no weight changes or key presses.
- Powers off after 15 minutes with no weight changes or key presses.
- Powers off after 30 minutes with no weight changes or key presses.
- Press TARE/^to select.
- Press ZERO/ENTERto set your selection.
RETURN TO NORMAL OPERATING MODE Display shows return.
1. Press ZERO/ENTERto return to normal operating mode.
BATTERY OPERATION
BATTERY LIFE
The scale will operate on battery-only power for approximately 70 hours.
LOW BATTERY INDICATOR
When the low battery icon![]() turns on, recharge the battery as soon as possible. To protect the battery, the scale will shut off after 30 minutes. The indicator will flash every 5 minutes.
turns on, recharge the battery as soon as possible. To protect the battery, the scale will shut off after 30 minutes. The indicator will flash every 5 minutes.
CHARGING THE BATTERY
Plug into the AC adapter. The scale does not need to be turned on. The battery should be charged for 12 hours for full capacity.
BATTERY CHARGING STATUS
A light above the display (charging) indicates the state of the battery charge. When the scale is plugged in, the battery is charging.
The light color will change to indicate the battery status:
- Green — Battery is fully charged.
- Red — Battery needs recharging.
- Yellow — battery is being charged.
Over time, the battery may fail to hold a full charge and eventually will need replacing.
![]()
BATTERY PERFORMANCE
Always use original batteries and AC adapter. The counting scale is not intended for use with non-original batteries and/or battery chargers.
- AC adapter rating is 9V; normal output range is 11V to 15V.
- New batteries or batteries stored for long periods of time may require longer charging times.
- Keep the battery at or near room temperature when charging.
- Do not expose batteries to temperatures below 14°F (-10°C) or above 113°F (45°C).
CALIBRATION
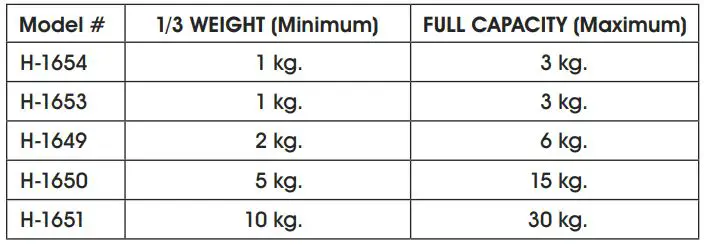
The scale is calibrated before leaving the manufacturer’s facility. Vibrations in shipping may cause the scale to fall out of calibration. Uline recommends re-verifying calibration in the field before first use. You must use a precision calibration weight to properly calibrate the scale. The calibration weight must be at least 1/3 of the scale’s capacity and cannot exceed the scale’s capacity.
![]() NOTE: Calibration can be done in English system weight (lb.) or Metric system weight (kg).
NOTE: Calibration can be done in English system weight (lb.) or Metric system weight (kg).
CALIBRATION WEIGHT (lb.)
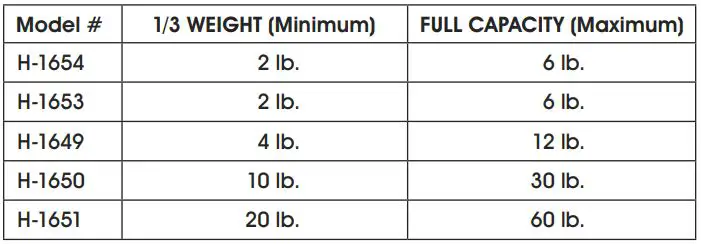
CALIBRATION WEIGHT (kg.)
![]() NOTE: Calibration weights are sold separately. See uline.com for details.
NOTE: Calibration weights are sold separately. See uline.com for details.
SINGLE POINT CALIBRATION (SPAN)
Single point calibration uses two calibration points: zero and any weight between 1/3 of the scale’s capacity and the full weight of the scale capacity. Refer to the calibration weights charts above.
- Turn on the scale. In weighing mode, press the UNIT key
 until the desired weighing unit appears lb or kg.
 - Turn off the scale. Turn on the scale. During the self-test, press the % key
 and TARE key Tare simultaneously and release. UnloAd will be shown on the display.
UnLoAd - Remove all weight from the platform.
- Once the stable indicator O is shown on the display, press the ZERO key
 . The last calibration weight used will be shown on the display.
 - Use the %, LIMIT,
 and TARE
  keys to enter the calibration weight you are using.
 - Press the ZERO key. The loAd will be shown on the display.
LoAd - Place the calibration weight on the platform.
- Once the stable indicator O is shown on the display, press the ZERO key.
- The scale will enter a self-test mode. Remove weight before self-test mode is complete. After completing the self-test, the scale will enter the weighing mode.
MULTI-POINT CALIBRATION (LINEAR)
Multi-point calibration uses three calibration points: zero, 1/3, and a full weight capacity of the scale. Refer to the calibration weights charts above.
- Turn on the scale. In weighing mode, press the UNIT key until the desired weighing unit appears lb or kg.
- Turn off the scale. Turn on the scale. During the self-test, press the % key and LIMIT key
 simultaneously and release. UnloAd will be shown on the display.
UnLoAd - Remove all weight from the platform.
- Once the stable indicator O is shown on the display, press the ZERO key . The 1/3 calibration weight will be shown on the display.
- Place the 1/3 calibration weight on the platform.
- Once the stable indicator O is shown on the display, press the ZERO key. The full capacity calibration weight will be shown on the display.
- Place the full capacity calibration weight on the platform.
- Once the stable indicator O is shown on the display, press the ZERO key.
- The scale will enter a self-test mode. Remove weight before self-test mode is complete. After completing the self-test, the scale will enter the weighing mode.
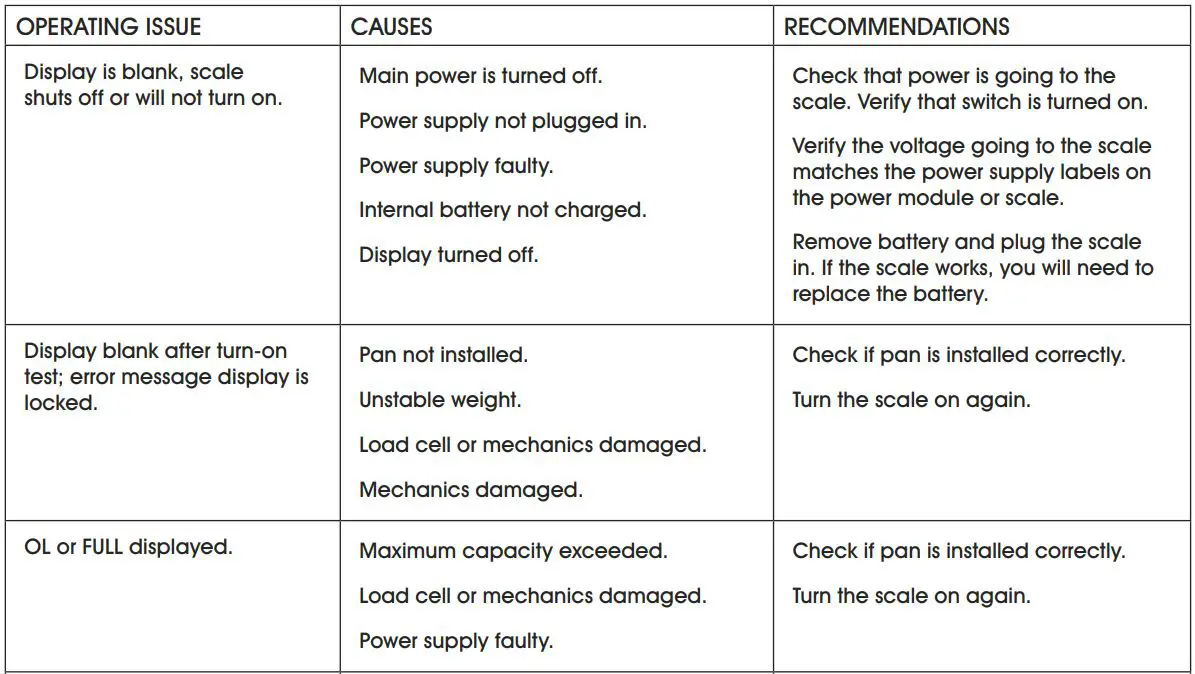
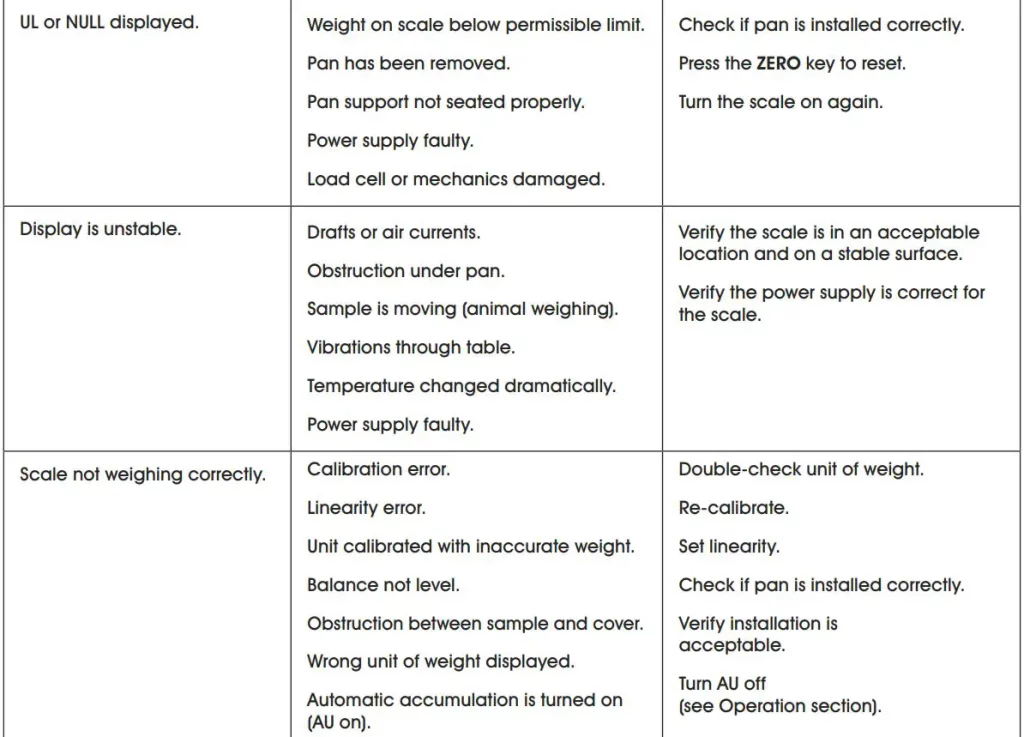
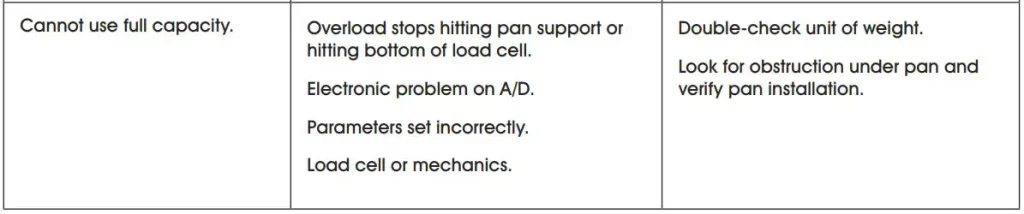
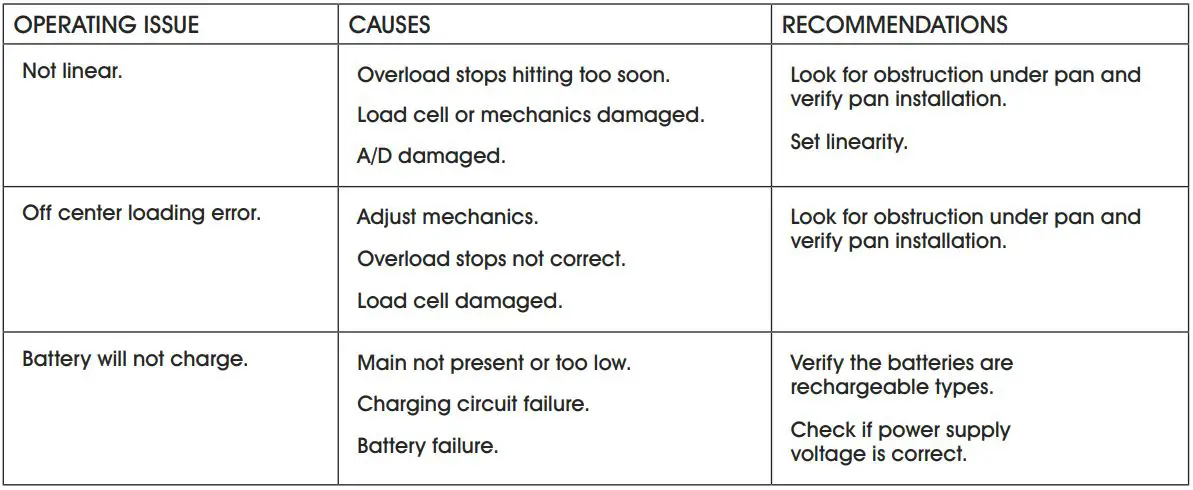
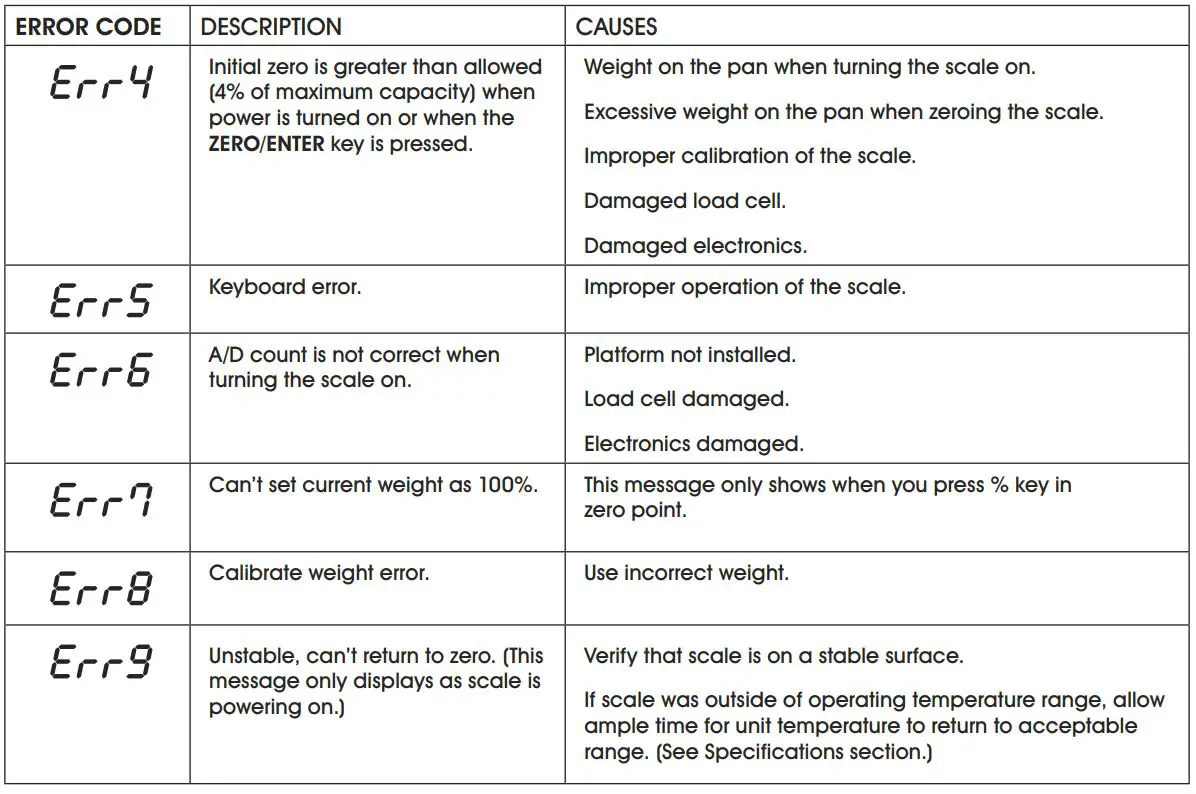
TROUBLESHOOTING
ERROR CODE
During the initial power-on testing or during operation, it is possible the scale may show an error message. Specific error message info is described below.
If an error message is shown, repeat the procedure that caused the message (turning the balance on, calibrating, or other functions). If error messages are displayed, turn the scale off, wait 3-5 minutes and then turn the scale on again. If the error message is still shown, contact Uline Customer Service at 1-800-295-5510 for further support.
![]()
uline.com