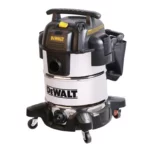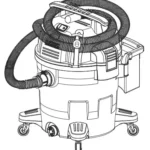
H-5048, H-6460
INDUSTRIAL
BACKPACK VACUUMS
1-800 -295-5510
uline.com
TOOL NEEDED

SAFETY
WARNING! Read the owner’s manual before using this product. Failure to do so can result in injury or property damage.
![]() NOTE: Following the cleaning instructions will prolong the life of the vacuum.
NOTE: Following the cleaning instructions will prolong the life of the vacuum.
- Carefully unpack and inspect vacuum for shipping damage. Each vacuum is tested and thoroughly inspected before shipping.
- Use only as described in this manual. Use only the recommended attachments and replacement parts.
- To reduce the risk of overheating, sparking, or damage to cords, do not tie pigtail and extension cord in a knot in an attempt to prevent cords from pulling apart. Use the provided cord holder to keep the extension cord plugged in to vacuum.
- Do not leave a vacuum plugged in when not in use. Unplug the vacuum from the outlet before servicing. Do not leave running while unattended. Turn off the vacuum before unplugging.
- Do not use outdoors or on wet surfaces.
- Do not try to recover any liquid with this vacuum. This vacuum is for dry recovery only.
- Do not use a damaged cord or plug. If the vacuum is not working as it should, or if it has been dropped,
damaged, left outdoors, or exposed to water, contact Uline Customer Service. - Do not allow the vacuum to be used as a toy. Pay close attention when using the vacuum near children.
- Do not pull or carry the vacuum by the cord or use the cord as a handle. Do not close a door on the cord or pull the cord around sharp edges or corners. Do not run over the cord. Keep the cord away from heated surfaces.
- Do not pull on the cord to unplug. Grasp and pull the plug, not the cord.
- Do not handle the plug, switch or vacuum with wet hands.
- Do not put any objects into openings. Do not use with any opening blocked; keep free of dust, lint, hair and anything else that may reduce airflow.
- Keep hair, loose clothing, fingers, and all parts of the body away from openings and moving parts.
- Use extra care when cleaning stairs.
- Do not vacuum flammable or combustible materials or anything that is burning or smoking, such as cigarettes, matches, or hot ashes.
- Sparks inside the motor can ignite flammable vapors or dust. To reduce the risk of fire or explosion, do not
use near combustible liquids, gases, or dust, such as gasoline and other fuels, lighter fluid, cleaners, oil-based
paints or natural gas. - To reduce the risk of inhaling toxic vapors or dust, do not vacuum or use near toxic or hazardous materials.
- Empty the Intercept® Micro Filter after every use and before storage. Some types of wood dust and debris may catch on fire if stored in a vacuum.
- Do not use without filters in place.
- Connect to a properly grounded outlet only.
![]() NOTE: This vacuum is equipped with a thermal protection shutoff switch that cuts power if excessive operating temperatures are detected. This may occur if there’s a blocked vacuum passage or clogged/full filters.
NOTE: This vacuum is equipped with a thermal protection shutoff switch that cuts power if excessive operating temperatures are detected. This may occur if there’s a blocked vacuum passage or clogged/full filters.
![]() NOTE: If the thermal protection cutoff switch is tripped, immediately turn off the vacuum, inspect for a blockage and verify the condition of the filter bag. Replace or empty the filter bag as required. The vacuum will require several minutes to cool down to a safe operating temperature. When cool enough, the thermal switch will reset and the user can resume normal use of the vacuum.
NOTE: If the thermal protection cutoff switch is tripped, immediately turn off the vacuum, inspect for a blockage and verify the condition of the filter bag. Replace or empty the filter bag as required. The vacuum will require several minutes to cool down to a safe operating temperature. When cool enough, the thermal switch will reset and the user can resume normal use of the vacuum.
SAFETY CONTINUED
INTRODUCTION
MOTOR
Electric thru-flow vacuum motors must never be used in applications in which wet or moist conditions are involved, where dry chemicals or other volatile materials are present, or where airflow may be restricted or blocked. Such motors are designed to permit the vacuumed air to pass over the electrical wiring to cool it. Therefore, any liquid (including water), dry chemical, or other foreign substance that would come in contact with electrical conductors could cause combustion (depending on volatility) or electrical shock. Failure to observe these precautions could result in property damage and personal injury, including death in extreme cases.
ELECTRICAL
The vacuum operates at 120 volt/60 Hz. Severe changes in voltage, high or low, can cause damage to the motor and cause premature motor failure.
This vacuum is equipped with a thermal protection shutoff switch that cuts power if excessive operating temperatures are detected. This may occur if there’s a blocked vacuum passage or clogged/full filters.
If the thermal switch is tripped, immediately turn off the vacuum, inspect for a blockage and verify the condition of the filter bag. Replace or empty the filter bag as required. The vacuum will require several minutes to cool down to a safe operating temperature. When cool enough, the thermal switch will reset and the user can resume normal use of the vacuum.
Use only the manufacturer’s replacement extension cord or one that is properly sized for your application. Do not
use an extension cord with conductors smaller than 16 gauge (AWG) in size and make sure to only use a three-wire outdoor extension cord provided with a three-prong grounding plug and receptacle. To reduce power loss, use a 14 AWG extension cord if longer than 50 ft. The extension cord jacket type should be SJT or better. Extension cords in poor condition or too small in wire size can pose fire and shock hazards. To reduce the risk of these hazards, be sure the cord is in good condition and that liquid does not contact the connection.
![]() WARNING! To reduce the risk of personal injury due to a loose electrical connection between the appliance’s plug and extension cord, firmly and fully attach the appliance plug to the extension cord. Periodically check the connection while operating to ensure it is fully attached. Do not use an extension cord that provides a loose connection. A loose connection may result in overheating or fire and increases the risk of a burn.
WARNING! To reduce the risk of personal injury due to a loose electrical connection between the appliance’s plug and extension cord, firmly and fully attach the appliance plug to the extension cord. Periodically check the connection while operating to ensure it is fully attached. Do not use an extension cord that provides a loose connection. A loose connection may result in overheating or fire and increases the risk of a burn.
To reduce the risk of disconnection of the vacuum the cord from the extension cord during operating:
Use the cardholder on the waist belt to secure the extension cord to the vacuum plug as shown on page 5, Figure 16, and described on page 5 under Operating The Vacuum, items 1 and 2.
Maintain appliance with care. Inspect extension cords periodically and replace them if damaged.
GROUNDING INSTRUCTIONS
The vacuum must be grounded. If a vacuum should malfunction or stop working, grounding provides a path
of least resistance for electrical current, thereby reducing the risk of electrical shock. This vacuum is equipped with
a cord that has an equipment-grounding conductor and grounding plug. The plug must be inserted in an appropriate outlet that is properly installed and grounded in accordance with all local codes and ordinances.
Cutting off the ground wire or using a cord that is not equipped with a ground plug will void the warranty of the
vacuum.
![]() WARNING! Improper connection of the equipment-grounding conductor can result in a risk of electrical shock. Check with a qualified electrician or service person if unsure that the outlet is properly grounded. Do not modify the plug provided with the vacuum. If it will not fit the outlet, have a proper outlet installed by a qualified electrician.
WARNING! Improper connection of the equipment-grounding conductor can result in a risk of electrical shock. Check with a qualified electrician or service person if unsure that the outlet is properly grounded. Do not modify the plug provided with the vacuum. If it will not fit the outlet, have a proper outlet installed by a qualified electrician.
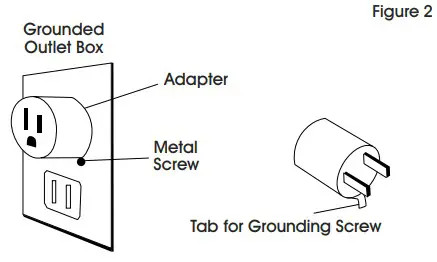
- The vacuum is for use on a nominal 120-volt circuit and has a grounding plug. (See Figure 1)
SAFETY CONTINUED
- A temporary adapter may be used to connect this plug to a two-pole receptacle if a properly grounded
outlet is not available. (See Figure 2)
![]() NOTE: The temporary adapter should be used only until a properly grounded outlet can be installed by a qualified electrician. The green-colored rigid ear, lug or the like extending from the adapter must be connected to a permanent ground, such as a properly grounded outlet box cover. Whenever the adapter is used, it must be held in place by a metal screw.
NOTE: The temporary adapter should be used only until a properly grounded outlet can be installed by a qualified electrician. The green-colored rigid ear, lug or the like extending from the adapter must be connected to a permanent ground, such as a properly grounded outlet box cover. Whenever the adapter is used, it must be held in place by a metal screw.
![]() NOTE: In Canada, the use of a temporary adapter is not permitted by the Canadian Electrical Code.
NOTE: In Canada, the use of a temporary adapter is not permitted by the Canadian Electrical Code.
For Canada – This appliance is for use on a nominal 120-volt circuit and has a grounded attachment plug that looks like the plug illustrated in Figure 1. Make sure the vacuum is connected to an outlet having the same configuration as the plug. No adapter should be used with this vacuum.
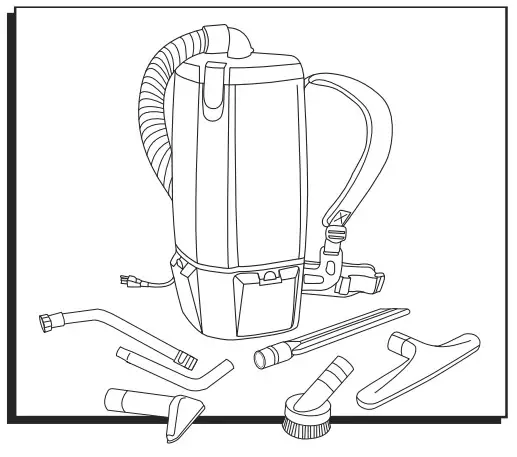
PARTS

OPTIONAL – SOLD SEPARATELY

ASSEMBLY
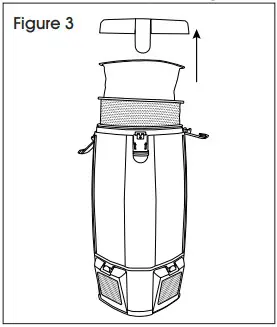
- Unlatch the three clamps on top of the vacuum and remove the cap. Remove micro cloth filter and Intercept® Micro Filter. (See Figure 3)

- Check to make sure the dome filter did not shift during shipping. (See Figure 4)
- Replace the Intercept® Micro Filter and the micro cloth filter into the vacuum. Replace the cap and relatch the three clamps.
- Push the hose into the cap opening. (See Figure 5)
WAND ASSEMBLY
- Fasten the pieces of the wand together. Open the purple latch on the lower half of the wand. Align the notch on the inside of the lower half with a groove on the outside of the upper half and push pieces together. Adjust wand to the desired height, then close the purple latch to secure the position. (See Figure 6)
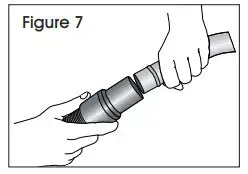
- Twist the wand into the end of the hose. (See Figure 7)
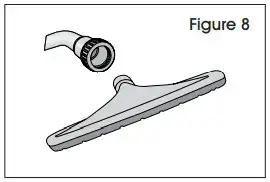
- Attach the floor tool to the end of the wand. Align the brass ring with the groove on the floor tool to ensure a secure fit. (See Figure 8)
HARNESS HEIGHT ADJUSTMENT
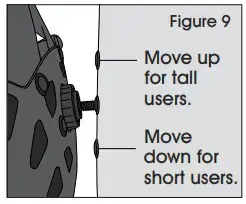
- The upper harness should sit between shoulder blades for the most comfortable fit. The vacuum is shipped with the upper harness in the middle position. Tall users will need to move the position up. Shorter users will need to move the position down. (See Figure 9)

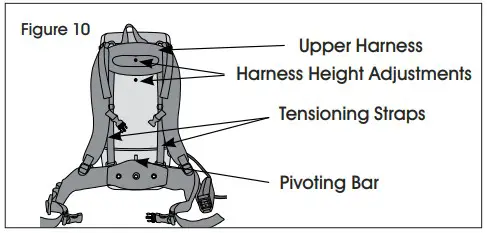
- To move the upper harness, loosen the tensioning straps. Then, using a #3 Phillips screwdriver, remove
the screw located in the center of the upper harness. (See Figure 10)
- To ensure that the upper harness is secure, tighten the screw until it’s all the way in.
OPERATION
WEARING THE BACKPACK VACUUM
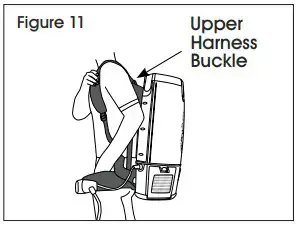
- Loosen the shoulder straps and the waist belt. Lift the vacuum and slide your arms through the straps.
The upper harness can be adjusted by tightening or loosening the buckles. (See Figure 11)

- Connect the waist strap. (See Figure 12)
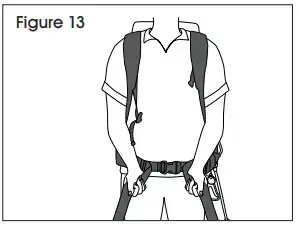
- Tighten the waist belt by grabbing the ends of the straps, pulling each end toward each other, and then pulling
outward from the center of the body. It is very important that the weight of the vacuum be concentrated on your hips rather than your shoulders. (See Figure 13)
- Adjust the shoulder straps so the vacuum fits comfortably, but the weight is still concentrated on hips. (See Figure 14)
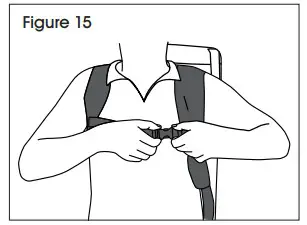
- Connect the sternum strap buckle and slide the strap up or down on the sewn-in wire support for the best fit. (See Figure 15)
OPERATING THE VACUUM
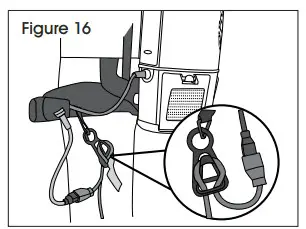
- Thread the extension cord through the cord holder on the waist belt (See Figure 16). Then plug the cord
into the on/off switch, also on the waist belt. - Do not tie the extension cord to the waist belt or the switch-to-vacuum power cord. Doing so will result in damage to both cords and will not be covered under warranty.
- Plug the extension cord into the wall and turn the vacuum on.
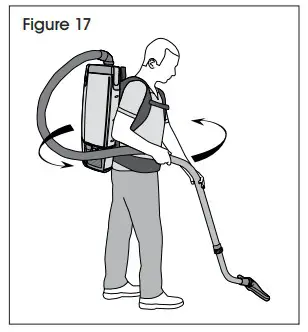
PROPER VACUUMING MOTION FOR LARGE AREAS
- Begin with the wand parallel to your body.
- Draw the top of the wand in toward your waist and twist at the waist walking backward or forward in a
side-to-side motion. (See Figure 17) - The motion is similar to mopping and keeps the upper body and arms from tiring.
FILTER MAINTENANCE
INTERCEPT® MICRO FILTER AND MICRO CLOTH FILTER
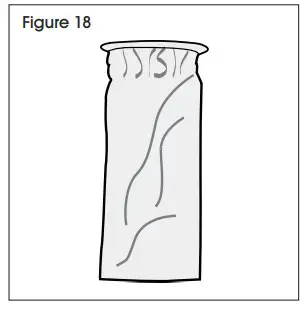
- Empty and inspect the Intercept® Micro Filter every time you start and finish vacuuming. (See Figure 18)
- Replace if necessary. A clogged and dirty filter restricts airflow and results in reduced suction and overheating.
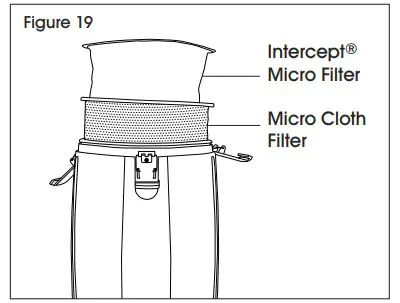
- To replace the Intercept® Micro Filter, slide the filter into the micro cloth filter and secure it into the vacuum. (See Figure 19)

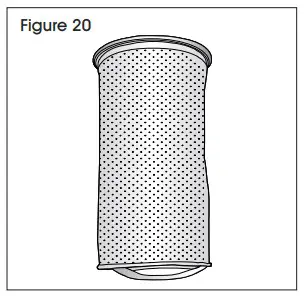
- Once a month or as necessary, hand or machine wash the micro cloth filter and let it air dry. Do not put it in the dryer. (See Figure 20)
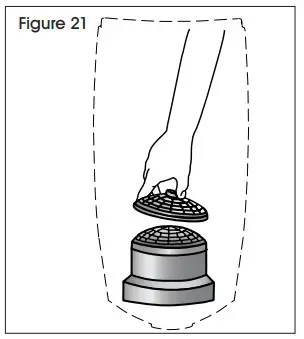
DOME FILTER
- Once a week, or as necessary, clean the dome filter.
- First, remove the Intercept® Micro Filter and a cloth filter. Reach into the vacuum body and pull the top
piece of the dome filter off and remove the foam media. (See Figure 21)

- Shake out the foam, rinse it and let it air dry thoroughly. (See Figure 22)
- Once dry, replace the foam and firmly snap the top of the dome filter into place.
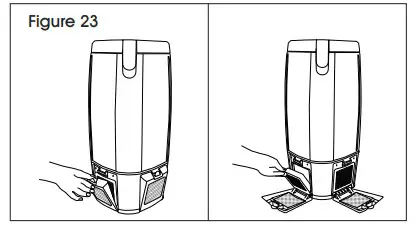
HEPA EXHAUST FILTER
- Once every two weeks or as necessary, inspect the HEPA filters. When the filter becomes discolored, replace it with a new filter. For best results, this filter should be replaced every six months.
- To inspect or replace the HEPA filter, turn the tab clockwise to open the filter door. Grasp the plastic housing on the HEPA filter to remove. (See Figure 23)

- To replace the filter door, align the tabs with the slots in the housing close. Be sure to close the door firmly and turn the tab counterclockwise to lock. You should hear an audible click if closed correctly.
ROUTINE MAINTENANCE
![]() WARNING! Unplug the vacuum when performing any maintenance. Check the condition of all electrical cords before each use.
WARNING! Unplug the vacuum when performing any maintenance. Check the condition of all electrical cords before each use.
DAILY/AFTER EACH USE
- Check Intercept® Micro Filter. Replace or empty if full.2. Use only genuine manufacturer’s replacement filters to ensure optimal performance, achieve improved indoor air quality, and maintain a valid vacuum
warranty. - Check micro cloth filter. If dirty, rinse out and air dry before replacing back into the vacuum.
![]() NOTE: All filters must be in place to operate the vacuum. This will optimize airflow and prevent the motor from laboring.
NOTE: All filters must be in place to operate the vacuum. This will optimize airflow and prevent the motor from laboring.
PERIODICALLY
- Check harness for fit and comfort.
- Replace lost or damaged pieces.
ELECTRICAL CORD CARE
- Never stretch the cord tightly between the vacuum and the outlet. A cord that is stretched or pulled may not function properly. It can damage the cord or plug and create a tripping hazard as well.
- Do not tie the extension cord and power cord together in a knot in an effort to keep the connection together. Doing so will result in damage to both cords and will not be covered under warranty.
Instead, use the provided cardholder. - After vacuuming, unplug the extension cord at both ends and wind it up loosely.
a. Wind the cord from the female receptacle to the male plug.
b. Lay the cord out, as straight as possible, on the floor before winding.
c. Do not wind the cord up by wrapping it around your hand and elbow, as repeated winding in this manner will result in a twisted cord that is hard to wind and unwind. - Use only a manufacturer’s replacement extension cord or one that is properly sized for your application. The extension cord jacket type should be SJT or better and rated for outdoor use. Extension cords in poor condition or too small in wire size can pose fire and shock hazards.
- To reduce the risk of these hazards, be sure the cord is in good condition and that liquid does not contact the connection.
- Do not use an extension cord with conductors smaller than 16 gauge (AWG) in size. To reduce power loss, use a 14-gauge extension cord if longer than 50 feet.
PROPER STORAGE
- When the vacuum is not in use, the vacuum and the extension cord should be stored indoors and in a
dry place.
![]() WARNING! The following information is for use by qualified service personnel only and provides guidance for troubleshooting and maintenance under normal working conditions.
WARNING! The following information is for use by qualified service personnel only and provides guidance for troubleshooting and maintenance under normal working conditions.
Unplug the vacuum when working on the motor or any electrical part.
MOTOR BRUSHES
Only the Uline Service Team should replace the carbon motor brushes. Use the following schedule for replacement:
- After the first 1,000 hours of operation.
- Again after the next 500 hours of operation.
- Again after the next 200 hours of operation.
TROUBLESHOOTING
| OPERATING ISSUE | RECOMMENDATIONS | |
| There is little or no such on. | 1. | There may be a clog in the hose or wands. If so. fake the hose and wands apart and remove the clog. |
| 2. | Open the lid and ensure that the Intercept` Micro Filter is not full, the micro cloth filter bag is correctly located. and that the flexible ring provides a proper seal when the lid is closed. | |
| 3. | Check to make sure pre•motor and side HEPA exhaust filters are deans. | |
| Vacuum turns oft while in use. | 1. | The machine may turn off due to overheating. Waif until the vacuum has coded down. |
| 2. | Check to make sure there are no clogs. | |
| The vacuum has a burning smell. | 1. | Check to see if the cord is damaged. |
| Do not clean the carpet. | 1. | Be sure the hose is secure on cleaner. |
| 2. | Check hose. wands and attachment for clogs. |
1-800-295-5510
uline.com
0421 IH-5048