ULINE H-8831 Shark Navigator Lift-Away
Vacuum User Guide
SAFETY
![]() CAUTION! To reduce risk of electric shock, this appliance has a polarized plug (one blade is wider than the other). Plug will fit in a polarized outlet only one way. If the plug does not fit fully in the outlet, reverse the plug. If it still does not fit, contact a qualified electrician to install the proper outlet. Do not alter the plug in any way.
CAUTION! To reduce risk of electric shock, this appliance has a polarized plug (one blade is wider than the other). Plug will fit in a polarized outlet only one way. If the plug does not fit fully in the outlet, reverse the plug. If it still does not fit, contact a qualified electrician to install the proper outlet. Do not alter the plug in any way.
NOTE: Read the following warnings to reduce the risk of fire, electric shock, injury, or property damage.
GENERAL WARNINGS
- This vacuum features a motorized nozzle, wand, hose, and/or vacuum pod. This device contains electrical connections, electrical wiring and moving parts that potentially present risk to the user.
- Use only identical replacement parts.
- Carefully observe and follow the instructions provided below to avoid improper use of the appliance. Do not use the vacuum for any purpose other than those described in these instructions.
- Before use, carefully inspect all parts for any damage. Do not use if any parts are damaged.
- The use of an extension cord is not recommended.
- Vacuum contains no serviceable parts.
USE WARNINGS
- Do not allow the vacuum to be used by children. Close supervision is necessary when used near children. This is not a toy.
- Always turn off the vacuum before connecting or disconnecting any motorized nozzles or other accessories.
- Do not handle plug or vacuum with wet hands.
- Do not use without filters in place.
- Only use Shark® brand filters and accessories. Failure to do so will void the warranty.
- Do not damage the power cord:
a) Do not pull or carry vacuum by the cord or use the cord as a handle.
b) Do not unplug by pulling on cord. Grasp the plug, not the cord.
c) Do not run the vacuum over the power cord, close a door on the cord, pull the cord around sharp corners, or leave the cord near heated surfaces. - Do not put any objects into nozzle or accessory openings. Do not use with any opening blocked; keep free of dust, lint, hair, and anything that may reduce airflow.
- Do not use if nozzle or accessory airflow is restricted. If the air paths or the motorized floor nozzle become blocked, turn the vacuum off and unplug from electrical outlet. Remove all obstructions before plugging in, and turn on the unit again.
- Keep nozzle and all vacuum openings away from hair, face, fingers, uncovered feet or loose clothing
- Do not use if vacuum is not working as it should, or has been dropped, damaged, left outdoors, or dropped into water.
- Use extra care when cleaning on stairs.
- Do not leave the vacuum unattended while plugged in.
- When powered on, keep the vacuum moving over the carpet surface at all times to avoid damaging the carpet fibers.
- Do not place vacuum on unstable surfaces such as chairs or tables.
- Do not use to vacuum:
a) Liquids
b) Large objects
c) Hard or sharp objects (glass, nails, screws or coins)
d) Large quantities of dust (drywall dust, fireplace ash or embers). Do not use as an attachment to power tools for dust collection.
e) Smoking or burning objects (hot coals, cigarette butts or matches)
f) Flammable or combustible materials (lighter fluid, gasoline or kerosene)
g) Toxic materials (chlorine bleach, ammonia or drain cleaner) - Do not use in the following areas:
a) Poorly lit areas
b) Wet or damp surfaces
c) Outdoor areas
d) Enclosed spaces that may contain explosive or toxic fumes or vapors (lighter fluid, gasoline, kerosene, paint, paint thinners, mothproofing substances, or flammable dust) - Turn off all controls before plugging in or unplugging the vacuum.
- Unplug from electrical outlet when not in use and before any maintenance or cleaning.
- Hand wash with water only. Washing with cleaning chemicals could damage the unit.
- During cleaning or routine maintenance, do not cut anything other than hair, fibers or string wrapped around the brush roll.
- Allow all filters to air-dry completely before replacing in the vacuum to prevent liquid from being drawn into electric parts.
- Ensure the dust cup and all filters are in place after routine maintenance.
- If provided, secure the power cord around the two cord hooks during storage.
ASSEMBLY
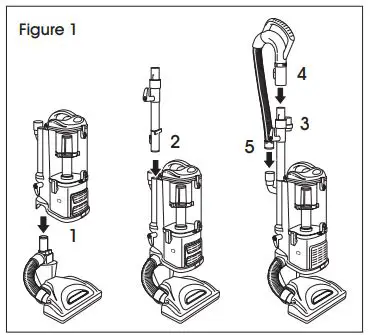
- Place pod onto floor nozzle post and slide it down until it clicks into place. (See Figure 1)
- Insert extension wand into pod until it clicks into place.
- Slide accessory holder onto wand with post facing away from cord hook.
- Insert handle assembly into wand until it clicks into place.
- Insert flexible hose into connector on back of pod.
NOTE: For proper operation, ensure all parts are firmly clicked into place.

OPERATION
SETTINGS

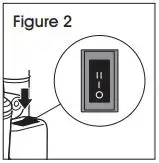
- Press the Power/Surface switch at the top of the pod. (See Figure 2)
- Select surface setting:
• 0 Power Off
• I Bare Floor (for bare floors and small area rugs)
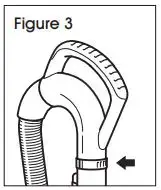
• II Carpet - Suction Control offers variable suction based on user’s needs. Rotate counter-clockwise to reduce suction and increase maneuverability on carpets. Rotate clockwise to increase suction on bare floors. (See Figure 3)
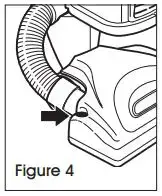
BRUSH ROLL INDICATOR LIGHT
Color of light indicates status of brush roll. (See Figure 4)
- Solid Green: Brush roll is spinning and working as it should.
- Solid Red: There is a jam in the brush roll area. Turn vacuum off and remove blockages in nozzle.
- No Light: The vacuum is off.
NOTE: For deep carpet cleaning per ASTM F608 (embedded dirt in carpets), use setting II, Carpet.
CLEANING MODES
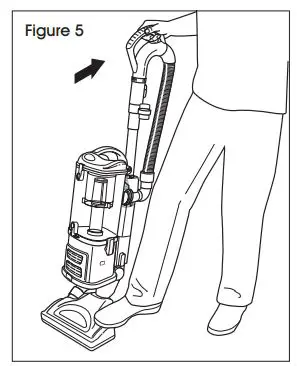
UPRIGHT
To engage brush roll, turn on power, then step on floor nozzle and tilt handle back. (See Figure 5)
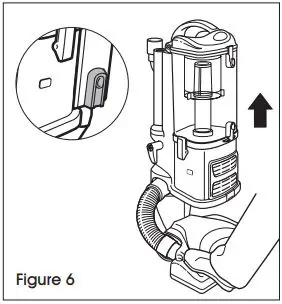
LIFT-AWAY
Press the red release button on the side of the pod. Gently hold the nozzle to the floor with foot and pull the pod up. (See Figure 6)
ABOVE-FLOOR EXTENDED REACH
Follow instructions for detaching the pod above. Press the wand release button to remove the wand from the pod. Attach an accessory to the end of the wand. (See Figure 7)
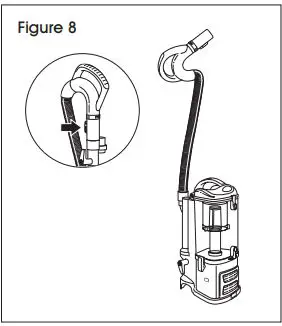
ABOVE-FLOOR
Follow instructions for detaching the pod and wand. Press the handle release button to detach the handle from wand. Attach an accessory to the end of handle. (See Figure 8)
NOTE: All accessories are compatible with both the wand and the handle.
EMPTYING THE DUST CUP
![]() IMPORTANT! Unplug the power cord before performing any maintenance.
IMPORTANT! Unplug the power cord before performing any maintenance.
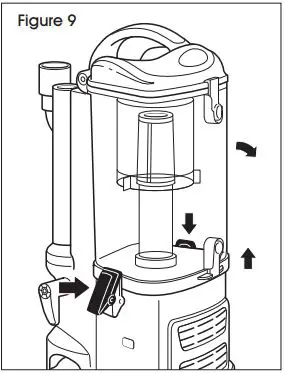
1. Undo the latches on the sides of the dust cup by lifting them up and out. Tilt the dust cup and lift it off vacuum pod. (See Figure 9)
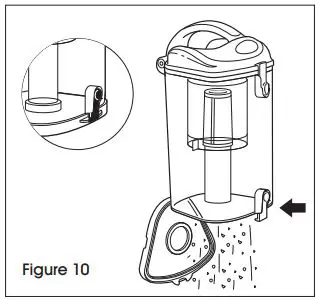
2. To empty debris into trash, press lower release button and bottom of dust cup will drop open (See Figure 10)
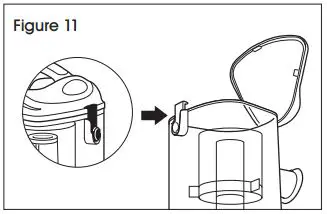
3. To remove collected debris from lint screen, press top release button and lift handle to open. Gently brush lint screen to clean. (See Figure 11)
4. To reinstall, set bottom of dust cup on pod and tilt until dust cup clicks into place. (See Figure 12)
MAINTENANCE
CLEANING FILTERS
Regularly clean and replace filters to keep vacuum’s suction power optimal.
To clean filters, rinse with cold water only to prevent damage from cleaning chemicals. Allow all filters to air-dry for at least 24 hours before reinstalling them to prevent liquid from being drawn into electric parts.
![]() IMPORTANT! Do not use soap when cleaning the filters.
IMPORTANT! Do not use soap when cleaning the filters.
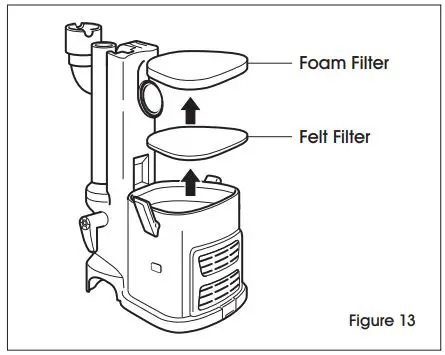
Pre-Motor (foam and felt): (See Figure 13)
- With the dust cup removed, remove the foam and felt filters.
- Clean pre-motor filters every three months.
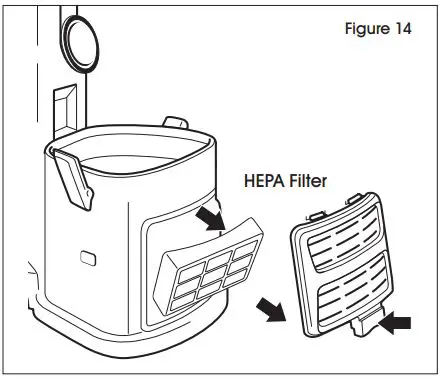
Post-Motor (HEPA): (See Figure 14)
- To access the HEPA filter, press the tab, tilt the filter cover and lift it from vacuum. Remove the HEPA filter.
- Clean HEPA filter every year.
REPLACING FILTERS
Follow the instructions for removing filters. The pre-motor filter should be replaced every two and a half years. The HEPA filter should be replaced every three years.
- XHF350 = Replacement pre-motor foam and felt filter kit.
- XHF350 = Replacement HEPA filter.
CLEANING THE BRUSH ROLL
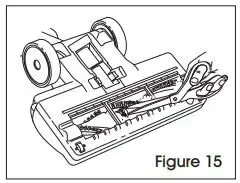
- Detach pod from floor nozzle.
- Remove any blockages or buildup from the airways in the nozzle. With scissors, carefully cut away any fibers, hair or string wrapped around the brush roll. Avoid damaging or cutting the bristles. (See Figure 15)
CHECKING FOR BLOCKAGES
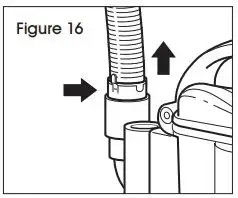
1. Detach handle from wand by pressing the handle release button. Remove flexible hose from the vacuum pod by pressing the tabs on the hose collar. Inspect the hose for clogs.
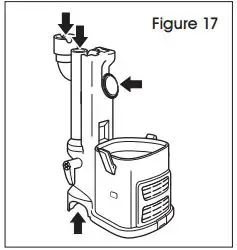
2. Detach the pod, wand, hose, and dust cup. Check all openings and remove blockages. (See Figure 17)
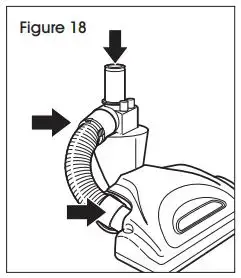
3. With the pod detached, remove the lower nozzle hose and check for clogs. (See Figure 18)
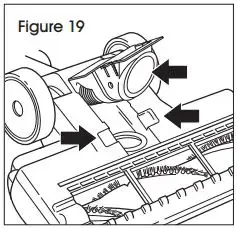
4. Open the airway on the bottom of the floor nozzle by squeezing the tabs on the sides and lifting up. Check for clogs and clear away any obstructions. (See Figure 19)
TROUBLESHOOTING
ULINE CHICAGO · ATLANTA · DALLAS · LOS ANGELES · MINNEAPOLIS · NYC/PHILA · SEATTLE · MEXICO · CANADA
1-800-295-5510
uline.com