VEVOR B09BCQVHBB Commercial Slushy Machine
Product Description
Product Usage
This machine is suitable for making slush and cold drinks, and the operation of this slush machine must comply with current standards.
Main Parts
The main components of the machine are as follows:
- Bowl lid
- Bowl
- Discharge Handle
- Discharge Port
- Control Panel
- Chassis
- Water Tray
Technical Parameters
- Model: please see nameplate
- Size: please see nameplate
- Maximum output power (watts): please see nameplate
- Operating voltage (volts): please See the nameplate on the side of the machine
- Operating ambient temperature range: from 5 degree to 32 degrees
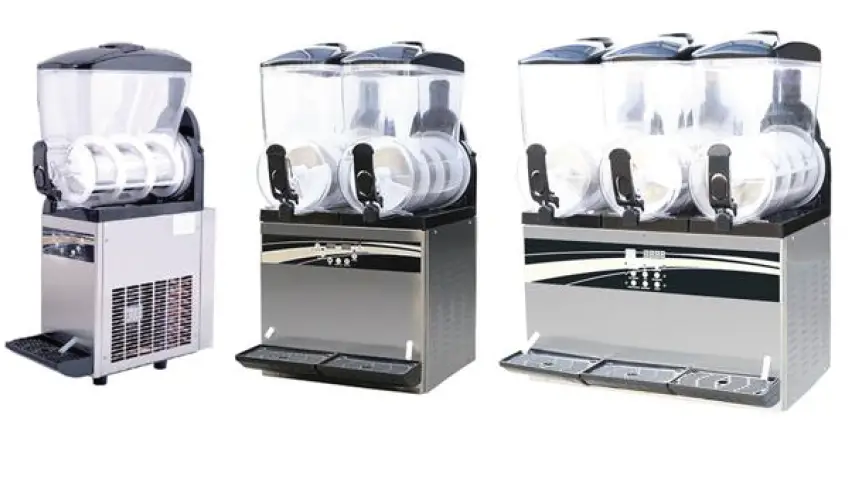
- Bowl Number: 1/2/3
- Single bowl capacity (L):15
- Sound pressure level: minimum 70 dB Grade: N
* Tip: The factory reserves the right to alter the machine without prompting.
Control Panel Description and Function
Panel Diagram:

Introduction of Function and Set Parameters
| Model | Code | Factory Setting | Meaning |
| X-150 | SL1 | -2.0℃ | Slush temperature |
| Cd1 | 5.0℃ | Cold drink temperature | |
| X-300 | SL1 | -2.0℃ | Slush temperature for left bowl |
| SL2 | -2.0℃ | Slush temperature for right bowl | |
| Cd1 | 5.0℃ | Cold drink temperature for left bowl | |
| Cd2 | 5.0℃ | Cold drink temperature for right bowl | |
| X-450 | S1 | -2.0℃ | Slush temperature for left bowl |
| S2 | -2.0℃ | Slush temperature for middle bowl | |
| S3 | -2.0℃ | Slush temperature for right bowl | |
| C1 | 5.0℃ | Cold drink temperature for left bowl | |
| C2 | 5.0℃ | Cold drink temperature for middle bowl | |
| C3 | 5.0℃ | Cold drink temperature for right bowl |
| Code | Factory Setting | Meaning |
| P00 | 0.2 (Degrees) | Slush temperature return difference value |
| P01 | 0 (Degrees) | The maximum setting temperature |
| P02 | -9.0 (Degrees) | The minimum setting temperature |
| P03 | 10 (Minutes) | Press protection time |
| P04 | 110V:85(V) 220V:185(V) |
Low voltage protection value |
| P05 | 1 (0: Disable 1: Enable) | Voltage protection enabled |
| P06 | 0.0 | # 1 bowl temperature correction |
| P07 | 0.0 | # 2 bowl temperature correction |
| P08 | 0.0 | # 3 bowl temperature correction |
| P09 | 2.0 (Degrees) | Cold drink temperature return difference value |
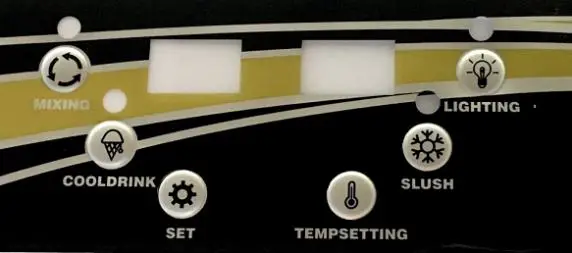
( Model:X-150)
- Press “Mixing key”, turn on mixing function, mixing light is on. Press “Mixing key” again to turn off the mixing function.
- Press the “Cold Drink key” (mixing function must be turned on, otherwise the Cold Drink key will not work), turn on the cold drink function, and cold drink light is on (the compressor is powered on) or cold drink light flashes (compressor is powered off), then press the “cold drink” key again to close the cold drink function.
- Press the Slush key (mixing function must be turned on, otherwise the Slush key will not work) to open the slush function, and slush light is on (the compressor is powered on) or slush light flashes (compressor is powered off), then press the Slush key again to close the slush function.
- Press the “Lighting key” to turn on the light, and then press the “Lighting key” again to turn off the light.
- Press “Set key”, enter the user parameter setting state. At this time, press the Set key to change the setting object, press “temp setting key(-)” and “set key(+)”to change the value. After 5 seconds without operating the key, the system will exit and save the setting value automatically.
- Hold down “Set key” and “temp setting key” for 5 seconds at the same time to enter the factory parameter setting mode, press the “Lighting key” to change the object, press “Set key(-)” and “temp setting key(+)” to change the value. The system will exit and save the parameters automatically after 5 seconds without any operation of keys.
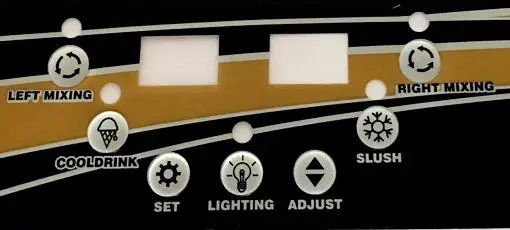
( Model:X-300)
- Press “Left Mixing Key”, turn on left mixing function, left mixing light is on. Press “Left Mixing key” again to turn off the left mixing function.
- Press “Right Mixing Key”, turn on right mixing function, right mixing light is on. Press “Right Mixing Key” again to turn off the right mixing function.
- Press the “Cold Drink key” (a Mixing function must be turned on, otherwise the Cold Drink key will not work), turn on the cold drink function, and cold drink light is on (the compressor is powered on) or cold drink light flashes (compressor is powered off), then press the “cold drink” key again to close the cold drink function.
- Press the Slush key (a Mixing function must be turned on, otherwise the Slush key will not work) to open the slush function, and slush light is on (the compressor is powered on) or slush light flashes (compressor is powered off), then press the Slush key again to close the slush function.
- Press the “Lighting key” to turn on the light, and then press the “Lighting key” again to turn off the light.
- Press “Set key”, enter the user parameter setting state. At this time, press the Set key to change the setting object, press “lighting(-)” and “Adjust key(+)” to change the value. After 5 seconds without operating the key, the system will exit and save the setting value automatically.
- Hold down “Set key” and “Adjust key” for 5 seconds at the same time to enter the Factory parameter setting mode, press the “set” key to change the object, press “Set key(-)” and “Adjust key(+)” to change the value. The system will exit and save the parameters automatically after 5 seconds without any operation of keys.
( Model:X-450)
- Press “Left mixing Key”, turn on left mixing function, left mixing light is on. Press “Left Mixing Key” again to turn off the left mixing function.
- Press “Mid Mixing Key”, turn on mid mixing function, mid mixing light is on. Press “Mid Mixing Key” again to turn off the mid mixing function.
- Press “Right Mixing Key”, turn on right mixing function, right mixing light is on. Press “Right Mixing Key” again to turn off the right mixing function.
- Press the “Cold Drink key” (a mixing function must be turned on, otherwise the Cold Drink key will not work), turn on the cold drink function, and cold drink light is on (the compressor is powered on) or cold drink light flashes (compressor is powered off), then press the “cold drink” key again to close the cold drink function.
- Press the Slush key (a Mixing function must be turned on, otherwise the Slush key will not work) to open the slush function, and slush light is on (the compressor is powered on) or slush light flashes (compressor is powered off), then press the Slush key again to close the slush function.
- Press the “Lighting key” to turn on the light, and then press the “Lighting key” again to turn off the light.
- Press “Set key”, enter the user parameter setting state. At this time, press the Set key to change the setting object, press “Lighting(-)” and “Adjust Key(+)” to change the value. After 5 seconds without operating the key, the system will exit and save the setting value automatically.
- Hold down “Mid Mixing Key” and “Right Mixing Key” for 5 seconds at the same time to enter the Factory parameter setting mode, press the “set” key to change the object, press “Lighting key(-)” and “Adjust key(+)” to change the value. The system will exit and save the parameters automatically after 5 seconds without any operation of keys.
Notice: when machine works well, please do not changed factory settings.
Alarm Code Description
- “- -“: Frozen bowl alarm is given and the compressor and motor will stop working, and resume automatically after 10 minutes.
- “RH”: temperature sensor malfunction alarm. Stop cooling in cold drink function state without affecting slush function.
- “LLL”: low voltage alarm, the whole machine stops. Turn off the power and check the power supply. Restart machine after voltage is stable. If it show “LLL” frequently, We suggest you connect a voltage stabilizer.
Safety
General Safety Rules
- Read the entire manual carefully
- The power cord must meet local safety standards
- The power cord and the plug size shall be in compliance with the parameters on the machine nameplate, properly grounded, and coupled with applicable switches and circuit breakers. Never operate the machine near flammable or explosive objects.
- No technical modifications to the machine
- Please do not spray rinsing the machine
- Be sure to follow the instructions to operate the machine
- Please do not mount the machine on other devices
- Please do not wash with benzene or other dissolved substances
- Never block the vents on the side of the machine
Before cleaning the machine, make sure the machine has been disconnected from the power.
The machine must be repaired by our service center or a trained technician.
* Damage due to improper operation will void our warranty, and the Factory will not be responsible for personal injury or property damage.
Stop Function
Turn off the main switch to stop the machine.
Operation and Storage
All operations described in Chapter 4 must be carried out by professionals in charge of transporting/handling packaged or unpackaged products.
Be sure to use appropriate equipment depending on the nature and weight of the goods, as well as relevant stipulations of local regulations.
Packaging
The goods to be shipped shall be packaged and fixed with foam inside, and cardboard boxes outside.
Transport and Handling
In case of physically works needed, it must be completed by at least two people.
- The machine must stay upward when being moved.
- Pay attention to the packaging and protruding parts.
Storage
The machine should be cleaned and disinfected before it is put into the warehouse.
If the machine is to be put idle for a long time, protective measures must be taken for its placement location and storage time:
- The machine shall be placed in enclosed space
- Prevent the machine from being hit and squeezed
- The machine should be placed in a cool and dry place, not exposed to moisture and high temperature
- Keep the machine away from corrosive substances
Installation
The machine must be installed in a bright, well-ventilated room with a hard solid floor.
Mounting Location
- The floor for the machine to be mounted on must be firm and flat.
- The space should be bright, well-ventilated and clean
- Sufficient clearance shall be provided to facilitate unrestricted operation as well as emergency use. *TIP: Leave 25 cm (10 in.) clearance on the top of the bowl.
* Before using the machine for the first time, all the parts must be cleaned, and the parts that are in contact with the slush need to be handled carefully; for more details, please read relevant section.
Power Connection
Make sure the main switch is at “0” before you plug in.
Warning: The power socket must be arranged in a place easily accessible by the user.
Operation
Before the machine is started for the first time, it must be checked by a professional technician to see whether its function can work well.
Material Preparation
Pour the material into the bowl when the machine is off and unpowered.
Warning: Minimum sugar content should not be less than 13% as low concentration may damage the machine.
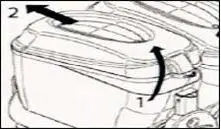
Remove the lid from the bowl according to the following instructions:
- Lift the back of the lid;
- Remove the lid from the front retainer.
- After material was added to the bowl, the lid on the bowl should be put back.
Warning:
- Please do not open the lid forcibly.
- Never add liquid higher than 25 degrees Celsius
- When feeding the bowl, be careful not to exceed the maximum limit and must exceed mixer shaft.
- Please do not turn on the machine when the lid is not in place. Please turn off and unplug the machine before removing the lid.
- Please turn off and unplug the machine before removing any parts from the bowl


Starting the Slush Machine
Refer to 1.4. Control Panel Description and Function
Slush Concentration Adjustment
Refer to 1.4.2 to Set up Parameters; the bigger position corresponds to thicker slush
Slush Production
Pull the handle to produce the slush.
If the machine is not to be used continuously, the following operations are required in case of dairy products:
- Spray water onto the faucet and surrounding area.
(Use a clean cloth to wipe for disinfection at the same time) - Before making slush for the customer, please use a small amount of product to try first.
Emergency Situations
- In extreme emergencies, set the main switch to “0” to turn off the machine.
- If the machine is stuck, turn off the machine, and contact the service center or a professional technician.
Cleaning and Maintenance
Prior to any cleaning and maintenance of external components of the machine, make sure the main switch is located at position 0 and the machine is not plugged in.
For cleaning and maintenance, follow these instructions:
- Put on protective gloves
- Never use soluble and explosive materials
- When the machine is powered on and the main switch at position “1”, cleaning is prohibited.
Empty the Bowl
Before cleaning the bowl, please first remove all the previously prepared material
Disassemble the handle parts
Please do not dismantle the handle of the machine if there is material or other liquid in the bowl
Remove the bowl and lid
Remove each bowl to ensure that the machine is neat and clean.
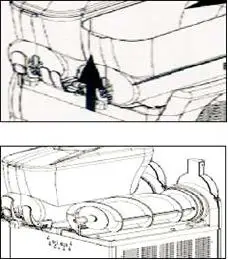
Remove the bowl as follows:
- Remove the lid as shown in the figure.
- Raise the front part of the bowl to loosen it.
- Gently push and rotate its back to remove the bowl
- Take out the mixer shaft and remove the seal ring
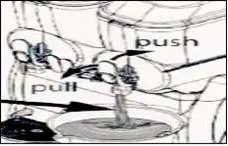
Disassemble the push handle
- Put the bowl on a smooth surface to facilitate the removing of the tap. Pull the “U” towards you and push the tap with your other hand.
- Unlock the spring, hold it down, push horizontally and finally release it.
- Unscrew the bar from the tap.
- Hold down the two rubber flanges, and separate the red rubber from it.
All parts must be washed with hot water and soap, and fully air dried before being re-assembled.
Wash and disinfect the components
All previously removed parts must be thoroughly cleaned and disinfected.
Important note: Disinfection procedures must comply with the machine operation guidelines.
Please follow the instructions below to ensure proper disinfection:
- Dispense the antiseptic solution into the container (2% sodium hypochlorite mixed with water)
- Thoroughly wash the bowl, lid and evaporator with a soaked sponge.
- Thoroughly clean with water
- Pour disinfectant into another container
- Dip the disassembled parts into the disinfectant
- Soak the parts in disinfectant for 30 minutes
- Wash thoroughly with water again
- Air dry the parts at a clean place
- Reassemble as described in section 7.5
- Rinse thoroughly with water before using the machine
Caution: Do not immerse the lid with the lamp in any solution. Before cleaning and disinfecting the lid, please remove the lid as described in the previous section. In order to properly clean the lamp cover, these steps must be followed:
- Wipe the bottom of the lid (the part contact with the machine) with a clean, damp cloth.
- Wipe the outside of the machine with a clean, damp cloth.
- Use a disinfectant soaked sponge to disinfect the bottom of the lid. with the machine.
- Allow operation for 30 minutes.
- Rinse twice or more. Only the bottom of the lid needs to be wiped with clean water sponge.
- Put the lid on a clean flat surface to dry. First, dry the bottom and wipe the external parts with a clean cloth.
- Install the lid back after the bowl has been cleaned and disinfected. Never clean the machine when the lid is installed on it.
Reassemble the cleaned parts
All cleaned and disinfected components must be carefully reinstalled, and components must be fully lubricated for the machine to work more efficiently.
Clean the tray and grid separately with warm water
Dry all the parts
Put the grid back over the tray
Install the seal ring of the mixer shaft as shown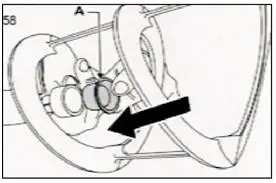

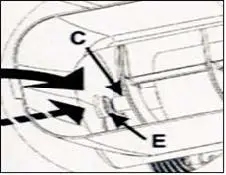

Important note: Always check the integrity of the seal ring. If the seal ring is broken, it should be replaced with a new one
Use the supplied Vaseline to lubricate the seal ring in the illustrated area.
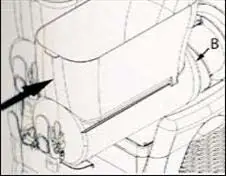
Install the mixer shaft as shown; install the head of the mixer shaft (C) to the shaft (D) Tips: Rotate it into the first half of the bowl and push the bowl to the designated position in contact with the seal ring (B)
- Align the head of the mixer shaft with the interface inside the bowl, press down the bowl, and follow instructions below to reinstall the faucet.
- Lubricate the joints fully with the supplied Vaseline
- Put the piston in the designated position, and push the handle until it connects the faucet.
Rinse cycle
Before starting the machine, it must be cleaned circularly Proceed as follows:
- Fill the bowl with water
- Let the machine stir for 5 minutes
- Turn off the machine, and open the tap to empty the water in the bowl
Clean the water box
The water box should be emptied and cleaned regularly
Pull up the water box with the lid and then pull it out
Lamp cover
Lamp replacement
When replacing the lamp, the main switch must be turned off and the power must be disconnected.
Remove the protective cap and unscrew the cover screws; use suitable screwdriver to operate
Regular maintenance
- The machine must be maintained regularly by professional technicians (at least once a year)
- Regular inspection can ensure that all components are installed in place, and the machine can run safely.
- Any damaged components must be replaced with original parts
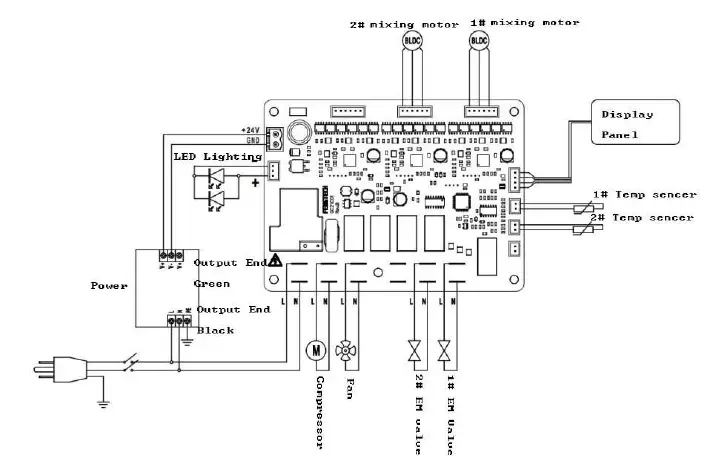
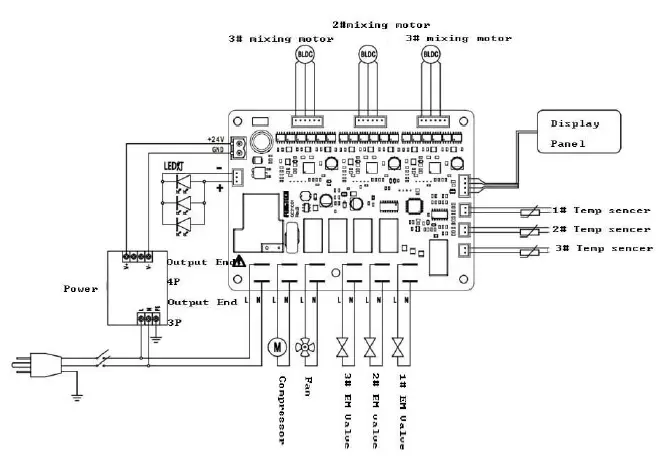
Wiring diagram