![]()
Vivitar 360 Sky View Video Drone

Vivitar 360 Sky View Video Drone
DRC-888/X-98
GPS
FOLLOW ME TECHNOLOGY
PRE-FLIGHT CHECKLIST
Before attempting to fly your drone, make sure that you have clone all of the following.
- Inserted 4 AA Batteries in Your Remote
See page 7 of this manual for more information. - Charged Your Drone Battery
See page of this manual for more information. - Check That the Propellers are Firmly Attached
See page 21 of this manual for more information. - Calibrated Your Drone with the Remote Control
See page 9 of this manual for more information. - Calibrated Your Drone’s Gyroscope
See page 9 of this manual for more information. - Complete the compass calibration process,
see the page 9-10 this manual for more information. - Unlock your drone.
WARNING
Faure to to your drone before flight can lead to severe flight malfunctions and potential damage your Drone. Always fly carefully!
For more information and la instructional videos…I your drone, scan rho QR code.

Introduction
Thank you for purchasing the Vivitar 360 SKYVIEW Video Drone, item DRC6368. The included remote controlled aircraft is designed specifically for outdoor flying In order to get the best possible results please read this user’s manual carefully before using. In addition, be sure to keep this manual in a safe place for future reference.
Features
- 2.4Ghz Remote Control System and Wi-Fi Control
- GPS Navigation
- Follow ME Technology
- Full HD360 Camera with Live Video Feed, Real Time Transmission
- Real Time Viewing
- 2X-GPS
- 1000ft Range
Important Safety Precautions
When using your Vivitar 360 SkEVEview Video Drone, basic safety precautions should always be followed, including the following:
- Do not allow children or the infirm to operate your drone without adult supervision. For safety purposes, only allow experienced pilots aged 14 and up fly your drone.
- To avoid choking hazards, keep all small parts and pieces away from children.
- Your drone is not a toy. Makes sure that it is properly assembled before use, and operated safely.
- Keep your drone away from obstacles, crowds, power lines, trees, and bodies of water while it is in flight. Always fly your drone in a wide open spacious environment. Avoid flying your drone directly above people or animals. Maintain a 7ft (2m) distance from the aircraft when taking off and landing,
- Only use your drone in a dry environment. Your drone is composed of sophisticated electronic components and Ferts. To avoid damage to your drone, please keep your drone away from water and moisture. Use a soft dry cloth to wipe the surface of your drone and keep it clean.
- Beginner and novice level pilots should practice flying with experienced pilots until suitably experienced in flight.
- To ensure safety. only use the included parts when using your drones. a Make sure to keep your ears and eyes protected when using your drone. When your drone’s blades are spinning, make sure to keep people and objects at a distance from rotating parts.
- Keep your drone away from excessive heat or flames, especially while charging the battery.
- Please recycle or dispose of your drone properly based on the laws and rules of your municipality. Contact local recycling facilities and/or the manufacturer of your speaker for further information.
Package Contents

Specification
- Weight: 710g
- Battery : 7.4V Lithium Polymer Battery
- Height: 168mm Diameter: -350mm
- Charging Time: -5 hours
- Flying Time Per Charge: -10 minutes
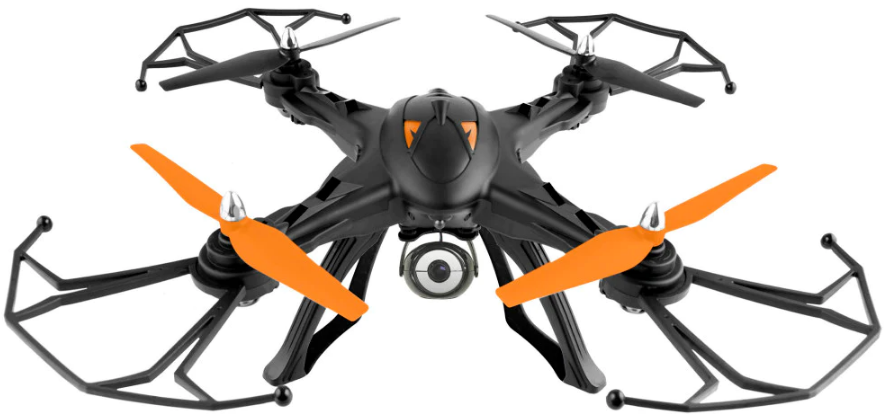
A quick look at your Drone

A quick look at your remote control

Inserting Batteries into your remote

Use a screwdriver to open up the battery compartment located on the rear of your remote control.
Insert 4 AA15V batteries, making sure that the batteries are inserted with the correct polarity (u,-) as displayed in the battery compartment.
Once the batteries are inserted, put the battery compartment cover back on the battery compart-ment, and use a screwdriver to close it securely.
Warning:
- Do not mix rechargeable and non-rechargeable batteries.
- Do not mix old and new batteries or different types of batteries.
- Remove exhausted batteries and dispose of them based on the rules of your local municipality.
- Remove the batteries from your remote control if it will not be in use for an extended period of time.
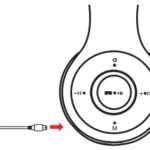
Charging your Drone’s Battery.
Use included charging adapter to charging Drone’s Battery.

Charging takes about five hours to complete.
Warning
- It is recommended to use a 5V,1-2A charger (not included) to charge your battery.
- Do not leave the charger unattended in the presence of children.
- Do not expose the battery to excessive heat or flames.
- While charging your battery, keep it away from flammable materials.
- When the quadcopter’s battery is on low power and cannot fly, the power switch of quadcopter must be turned off.
Once your battery is fully charged it can be inserted directly into the battery slot on the underside of your drone.

Calibrating Your Drone (Preparing for Flight)
TO power on your drone, slide the ON/OFF switch on the bottom of your drone to the ON position. To power on your remote control, press the ON/OFF button. Once your drone and remote control are powered on, follow the calibration steps below in order to prepare your drone for flight.
Calibrating Your Drone with Your Remote Control
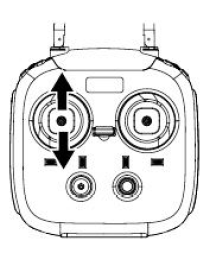
- Pull the throttle stick all the way down and then push it all the way up.
- When the LED lights on the rear legs of your drone are solid blue and the LED lights on the front legs of your drone are solid red then your drone is synchronized with your remote control and ready to fly.
- When the LED lights on the rear legs of your drone are solid green and the LED lights on the front legs of your drone are solid red then your drone is in GPS mode.
Calibrating Your Drone’s Internal Gyroscope
Calibrate your drone’s Internal gyroscope to ensure smooth and balanced flight. Before you start. make sure your drone is placed on a flat, stable surface.
- Pull the throttle stick and the directional stick all the way down and to the left simultaneously. Release them after about 2-3 seconds.
- The LED lights on the rear legs of your drone will turn blue and green and start blinking rapidly. The LED lights on the front legs of your drone will turn red and start blinking rapidly while synchronizing.
- The LED lights on the rear legs of your drone will turn solid blue, and the LED lights on the front legs of your drone will turn solid red to indicate that your drone’s internal gyroscope is calibrated.

Aircraft Compass Calibration
The aircraft compass calibration allows your drone to be tracked over CPS. Before you start, make sure your drone is placed on a flat, stable surface.
- Press the geomagnetic calibration button on the remote control.

- Rotate your drone horizontally, spinning it in a clockwise direction for 3 revolutions. The lights on the front legs of your drone will solidly shine red, while the lights on the back legs of your drone will solidly shine green.

-Turn the head downwards and rotate your drone vertically, spinning it for 3 revolutions When you see green lights shining solidly, calibration is complete.

Warning:
- When flying your drone in CPS mode, make sure you are in a wide open space.
- Do not calibrate your drone in areas where there are strong magnetic fields.
- When calibrating, do not carry ferromagnetic materials such as keys or cell phones.
- Do not calibrate near large sheets of metal.
Locking and Unlocking Your Drone
Unlocking Your Drone
If your drone is locked, push the throttle stick all the way up and the pull it back to its mid-point and your drone will be unlocked.

Locking Your Drone
With your drone in a landed position, pull the throttle stick all the way down and hold it down for approximately 3 seconds. The motor will stop and your drone will be locked in place.

Flying Your Drone
Pre-Flight Preparation
If you have never used a drone before and you are not an experienced pilot, make sure to read these instructions carefully before flying. Get familiar with all of the controls. If necessary, read through these instructions many times and practice handling the remote control until you feel completely comfortable and ready.
- Place your drone M a clear, open field, Make sure that it is resting on a secure. flat surface.
- Practice using the throttle stick and the directional control stick (see below).
- By simulating the use of the remote and both sticks, you will grow more comfortable with the natural motions required during flight and you will learn to react more rapidly to unexpected circumstances.

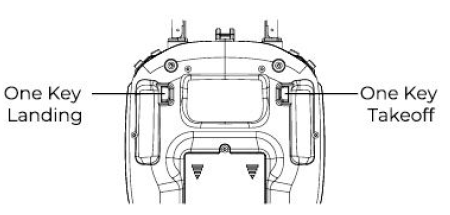
One Key Takeoff and Landing
Once your drone is unlocked, you can press the one key takeoff button and the drone will automatically hover 1.5 meters above the ground.
By pressing the one key landing button, your drone will automatically land on the ground.
One Key Landing
Headless Mode
Headless mode allows users to fly their drone without worrying about the drone’s orientation. Regardless of which way the drone is facing, this function ensures that the drone will always follow controls from your perspective all the time.
To enter headless mode, before your drone takes oft stand in front of your drone and press the headless mode button on your remote control.

Return Functions
When your drone is properly calibrated to be tracked over CPS, then you can use multiple return functions which allow your drone to return to a specific destination.
NOTES
- In order to make sure that your drone can be tracked over CPS, complete the “aircraft compass calibration’ process discussed earlier in this manual.
- You can use the Vivitar SkyEYEview app to view your Drone’s GPS Status.
- Make sure to fly your drone in clear areas with strong GPS signal in order to use the return to home functions successfully.
Smart Return Function
One The Smart Return Function returns your drone to the location of Key your remote control or phone. Push the one key return button on Return your remote control, or the corresponding button in the Visitor SkyEVEview app to enter Smart Return mode. When in Smart Return mode, you can use the directional control stick to control the drone’s landing point. Push the throttle stick to exit Smart Return mode.

NOTE: If CPS signal and remote control signal is lost for more than 6 seconds while In Return to Home mode, the drone will descend slowly until it lands on the ground.
Failsafe Return Function
If CPS signal and remote control signal is lost for more than 6 seconds while flying, the Failsafe Return Function automatically returns your drone to the origin of its flight. This feature is only available when you begin your flight with a strong GPS signal.
NOTE: When in Failsafe Return mode, your drone is unable to automatically avoid obstacles.
Follow Me Flight Mode
When your remote control and your drone receive GPS signal. press the follow me flight button on the remote control and your drone will automatically fly towards the remote control and follow it as is moves around.

When in follow me flight mode, the drone will stay between 4-20 meters of your remote control. Push the directional control stick forward to more the drone further from the remote control. Pull it back to bring the drone closer to the remote control. If the drone gets closer than 4 meters to the remote control or further than 20 meters away, then press the follow me flight button again to bring your drone back in range.
Follow me flight mode can be used with both your remote control or your phone. If you are using both together. your drone will stay within range of your remote control
GPS Surround Flight Mode
When your remote control and your drone receive CPS signal, press the GPS Surround Flight button on the remote control, and your drone will automatically fly in circles around the remote.

When in GPS Surround Flight. push the directional control stick to the left and the drone will fly in counterclockwise circles. Push the directional control stick to the right and the drone will fly in clockwise circles. Push the directional control stick forward to enlarge the radius of the circle or pull it backwards to shrink the diameter of the circle.
Emergency Stop Function.
If your drone is flying abnormally press rho one key return button and the CPS surround flight cottons on your remote control simultaneously to trigger an emergency stop.

Using the Vivitar SkyEYEview App
Connect Mobile Phone Holder to the Remote Control

Download the Vivitar SlcyEYEview App
Go to the Ape Store or Google Play store and search for the Vivitar SkyEYEview app. Follow the instructions to proceed to download the app. You can al.o neon the applicable OP code below

Using WIFI to Connect the Drone to Your Phone
- Power on your drone. LED lights will illuminate to indicate that it is powered on.
- On your mobile phone, find the WIFI Settings menu. Select the network labeled SKEYE WiFi-xxxxxx in order to sync your drone with your phone.
- Open the Vivitar SkyEYEview application on your phone. Press the “TAKE OFF” option on the menu screen in order to open the control interface.

Control interface Function

Manu Screen Option

Tab ” TAKE OFF” to access the control interface.

Tab ” Photos and Videos” to view photos and videos recorded with your drone’s camera.

For more information on using your drone Tab ” Instructions”
Troubleshooting
Problem: During calibration, the red lights on the front legs as well as green and blue lights on the rear legs flash slowly.
Solution: The drone and remote control are not recognizing each other. Turn both units off, urn them back on and then try calibrating your drone and remote control again.
Problem: The drone is not connecting to CPS.
Solution: There may not be a strong enough COS signal available. Try moving outside to a clear spacious area. Then reattampt the compass calibration process.
Problem: The drone won’t unlock.
Solution: The drone’s battery may be drained. Try replacing or recharging the battery. Also, the remote control and the drone may not be synchronized. Try turning both off and then try recali-brating them.
Remote Control Light Indicators
The green light is flashing slowly
The remote control is still calibrating.
The green light is flashing slowly while the remote is making repeated beeping sounds.
The batteries are running low on power and need to be replaced.
There is a red light flashing slowly while the remote is making repeated beeping sounds.
The remote control is not yet sensing a GPS connection
There is a red light shining steadily.
The remote control is connected to GPS
Replacing your Propeller Battery
Remove the cap covering the Propeller.

Unscrew the propeller so that your current propeller can be remove and replaced with a new one.

Screw the new propeller on and then cap back on the propeller.

FCC Compliance Statement
Changes or modifications not expressly approved by the party responsible for compliance could void the user’s authority to operate the equipment.
This device complies with Part 15 of the FCC Rules. Operation is subject to the following two conditions:
- This device may not cause harmful interference, and
- This device must accept any interference received, including interference that may cause undesired operation.
This equipment has been tested and found to comply with the limits for a Class B digital device, pursuant to Part15 of the FCC Rules. These limits are designed to provide reasonable protection against harmful interference in a residential installation. This equipment generates, uses and can radiate radio frequency energy and, if not installed and used in accordance with the instructions, may cause harmful interference to radio communications. However, there is no guarantee that interference will not occur in a particular installation.
If this equipment does cause harmful interference to radio or television reception, which can be determined by turning the equipment off and on, the user is encouraged to try to correct the interference by one or more of the following measures:
- Reorient or relocate the receiving antenna
- Increase the separation between the equipment and receiver.
- Connect the equipment into an outlet on a circuit different from that to which the receiver is connected.
- Consult the dealer or an experienced radio/TV technician for help.
Vivitar One Year Warranty
This warranty covers the original consumer purchaser only and is not transferable.
This warranty covers products that fail to function properly UNDER NORMAL USAGE, due to defects in material or workmanship. Your product will be repaired or replaced at no charge for parts or labor for a period of one year.
What Is Not Covered by Warranty
Damages or malfunctions not resulting from defects in material or workmanship and damages or malfunctions from other than normal use, including but limited to, repair by unauthorized parties, tampering, modification or accident.
To Obtain Warranty Service and Troubleshooting Information:
Call 1-800-592-9541 in the U.S. or visit our website at www.vivitarcom.
To receive Warranty service along with the name and address of an authorized product service center, the original consumer purchaser must contact us for problem determination and service procedures. Proof of purchase in the form of a bill of sale or receipted invoice, evidencing that the product is within the applicable Warranty period, MUST be presented in order to obtain the requested service. It is your responsibility to properly package and send any defective products along with a dated copy of proof of purchase, a written explanation of the problem, and a valid return address to the authorized service center at your expense. Do not include any other items or accessories with the defective product. Any products received by the authorized service center that are not covered by warranty will be returned unrepaired.


Downloads Resources
- Vivitar 360 Sky View Video Drone User Manual – Download [optimized]
- Vivitar 360 Sky View Video Drone User Manual – Download
FAQ’S
What app do you use with the Vivitar Skyview drone?
VIVITAR SKYEYEVIEW is a new type of flight toy control App. Our aircraft has a panoramic camera, which can be used for real-time communication through WiFi and mobile App. The new panoramic preview in App can watch real time images at 360 degrees. The upgraded version of the aircraft is installed with the GPS module.
How do I connect my Vivitar drone to my phone?
And you’ve turned on your the drone all you do is you go to the app you go to your phone and go to where you you can connect to the Wi-Fi settings.
How long can a drone fly without recharging?
Taking the average flight times of these popular higher-end consumer drones, you end up with around 28 minutes of expected flight time. Not bad, considering how much ground you can cover in half an hour. Add on to that a second battery, and you can be in the air for around an hour, almost uninterrupted.
How long do drones fly on a charge?
A typical consumer drone can fly typically between 10 to 30 minutes, while more advanced professional drones can fly for even an hour or more.
Do drones need WiFi?
A drone can fly without WiFi or cell service. Access to the internet is only required when downloading a program for your drone or doing a system update. Once the download is complete, the internet is no longer needed. However, some drone features are enhanced with WiFi or cell service.
How do you reset a drone?
Hold down the power button on the drone for 9 seconds (for DJI drones) until you hear three beeps. Then do the same on the controller. The next thing is to power off both the controller and the drone.
Do Drones Use Bluetooth?
Bluetooth is a popular technology for connecting to drones and controlling them via an app. Because of its range, this type of communication is often found in toy drones. Bluetooth can reach 100m maximum connectivity in ideal conditions, while WiFi can reach 1000m.
How high can a Vivitar drone fly?
The Vivitar AeroView quadcopter video drone is the only drone you need. With a full HD camera with live video feed over wifi, you can see real time what you are flying over. With follow me technology and GPS tracking you can always get the perfect shot! The drone has a range of 1000 feet and a 12 minute flight time.
How do you control a Vivitar drone?
TO power on your drone, slide the ON/OFF switch on the bottom of your drone to the ON position. To power on your remote control, press the ON/OFF button. Once your drone and remote control are powered on, follow the calibration steps below in order to prepare your drone for flight.
Why is my drone not connecting to remote?
In simple terms, if your drone is not pairing with your controller, you should: Make sure both batteries have got enough charge in them. Switch the batteries with new ones. Pair the controller correctly to the drone using the correct procedure.
Why is my drone blinking red?
Flashing red, your device is indicating an IMU error.
How do you know if a drone is recording?
Radio: If you think you are being spied on, the best way of confirming this is by using radio counter-surveillance systems to track down the drone. A radio counter-surveillance system decodes radio waves generated by the drone and makes a pattern to show where the signals are coming from.