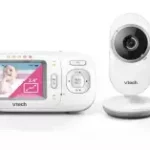
vtech VM3254 Full 2.8 Inch Colour Video Baby Monitor

Important safety instructions
The applied nameplate is located at the bottom of the baby unit’s base.
When using your equipment, basic safety precautions should always be followed to reduce the risk of fire, electric shock and injury, including the following:
- Follow all warnings and instructions marked on the product.
- Adult setup is required.
- CAUTION: Do not install the baby unit at a height above 2 meters.
- This product is not a substitute for adult supervision of the infant. Supervising the infant is the parent’s or caregiver’s responsibility. This product could cease operating, and therefore you should not assume it will continue working properly for any given period of time. Further, this is not a medical device and should not be used as such. This product is intended to assist you in supervising your baby.
- Do not use this product near water. For example, do not use it next to a bath tub, wash bowl, kitchen sink, laundry tub or swimming pool, or in a wet basement or shower.
- CAUTION: Use only the battery provided. There may be a risk of explosion if a wrong type of battery is used for the parent unit. The battery cannot be subjected to high or low extreme temperature and low air pressure at high altitude during use, storage or transportation. Disposal of battery into fire or a hot oven, or mechanically crushing or cutting or the battery can result in an explosion. Leaving the battery in an extremely high temperature surrounding environment can result in an explosion or the leakage of flammable liquid of gas. Battery subjected to extremely low air pressure may result in an explosion or the leakage of flammable liquid or gas. Dispose of used battery according to the information in The RBRC seal.
- Use only the adapters included with this product. Incorrect adapter polarity or voltage can seriously damage the product.
- The power adapters are intended to be correctly oriented in a vertical or floor mount position. The prongs are not designed to hold the plug in place if it is plugged into a ceiling, under-the-table or cabinet outlet.
- For pluggable equipment, the socket-outlet shall be installed near the equipment and shall be easily accessible.
- Unplug this product from the wall outlet before cleaning. Do not use liquid or aerosol cleaners. Use a damp cloth for cleaning.
- Do not cut off the power adapters to replace them with other plugs, as this causes a hazardous situation.
- Do not allow anything to rest on the power cords. Do not install this product where the cords may be walked on or crimped.
- This product should be operated only from the type of power source indicated on the marking label. If you are not sure of the type of power supply in your home, consult your dealer or local power company.
- Do not overload wall outlets or use an extension cord.
- Do not place this product on an unstable table, shelf, stand or other unstable surfaces.
- This product should not be placed in any area where proper ventilation is not provided. Slots and openings in the back or bottom of this product are provided for ventilation. To protect them from overheating, these openings must not be blocked by placing the product on a soft surface such as a bed, sofa or rug. This product should never be placed near or over a radiator or heat register.
- Never push objects of any kind into this product through the slots because they may touch dangerous voltage points or create a short circuit. Never spill liquid of any kind on the product.
- To reduce the risk of electric shock, do not disassemble this product, but take it to an authorized service facility. Opening or removing parts of the product other than specified access doors may expose you to dangerous voltages or other risks. Incorrect reassembling can cause electric shock
when the product is subsequently used. - You should test the sound reception every time you turn on the units or move one of the components.
- Periodically examine all components for damage.
- There is a very low risk of privacy loss when using certain electronic devices, such as baby monitors, cordless telephones, etc. To protect your privacy, make sure the product has never been used before purchase, reset the baby monitor periodically by powering off and then powering on the units, and power off the baby monitor if you will not use it for some time.
- Children should be supervised to ensure that they do not play with the product.
- The product is not intended for use by persons (including children) with reduced physical, sensory or mental capabilities, or lack of experience and knowledge, unless they have been given supervision or instruction concerning use of the appliance by a person responsible for their safety.
SAVE THESE INSTRUCTIONS
Cautions
- Use and store the product at a temperature between 32oF and 104oF.
- Do not expose the product to extreme cold, heat or direct sunlight. Do not put the product close to a heating source.
- Batteries should not be exposed to excessive heat such as bright sunshine or fire.
- Warning – Strangulation Hazard – Children have STRANGLED in cords. Keep this cord out of the reach of children (more than 3 ft (0.9m) away). Do not remove this tag.
- Never place the baby unit(s) inside the baby’s crib or playpen. Never cover the baby unit(s) or parent unit with anything such as a towel or a blanket.
- Other electronic products may cause interference with your baby monitor. Try installing your baby monitor as far away from these electronic devices as possible: wireless routers, radios, cellular telephones, intercoms, room monitors, televisions, personal computers, kitchen appliances and cordless telephones.
Precautions for users of implanted cardiac pacemakers
Cardiac pacemakers (applies only to digital cordless devices):
Wireless Technology Research, LLC (WTR), an independent research entity, led a multidisciplinary evaluation of the interference between portable wireless devices and implanted cardiac pacemakers. Supported by the U.S. Food and Drug Administration, WTR recommends to physicians that:
Pacemaker patients
- Should keep wireless devices at least six inches from the pacemaker.
- Should NOT place wireless devices directly over the pacemaker, such as in a breast pocket, when it is turned ON.
WTR’s evaluation did not identify any risk to bystanders with pacemakers from other persons using wireless devices.
Electromagnetic fields (EMF)
This VTech product complies with all standards regarding electromagnetic fields (EMF). If handled properly and according to the instructions in this user’s manual, the product is safe to be used based on scientific evidence available today.
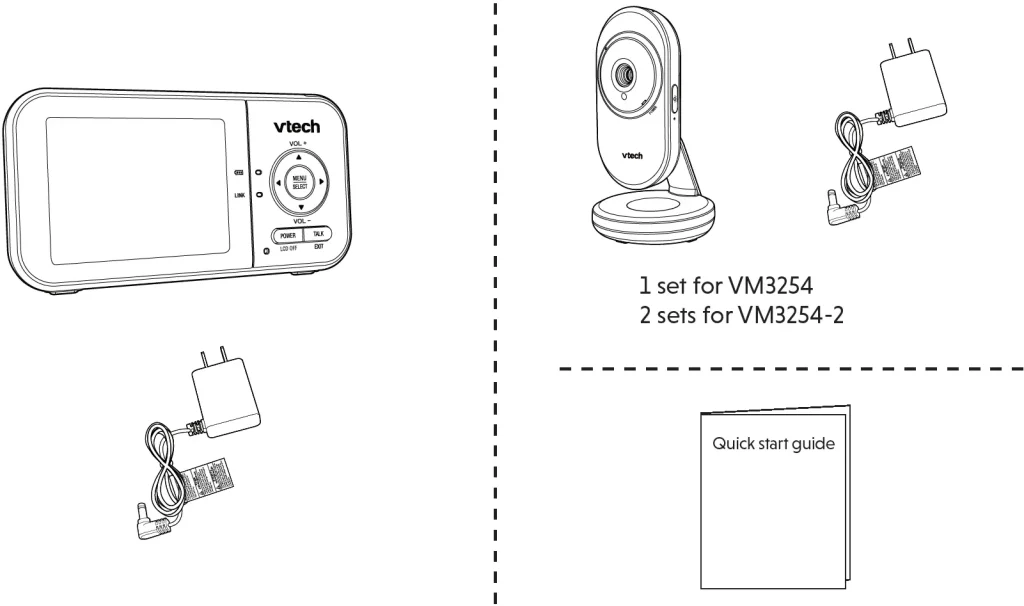
What’s in the box
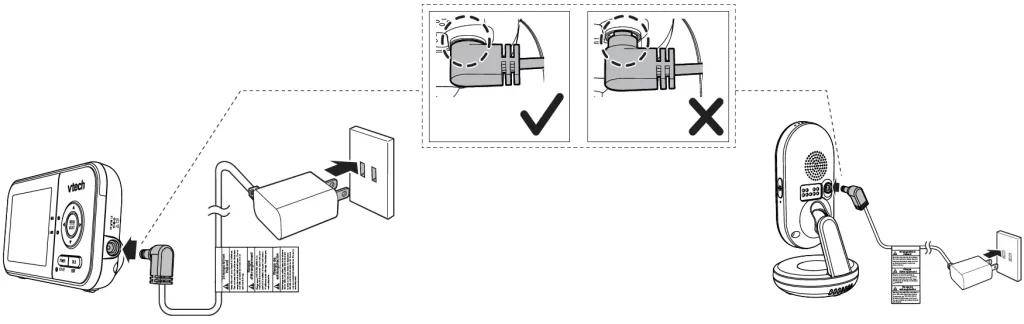
Connect the baby monitor
NOTES
- The rechargeable battery in the parent unit is built-in.
- Use only the power adapters supplied with this product.
- Make sure the baby monitor is not connected to a switch-controlled electric outlet.
- Connect the power adapters in a vertical or floor mount position only. The adapters’ prongs are not designed to hold the weight of a baby monitor, so do not connect them to any ceiling, under-the-table, or cabinet outlets. Otherwise, the adapters may not properly connect to the outlets.
- Make sure the parent unit, the baby units and the power adapter cords are out of reach of children.
Charge the parent unit battery
When you have connected and turned on the parent unit, the battery will be charged automatically.
NOTES
- Before using the baby monitor for the first time, charge the parent unit battery for 12 hours. When the parent unit battery is fully charged, the battery icon becomes solid .
- It takes longer to charge the battery when the parent unit is turned on. To shorten the charging time, turn the parent unit off while charging.
- The standby time varies depending on the sensitivity level you set, your actual use and the age of the battery.
The battery icon indicates the battery status (see the following table).
| Battery indicators | Battery status | Action |
| The screen displays. The light flashes. | The battery has very little charge and may be used for only a short time. | Charge without interruption (about 30 minutes). |
| The battery icon becomes solid. | The battery is fully charged. | To keep the battery charged, connect it to AC power when not in use. |
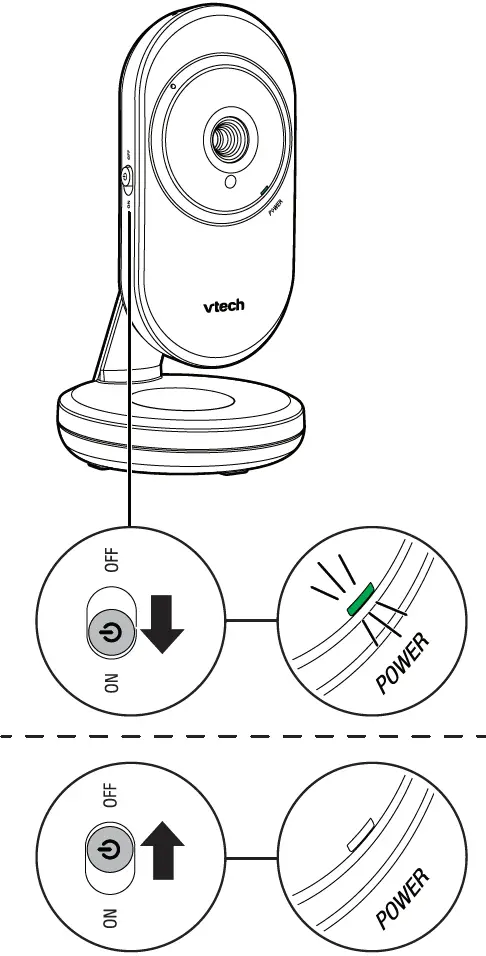
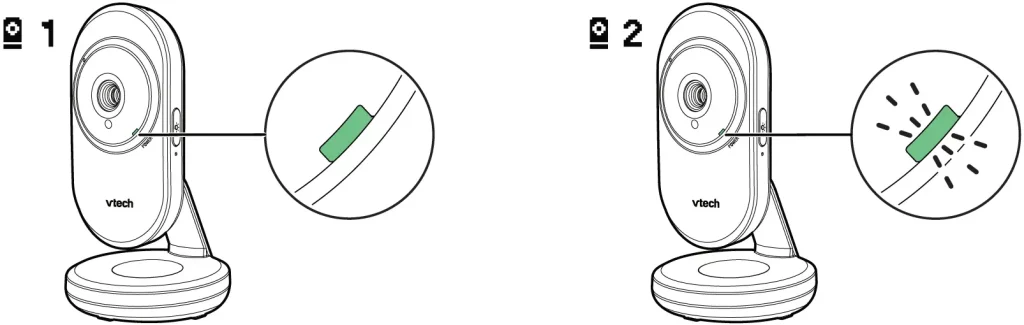
Power on or off the baby monitor
- Slide the ON/OFF switch to power on or off your baby unit.
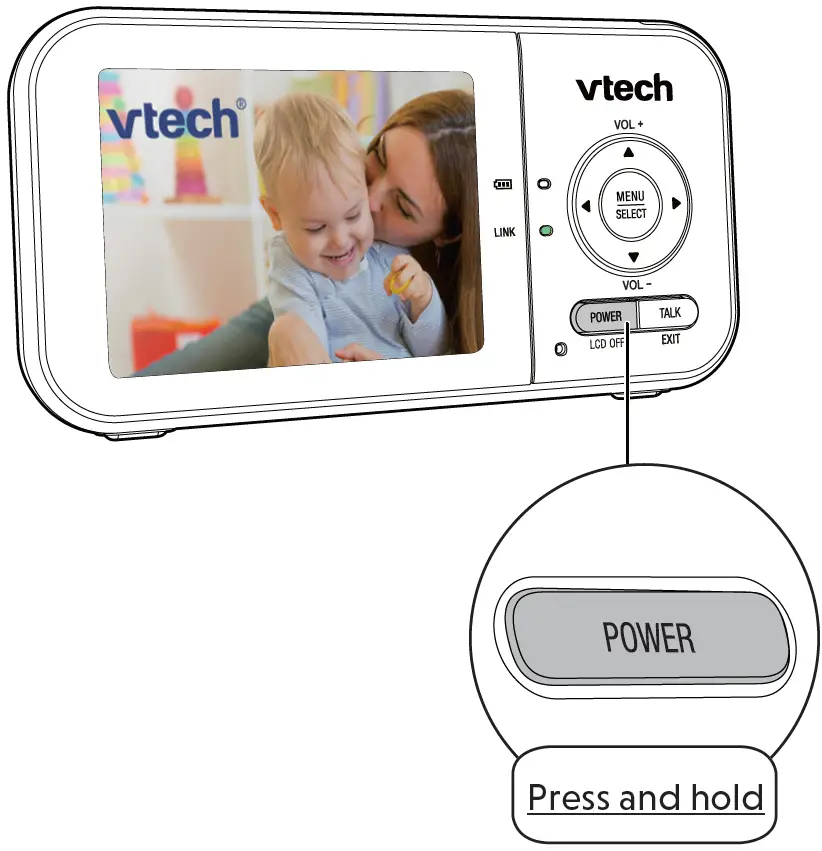
- Press and hold POWER to power on or off your parent unit.
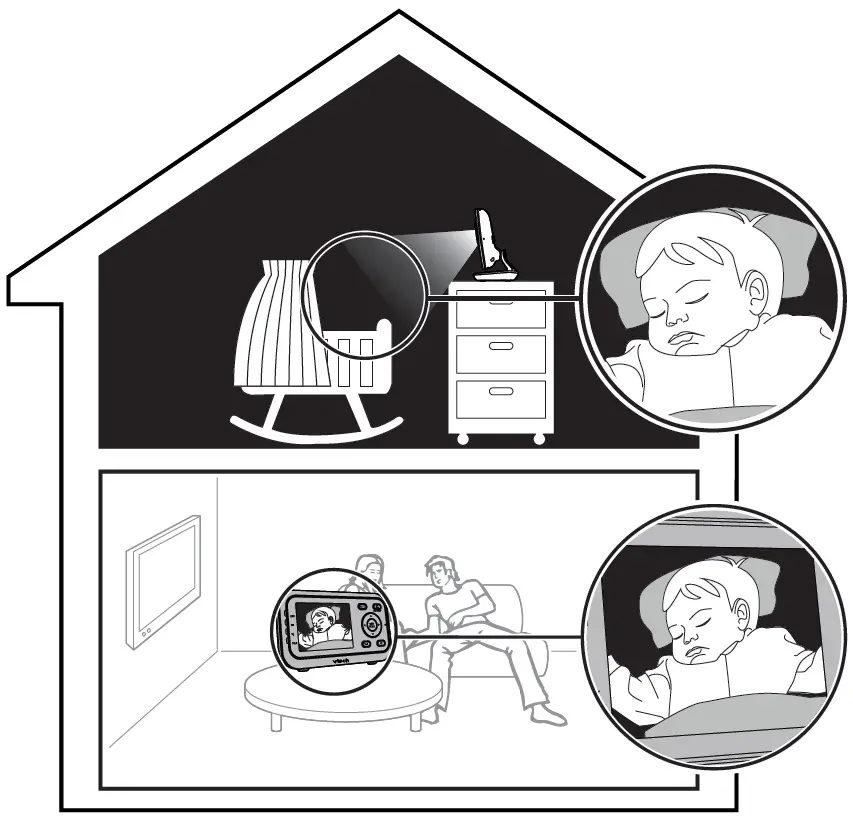
Positioning the baby monitor
Caution
- Keep the baby unit out of the reach of your baby. Never place or mount the baby unit inside the baby’s crib or playpen.
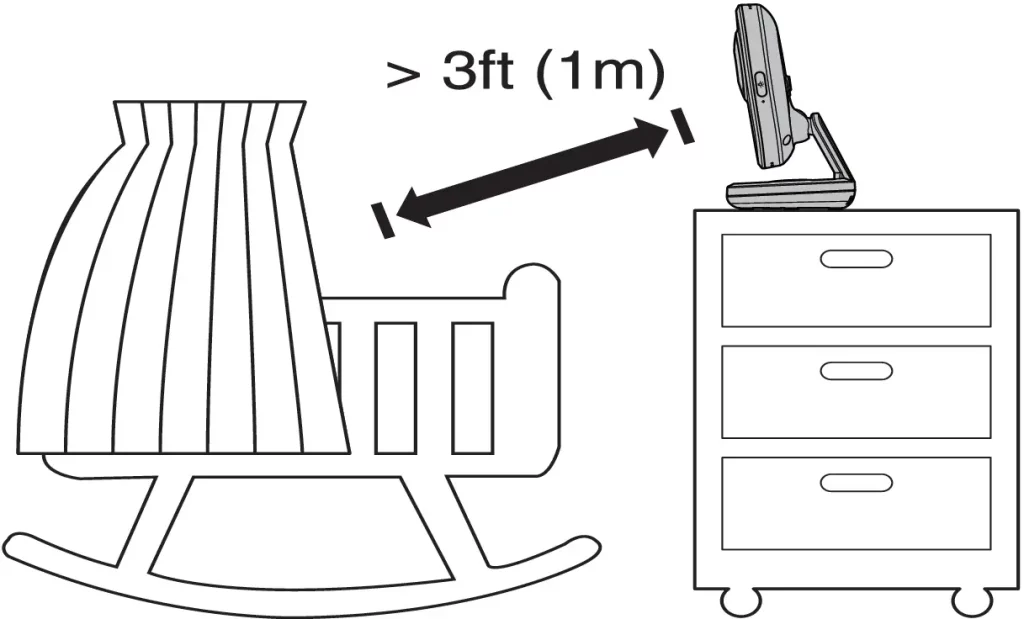
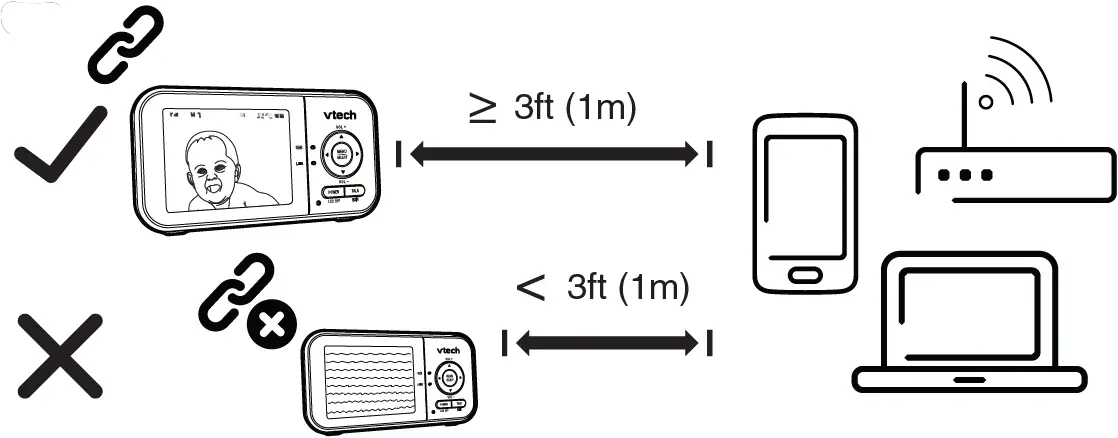
- The default volume of your parent unit is level 3, and the maximum volume is level 5. If you experience high-pitched screeching noise from your baby monitor while positioning:
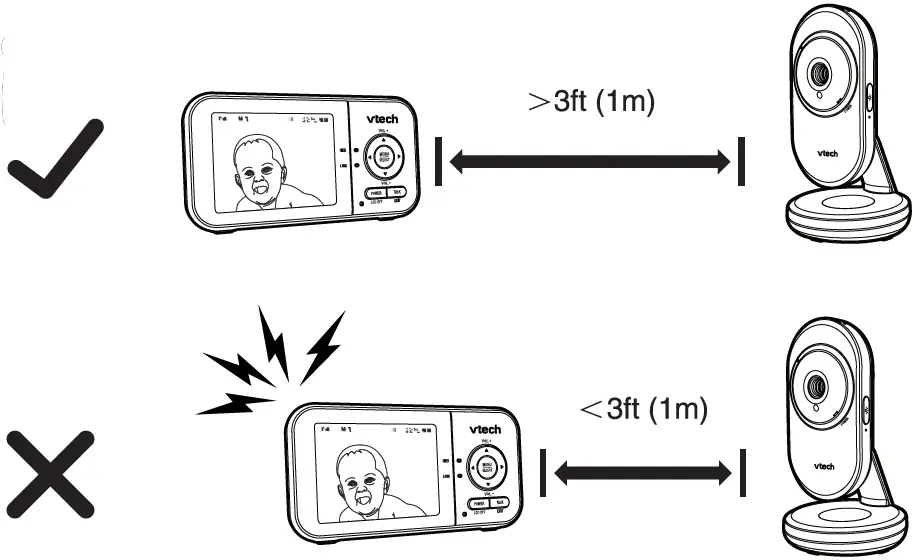
- Make sure your baby unit and parent unit are more than 3 feet (1 meter) apart, OR
- Turn down the volume of your parent unit.
Note
- To avoid interference from other electronic devices, place your baby monitor at least 3 feet (1 meter) away from devices such as wireless routers, microwaves, cell phones and computers.
Status Check
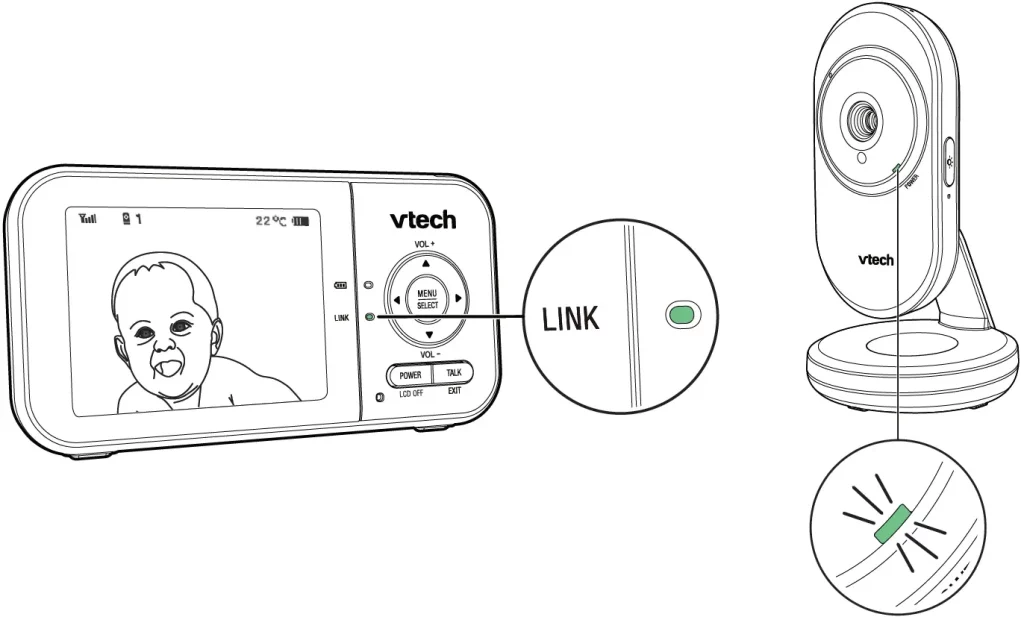
Once you power on both your baby unit and parent unit, your parent unit displays image from the baby unit, and the LINK LED light turns on.
The baby unit’s POWER LED light turns on.
Basic operation – Parent unit
Use the Menu
Press MENU to enter the menu, or save a setting. You can use the parent unit for advanced settings or operations, such as to play or stop the baby unit’s lullaby, or to adjust the baby unit’s sound sensitivity.
While in the menu:
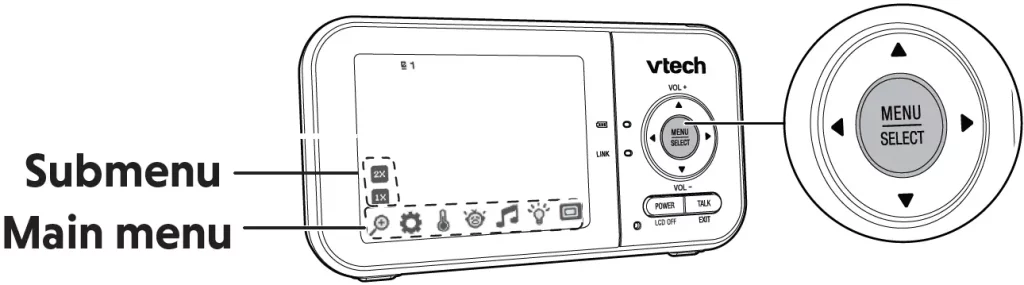
- Press or to scroll among the menu options.
- Press or to select an item.
- Press SELECT to confirm your selection.
- Press TALK/EXIT to exit the menu and return to live view.
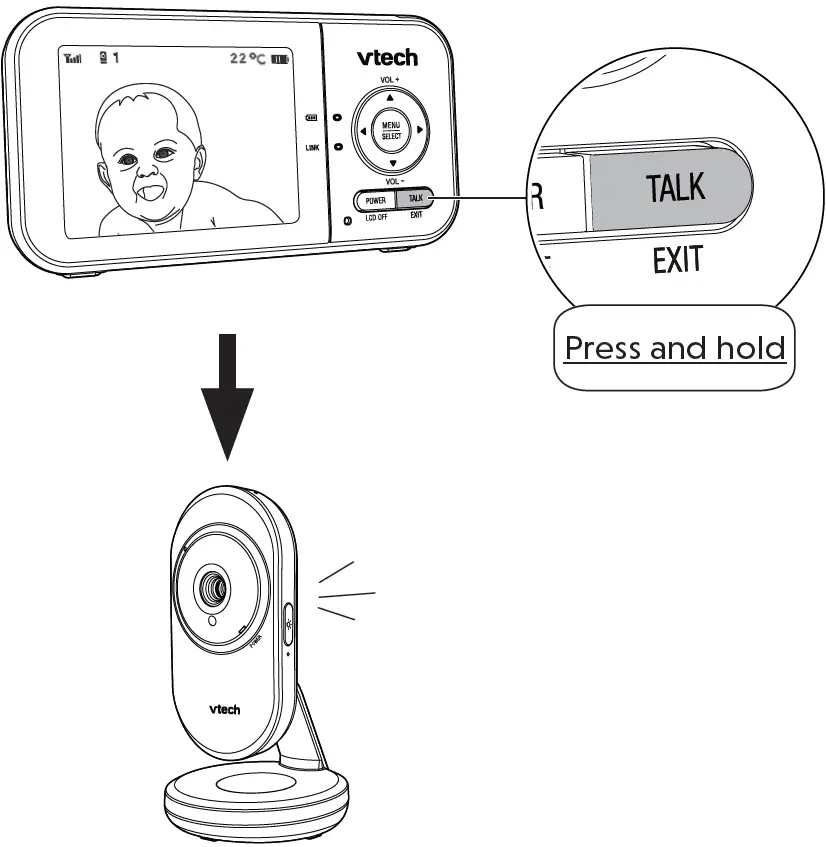
Talk to your baby unit
Press and hold TALK and speak to your parent unit. Your voice is transmitted to the baby unit. Release TALK when done talking and hear your baby again.
Turn off the screen
Press POWER/LCD OFF to switch off the screen. You can still hear sound from the selected baby unit.
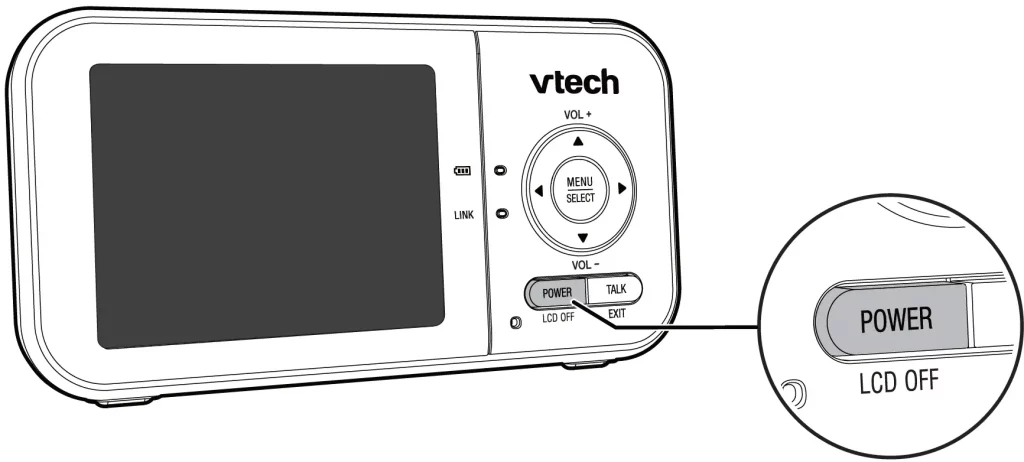
- Press any key on the parent unit to turn on the screen again.
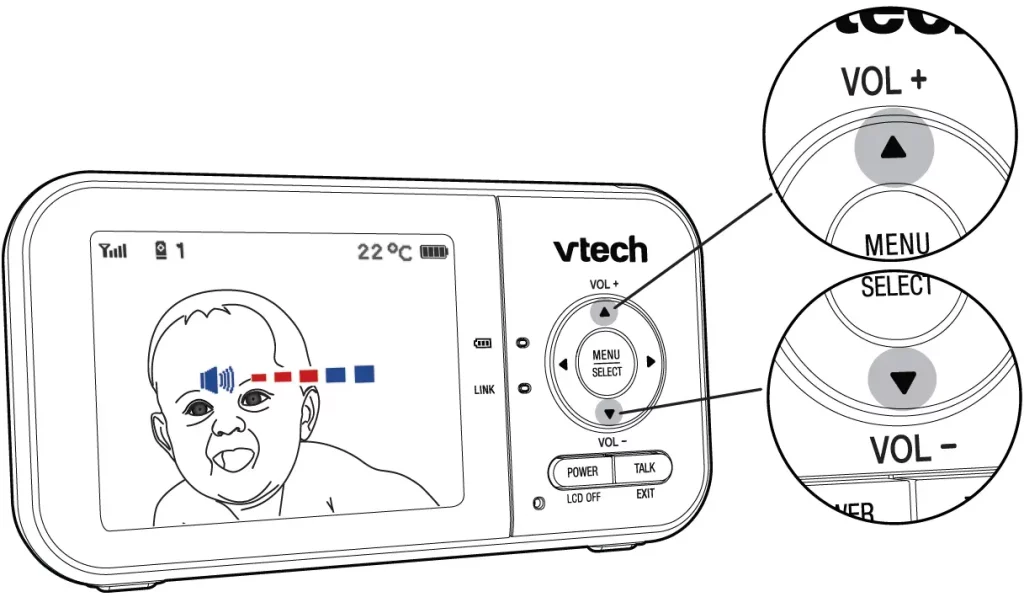
Adjust parent unit speaker volume
- Press VOL+ / VOL- to adjust your parent unit speaker volume.
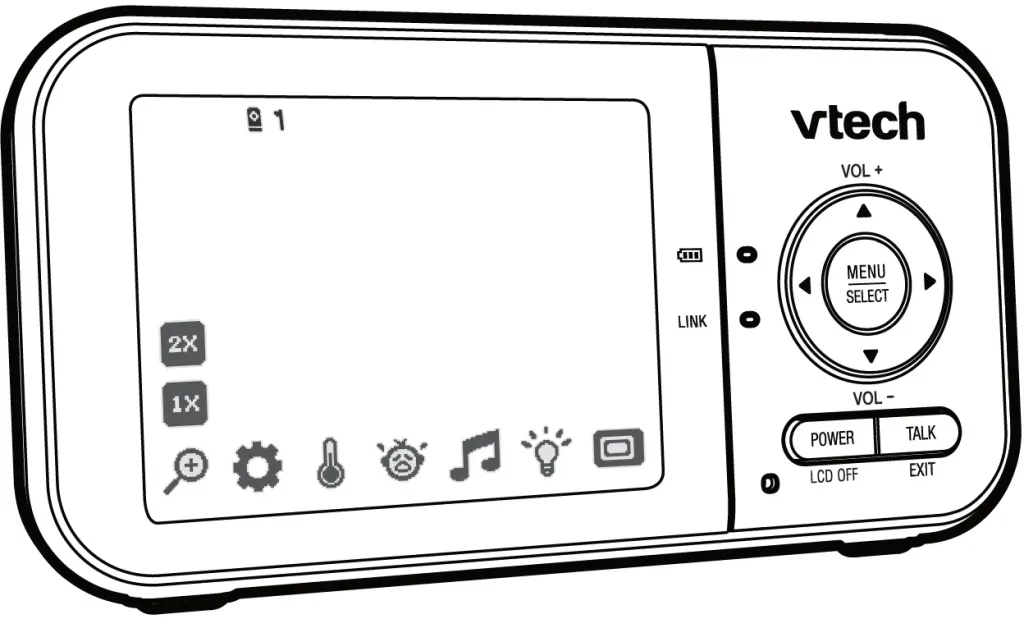
Zoom
- Press MENU when in idle mode.
- Choose +.
- Press or to choose 2x (Zoom in) or 1x (Zoom out), then press SELECT to confirm your selection.
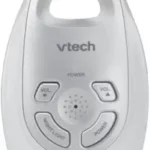
Overview – Parent Unit
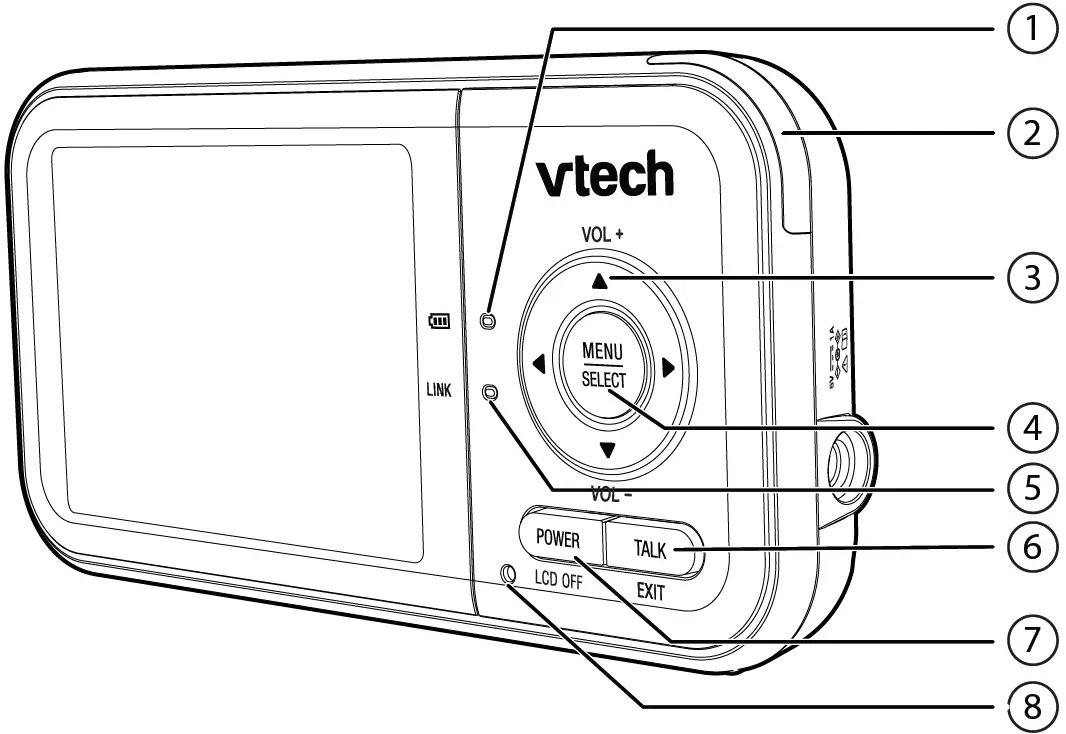
- Battery LED light
- 3-level sound indicator light
- Arrow keys
- VOL+ / VOL-
- MENU/SELECT
- LINK LED light
- On when the parent unit is linked to the baby unit.
- Flashes when the link to the baby unit is lost.
- TALK/EXIT
- Press and hold to talk to the baby unit.
- While in a submenu, press to exit.
- POWER/LCD OFF
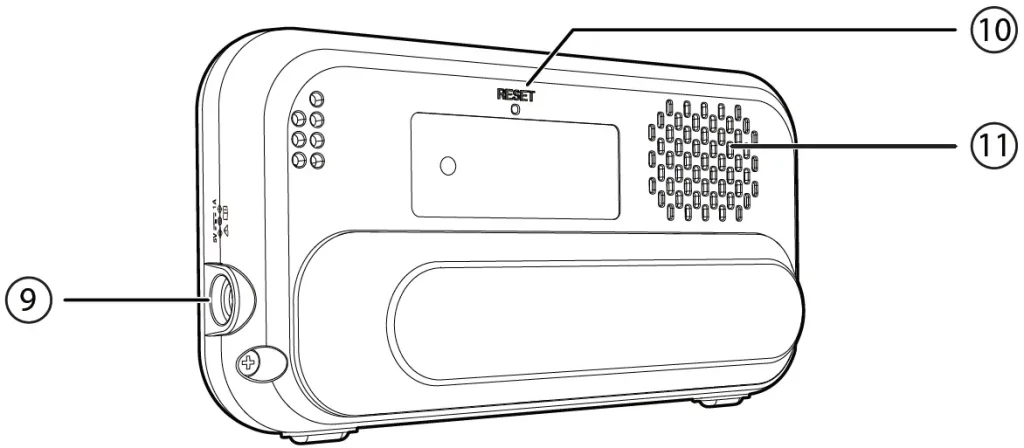
- Microphone
- Power jack
- RESET
- Force reboot the parent unit.
- Speaker
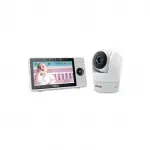
Overview – Baby Unit
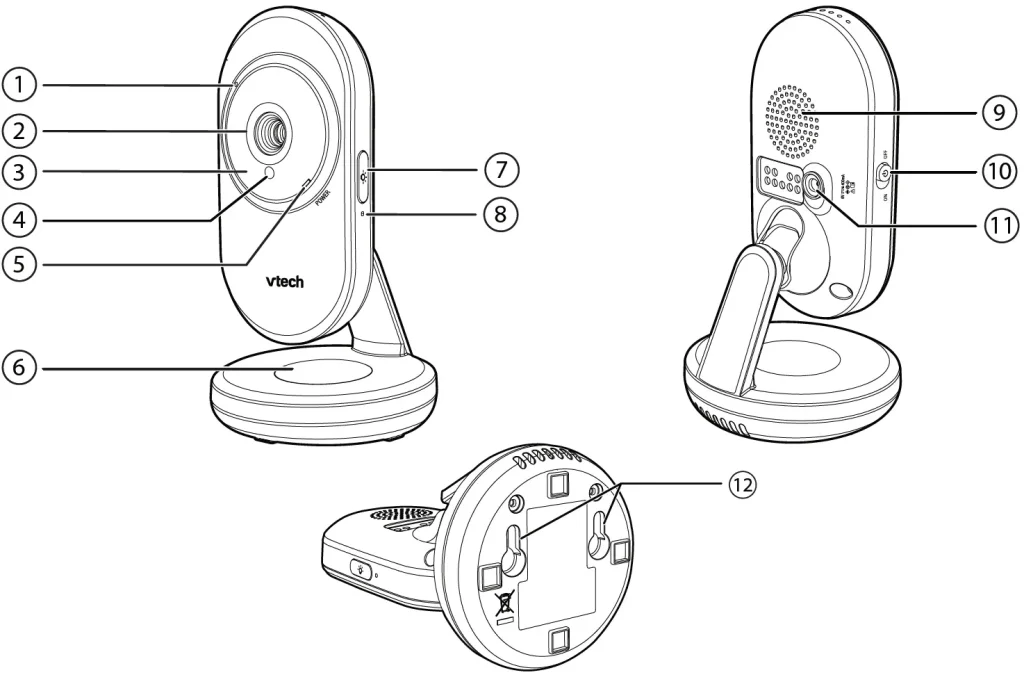
- Microphone
- Camera lens
- Infrared LEDs
- Light sensor
- POWER LED light
- Night light
- Night light ON/OFF
- PAIR hole
- The parent unit and baby unit(s) provided are already paired.
- Speaker
- ON/OFF switch
- Power jack
- Slots for wall mounting
Need help?
For operations and guides to help you using your video monitor, and for latest information and supports, go and check the online help topics and online FAQs.
Use your smartphone or mobile device to access our online help.

- Go to https://phones.vtechcanada.com/manuals; OR
- Scan the QR code on the right. Launch the camera app or QR code scanner app on your smartphone or tablet. Hold the device’s camera up to the QR code and frame it. Tap the notification to trigger the redirection of the online help.
- If the QR code is not clearly displayed, adjust your camera’s focus by moving your device closer or further away until it is clear.
You can also call our Customer Support at 1 (800) 267-7377 for help.
Sound Sensitivity and Sound Activation
Adjust the sound sensitivity of the baby unit

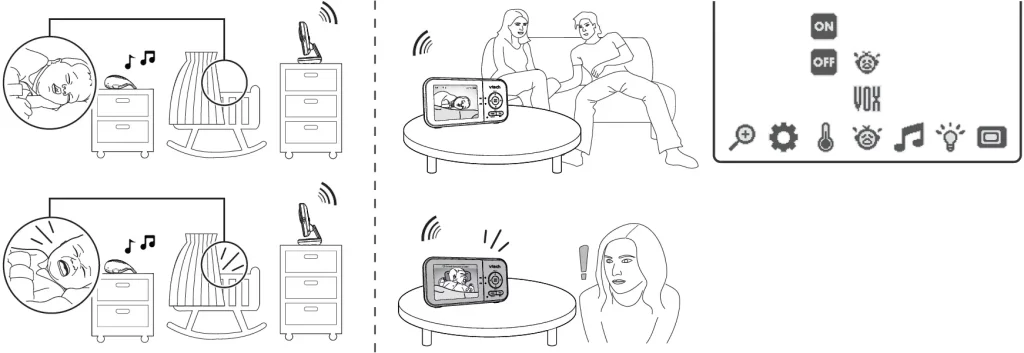
You can choose to hear sounds from the baby unit all the time, or to hear sounds that exceed a certain level. You can use the parent unit to adjust the microphone sensitivity of your baby unit. The higher the sensitivity level, the more sensitive the baby unit is in detecting sounds that transmit to the parent unit. The VOX sensitivity level is preset to the highest level.
| VOX Sensitivity level | Highest | High | Medium | Low | Lowest |
| Description | The parent unit speaker is constantly on, and you will hear all sounds (including background noises) from your baby’s room. | The parent unit speaker turns on for soft babbling and louder sounds from your baby. It remains quiet when your baby sleeps soundly. | The parent unit speaker turns on for loud babbling and louder sounds from your baby. It remains quiet when your baby makes soft sounds. | The parent unit speaker turns on for crying and louder sounds from your baby. It remains quiet when your baby makes soft sounds. | The parent unit speaker turns on for loud crying or screeching sounds from your baby. It remains quiet when your baby makes soft sounds. |
Sound Activated Screen
When sound activation is on, the parent unit screen stays off to save power when the baby unit detects no sound. Once the baby unit detects sounds that are louder than the chosen sound sensitivity level, the parent unit screen turns on automatically. It will then turn off again after 50 seconds of no sound detection.
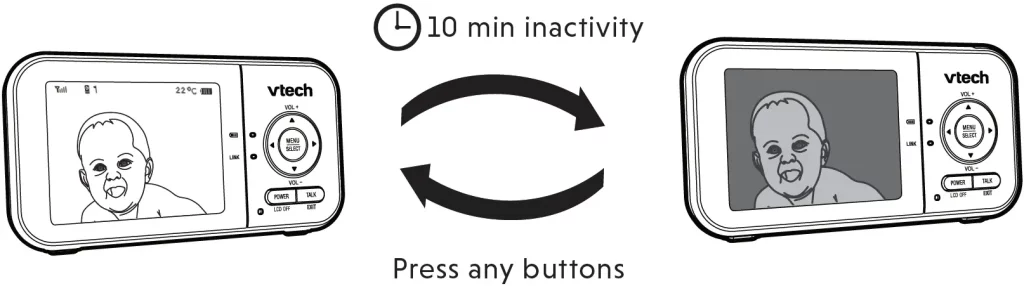
Dim Mode
The dim mode is to help you save the parent unit power. Your parent unit display will dim automatically after 10 minutes of inactivity, in which there is neither key pressed nor alert received from the baby unit.
Note
- While the screen is dimmed, any keypress or alert message will trigger the screen to return to the preset brightness level. After 10 minutes of inactivity, it will resume to dim mode.
Night Vision
The baby unit has infrared LEDs that allow you to see your baby clearly at night or in a dark room. When the baby unit being viewed detects low light levels, the infrared LEDs are switched on automatically. The images from the baby unit are in black and white, and appears on the screen.
Notes
- It is normal to see a short white glare on your parent unit screen as the baby unit is adapting to the dark environment.
- When the infrared LEDs are on, the images are in black and white. This is normal.
Tip
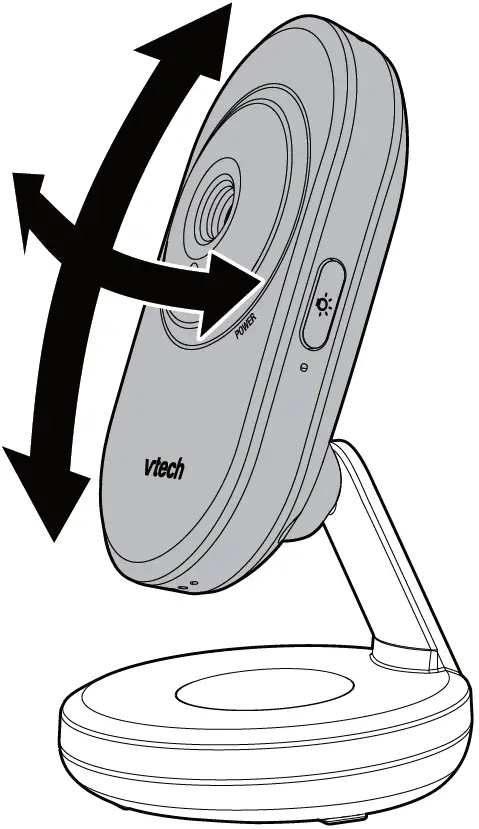
- Depending on the surroundings and other interfering factors, like lighting, objects, colors and backgrounds, the display resolution may vary. Adjust the baby unit’s angle or place the baby unit at a higher level to prevent glare and blurry display.
For VM3254-2 only
Status check – Two baby units
If you are viewing baby unit 1, the POWER LED light of baby unit 1, turns on.
As baby unit 2, is not being viewed, its POWER LED light flashes.
Note
If you power on only one baby unit, your parent unit may display and the LINK LED light will flash.
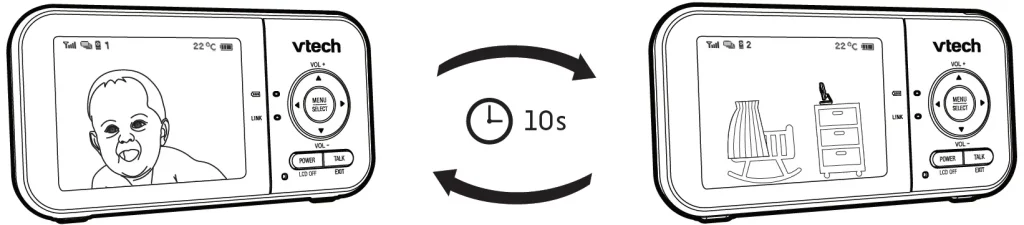
Change different views – Patrol
- Press MENU when the parent unit is idle.
- Press or to choose.
- Press or to choose, then press SELECT to confirm your selection.
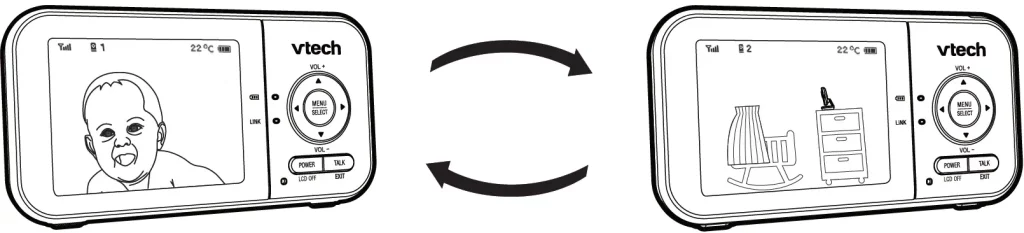
Change different views – Single-cam
- Press MENU when the parent unit is idle.
- Press or to choose.
- Press or to choose between cam 1 and cam 2, then press SELECT to confirm the baby unit you would like to view.
Mount the baby unit on dry wall (optional)
Items to purchase
You will need to purchase the following items separately to mount your baby unit:

Note
The types of screws and anchors you need depend on the composition of the wall.
- Use a pencil to mark two holes in parallel. Make sure they are the same distance apart as the wall mount holes on the baby unit.
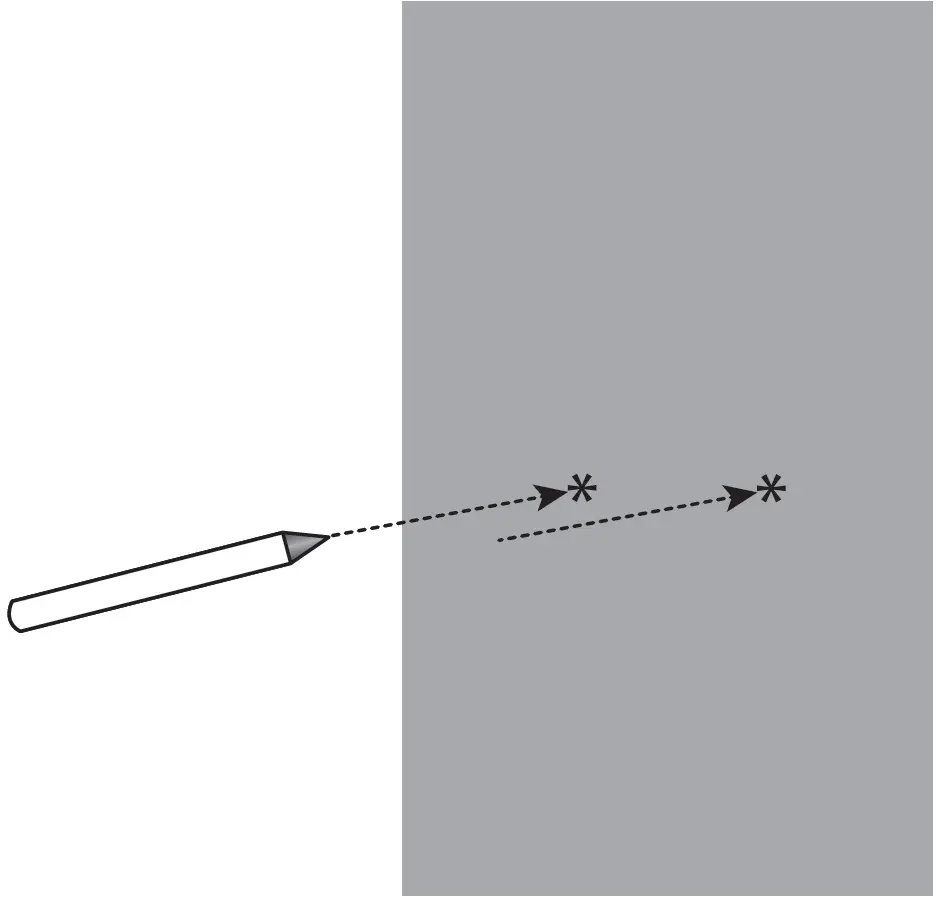
- Drill two holes in the wall ( 7/23 inch drill bit ). If you drill the holes into a stud, go to step 3.
-OR-
If you drill the holes into an object other than a stud, insert the wall anchors into the holes. Tap gently on the ends with a hammer until the wall anchors are flush with the wall.

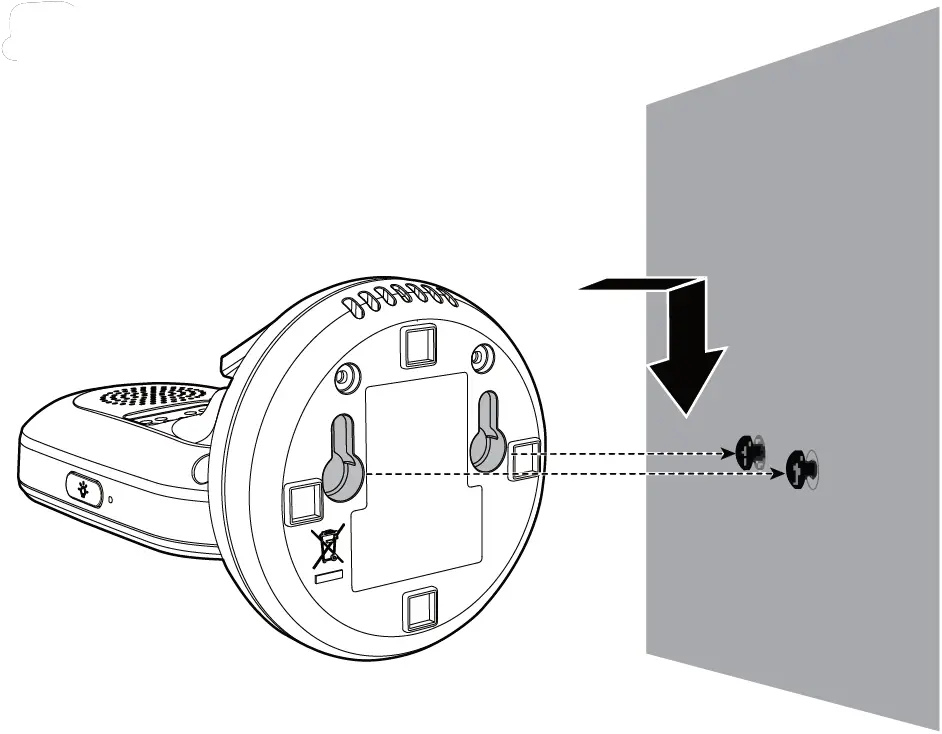
- Insert the screws into the holes and tighten the screws until only 1/4 inch of the screws are exposed.

- Align the wall mount holes on the baby unit with the screws on the wall. Slide the baby unit down until it locks into place.
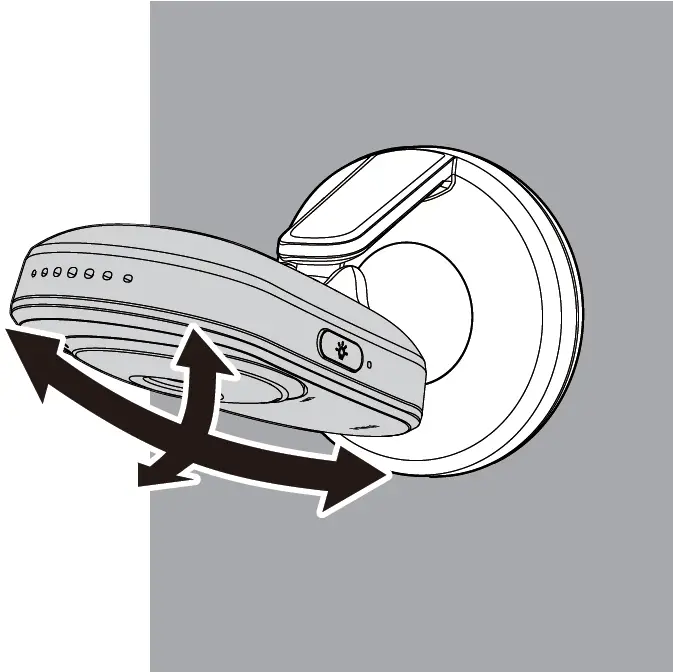
- Adjust the camera angle.
Frequently Asked Questions
Below are the questions most frequently asked about the baby monitor.
Why does the baby monitor not respond normally?
Try the following (in the order listed) for common cure:
- Disconnect the power to the baby units and the parent unit.
- Wait a few seconds before connecting power back to the baby units and the parent unit.
- Turn on the baby units and the parent unit.
- Wait for the parent unit to synchronize with the baby units. Allow up to one minute for this to take place.
Why don’t the power-on light of the baby unit and parent unit go on when I switch on the units?
Perhaps the parent unit is not connected to the power. Insert the appliance plug into the parent unit and put the adapter in a wall socket. Then, press and hold POWER to switch on the parent unit and to establish connection with the baby unit.
Perhaps the baby unit is not connected to the power. Insert the appliance plug into the baby unit and put the adapter in a wall socket. Then, slide the ON/OFF switch to ON to switch on the baby unit and to establish connection with the parent unit.
Why doesn’t my parent unit charge while connected to AC power?
Make sure the power is not controlled by a wall switch.
You may have used the battery for a long time. See Warranty for repair/replacement.
Why is my screen in black and white?
The screen is in black and white during night-time or in a dark room when the night vision feature is activated. This is normal.
Why do I get glare or blurry display on my screen when viewing my baby at night?
During night-time or in a dark room, the surroundings and other interfering factors, like lightings, objects, colors and backgrounds may affect the image quality on your parent unit screen. Adjust the baby unit’s angle or place the baby unit at a higher level to prevent glare and blurry display.
Why does the baby monitor produce a high-pitched noise?
The parent unit and baby units may be too close to each other.
- Move the parent unit away from the baby units until the noise stops; OR
- Turn down the volume of your parent unit.
Why does the parent unit beep?
The baby units may be out of range. Move the parent unit closer to the baby units (but not less than 3 feet).
The parent unit may not have enough charge for the parent unit to perform normally. Charge the battery in the parent unit until the battery icon becomes solid.
The temperature of your baby’s room may be too high or too low.
Why does the parent unit react too quickly to other sounds?
The baby unit also picks up other sounds than those of your baby. Adjust the VOX sensitivity level to a lower level or lower the parent unit speaker volume.
Why don’t I hear a sound/Why can’t I hear my baby cry?
The parent unit speaker volume may be too low. See Adjust parent unit speaker volume to increase the volume.
You may have set a low VOX sensitivity level. See Adjust the sound sensitivity of the baby unit to set to a higher level.
Why can’t I establish a connection? Why is the connection lost every now and then? Why are there sound interruptions?
The baby units may be out of range. Move the parent unit closer to the baby units (but not less than 3 feet).
Other electronic products and wireless products may cause interference with your baby monitor. Try installing your baby monitor as far away from these devices as possible.
If you power on only one baby unit, your parent unit may display , and the LINK LED light will flash.
The RBRC seal
The RBRC seal on the Li-ion battery indicates that VTech Communications, Inc. is voluntarily participating in an industry program to collect and recycle these batteries at the end of their useful lives, when taken out of service within the United States and Canada.
The program provides a convenient alternative to placing used Li-ion batteries into the trash or municipal waste, which may be illegal in your area.
VTech’s participation makes it easy for you to drop off the spent battery at local retailers participating in the program or at authorized VTech product service centers. Please call 1 (800) 8 BATTERY® for information on Li-ion battery recycling and disposal bans/restrictions in your area. VTech’s involvement in this program is part of its commitment to protecting our environment and conserving natural resources.
The RBRC Seal and 1 (800) 8 BATTERY® are registered trademarks of Call2recycle, Inc.
FCC and IC regulations
FCC Part 15
This equipment has been tested and found to comply with the requirements for a Class B digital device under Part 15 of the Federal Communications Commission (FCC) rules. These requirements are intended to provide reasonable protection against harmful interference in a residential installation. This equipment generates, uses and can radiate radio frequency energy and, if not installed and used in accordance with the instructions, may cause harmful interference to radio communications. However, there is no guarantee that interference will not occur in a particular installation. If this equipment does cause harmful interference to radio or television reception, which can be determined by turning the equipment off and on, the user is encouraged to try to correct the interference by one or more of the following measures:
- Reorient or relocate the receiving antenna.
- Increase the separation between the equipment and receiver.
- Connect the equipment into an outlet on a circuit different from that to which the receiver is connected.
- Consult the dealer or an experienced radio/TV technician for help.
WARNING: Changes or modifications to this equipment not expressly approved by the party responsible for compliance could void the user’s authority to operate the equipment.
This device complies with Part 15 of the FCC rules. Operation is subject to the following two conditions: (1) this device may not cause harmful interference, and (2) this device must accept any interference received, including interference that may cause undesired operation.
This Class B digital apparatus complies with Canadian requirement:
CAN ICES-3 (B)/NMB-3(B)
Industry Canada
This device contains license-exempt transmitter(s)/receiver(s) that comply with Innovation, Science and Economic Development Canada’s license-exempt RSS(s). Operation is subject to the following two conditions:
- This device may not cause interference.
- This device must accept any interference, including interference that may cause undesired operation of the device.
The term ‘’IC:‘’ before the certification/registration number only signifies that the Industry Canada technical specifications were met.
This product meets the applicable Innovation, Science and Economic Development Canada technical specifications.
RF Radiation Exposure Statement
To ensure safety of users, the FCC/ISEDC has established criteria for the amount of radio frequency energy that can be safely absorbed by a user or bystander according to the intended usage of the product. This product has been tested and found to comply with the FCC/ISEDC criteria. The baby unit shall be installed and used such that parts of all persons’ body are maintained at a distance of approximately 8 in (20 cm) or more. The transmitter and antenna of the parent unit shall be held at least 1 in (2.5 cm) from your face.
Limited Warranty
What does this limited warranty cover?
The manufacturer of this VTech Product warrants to the holder of a valid proof of purchase (“Consumer” or “you”) that the Product and all accessories provided in the sales package (“Product”) are free from defects in material
and workmanship, pursuant to the following terms and conditions, when installed and used normally and in accordance with the Product operating instructions. This limited warranty extends only to the Consumer for Products purchased and used in the United States of America and Canada.
What will VTech do if the Product is not free from defects in materials and workmanship during the limited warranty period (“Materially Defective Product”)?
During the limited warranty period, VTech’s authorized service representative will replace at VTech’s option, without charge, a Materially Defective Product. If we choose to replace
the Product, we may replace it with a new or refurbished Product of the same or similar design. We will retain defective parts, modules, or equipment. Replacement of the Product, at VTech’s option, is your exclusive remedy. VTech will return the replacement Products to you in working condition. You should expect the replacement to take approximately 30 days.
How long is the limited warranty period?
The limited warranty period for the Product extends for ONE (1) YEAR from the date of purchase (90 days on products purchased as Refurbished*). This limited warranty also applies to the replacement Product for a period of either (a) 90 days from the date the replacement Product is shipped to you or (b) the time remaining on the original one-year warranty (90-day limited warranty on products that are purchased as Refurbished*); whichever is longer.
*Refurbished products purchased from our online store carry a 90-day replacement warranty.
What is not covered by this limited warranty?
This limited warranty does not cover:
- Product that has been subjected to misuse, accident, shipping or other physical damage, improper installation, abnormal operation or handling, neglect, inundation, fire, water or other liquid intrusion; or
- Product that has been damaged due to repair, alteration or modification by anyone other than an authorized service representative of VTech; or
- Product to the extent that the problem experienced is caused by signal conditions, network reliability, or cable or antenna systems; or
- Product to the extent that the problem is caused by use with non-VTech accessories; or
- Product whose warranty/quality stickers, product serial number plates or electronic serial numbers have been removed, altered or rendered illegible; or
- Product purchased, used, serviced, or shipped for repair from outside the United States of America or Canada, or used for commercial or institutional purposes (including but not limited to Products used for rental purposes); or
- Product returned without a valid proof of purchase (see item 2 below); or
- Charges for installation or set up, adjustment of customer controls, and installation or repair of systems outside the unit.
How do you get warranty service?
To obtain warranty service in Canada, go to www.vtechcanada.com or call 1 (800) 267-7377.
NOTE: Before calling for service, please review the user’s manual – a check of the Product’s controls and features may save you a service call.
Except as provided by applicable law, you assume the risk of loss or damage during transit and transportation and are responsible for delivery or handling charges incurred in the transport of the Product(s) to the service location. VTech will return replaced Product under this limited warranty. Transportation, delivery or handling charges are prepaid. VTech assumes no risk for damage or loss of the Product in transit.
What must you return with the Product to get warranty service?
- Return the entire original package and contents including the Product to the VTech service location along with a description of the malfunction or difficulty; and
- Include a “valid proof of purchase” (sales receipt) identifying the Product purchased (Product model) and the date of purchase or receipt; and
- Provide your name, complete and correct mailing address, and telephone number.
Other limitations
This warranty is the complete and exclusive agreement between you and VTech. It supersedes all other written or oral communications related to this Product. VTech provides no other warranties for this Product. The warranty exclusively describes all of VTech’s responsibilities regarding the Product. There are no other express warranties. No one is authorized to make modifications to this limited warranty and you should not rely on any such modification. State/Provincial Law Rights: This warranty gives you specific legal rights, and you may also have other rights, which vary from state to state or province to province.
Limitations: Implied warranties, including those of fitness for a particular purpose and merchantability (an unwritten warranty that the Product is fit for ordinary use) are limited to one year from the date of purchase. Some states/provinces do not allow limitations on how long an implied warranty lasts, so the above limitation may not apply to you. In no event shall VTech be liable for any indirect, special, incidental, consequential, or similar damages (including, but not limited to lost profits or revenue, inability to use the Product or other associated equipment, the cost of substitute equipment, and claims by third parties) resulting from the use of this Product. Some states/provinces do not allow the exclusion or limitation of incidental or consequential damages, so the above limitation or exclusion may not apply to you.
Please retain your original sales receipt as proof of purchase.