FREESTANDING MICROWAVE
WMF2302SA, WMF2302WA
CONGRATULATIONS
Dear Customer,
Congratulations and thank you for choosing our microwave. We are sure you will find it a pleasure to use. Before you use the microwave, we recommend that you read through the relevant sections of this manual, which provides a description of your appliance and its functions. To avoid the risks that are always present when you use an appliance, it is important that the appliance is installed correctly and that you read the safety instructions carefully to avoid misuse and hazards. We recommend that you keep this instruction booklet for future reference and pass it on to any future owners. After unpacking the appliance, please check it is not damaged. If in doubt, do not use the appliance but contact your local customer care center.
Conditions of use
This appliance is intended to be used in household and similar applications such as:
• Staff kitchen areas in shops, offices, and working environments
• Farmhouses
• By clients in hotels, motels, and other residential type environments
• Bed and breakfast type environments
• Catering and similar non-retail applications
Please ensure you read the instruction manual fully before you call for service, or a full-service fee could be applicable.
Record model and serial number here:
Model number:…………………………………………………………………………….
Serial number: ……………………………………………………………………………..
PNC: ……………………………………………………………………………………………….
IMPORTANT INFORMATION THAT MAY IMPACT YOUR MANUFACTURER’S WARRANTY
Adherence to the directions for use in this manual is extremely important for health and safety. Failure to strictly adhere to the requirements in this manual may result in personal injury, property damage and affect your ability to make a claim under the Westinghouse manufacturer’s warranty provided with your product. Products must be used, installed, and operated in accordance with this manual. You may not be able to claim on the Westinghouse manufacturer’s warranty in the event that your product fault is due to failure to adhere to this manual.
Please read the user manual carefully and store it in a handy place for later reference. The symbols you will see in this booklet have these meanings:
 WARNING
This symbol indicates information concerning your personal safety.
CAUTION
This symbol indicates information on how to avoid damaging the appliance.
 IMPORTANT
This symbol indicates tips and information about the use of the appliance.
 ENVIRONMENT
This symbol indicates tips and information about the economical and ecological use of the appliance.
GENERAL WARNINGS
Please read the user manual carefully and store it in a handy place for later reference. Pass the user manual on to possible new owners of the appliance. Read the following carefully to avoid damage or injury. NOTE: You must read these warnings carefully before installing or using the appliance. If you need assistance, contact your Customer Care Department. The manufacturer will not accept liability, should these instructions or any other safety instructions incorporated in this book be ignored. Children and vulnerable people safety. Please read the user manual carefully and store it in a handy place for later reference. Pass the user manual on to possible new owners of the appliance. Read the following carefully to avoid damage or injury. NOTE: You must read these warnings carefully before installing or using the appliance. If you need assistance, contact your Customer Care Department. The manufacturer will not accept liability, should these instructions or any other safety instructions incorporated in this book be ignored. Children and vulnerable people safety.
WARNING
Risk of suffocation, injury, or permanent disability.
- This appliance is not intended for use by persons (including children) with reduced physical, sensory or mental capabilities, or lack of experience and knowledge unless they have been given supervision or instruction concerning the use of the appliance by a person responsible for their safety.
- Children should be supervised to ensure that they do not play with the appliance.
- WARNING: Accessible parts may become hot during use. Young children should be kept away.
- Keep all packaging away from children.
- Keep children and pets away from the appliance when it operates or when it cools down. Accessible parts are hot.
- If the appliance has a child safety device, we recommend that you activate it.
CAUTION
It is important to use your appliance safely. Check these safety points before using your appliance.
General safety
- During use the appliance becomes hot. Care should be taken to avoid touching heating elements inside the oven.
- Do not use a steam cleaner to clean the appliance.
- Before maintenance isolates the power supply.
- If the door or door seals are damaged, the appliance must not be operated until it has been repaired by a competent person.
- The appliance is not intended to be operated by means of an external timer or separate remote control system.
- Only a competent person can carry out any service or repair operation that involves the removal of a cover that gives protection against exposure to microwave energy.
- Do not heat liquids and other foods in sealed containers. They are liable to explode.
- Only use utensils that are suitable for use in microwaves.
- When heating food in plastic or paper containers, keep an eye on the appliance due to the possibility of ignition.
- The appliance is intended for heating food and beverages. Drying of food or clothing and heating of warming pads, slippers, sponges, damp cloth, and similar may lead to the risk of injury, ignition, or fire.
- If smoke is emitted, switch off or unplug the appliance and keep the door closed in order to stifle any flames.
- Microwave heating of beverages can result in delayed eruptive boiling. Care must be taken when handling the container.
- The contents of feeding bottles and baby food jars should be stirred or shaken and the temperature checked before consumption, in order to avoid burns.
- Eggs in their shell and whole hard-boiled eggs should not be heated in the appliance since they may explode, even after microwave heating has ended.
- The appliance should be cleaned regularly and any food deposits removed.
- Failure to maintain the appliance in a clean condition could lead to deterioration of the surface that could adversely affect the life of the appliance and possibly result in a hazardous situation.
- The temperature of accessible surfaces may be high when the appliance is operating.
- Pay attention to the minimum dimensions of the cabinet. Refer to the installation chapter.
- This appliance is not suitable for building in and must not be installed in a cupboard or behind a decorative door, the ventilation requirements in this manual must be followed.
- Do not use harsh abrasive cleaners or sharp metal scrapers to clean the glass door since they can scratch the surface, which may result in shattering of the lass.
- If the supply cord is damaged, it must be replaced by the manufacturer, an authorized Service, or similarly qualified persons in order to avoid a hazard.
- Caution: In order to avoid a hazard due to inadvertent resetting of the thermal cut-out, this appliance must not be supplied through an external switching device, such as a timer, or connected to a circuit that is regularly switched on and off by the utility.
- WARNING: Ensure that the appliance is switched off before replacing the lamp to avoid the possibility of electric shock.
IMPORTANT SAFETY INSTRUCTIONS
Installation
WARNING
Only a qualified person must install this appliance.
- Remove all the packaging.
- Do not install or use a damaged appliance.
- Obey the installation instructions supplied with the appliance.
- Always be careful when you move the appliance because it is heavy. Always wear safety gloves.
- Keep the minimum distance from the other appliances and units.
- The sides of the appliance must stay adjacent to appliances or to units of the same height.
Electrical connection
WARNING
Risk of fire and electrical shock.
- All electrical connections should be made by a qualified electrician.
- The appliance must be earthed.
- Make sure that the electrical information on the rating plate agrees with the power supply. If not, contact an electrician.
- Connect the mains plug to the mains socket only at the end of the installation. Make sure that there is access to the mains plug after the installation.
- Make sure not to cause damage to the mains plug and to the mains cable. Contact the Service Centre or an electrician to change a damaged mains cable.
- Do not pull the mains cable to disconnect the appliance. Always pull the mains plug.
Use
WARNING
Risk of injury, burns or electric shock, or explosion.
- Use this appliance in a household environment.
- Do not change the specification of this appliance.
- Make sure that the ventilation openings are not blocked.
- Do not let the appliance stay unattended during operation.
- Do not apply pressure on the open door.
- Do not use the appliance as a work surface and do not use the cavity for storage purposes.
Care and cleaning
WARNING
Risk of injury, fire, or damage to the appliance.
- Before maintenance, deactivate the appliance and disconnect the mains plug from the mains socket.
- Regularly clean the appliance to prevent the deterioration of the surface material.
- Do not allow food spills or cleaner residue to accumulate on door sealing surfaces.
- The remaining fat or food in the appliance can cause smoke/fire, particularly on the grill element.
- The remaining fat or food in the appliance can cause smoke/fire, particularly on the grill element.
- Clean the appliance with a moist soft cloth. Only use neutral detergents. Do not use abrasive products, abrasive cleaning pads, solvents or metal objects.
- If you use an oven spray, obey the safety instructions on the packaging.
Disposal
WARNING
Risk of injury or suffocation.
- Disconnect the appliance from the mains supply.
- Cut off the mains cable and discard it.
WARNING
If the door or door seals are damaged, the microwave must not be operated until it has been repaired by a competent person
- The microwave is for household use only and not for commercial use.
- Never remove the distance holder in the back or on the sides, as it ensures a minimum distance from the wall for air circulation.
- Please secure the turntable before you move the appliance to avoid damages.
It is dangerous to repair or maintain the appliance by no other than a specialist because under these circumstances the cover has to be removed which assures protection against microwave radiation. This applies to changing the power cord or the lighting as well. Send the appliance in these cases to our service center.
- The microwave is intended for defrosting, cooking, and steaming food only.
- Use gloves if you remove any heated food.
CAUTION
Steam will escape when opening lids or wrapping foil.
Specifications
Model: WMF2302SA / WMF2302WA
Rated Voltage: 230-240V~ 50Hz
Rated Input Power (Microwave): 1200-1250W
Rated Output Power (Microwave): 750-800W
Oven Capacity: 23L
Turntable Diameter: 270mm
External Dimensions: 485x375x293 mm
Net Weight: Approx. 13 kg
BEFORE FIRST USE
Make sure that all the packing materials are removed from the inside of the door.
WARNING
Check the microwave for any damage, such as misaligned or bent door, damaged door seals and sealing surface, broken or lose door hinges and latches, and dents inside the cavity or on the door. If there is any damage, do not operate the microwave and contact qualified service personnel.
- This microwave must be placed on a flat, stable surface to hold its weight and the heaviest food likely to be cooked in the microwave.
- Do not place the microwave where heat, moisture, or high humidity are generated or near combustible materials.
- Do not operate the microwave without a glass tray, roller support, and shaft in their proper positions.
- Make sure that the power supply cord is undamaged and does not run under the microwave or over any hot or sharp surface.
- The socket must be readily accessible so that it can be easily unplugged in an emergency.
- Do not use the microwave outdoors.
Radio Interference
Operation of the microwave can cause interference to your radio, TV or similar equipment. When there is interference, it may be reduced or eliminated by taking the following measures:
- Clean door and sealing surface of the microwave.
- Reorient the receiving antenna of radio or television.
- Relocate the microwave with respect to the receiver.
- Move the microwave away from the receiver.
- Plug the microwave into a different outlet so that the microwave and receiver are on different branch circuits.
Grounding Instructions
This appliance must be grounded. This microwave is equipped with a cord having a grounding wire with a grounding plug. It must be plugged into a wall receptacle that is properly installed and grounded. In the event of an electrical short circuit, grounding reduces the risk of electric shock by providing an escape wire for the electric current. It is recommended that a separate circuit serving only the microwave be provided. Using a high voltage is dangerous and may result in a fire or other accident causing microwave damage.
WARNING
Improper use of the grounding plug can result in a risk of electric shock.
NOTE:
- If you have any questions about the grounding or electrical instructions, consult a qualified electrician or service person.
- Neither the manufacturer nor the dealer can accept any liability for damage to the microwave or personal injury resulting from failure to observe the electrical connection procedures.
The wires in this mains cable are colored in accordance with the following code:
Green and Yellow = EARTH
Blue = NEUTRAL
Brown = LIVE
Microwave cooking principles
- Arrange food carefully. Place thickest areas towards outside of dish.
- Watch cooking time. Cook for the shortest amount of time indicated and add more as needed. Food severely overcooked can smoke or ignite.
- Cover foods while cooking. Covers prevent spattering and help foods to cook evenly.
- Turn foods over once during microwaving to speed cooking of such foods as chicken and hamburgers. Large items like roasts must be turned over at least once.
- Rearrange foods such as meatballs halfway through cooking both from top to bottom and from the center of the dish to the outside.
Before you call for service
If the microwave fails to operate:
- Check to ensure that the microwave is plugged in securely. If it is not, remove the plug from the outlet, wait 10 seconds and plug it in again securely.
- Check for a blown circuit fuse or a tripped main circuit breaker. If these seem to be operating properly, test the outlet with another appliance.
- Check to ensure that the control panel is programmed correctly and the timer is set.
- Check to ensure that the door is securely closed engaging the door safety lock system. Otherwise, the microwave energy will not flow into the microwave.
If none of the above rectifies the situation, then contact a qualified technician. Do not try to adjust or repair the microwave yourself.
Utensils guide
- Only use utensils that are suitable for use in microwave ovens.
- Microwaves can not penetrate metal, so metal utensils or dishes with metallic trim should not be used.
- Do not use recycled paper products when microwave cooking, as they may contain small metal fragments which may cause sparks and/or fires.
- Round/oval dishes rather than square/oblong ones are recommended, as food in corners tends to overcook.
- Narrow strips of aluminum foil may be used to prevent overcooking of exposed areas. But be careful don’t use too much and keep a distance of 1 inch (2.54cm) between foil and cavity.
| COOKWARE | MICROWAVE |
| Heat–resistant glass | Yes |
| Nonheat–resistant glass | No |
| Heat–resistant ceramics | Yes |
| Microwave–safe plastic dish | Yes |
| Kitchen paper | Yes |
| Metal tray | No |
| Metal rack | No |
| Aluminum foil & foil containers | No |
WARNING
Refer to the Safety chapters
Initial cleaning
• Remove all parts from the appliance.
• Clean the appliance before first use.
WARNING
Refer to chapter “Care and cleaning”.
Setting the time
IMPORTANT
When you connect the appliance to the electrical supply or after a power cut, the display shows 0:00.
Setting the clock
When the microwave oven is plugged into an outlet, “0:00” will display.
- Press Clock, “00:00” will appear in the display. The first figure will flash; “:” and “0” will be illuminated.
- Press the number pads and enter the current
clock time. For example, if the time is now 10:12, press “ 1, 0, 1, 2 “ in order. - Press Clock, to finish the clock setting, “:” will flash and the numbers will appear as a clock time in the display.
NOTE:
1. If the numbers entered are not within the range between 1:00 to 12:59, the setting will not be accepted until valid numbers are entered.
2. In the process of the setting clock, if is pressed or if there is no operation within 1 minute, the display will automatically return to the previous clock setting.
3. This microwave has an energy-saving feature that turns off the display if no buttons have been pressed within 1 minute, this is normal operation and not a product fault.
PRODUCT DESCRIPTION
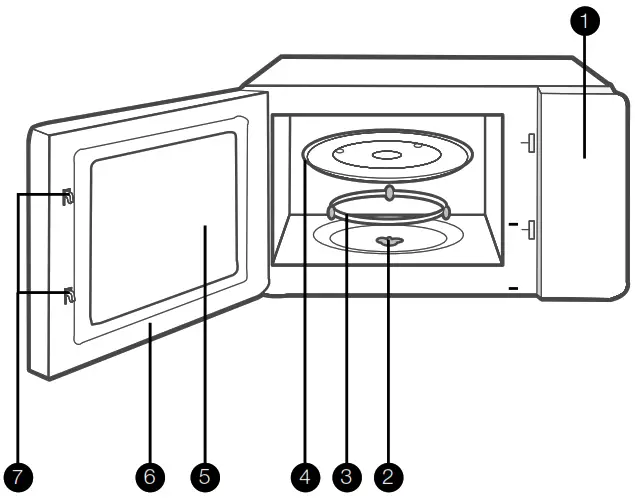
1. Control panel
2. Turntable shaft
3. Turntable ring
4. Glass tray
5. Observation window
6. Oven door
7. Safety interlock system
Accessories
Turntable set
Glass cooking tray and roller guide.
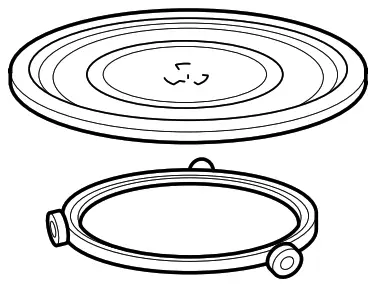
IMPORTANT
Always use the turntable set to prepare food in the appliance
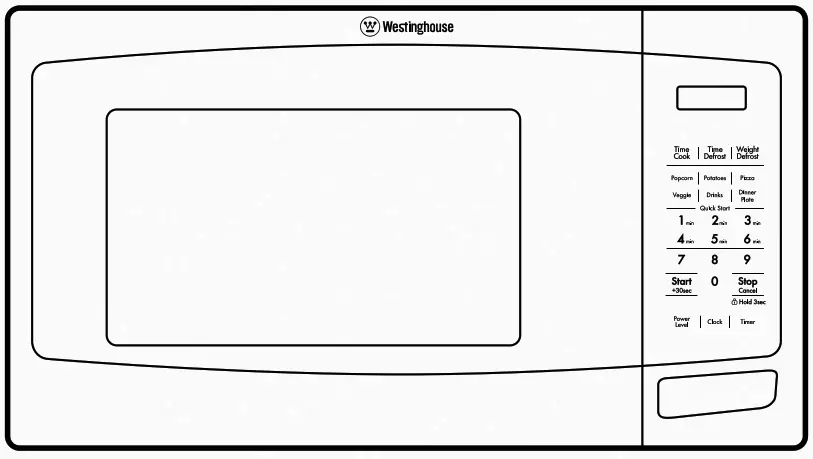
CONTROL PANEL
Model
WMF2302SA, WMF2302WA

- Display window
- Time/ Weight Defrost
- Quick touch presets
- STOP: Cancel Hold 3 seconds: Before cooking starts, press to clear all previous settings. During cooking, press once to stop the oven; press twice to stop oven and clear all settings. Hold or 3 seconds to lock the appliance.
- Timer
- Clock
- Power Level
- Start + 30 SEC
- Number Pad
- Time Cook
DAILY USE
WARNING
Refer to the safety chapters.
CAUTION
Do not let the appliance operate when there is no food in it.
General information about using the appliance
- After you deactivate the appliance, let the food standfor some minutes.
- Remove the aluminium foil packaging, metal containers, etc before you prepare the food
Cooking
- If possible, cook food covered with material suitable for use in the microwave. Only cook food without a cover if you want to keep it crusty.
- Do not overcook the dishes by setting the power and time too high. The food can dry out, burn or catch firein some places.
- Do not use the appliance to cook eggs or snails in their shells, because they can explode. With fried eggs, pierce the yolks first.
- Prick food with “skin” or “peel”, such as potatoes, tomatoes, sausages, with a fork several times before cooking so that the food does not explode.
- For chilled or frozen food, set a longer cooking time.
- Dishes that contain sauce must be stirred from time to time.
- Vegetables that have a firm structure, such as carrots, peas or cauliflower, must be cooked in water.
- Turn larger pieces after half of the cooking time.
- If possible, cut vegetables into similar-sized pieces.
- Use flat, wide dishes.
- Do not use cookware made of porcelain, ceramic or earthenware with small holes, e.g. on handles or unglazed bottoms. Moisture going into the holes can cause the cookware to crack when it is heated.
- The glass cooking tray is a workspace for heating food or liquids. It is necessary for the operation of the microwave. Defrosting meat, poultry, fish
- Put the frozen, unwrapped food on a small upturned plate with a container below it so that the defrosting liquid collects in the container.
- Turn the food after half of the defrosting time. If possible, divide and then remove the pieces that started to defrost.
Defrosting butter or similar
• Do not fully defrost the food in the appliance but let it defrost at room temperature. This gives a more even result. Fully remove all metal or aluminum packaging before defrosting.
Defrosting fruit, vegetables
• Do not fully defrost fruit and vegetables, which are to be further prepared while raw, in the appliance. Let them defrost at room temperature.
• You can use a higher microwave power to cook fruit and vegetables without defrosting them first.
Ready meals
• You can prepare ready meals in the appliance only if their packaging is suitable for microwave use.
• You must follow the manufacturer’s instructions printed on the packaging (e.g. remove the metal cover and pierce the plastic film).
DAILY USE (CONTINUED)
Suitable cookware and materials
| COOKWARE / MATERIAL | MICROWAVE | ||
| DEFROSTING | DEFROSTING | DEFROSTING | |
| Ovenproof glass and porcelain (with nometal components, e.g. Pyrex, eatproof glass) |  |
|
|
| Non-ovenproof glass and porcelain 1) | |
— | — |
| Glass and glass ceramic made of ovenproof / frost-proof material (e.g. Arcoflam), grill shelf | |
|
|
| Ceramic 2) , earthenware 2) | |
|
|
| Heat-resistant plastic up to 200°C3) | |
|
|
| Cardboard, paper | |
— | — |
| Plastic wrap | |
— | — |
| Roasting film with microwave safe closure3) | |
|
|
| Roasting dishes made of metal, e.g. enamel, cast iron | – | – | |
| Baking tins, black lacquer or silicon coated3) | – | – | – |
| Baking tray | – | – | – |
| Browning cookware, e.g. Crisp pan or Crunch plate | – | |
|
| Ready meals in packaging 3) | |
|
|
1) With no silver, gold, platinum, or metal plating/decorations.
2) Without quartz or metal components, or glazes that contain metals.
3) You must follow the manufacturer’s instructions about the maximum temperatures.
suitable
— not suitable
OPERATION
Power level
• 11 power levels are available. The default power level is 10 ( 100%). Prior to or during cooking, press the Power Level pad or a number pad to select a different power level.
| LEVEL | 10 | 9 | 8 | 7 | 6 | 5 | 4 | 3 | 2 | 1 | 0 |
| POWER | 100% | 90% | 80% | 70% | 60% | 50% | 40% | 30% | 20% | 10% | 0% |
| DISPLAY | PL 10 | PL 9 | PL8 | PL7 | PL6 | PL5 | PL4 | PL3 | PL2 | PL1 | PL0 |
Clock setting
- Press Clock, “00:00” will display.
- Press the number pads and enter the current clock time. For example, if the time is now 1 2: 1 0, press” 1, 2, 1, 0” in order.
- Press Clock to finish clock setting.”:’’ will flash and the numbers will appear as a clock time in the display.
Note: If the numbers entered are, not within the range between 1:00 to 12:59, the setting will not be accepted until valid numbers are entered. In the process of setting the clock, if the Stop button is pressed or if there is no operation within 1 minute, the display will automatically return to the previous clock setting.
Kitchen timer
- Press Timer, “00:00” will display.
- Press the number pods to enter the time amount. The maximum amount of time that can be entered in 99 minutes, 99 seconds. For example, press “1, 0, 0, 0” in order for 10 minutes on the Kitchen Timer.
- Press Start to confirm the setting.
- When the time amount elapses, the oven will beep 5 times, and the clock time will return to the display.
Note: The kitchen Timer setting is different from the Clock setting, it is simply a timer. During the Timer function, no cooking function can be set into operation.
Microwave cook
1. Press TimeCook, “00:00” will display.
2. Press number pads to input the cooking time; the maximum cooking time is 99 minutes and 99 seconds.
3. Press Power Level; PL 10 will display. This is the default power level of 100%. Press pads O through 9 to select a different power level if desired. See the Power Level table above.
4. Press Start to start cooking.
Example: To cook the food with 50% microwave power for 15 minutes.
1. Press TimeCook, “00:00” will display.
2. Press “1, 5, 0, 0” in order for 15:00 to appear in the display.
3. Press Power Leve then press “5” to select 50% microwave power.
4. Press Start to start cooking.
Note: In the process of setting, if the Stop button is pressed or if there is no operation within 1 minute, the oven will automatically return to display the clock. If PL 0 is selected, the oven will run for the time selected with no cooking power. During microwave cooking, Power Leve can be pressed to change the power you need. After pressing Power Leve, the current power displays for 3 seconds; during this time press desired number pad to change the power. The oven will run with the selected power for the remaining time.
Speed cooking
1. Instant cooking at 100% power level and 1 to 6 minutes cooking time can be started by pressing number pads 1 to 6. Press Start to increase the cooking time by 30 seconds with each press. The maximum cooking time is 99 minutes, 99 seconds.
2. Instant cooking at 100% power level and 30 seconds cooking time con be started by pressing Start. Each repeated press will increase cooking time by 30 seconds. The maximum cooking time is 99 minutes and 99 seconds.
Note: Time can also be added in 30-second increments during Microwave Cooking and Time Defrost operation by pressing the Start pad.
Weight defrost function
- Press Weight Defrost, “dEF1” will display.
- Press number pads to input weight to be defrosted. Input the weight range between 100 to 2000g.
- If the weight input is not between 100 to 2000g, the input will be invalid. A beep will sound and the unit will not work until valid numbers are entered.
- Press Start to start defrosting and the cooking time remaining will be displayed.
Time defrost function
- Press Tome Defrost, “dEF2” will display.
- Press number pads to input defrosting time. The time range is between 00:01 and 99:99.
- The default microwave power is power level 3. If you want to change the power level, press Power Level once, and PL 3 will display; then press the number pad for the desired power level.
- Press Start to start defrosting. The remaining cooking time will be displayed.
Popcorn
- Press Popcorn repeatedly until the number you wish appears in the display, “50”, “100”g will display in order. For example, press Popcorn once, “50” appears.
- Press Start to cook, the oven beeps once. The oven beeps 5 times when cooking is finished.
Potatoes
- Press Potatoes repeatedly until the number you wish ppears in the display, “1”, “2”, “3” will display in order.
Press once: 1 potato (approx. 200g),
Press twice: 2 potatoes ( approx. 400g)
Press three times: 3 potatoes ( approx. 600g) - Press Start to cook, the oven beeps once. The oven beeps 5 times when cooking is finished.
Frozen vegetable
- Press Veggie, repeatedly until the number you wish appears in the display, “150”, “350”, “500” will display in order.
- Press to cook, oven beeps once. Oven beeps 5 times when cooking is finished.
Drinks
- Press Drinks repeatedly until the number you wish appears in the display, “1”, “2”, “3” cup will display in order. One cup is about 4.0 oz.
- Press Start to cook, oven beeps once. Oven beeps 5 times when cooking is finished.
Dinner plate
1. Press Dinner platere peatedly until the number you wish appears in the display, “250”, “350”, “500”g. will display in order.
2. Press Start to cook, oven beeps once. Oven beeps 5 times when cooking is finished.
Pizza
1. Press Pizza repeatedly until the number you wish appears in the display, “100”, “200”, “400”g will display in order.
2. Press Start to cook, oven beeps once. The oven beeps 5 times when cooking is finished.
Memory Function
1. Press “0” to choose the memory 1-3 procedure. The screen will display 1, 2, 3.
2. If a procedure has been set to memory, press Start to use it. If not, continue to set the procedure. Only procedures with one or two stages can be set.
3. After finishing the setting, press Start once to save the procedure and return to the waiting state. If Start is pressed again, cooking will start.
Example: Setting the following procedure as the second memory item, that is ‘Memory 2’. The procedure: to cook the food with 80% microwave power for 3 minutes and 20 seconds.
The steps are as follows:
1. In waiting states, press “0” twice, stop pressing when the screen displays “2”.
2. Press TimeCook once, then press “3, 2, 0” in order.
3. Press Power Level then press “8” to select 80% microwave power.
4. Press Start to save the setting. A buzzer sounds once, then it returns to waiting state. If you press twice after Step 3, the procedure will be saved as ‘Memory 2’ and operated.
5. If the electricity is not cut off, the procedure will always be saved. If the electricity is cut off, the procedure will be reset.
6. If you want to run the saved procedure in waiting states, press “0” twice, until the screen display is “2”, then press Start to run.
Multi-stage cooking function
At most, 2 stages can be set for cooking. In multi-stage cooking, if one stage is defrosting, then defrosting will occur first automatically.
Note: Auto cooking cannot work in the multi-stage cooking function. Example: if you want to cook with 80% microwave power for 5 minutes + 60% microwave power for 10 minutes, the cooking steps are as follows:
1. Press TimeCook once, then press “5, 0, 0” to set the cooking time.
2. Press Power Level then press “8” to select 80%microwave power.
3. Press TimeCook once, then press “1, 0, 0, 0” to set the cooking time;
4. Press Power Level then press “6” to select 60% microwave power.
5. Press Start to start cooking.
Inquiring function
1. When the oven is cooking, press Clock for the time of day to appear for three seconds in the display.
2. When the oven is in Microwave Cooking, press Power Level pad for cooking power to appear for three seconds in the display.
Lock function
To lock the microwave so that it cannot be operated by children or other unintended users, press Stop pad for 3 seconds. You will hear a long beep and a lock icon will appear on the display. To unlock, press Stop for 3 seconds. You will hear a long beep and the lock icon will disappear from the display. Cooking end reminder function The oven will beep five times to alert the user that cooking time has ended.
Other specifications
1. When setting the cooking function, the function abbreviation appears in the display.
2. When the microwave oven is cooking or paused (door opened) in the midst of cooking time, the remaining cooking time appears in the display.
USING THE ACCESSORIES
WARNING
Refer to the safety chapters.
CAUTION
Do not cook food without the turntable set. Use only the turntable set provided with the appliance.
IMPORTANT
Never cook food directly on the glass cooking tray.
Inserting the turntable set
 1. Place the roller guide around the turntable shaft.
2. Before first use remove the tape from the centre ofthe turntable shaft.
3. Place the glass cooking tray on the roller guide.
HELPFUL HINTS AND TIPS
Power setting table
| PROBLEM | REMEDY |
| You cannot find details for the amount of food prepared. | Look for similar food. Increase or shorten the length of the cooking times according to the following rule: Double the amount = almost double the time Half the amount = half the time |
| The food got too dry. | Set shorter cooking time or select lower microwave power. |
| The food is not defrosted, hot or cooked after the time came to an end. | Set longer cooking time or set higher power. Note that large dishes need longer time. |
| After the cooking time comes to an end, the food is overheated at the edge but is still not ready in the middle. | Next time set a lower power and a longer time. Stir liquids halfway through, e.g. soup. |
Defrosting
Always defrost roast with the fat side down. Do not defrost covered meat because this may cause cooking instead of defrosting. Always defrost whole poultry breast side down.
Cooking
Always remove chilled meat and poultry from the refrigerator at least 30 minutes before cooking. Let the meat, poultry, fish, and vegetables stay covered after cooking. Brush a little oil or melted butter over the fish. Add 3045ml of cold water for every 250g of vegetables. Cut the fresh vegetables into even size pieces before cooking. Cook all vegetables with a cover on the container.
Reheating
When you reheat packed ready meals always follow the instructions written on the packaging.
CARE AND CLEANING
WARNING
Refer to the safety chapters.
Notes on cleaning:
- To clean front panel fingerprint-resistant stainless steel simply wipe with a soft cloth using warm water and a mild detergent. DO NOT use stainless steel cleaners, abrasive cleaners or harsh solvents.
- Clean the appliance interior after each use. Then you can remove dirt more easily and it does not burn on.
- Clean stubborn dirt with a special cleaner.
- Clean all accessories regularly and let them dry. Use a soft cloth with warm water and a cleaning agent.
- To soften hard to remove remains, boil a glass of water at full microwave power for 2 to 3 minutes.
- To remove odors, mix a glass of water with 2 tsp of lemon juice and boil at full microwave power for 5 minutes.
TROUBLESHOOTING
WARNING
Refer to the safety chapters.
| PROBLEM | POSSIBLE CAUSE | REMEDY |
| Oven will not start | Electrical cord for oven is not plugged in. | Plug into the outlet. |
| Door is open. | Close the door and try again. | |
| Wrong operation is set. | Check instructions. | |
| Arcing or sparking | Materials to be avoided in microwave oven were used. | Use microwave-safe cookware only. |
| The oven is operated when empty. | Do not operate with oven empty. | |
| Spilled food remains in the cavity. | Clean cavity with wet towel. | |
| Unevenly cooked foods | Materials to be avoided in microwave oven were used. | Use microwave-safe cookware only. |
| Food is not defrosted completely. | Completely defrost food. | |
| Cooking time, power level is not suitable. | Use correct cooking time, power level. | |
| Food is not turned or stirred. | Turn or stir food. | |
| Overcooked foods | Cooking time, power level is not suitable. | Use correct cooking time, power level. |
| Undercooked foods | Materials to be avoided in the microwave oven were used. | Use microwave-safe cookware only. |
| Food is not defrosted completely. | Completely defrost food. | |
| Oven ventilation ports are restricted. | Check to see that oven ventilation ports are not restricted. | |
| Cooking time, power level is not suitable. | Use correct cooking time, power level. | |
| Improper defrosting | Materials to be avoided in microwave oven were used. | Use microwave-safe cookware only. |
| Cooking time, power level is not suitable. | Use correct cooking time, power level. | |
| Food is not turned or stirred. | Turn or stir food. | |
| Sensor cooked foods not properly cooked | Cover or lid on food not vented. | Cover or lid over food must contain vent hole for escaping steam. |
| Door opened before sensor-detected cooking time appears in display. | Do not open door to stir or turn food before sensor-detected cooking time appears in display. | |
| Display goes blank after 1 minute | WMF2302 models are fitted with a power-saving feature that turns off the display after 1 minute | This is normal operation and not aproduct fault |
If you cannot find a solution to the problem yourself, contact your dealer or the customer service centre. The necessary data for the customer service centre is on the rating plate on the appliance.
We recommend that you write the details of your product here:
Model (M) …………………………………………………………………………………………..
Product number (PNC) ………………………………………………………………….
Serial number (S.N.) ………………………………………………………………………..
INSTALLATION
CAUTION
Do not block the air vents. If you do that, the appliance can overheat.
CAUTION
Do not connect the appliance to adapters or extension leads. This can cause overloading and risk of fire.
• Put the appliance far away from steam, hot air and water splashes.
• If the appliance is stored/ transported at sub-zero temperatures, do not activate it immediately after installation. Allow at least two hours for it to be brought up to room temperature before turning on the unit.
Installation
• Remove all packing material and any promotional material from the microwave oven.
• Examine the oven for any damage such as dents or a broken door. Do not install if the oven is damaged. Call the service center.
• Remove the protective film on the oven cabinet surface. Do not remove the light brown Mica cover that is attached to the right-hand side of the oven cavity to protect the magnatron.
• Do not leave the packing material so that small children can play with it. This can be hazardous.
• Select a flat, level surface that provides enough open space for the intake and outlet vents and that is strong enough to bear the weight of the oven. A minimum clearance of 7.5cm is required between the oven and any adjacent walls. Leave a minimum clearance 30cm above the oven.Blocking the intake or outlet vents can damage the oven. If air vents are blocked during operation, the oven may overheat, and this may lead to malfunctioning. Hot air escapes from the vents, so be sure not to obstruct it or let curtains come between the oven and the rear wall. NOTE: It is recommended to have greater than 7.5cm clearance on at least one of the sides to improve product performance and operation.
• The oven should be placed in a stable position to avoid the possibility of causing vibration or noise.
• Do not remove the legs from the bottom of the oven.
• This oven should only be installed freestanding; not built-in or in a cabinet.
• Keep the oven away from heat and water. Exposure to heat and water can lower the efficiency and lead to malfunctioning.
• Place the oven as far away from radios and TV as possible. Operation of the oven may cause interference to your radio or TV reception.
• When there is interference, it may be reduced or eliminated by taking the following measures:
– Clean door and sealing surface of the microwave oven.
– Reorient the receiving antenna of the radio and/or television.
– Move the microwave oven away from the receiver.
– Plug the microwave oven into a different outlet so that microwave oven and receiver are on different branch circuits.
Electrical installation
WARNING
Only a qualified person must do the electrical installation.
IMPORTANT
The manufacturer is not responsible if you do not follow the safety precautions from the chapter “Safety Instructions”. This appliance is supplied with a main cable and main plug.
WARNING
The microwave oven is fitted with a plug and must be only connected to a properly installed, earthed socket. In accordance with the appropriate regulations, the socket must only be installed and the connecting cable must only be replaced by a qualified electrician. If the plug is no longer accessible following installation an all-pole isolating switch must be present on the installation side with a contact gap of at least 3mm.

FOR SALES IN AUSTRALIA AND NEW ZEALAND
APPLIANCE: WESTINGHOUSE MICROWAVES
This document sets out the terms and conditions of the product warranties for Westinghouse Appliances. It is an important document. Please keep it with your proof of purchase documents in a safe place for future reference should there be a manufacturing defect in your Appliance. This warranty is in addition to other rights you may have under the Australian Consumer Law.
1. In this warranty:
(a) ‘ACL’ or ‘Australian Consumer Law’ means Schedule 2 to the Competition and Consumer Act 2010;
(b) ‘Appliance’ means any Electrolux product purchased by you and accompanied by this document;
(c) ‘ASC’ means Electrolux’s authorized serviced centers;
(d) ‘Westinghouse ’ is the brand controlled by Electrolux Home Products Pty Ltd of 163 O’Riordan Street, Mascot NSW 2020, ABN 51 004 762 341 in respect of Appliances purchased in Australia and Electrolux (NZ) Limited (collectively “Electrolux”) of 3-5 Niall Burgess Road, Mount Wellington, in respect of Appliances purchased in New Zealand;
(e) ‘Warranty Period’ means the period specified in clause 3 of this warranty;
(f) ‘you’ means the purchaser of the Appliance not having purchased the Appliance for re-sale, and ‘your’ has a corresponding meaning.
2. Application: This warranty only applies to new Appliances, purchased and used in Australia or New Zealand and is in addition to (and does not exclude, restrict, or modify in any way) other rights and remedies under a law to which the Appliances or services relate, including any nonexcludable statutory guarantees in Australia and New Zealand.
3. Warranty Period: Subject to these terms and conditions, this warranty continues in Australia for a period of 12 months and in New Zealand
for a period of 12 months, following the date of original purchase of the Appliance.
4. Repair or replace warranty: During the Warranty Period, Electrolux or its ASC will not service the Appliance. If the Appliance is defective, you should return the Appliance to the place of purchase for a replacement. You agree that any replaced Appliances or parts become the property of Electrolux.
5. Travel and transportation costs: Subject to clause 7, Electrolux will bear the reasonable cost of transportation, travel, and delivery of the Appliance to and from Electrolux or its ASC. Travel and transportation will be arranged by Electrolux as part of any valid warranty claim.
6. Proof of purchase is required before you can make a claim under this warranty.
7. Exclusions: You may not make a claim under this warranty unless the defect claimed is due to faulty or defective parts or workmanship. This warranty does not cover:
(a) light globes, batteries, filters, or similar perishable parts;
(b) parts and Appliances not supplied by Electrolux;
(c) cosmetic damage which does not affect the operation of the Appliance;
(d) damage to the Appliance caused by
(i) negligence or accident;
(ii) misuse or abuse, including failure to properly maintain or service;
(iii) improper, negligent or faulty servicing or repair works done by anyone other than an Electrolux authorized repairer or ASC;
(iv) normal wear and tear;
(v) power surges, electrical storm damage, or incorrect power supply;
(vi) incomplete or improper installation;
(vii) incorrect, improper or inappropriate operation;
(viii) insect or vermin infestation;
(ix) failure to comply with any additional instructions supplied with the Appliance;
In addition, Electrolux is not liable under this warranty if:
(a) the Appliance has been, or Electrolux reasonably believes that the Appliance has been, used for purposes other than those for which the Appliance was intended, including where the Appliance has been used for any non-domestic purpose;
(b) the Appliance is modified without authority from Electrolux in writing;
(c) the Appliance’s serial number or warranty seal has been removed or defaced.
8. How to claim under this warranty: To enquire about claiming under this warranty, please follow these steps:
(a) carefully check the operating instructions, user manual, and the terms of this warranty;
(b) have the model and serial number of the Appliance available;
(c) have the proof of purchase (e.g. an invoice) available;
(d) telephone the numbers are shown below.
9. Australia: For Appliances and services provided by Electrolux in Australia: Electrolux goods come with guarantees that cannot be excluded under the ustralian Consumer Law. You are entitled to a replacement or refund for a major failure and for compensation for any other reasonably foreseeable loss or damage. You are also entitled to have the Appliance repaired or replaced if the Appliance fails to be of acceptable quality and the failure does not amount to a major failure. ‘Acceptable quality’ and ‘major failure’ have the same meaning as referred to in the ACL.
10. New Zealand: For Appliances and services provided by Electrolux in New Zealand, the Appliances come with a guarantee by Electrolux pursuant to the provisions of the Consumer Guarantees Act, the Sale of Goods Act, and the Fair Trading Act. Where the Appliance was purchased in New Zealand for commercial purposes the Consumer Guarantee Act does not apply.
11. Confidentiality: You accept that if you make a warranty claim, Electrolux and its agents including ASC may exchange information in relation to you to enable Electrolux to meet its obligations under this warranty.
| Important Notice Before calling for service, please ensure that the steps listed in clause 8 above have been followed. |
||
| FOR SERVICE Or to find the address of your nearest authorised service centre in Australia PLEASE CALL 13 13 49 For the cost of a local call (Australia only) |
AUSTRALIA ELECTROLUX HOME PRODUCTS 163 O’Riordan Street, Mascot NSW 2020 electrolux.com.au |
FOR SPARE PARTS Or to find the address of your nearest spare parts centre in Australia PLEASE 13 13 50 For the cost of a local call (Australia only) |
| FOR SERVICE Or to find the address of your nearest authorised service centre in New Zealand PLEASE CALL 0800 10 66 10 (New Zealand only) |
NEW ZEALAND ELECTROLUX (NZ) Limited 3-5 Niall Burgess Road, Mount Wellington electrolux.co.nz |
FOR SPARE PARTS Or to find the address of your nearest spare parts centre in New Zealand PLEASE 0800 10 66 20 (New Zealand only) |
For more information on all Westinghouse appliances, or for dimension and installation information, call into your retailer, phone or email our customer care team or visit our website:
AUSTRALIA
phone: 1300 363 640
fax: 1800 350 067
email: [email protected]
web: westinghouse.com.au
NEW ZEALAND
phone: 0800 436 245
fax: 0800 225 088
email: [email protected]
web: westinghouse.co.nz
TOP SERVICE
Top Service encompasses the after-sales service provided by The Electrolux Group to consumers including delivery, home service, and spare parts. and WESTINGHOUSE is trademarks of Westinghouse Electric Corporation. Used under license by Electrolux Home Products Pty Ltd. All Rights Reserved.
© 2019 Electrolux Home Products Pty Ltd.
ABN 51 004 762 341
WMAN_FS_23L_MICRO_May19