Whirlpool Microwave Oven User Manual

SAFETY INSTRUCTIONS
IMPORTANT TO BE READ AND OBSERVED
Before using the appliance, read these safety instructions. Keep them nearby for future reference.
These instructions and the appliance itself provide important safety warnings, to be observed at all times. The manufacturer declines any liability for failure to observe these safety instructions, for inappropriate use of the appliance or incorrect setting of controls.
Very young children (0-3 years) should be kept away from the appliance. Young children (3-8 years) should be kept away from the appliance unless continuously supervised. Children from 8 years old and above and persons with reduced physical, sensory or mental capabilities or lack of experience and knowledge can use this appliance only if they are supervised or have been given instructions on safe use and understand the hazards involved. Children must not play with the appliance. Cleaning and user maintenance must not be carried out by children without supervision.
WARNING: The appliance and its accessible parts become hot during use. Care should be taken to avoid touching heating elements. Children less than 8 years of age must be kept away unless continuously supervised.
Never leave the appliance unattended during food drying. If the appliance is suitable for probe usage, only use a temperature probe recommended for this oven – risk of fire.
Keep clothes or other flammable materials away from the appliance, until all the components have cooled down completely – risk of fire. Always be vigilant when cooking foods rich in fat, oil or when adding alcoholic beverages – risk of fire. Use oven gloves to remove pans and accessories. At the end of cooking, open the door with caution, allowing hot air or steam to escape gradually before accessing the cavity – risk of burns. Do not obstruct hot air vents at the front of the oven – risk of fire.
Exercise caution when the oven door is in the open or down position, to avoid hitting the door.
WARNING: If the door or door seals are damaged, the oven must not be operated until it has been repaired – risk of injury.
WARNING: Liquids and foods must not be heated in sealed containers – risk of explosion. Heating of beverages can result in delayed eruptive boiling, care must be taken when handling the container – risk of burns.
Do not dry food or clothing or heat warming pads, slippers, sponges and similar – risk of fire. When heating food in plastic or paper containers, remain vigilant on the oven – risk of fire.
Contents of feeding bottles and baby food jars must be stirred or shaken and temperature checked – risk of burns. Do not heat eggs in their shell and whole hard-boiled eggs – risk of explosion.
Only use utensils suitable for microwave ovens. Do not use metallic containers – risk of injury.
Only use a temperature probe recommended for this oven – risk of fire.
If smoke is emitted switch off or unplug the appliance and keep the door closed in order to stifle any flames.
If appliance is installed above 850 mm height from floor, care should be taken not to displace turntable while removing container – risk of injury. Do not use your microwave oven for deep- frying, because the oil temperature cannot be controlled.
PERMITTED USE
CAUTION: The appliance is not intended to be operated by means of an external switching device, such as a timer, or separate remote controlled system.
This appliance is intended to be used in household and similar applications such as: staff kitchen areas in shops, offices and other working environments; farm houses; by clients in hotels, motels, bed & breakfast and other residential environments.
No other use is permitted (e.g. heating rooms).
This appliance is not for professional use. Do not use the appliance outdoors.
Do not store explosive or flammable substances (e.g. gasoline or aerosol cans) inside or near the appliance – risk of fire.
INSTALLATION
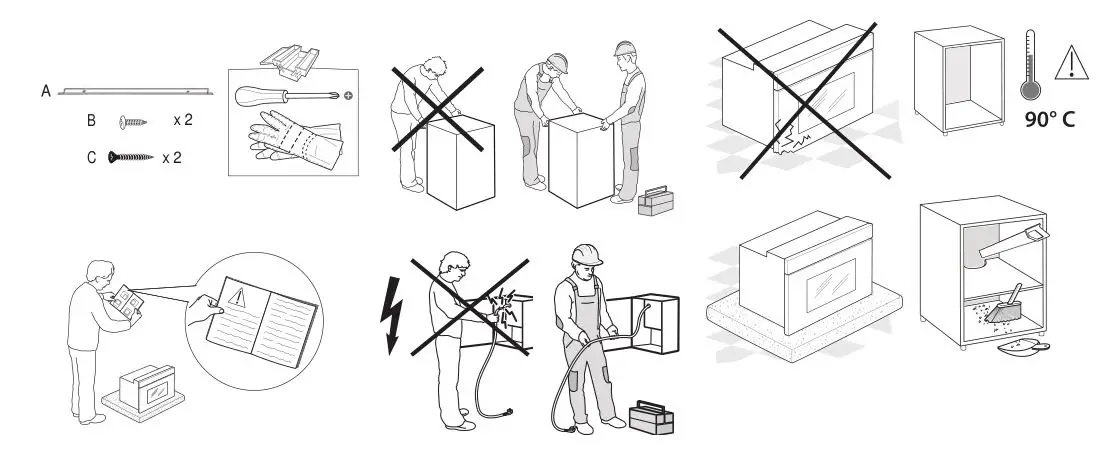
The appliance must be handled and installed by two or more persons – risk of injury. Use protective gloves to unpack and install – risk of cuts.
Installation, including water supply (if any), electrical connections and repairs must be carried out by a qualified technician. Do not repair or replace any part of the appliance unless specifically stated in the user manual. Keep children away from the installation site. After unpacking the appliance, make sure that it has not been damaged during transport. In the event of problems, contact the dealer or your nearest After sales Service. Once installed, packaging waste (plastic, Styrofoam parts etc.) must be stored out of reach of children – risk of suffocation. The appliance must be disconnected from the power supply before any installation operation – risk of electric shock. During installation, make sure the appliance does not damage the power cable – risk of fire or electric shock. Only activate the appliance when the installation has been completed.
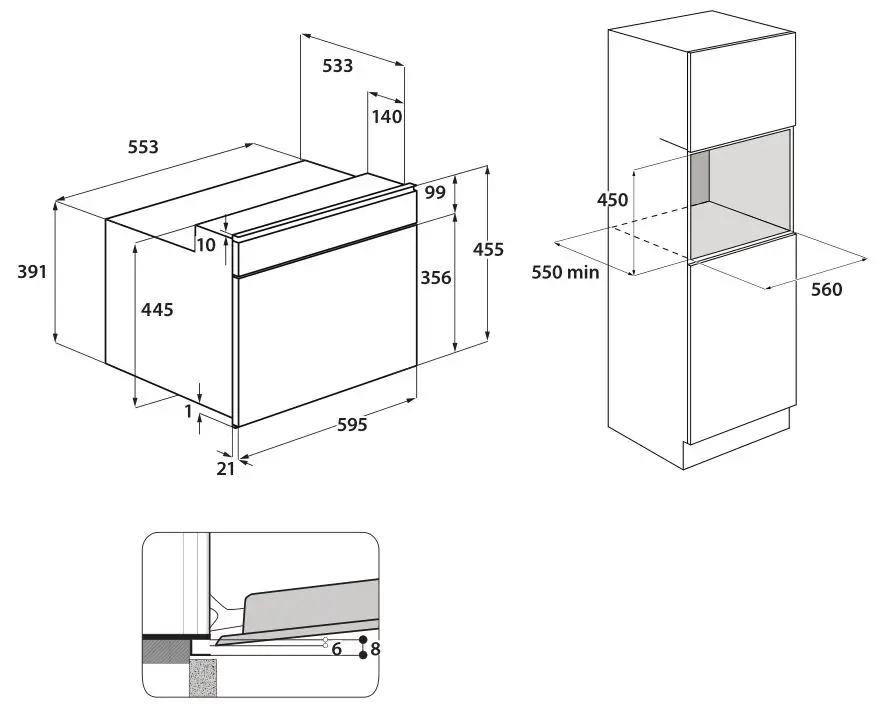
This appliance is intended to be used built-in. Do not use it freestanding or place into a cabinet. After unpacking the appliance, make sure that the appliance door closes properly. In the event of problems, contact the dealer or your nearest After-sales Service.
Carry out all cabinet cutting operations before fitting the appliance and remove all wood chips and sawdust. Do not obstruct the minimum gap between the worktop and the upper edge of the oven – risk of burns.
Do not remove the oven from its polystyrene foam base until the time of installation.
After installation, the bottom of the appliance must no longer be accessible – risk of burns.
Do not install the appliance behind a decorative door – risk of fire.
ELECTRICAL WARNINGS
The rating plate is on the front edge of the oven (visible when the door is open).
It must be possible to disconnect the appliance from the power supply by unplugging it if plug is accessible, or by a multi-pole switch installed upstream of the socket in accordance with the wiring rules and the appliance must be earthed in conformity with national electrical safety standards.
Do not use extension leads, multiple sockets or adapters. The electrical components must not be accessible to the user after installation. Do not use the appliance when you are wet or barefoot. Do not operate this appliance if it has a damaged power cable or plug, if it is not working properly, or if it has been damaged or dropped.
If the supply cord is damaged, it must be replaced with an identical one by the manufacturer, its service agent or similarly qualified persons in order to avoid a hazard – risk of electric shock.
In case of replacement of power cable, contact an authorised service centre.
CLEANING AND MAINTENANCE
WARNING: It is hazardous for anyone other than a competent person to carry out any service or repair operation that involves the removal of a cover which give protection against exposure to microwave energy.
Failure to maintain the oven in a clean condition could lead to deterioration of the surface that could adversely affect the life of the appliance and possibly result in a hazardous situation.
The oven must be cleaned regularly and any food deposits removed.
WARNING: Ensure that the appliance is switched off and disconnected from the power supply before performing any maintenance operation; never use steam cleaning equipment – risk of electric shock.
Do not use harsh abrasive cleaners or metal scrapers to clean the door glass since they can scratch the surface, which may result in shattering of the glass.
Ensure the appliance is cooled down before any cleaning or maintenance – risk of burns.
DISPOSAL OF PACKAGING MATERIALS
The packaging material is 100% recyclable and is marked with the recycle symbol 
DISPOSAL OF HOUSEHOLD APPLIANCES
This appliance is manufactured with recyclable or reusable materials. Dispose of it in accordance with local waste disposal regulations. For further information on the treatment, recovery and recycling of household electrical appliances, contact your local authority, the collection service for household waste or the store where you purchased the appliance. This appliance is marked in compliance with European Directive 2012/19/EU, Waste Electrical and Electronic Equipment (WEEE). By ensuring this product is disposed of correctly, you will help prevent negative consequences for the environment and human health. The symbol 
ENERGY SAVING TIPS
Only preheat the oven if specified in the cooking table or your recipe. Use dark lacquered or enameled baking trays as they absorb heat better. Food requiring prolonged cooking will continue to cook even once the oven is switched off.
ECO DESIGN DECLARATION
This appliance meets the Eco Design requirements of European Regulations n. 65/2014 and 66/2014 in conformity with the European standard EN 60350-1.
![]()
DAILY REFERENCE GUIDE
![]()
To receive more comprehensive help and support, please register your product at www.whirlpool.eu/register
Before using the appliance carefully read the Health and Safety guide.
PRODUCT DESCRIPTION
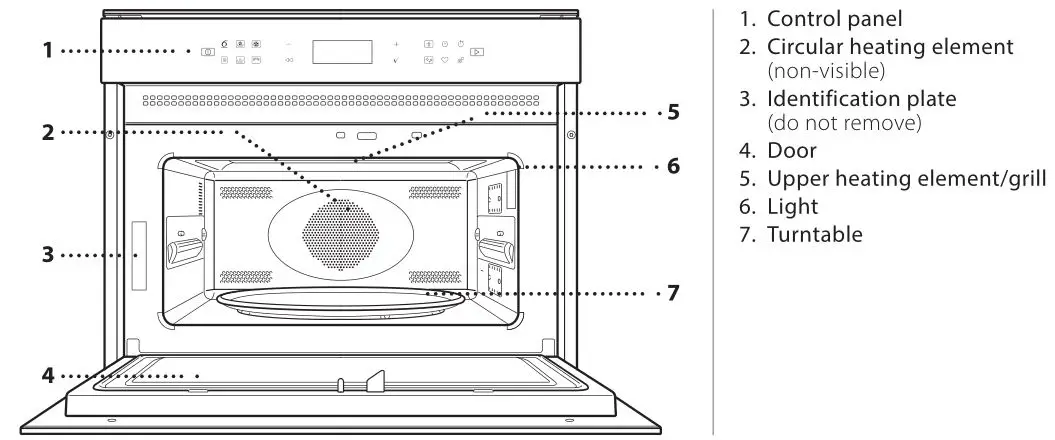
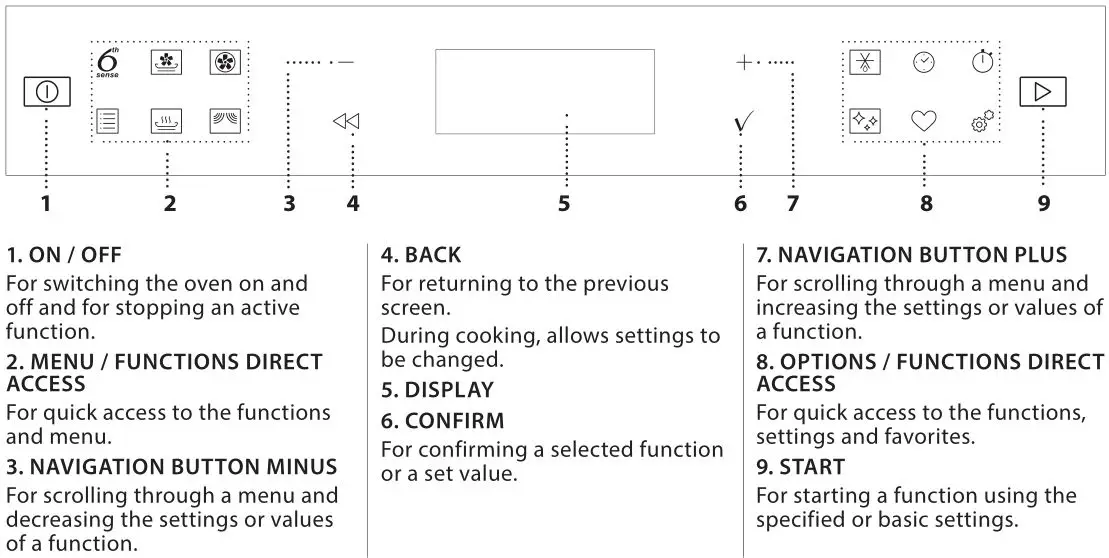
CONTROL PANEL DESCRIPTION
ACCESSORIES
TURNTABLE
Placed on its support, the glass turntable can be used with all cooking methods. The turntable must always be used as a base for other containers or accessories, with the exception of the rectangular baking tray.
TURNTABLE SUPPORT 
Only use the support for the glass turntable. Do not rest other accessories on the support.
CRISP PLATE
Only for use with the designated functions. The Crisp plate must always be placed in the centre of the glass turntable and can be pre-heated when empty, using the special function for this purpose only. Place the food directly on the Crisp plate.
HANDLE FOR CRISP PLATE
Useful for removing the hot Crisp plate from the oven.
WIRE RACK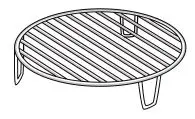
This allows you to place food closer to the grill, for perfectly browning your dish and allows an optimal air circulation. It must be used as base for the crisp plate in some “Crisp Fry” functions. Place the wire rack on the turntable, making sure that it does not come into contact with other surfaces.
RECTANGULAR BAKING TRAY
Only use the baking tray with functions that allow for convection cooking; it must never be used in combination with microwaves. Insert the plate horizontally, resting it on the rack in the cooking compartment.
Please note: You do not need to remove the turntable and its support when using the rectangular baking tray.
STEAMER
To steam foods such as fish or vegetables, place these in the basket (2) and pour drinking water (100 ml) into the bottom of the steamer (3) to achieve the right amount of steam. To boil foods such as potatoes, pasta, rice or cereals, place these directly on the bottom of the steamer (the basket is not required) and add an appropriate amount of drinking water for the amount you are cooking.
For best results, cover the steamer with the lid (1) provided. Always place the steamer on the glass turntable and only use it with the appropriate cooking functions, or with microwave function.
The steamer bottom has been designed also to be used in combination with the special steam clean function.
The number and the type of accessories may vary depending on which model is purchased.
Other accessories that are not supplied can be purchased separately from the After-sales Service.
There are a number of accessories available on the market. Before you buy, ensure they are suitable for microwave use and resistant to oven temperatures.
Metallic containers for food or drink should never be used during microwave cooking.
Always ensure that foods and accessories do not come into contact with the inside walls of the oven.
Always ensure that the turntable is able to turn freely before starting the oven. Take care not to unseat the turntable whilst inserting or removing other accessories.
FUNCTIONS

These functions automatically select the best temperature and cooking method for all types of food.
- 6th SENSE REHEAT
For reheating ready-made food that is either frozen or at room temperature. The oven automatically calculates the settings required to achieve the best results in the shortest amount of time. Place food on a microwave-safe and heatproof dinner plate or dish. Take out from packaging being careful to remove any aluminum foil. At the end of reheating process, leaving to stand for 1-2 minutes will always improve the result, especially for frozen food. Do not open the door during this function.
- 6th SENSE STEAM
For steam-cooking foods such as vegetables or fish, using the steamer provided. The preparation phase automatically generates steam, bringing the water poured into the bottom of the steamer to the boil. Timings for this phase may vary. The oven then proceeds with steam cooking the food, according to the time set. Set 1-2 minutes for soft vegetables such as broccoli and leek or 4-5 minutes for harder vegetables such as carrots and potatoes. Do not open the door during this function.
Required accessories: Steamer
- 6th SENSE COOK
For cooking several kind of dishes and foods and achieving optimal results quickly and easily. To get the best from this function, follow the indications on the relative cooking table.

This healthy and exclusive function combines the quality of crisp function with the properties of the warm air circulation. It allows crunchy, tasty frying results to be achieved, with a remarkable reduction of oil needed compared to the traditional way of cooking, even removing the need for oil in some recipes. It is possible fry a variety of preset foods, either fresh or frozen. Follow the following table to use the accessories as indicated and obtain the best cooking results for each type of food (fresh or frozen).


For cooking dishes in a way that achieves similar results to using a conventional oven. The baking plate or other cookware that is suitable for oven use can be used to cook certain foods.

Recommended accessories: Rectangular baking tray / Wire rack

- GRILL
For browning, grilling and gratins. We recommend turning the food during cooking.
- GRILL+MW
For quickly cooking and gratinating dishes, combining the microwave and grill functions.
- TURBO GRILL
For perfect results, combining the grill and oven air convection. We recommend turning the food during cooking.
- TURBO GRILL+MW
For quickly cooking and browning your food, combining the microwave, grill and the oven air convection.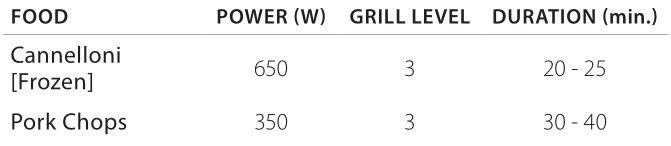
- FORCED AIR + MW
To prepare oven dishes in a short time. It is suggested to use the rack in order to optimize the air circulation.
- SPECIALS
- FAST PREHEAT
For quickly preheating the oven before a cooking cycle. Wait for the function to finish before placing food inside the oven. Once preheating has finished, the oven will select the “Forced Air” function automatically. - KEEP WARM
For keeping just-cooked food hot and crisp, including meat, fried foods or cakes. - RISING
For optimal proving of sweet or savoury dough. To maintain the quality of proving, do not activate the function if the oven is still hot following a cooking cycle.
- FAST PREHEAT


For perfectly browning a dish, both on the top and bottom of the food. This function must only be used with the special Crisp plate. 
Required accessories: Crisp plate, handle for the Crisp plate

For quickly cooking and reheating food or drinks.


For quickly defrosting various different types of food simply by specifying their weight. Always place the food directly on the glass turntable for best results.
CRISP BREAD DEFROST
This exclusive Whirlpool function allows you to defrost frozen bread. Combining both Defrost and Crisp technologies, your bread will taste and feel as if it were freshly baked. Use this function to quickly defrost and heat frozen rolls, baguettes & croissants. The Crisp Plate must be used in combination with this function.


For editing function time values.

For keeping time without activating a function.

The action of the steam released during this special cleaning cycle allows dirt and food residues to be removed with ease. Pour a cup of drinking water into the supplied steamer bottom (3) only or on a microwave proof container and activate the function.
Required accessories: Steamer

For retrieving the list of 10 favorite functions.

For adjusting the appliance settings.
When “ECO” mode is active the brightness of the display will be reduced to save energy and lamp switches of after 1 minute. It will be reactivated automatically whenever any of the buttons are pressed.
When “DEMO” is “On” all commands are active and menus available but the oven doesn’t heat up. To deactivate this mode, access “DEMO” from “SETTINGS” menu and select “Of”. By selecting “FACTORY RESET”, the product switches of and then it returns to first switch on. All settings will be deleted.
FIRST TIME USE
- SELECT THE LANGUAGE
You will need to set the language and the time when you switch on the appliance for the first time: “English” will show on the display.

Please note: The language can subsequently be changed by selecting “LANGUAGE” in “SETTINGS” menu, available by pressing
- SET THE TIME
After selecting the language, you will need to set the current time: The two digits for the hour will flash on the display.
Press + or – to set the minutes and press
Please note: You may need to set the time again following lengthy power outages. Select “CLOCK” in “SETTINGS” menu, available by pressing - HEAT THE OVEN
A new oven may release odours that have been left behind during manufacturing: this is completely normal. Before starting to cook food, we therefore recommend heating the oven with it empty in order to remove any possible odours.
Remove any protective cardboard or transparent film from the oven and remove any accessories from inside it.
Heat the oven to 200 °C for around one hour, ideally using the “Fast preheat” function. Follow the instructions for setting the function correctly.
Please note: It is advisable to air the room after using the appliance for the first time.


DAILY USE
SELECT A FUNCTION
Press 
To select a function contained in a menu, press + or – to select the desired one, then press 

Please note: Once a function has been selected, the display will recommend the most suitable level for each function.
SET THE FUNCTION
After having selected the function you require, you can change its settings. The display will show the settings that can be changed in sequence. Pressing << allows you to change the previous setting again.
POWER / TEMPERATURE / GRILL LEVEL

When the value flashes on the display, press + or – to change it, then press to confirm and continue with the settings that follow (if possible).
In the same way, it is possible to set the grill level: There are three defined power levels for grilling: 3 (high), 2 (mid), 1 (low).
DURATION

When the icon ![]()
Please note: You can adjust the cooking time that has been set during cooking by pressing 
In non-microwave functions you do not have to set the cooking time if you want to manage cooking manually (untimed): Press 
By selecting this mode, you cannot program a delayed start.
END TIME (START DELAY)
In functions which do not activate the microwave such as “Grill” or “Turbo grill”, once you have set a cooking time you can delay starting the function by programming its end time. In microwave functions the end time is equal to the duration. The display shows the end time while the icon ![]()

Press + or – to set the time you want cooking to end, then press
Please note: Programming a delayed cooking start time will disable the oven preheating phase: The oven will reach the temperature your require gradually, meaning that cooking times will be slightly longer than expected. During the
waiting time, you can press + or – to amend the programmed end time or press << to change other settings. By pressing
6th SENSE
These functions automatically select the best cooking mode, power, temperature and duration for all the dishes available.

When required, simply indicate the characteristic of food to obtain an optimal result.
WEIGHT / PORTIONS

To set the function correctly, follow the indications on the display, when prompted, and press + or – to set the required value then press
Some 6th Sense functions do not require quantity inputs: thanks to a smart humidity sensor, the oven can automatically adjust the cooking time to the food amount.
DONENESS
In 6th Sense functions it is possible to adjust the doneness level.

When prompted, press + or – to select the desired level between Light/Low (-1) and Extra/High (+1). Press
ACTIVATE THE FUNCTION
At any time, if the default values are those desired or once you have applied the settings you require, press
Every time the
During the delay phase, by pressing
Please note: At any time you can stop the function that has been activated by pressing
If the oven is hot and the function requires a specific maximum temperature, a message will be shown on the display. Press to return to previous screen and select a different function or wait for a complete cooling.
JET START
When the oven is switched off, press
PREHEATING
The forced air function requires a preheating phase: Once the function has started, the display indicates that the preheating phase has been activated.

Once this phase has finished, an audible signal will sound and the display will indicate that the oven has reached the set temperature, requiring food to be added.
At this point, open the door, place the food in the oven, close the door and start cooking.
Please note: Placing the food in the oven before preheating has finished may have an adverse effect on the final cooking
result. Opening the door during the preheating phase will stop pause it.
The cooking time does not include a preheating phase. You can always change the temperature you want the oven to reach using + or – .
PAUSE COOKING / ADD, TURN OR CHECK ON FOOD
PAUSE
By opening the door, the cooking will be temporarily paused through deactivating heating elements.
To resume the cooking, close the door and press
Please note: During “6th Sense” functions open the door only when prompted.
ADD, TURN OR STIR FOOD
Some 6th Sense Cook recipes will require the food to be added after the preheating phase or ingredients to be added to complete cooking. In the same way, there will be prompts to turn or stir the food during cooking.

An audible signal will sound and the display shows the action to be done.
Open the door, do the action prompted by the display and close the door, then press to continue cooking.
Please note: When turning or stirring is needed, after 2 minutes, even if no action is performed, the oven will resume the cooking. The “ADD FOOD” phase last 2 minutes: if no action is taken, the function will be ended.
END OF COOKING
An audible signal will sound and the display will indicate that cooking is complete.

Press
FAVORITE
To make the oven easier to use, it can save up to 9 of your favorite functions.
Once cooking is complete the display will prompt you to save the function in a number between 1 and 9 on your list of favorites.

If you would like to save a function as a favorite and store the current settings for future use, press
Once
Please note: If the memory is full or the number chosen has already been taken, the oven will ask you to confirm overwriting the previous function.
To call up the functions you have saved at a later time, press 

Press + or – to select the function, confirm by pressing
SMART CLEAN
Remove all accessories (with the exception of the glass turntable) from the microwave oven before activating the function.
Press 

Press
When required, pour a cup of drinking water into the supplied steamer bottom or in a microwave resistant container, then close the door.
After the last confirmation, press
Once finished, remove the container, finish the cleaning with the help of a smooth cloth and then dry the oven cavity using a damp microfibre cloth.
MINUTEMINDER
When the oven is switched off, the display can be used as a timer. To activate this function, make sure that the oven is switched off and press + or – : The icon ![]()

Press + or – to set the length of time you require and then press
An audible signal will sound and the display will indicate once the minuteminder has finished counting down the selected time.
Please note: The minuteminder does not activate any of the cooking cycles. Press + or – to change the time set on the timer.
Once the minuteminder has been activated, you can also select and activate a function. Press
During this phase, it isn’t possible to see the minuteminder (only the ![]()
KEYLOCK
To lock the keypad, press and hold << for at least five seconds. Do this again to unlock the keypad.

Please note: This function can also be activated during cooking. For safety reasons, the oven can be switched of at any time by pressing

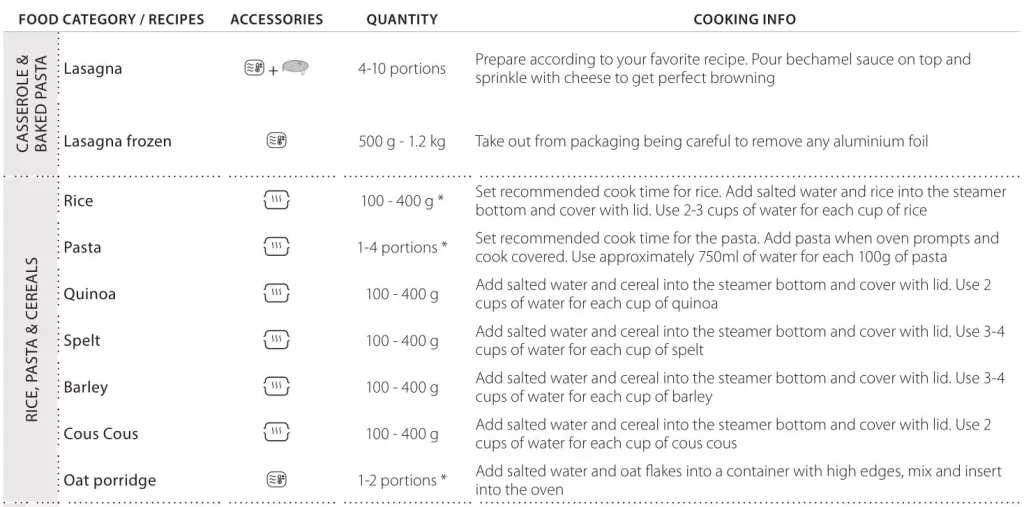
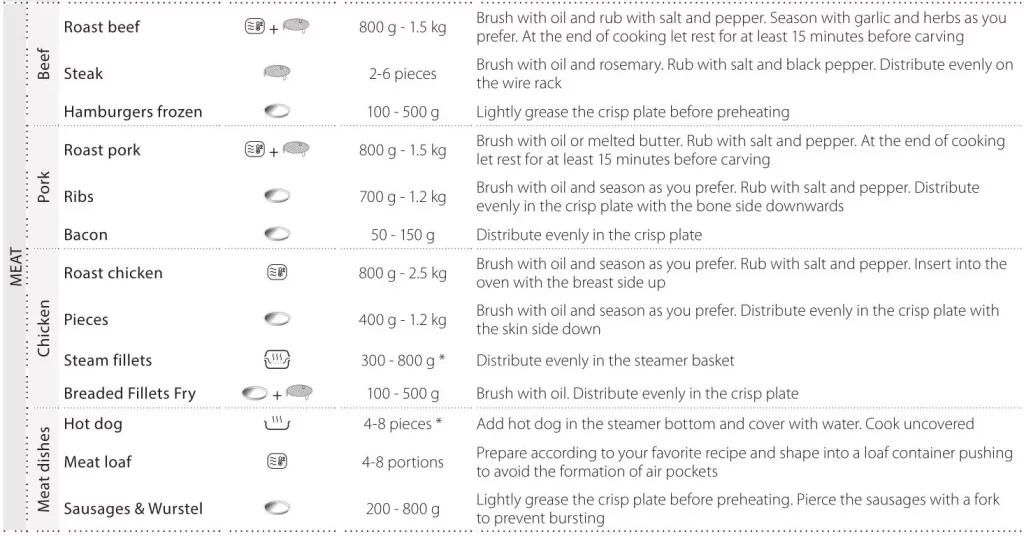
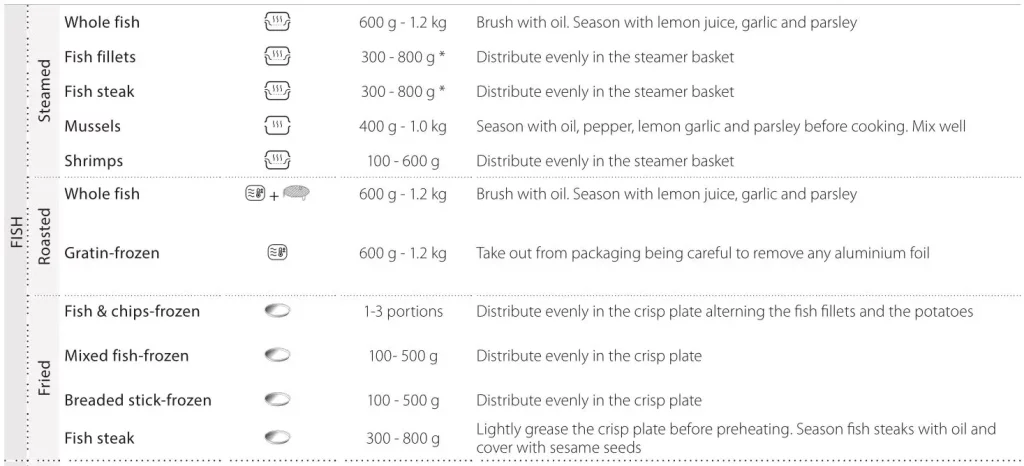

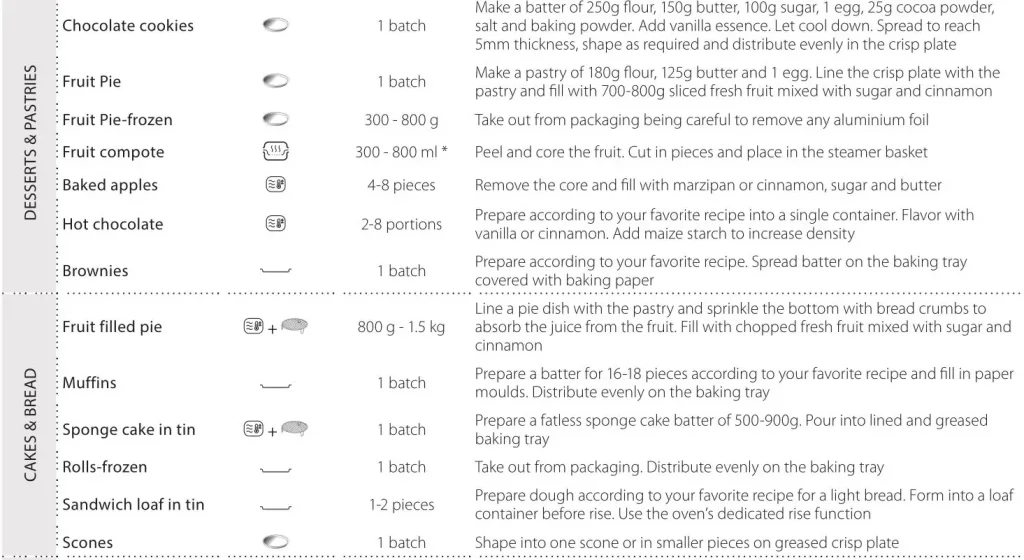
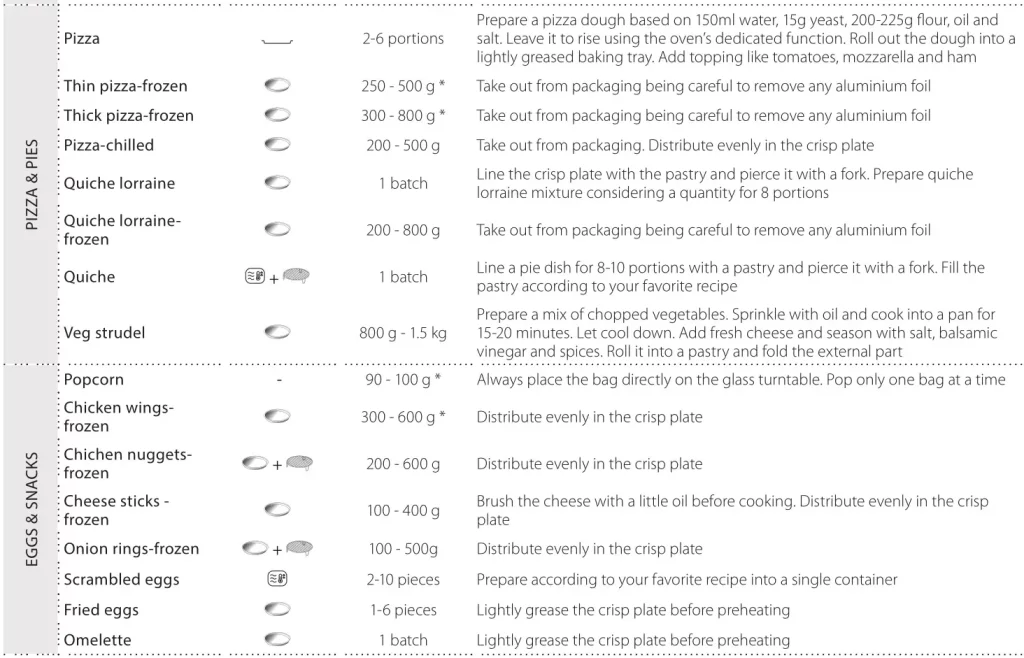
* Suggested quantity. Do not open door during cooking.

CLEANING
Make sure that the appliance has cooled down before carrying out any maintenance or cleaning.
Never use steam cleaning equipment.
Do not use wire wool, abrasive scourers or abrasive/corrosive cleaning agents, as these could damage the surfaces of the appliance.
INTERIOR AND EXTERIOR SURFACES
- Clean the surfaces with a damp microfibre cloth. If they are very dirty, add a few drops of pH-neutral detergent. Finish off with a dry cloth.
- Clean the glass in the door with a suitable liquid detergent.
- At regular intervals, or in case of spills, remove the turntable and its support to clean the bottom of the oven, removing all food residue.
- Activate the “Smart clean” function for an optimum cleaning of the internal surfaces.
- The grill does not need to be cleaned as the intense heat burns away any dirt. Use this function on a regular basis.
ACCESSORIES
All accessories are dishwasher safe with the exception of the Crisp plate.
The Crisp plate should be cleaned using water and a mild detergent. For stubborn dirt, rub gently with a cloth. Always leave the Crisp plate to cool down before cleaning.
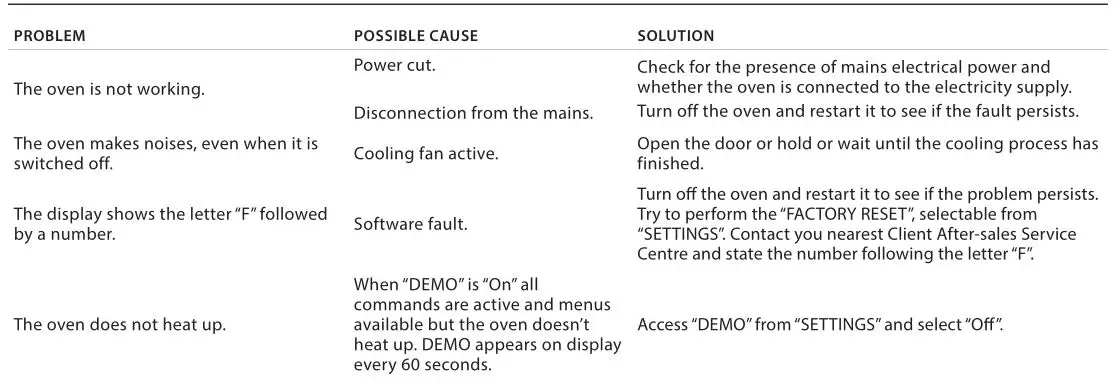
TROUBLESHOOTING
PRODUCT FICHE
![]()
CONTACTING OUR AFTER-SALES SERVICE
![]()
You can find our contact details in the warranty manual. When contacting our Client After-sales Service, please state the codes provided on your product’s identification plate.