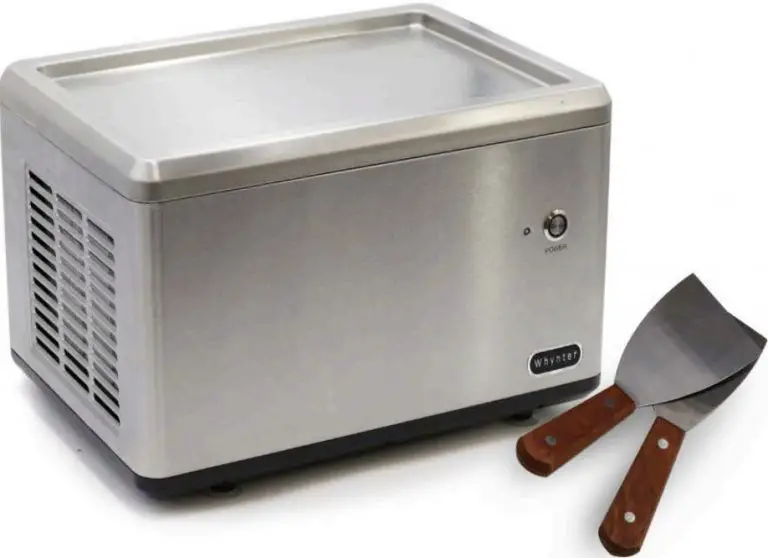
Whynter Portable Instant Ice Cream Maker ICR-300SS Instruction Manual
Congratulations on your new Whynter product. To ensure proper operation, please read this Instruction Manual carefully before using this product. Keep this manual in a safe place for future reference. Take on dessert making like never before! Make delicious homemade rolled ice cream that you can fully customize to taste in the comfort of your own home with the Whynter ICR-300SS Portable Instant Ice Cream Maker Frozen Pan Roller in Stainless Steel.
Rolled ice cream, also known as stir-fried ice cream, is made by stirring ingredients on an ice pan and simultaneously cooled to approximately 10°F ( -12°C). Rolled ice cream is chopped and scrapped while being frozen on an ice pan. This reduces the amount of air trapped inside ice cream make it taste more intense.
This portable ice cream maker with frozen pan offers premium functions that a commercial machine can do at any cafe or dessert shops. A built-in powerful compressor freezer allows for continuous use and can quickly freeze your favorite ice cream mix in less than 5 minutes! This unit includes two stainless steel spatula, and 4 suction legs to provide a more solid and steady base.
- Stainless steel housing
- Stainless steel pan top
- Powerful compressor and fast cooling speed
- 4 suction legs for solid base and stability
- 2 stainless steel spatulas
- High efficiency CFC-free compressor
- ETL Certified
TECHNICAL DATA
| MODEL | ICR-300SS |
| Capacity | 0.5 quart |
| Power Supply | 110/120V 60 Hz |
| Maximum power consumption | 120W |
| Cooling Temperature | 14ºF |
| Refrigerant | R600a |
| Noise Level | < 55dB |
| Net Weight | 24.25 lbs |
| Unit Dimensions | 12.5” W x 10.75” D x 14.25” H |
| Packaging Dimensions | 14” W x 12.75” D x 19.5” H |
Safety Precautions
APPLIANCE SAFETY
Your safety and the safety of others are very important to us.
To reduce the risk of fire, electrical shock, or injury when using your appliance, follow these basic precautions
![]() This is the Safety Alert Symbol. This symbol alerts you to potential hazards that may result in serious injury. All safety messages will follow the Safety Alert Symbol and either the words” DANGER” or “WARNING”.
This is the Safety Alert Symbol. This symbol alerts you to potential hazards that may result in serious injury. All safety messages will follow the Safety Alert Symbol and either the words” DANGER” or “WARNING”.
![]() DANGER
DANGER ![]() Danger means that failure to heed this safety statement may result in severe injury or death.
Danger means that failure to heed this safety statement may result in severe injury or death.
![]() WARNING
WARNING ![]() Warning means that failure to heed this safety statement may result in extensive product damage, serious injury, or death.
Warning means that failure to heed this safety statement may result in extensive product damage, serious injury, or death.
CAUTION: Caution means that failure to heed this safety statement may result in minor or moderate injury, or property or equipment damage.
All safety messages will alert you to know what the potential hazard is, tell you how to reduce the chance of injury, and let you know what can happen if the instructions are not followed.
IMPORTANT SAFEGUIDES
![]() Before the appliance is used, it must be properly positioned and installed as described in this manual, please read the manual carefully. To reduce the risk of fire, electrical shock or injury when using the appliance, follow basic precaution, including the following:
Before the appliance is used, it must be properly positioned and installed as described in this manual, please read the manual carefully. To reduce the risk of fire, electrical shock or injury when using the appliance, follow basic precaution, including the following:
![]() DANGER
DANGER ![]()
- Plug into a grounded 3-prong outlet, do not remove grounding prong, do not use an adapter, and do not use an extension cord.
- Do not use if the power supply cord is damaged. If damaged, it must be replaced by a qualified electrician.
- It is recommended that a separate circuit, serving only your appliance be provided. Use receptacles that cannot be turned off by a switch or pull chain.
- Never clean appliance parts with flammable fluids or harsh chemicals. These fumes can create a fire hazard or explosion.
- Do not store or use gasoline or other flammable vapors and liquids in the vicinity of the appliance or any other appliance.
- Before proceeding with cleaning and maintenance operations, make sure to unplug the appliance.
- Do not connect or disconnect the electric plug with wet hands.
- To protect against risk of electric shock, do not pour water on cord, plug and ventilation, immerse the appliance in water or any other liquid.
- Do not attempt to repair or replace any part of your appliance unless it is specifically recommended in this manual. All other servicing should be referred to a qualified technician.
![]() WARNING
WARNING ![]()
FOLLOW WARNING CALL OUTS BELOW ONLY WHEN APPLICABLE TO YOUR MODEL
- It is important for the appliance to be leveled in order to work properly. For a stable installation, make sure the appliance is placed on a flat, level and solid surface.
- When positioning or moving the appliance ensure that it is not turned upside down or greater than 45° or more off level.
- To ensure proper ventilation for your appliance, the air vents of the appliance must be completely unobstructed. Choose a well-ventilated area with temperatures above 60°F (16°C) and below 90°F (32°C). This appliance must be installed in an area protected from the element, such as wind, rain, water spray or drips.
- This appliance is not intended for use by young children or physically challenged persons without supervision/assistance. Young children must be supervised to ensure safety around this or any appliance.
- Never pull the cord to disconnect it from the outlet. Grasp the plug and pull it from the outlet.
- Never lift, carry or drag the appliance by the power cord.
- This appliance is designed for household, non-commercial use only. Any other use will void the warranty.
- Do not insert any foreign objects into the appliance.
- This is a self-contained ice cream maker and no pre-freezing is needed. Do not use pre-frozen ingredients as it can cause the mixture to freeze before ice cream is made.
- Avoid placing any objects on top of the appliance.
- This is an electrical appliance, to avoid injury from electrical shock do not operate the unit with wet hands, while standing on a wet surface or while standing in water. Do not use outdoors or in wet conditions.
- Do not plug into the power outlet before set up is completed.
Features and Parts
BEFORE USING YOUR APPLIANCE
- Remove the exterior and interior packing.
- Before connecting the appliance to the power source, let it stand upright for approximately 2 hours. This will reduce the possibility of a malfunction in the cooling system from handling during transportation.
- Wipe the exterior surface with lukewarm water using a soft cloth.
- Clean all parts that will come into contact with the ice cream.
Note: Please note that the stainless steel shovels are dishwasher safe. However, to prolong the quality of the materials of the stainless steel shovels, it is suggested to have these hand-washed.
PREPARE RECIPE INGREDIENTS
Prepare recipe ingredients from your own recipe or from ours.
Note: No pre-freezing is needed. This appliance has a built-in compressor which is designed to freeze the mixture in about 5 minutes.
Ice Cream mix recipes can be downloaded from the ICR-300SS product page on our website, www.whynter.com or just send us an email at [email protected] and we will send you a guide to introduce you to a variety of mixtures. Once you have mastered the basics, let your imagination run wild, as you try new flavors and fun combinations.
Installation and Operation
IMPORTANT SAFETY INSTRUCTIONS
| To reduce the risk of fire, electrical shock, or injury when using your appliance, follow these basic pre- cautions: | |
|
|
INSTALLATION OF YOUR APPLIANCE
- WARNING: Do not store or install the appliance outdoors.
- CAUTION: This appliance is designed for making ice cream desserts.
- Place your appliance on a hard and level surface that is strong enough to support it when ingredients are added.
- Allowance of at least 5 inches (127mm) of space around the appliance is suggested, which allows the proper air circulation to cool the compressor and condenser.
- Do not install the appliance near an oven or other heating source.
- Plug in the appliance into an exclusive, grounded wall power outlet. Do not under any circumstances cut or remove the third (ground) prong from the power cord. Any questions concerning power and/or grounding should be directed toward a qualified electrician or an authorized service center.
FREESTANDING INSTALLATION
A freestanding installation will allow you to install the ice cream maker in any place you desire provided that the required clearance space around the appliance is respected. In every setting, there must be an adequate ventilation and access for service. Never install or operate the unit in an enclosed area. Allowance of at least 5 inches (127mm) of space around the appliance is suggested, which allows the proper air circulation to cool the compressor and condenser.
ELECTRICAL CONNECTION
WARNING: Improper use of the grounded plug can result in the risk of electrical shock. If the power cord is damaged, have it replaced by a qualified electrician or contact Whynter Service Department.
This appliance requires a standard 115/120 Volt AC ~/60Hz electrical ground outlet with three-prong. Have the wall outlet and circuit checked by a qualified electrician to make sure the outlet is properly grounded. The cord should be secured behind the appliance and not left exposed or dangling to prevent accidental injury. The appliance should always be plugged into its own individual electrical outlet which has a voltage rating that matches the rating label on the appliance. This provides the best performance and also prevent overloading house wiring circuits that could cause a fire hazard from overheated. Never unplug the appliance by pulling the power cord. Always grip the plug firmly and pull straight out from the receptacle. Repair or replace immediately all power cords that have become frayed or otherwise damaged. Do not use a cord that shows cracks or abrasion damage along its length or at either end. When moving the appliance, be careful not to damage the power cord.
EXTENSION CORD
Because of potential safety hazards, it is strongly recommended that you do not use an extension cord with this appliance. However, if you must use an extension cord, it is absolutely necessary that it be a UL/CULListed, 3-wire grounding type appliance extension cord having a grounding type plug and outlet and that the electrical rating of the cord be 115 volts and at least 10 amperes.
INSTALLATION OF YOUR APPLIANCE

- Place the ice cream maker upright on a flat, level and solid surface.
- For stability, press the unit gently down onto the surface until the suction legs are securely attached
CONTROLS

- Power Button
After the appliance is installed and connected to the power supply, press the Power button to turn the machine on.
The Power button will illuminate a blue light indicating that the unit is in operation. When the unit is on and the Power button is pressed, the unit will turn off.
NOTE: The unit may enter a three minute compressor lockout when operation of the unit has been resumed. This three minute time delay helps extend the life of the compressor. Once delay elapses, the compressor will engage and the unit will start cooling again. - Operation Light
The operation light indicates when unit is ready for use.
Red Light – This indicates that the unit is starting up and in the process of reaching the optimal operation temperature point.
Green Light – This indicates that the unit has reached the optimal temperature (14ºF) necessary for ice cream making. This means that the ice cream mix can be poured on the freezing top plate.
NOTE: It takes approximately 8-10 minutes for the operation light to change from Red to Green.
BASIC ICE CREAM MIX
INGREDIENTS
- 1¾ cups heavy cream
- 1¼ cup whole milk
- ¾ cup sugar
- ⅛ teaspoon fine sea salt
- 1 tablespoon vanilla extract
Pour 1 cup of the mixture into a saucepan and add the sugar, salt. Scrape the seeds of the vanilla bean into the pot and then add the vanilla pod to the pot. Warm the mixture over medium heat, just until the sugar dissolves. Remove from the heat and add the remaining cream, milk, and vanilla extract (if using extract). Stir to combine. Set aside ice cream mix to cool down.
ICE CREAM MAKING
WARNING: Before first use, clean and wipe the top plate of the unit with a moist cloth. Do not clean the top plate or any of the parts with abrasive cleaners or hard implements.
- Press the power button to turn on the ice cream machine. Initially, the indicator light will illuminate in red color.
- The unit will then start the precooling process for about 8-10 minutes. When the indicator light changes from red to green, pour the ice cream (about 100g) on the freezing top plate(Fig 1). During the ice cream process, the compressor continues to work and the green indicator light will stay illuminated.
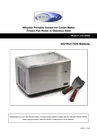
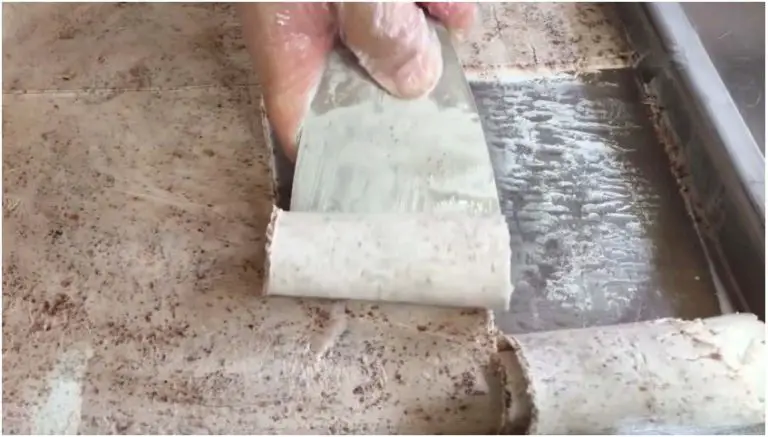
Fig 1 - Add fruits, brownies, chocolate, or any other toppings if desired. Using the stainless steel shovels, break down these ingredients to little pieces (Fig 2).

Fig 2 - When the ice cream mix has started to thicken, this is an indication that the ice cream mix has started to freeze. Evenly spread the the ice cream mix all throughout the freezing top plate(Fig 3).

Fig 3 - Once the ice cream mix has hardened, use the edges of the stainless steel shovels to divide, roll, and shovel out each rolled piece(Fig 4 and Fig 5).

Fig 4

Fig 5 - Place ice cream rolls in a cup and serve(Fig 6 and Fig 7)

Fig 6

Fig 7
Troubleshooting and Tips
Many common ice cream maker problems are easily resolved. Try the troubleshooting suggestions below to see if the problems can be resolved before having to contact the Whynter Service Department.
| Problem | Possible Causes | Solutions |
| Ice cream maker does not freeze |
|
|
| Ice cream maker compressor does not run when operation of the unit has been resumed | The ice cream maker has entered a three minute compressor lockout |
|
| Ice cream is not firm enough | Ingredients were warm or at room temperature before placing in the bowl |
|
| Ice cream too icy |
|
|
ONE YEAR LIMITED WARRANTY
This Whynter Ice Cream Maker is warranted, to the original owner within the 48 continental states, for one year from the date of purchase against defects in material and workmanship under normal use and service. When making a warranty claim, please have the original bill or invoice of purchase with purchase date available. Should your Whynter Ice Cream Maker prove defective within one year from the date of purchase, return the defective part or unit, freight prepaid (within two months of purchase; after two months to one year, customer will be responsible for freight cost to Whynter’s service department), along with an explanation of the claim to Whynter LLC. A return authorization number issued by Whynter is required for all warranty claims and returns. Please package the Whynter Ice Cream Maker carefully in its original packaging material to avoid damage in transit. The original box and packaging material should be retained, as Whynter is not responsible for the cost of replacement packaging. Under this warranty, Whynter will repair or replace any parts found defective at our discretion. This warranty is not transferable. After the expiration of the warranty, the cost of labor and parts will be the responsibility of the original owner of the unit.
THIS WARRANTY DOES NOT COVER:
- Acts of God, such as fire, flood, hurricanes, earthquakes and tornadoes.
- Improper power supply such as power surge, low voltage, defective household wiring or inadequate fuses. Use in commercial or industrial applications
- Damage, accidental or otherwise, to the Whynter Ice Cream Maker while in the possession of a consumer not caused by a defect in material or workmanship;
- Damage caused by consumer misuse, tampering, or failure to follow the care and special handling provisions in the instructions.
- Damage to the finish of the case, or other appearance parts caused by wear.
- Damage caused by repairs or alterations to the product by anyone other than authorized by the manufacturer.
- Removal, Replacement Packaging, Freight and Insurance cost for the warranty service.
DISCLAIMER OF IMPLIED WARRANTIES; LIMITATION OF REMEDIES CUSTOMER’S SOLE AND EXCLUSIVE REMEDY UNDER THIS LIMITED WARRANTY SHALL BE PRODUCT REPAIR OR REPLACEMENT AS PROVIDED HEREIN. CLAIMS BASED ON IMPLIED WARRANTIES, INCLUDING WARRANTIES OF MERCHANTABILITY OR FITNESS FOR A PARTICULAR PURPOSE, ARE LIMITED TO ONE YEAR OR THE SHORTEST PERIOD ALLOWED BY LAW, BUT NOT LESS THAN ONE YEAR. WHYNTER SHALL NOT BE LIABLE FOR CONSEQUENTIAL OR INCIDENTAL DAMAGES SUCH AS PROPERTY DAMAGE AND INCIDENTAL EXPENSES RESULTING FROM ANY BREACH OF THIS WRITTEN LIMITED WARRANTY OR ANY IMPLIED WARRANTY. SOME STATES AND PROVINCES DO NOT AL-LOW THE EXCLUSION OR LIMITATION OF INCIDENTAL OR CONSEQUENTIAL DAMAGES, OR LIMITATIONS ON THE DURATION OF IMPLIED WARRANTIES, SO THESE LIMITATIONS OR EXCLUSIONS MAY NOT APPLY TO YOU. THIS WRIT-TEN WARRANTY GIVES YOU SPECIFIC LEGAL RIGHTS. YOU MAY ALSO HAVE OTHER RIGHTS THAT VARY FROM STATE TO STATE.
Please retain the original proof of purchase in order to obtain warranty services. Warranty begins from the original date of purchase.
CONTACT UC
To obtain service or information, contact
Whynter LLC via email at [email protected] or call
866-WHYNTER.
Product contents and specifications may change without notice. Please visit our website for the most up to date information.
Copyright © 2020 Whynter LLC
WWW.WHYNTER.COM