|

IMPORTANT SAFETY INSTRUCTIONS
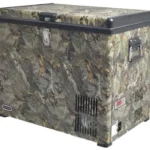
Whynter Sterymax Professional 360 Electrostatic Sprayer
MAIN COMPONENTS
| ITEMS INCLUDED | |
| 1 | SPRAYER |
| 1 | TANK |
| 1 | 16.8 VOLT BATTERY -3400 mAh |
| 1 | 16.8 VOLT CHARGER |
| 1 | NOZZLE WRENCH |
| 1 | TANK CAP |
| PRODUCT COMPONENTS | |
| 1.0 | TANK |
| 1.1 | TANK RELEASE |
| 1.2 | TANK LOCKING COLLAR |
| 1.3 | 16.8 VOLT BATTERY |
| 1.4 | UNIT ON/OFF |
| 1.5 | LOCK OFF SWITCH |
| 1.6 | ELECTROSTATIC CHARGE ON/OFF |
| 1.7 | 3 IN 1 NOZZLE |
| 1.8 | HEADLIGHT |
| 1.9 | GROUNDING STRAP |
| OPTIONAL ACCESSORIES SOLD SEPARATELY | |
| Model Number | Description |
| VP20B | Professional 16.8 Volt Battery |
| VP10 | Professional 16.8 Volt Charger |
| VP30 | VP200 Replacement Tank |
| VP49 | Nozzle Wrench |
| VP50 | 3 in 1 Nozzle |
| VP55 | Single 40 Nozzle |
| VP57 | Single 80 Nozzle |
| VP59 | Single 110 Nozzle |

NOZZLE WRENCH BATTERY CHARGER
TANK CAP
WARNING: It is the operator’s responsibility to read and understand the cautions and warnings in this manual before attempting to operate this machine.
IMPORTANT: The Electrostatic Sprayer has been designed and engineered to be very safe during normal operation. As with all cordless products certain safety precautions should be taken.
Please read the following WARNINGS before operating the machine.
UNDERSTAND THESE SAFETY PRECAUTIONS BEFORE OPERATING MACHINE. FAILURE TO PROPERLY FOLLOW THESE PRECAUTIONS MAY LEAD TO A FIRE, EXPLOSION, OR ELECTRICAL SHOCK HAZARD.
IMPORTANT SAFETY INSTRUCTIONS
WARNING - When using electric appliances, basic precautions should always be followed, including the following:
- Read all the instructions before using the appliance.
- To reduce the risk of injury, close supervision is necessary when an appliance is used near children.
- Do not contact moving parts.
- Only use attachments recommended or sold by the manufacturer.
- To reduce the risk of electrical shock, do not put electrode in water or other liquid. Do not place or store appliance where it can fall or be pulled into a tub or sink.
- Use only the charger supplied by the manufacturer to recharge.
SAVE THESE INSTRUCTIONS

WARNING
READ AND UNDERSTAND OWNERS MANUAL AND ALL OTHER SAFETY INSTRUCTIONS BEFORE OPERATING THIS MACHINE.
 TO AVOID ELECTRICAL SHOCK
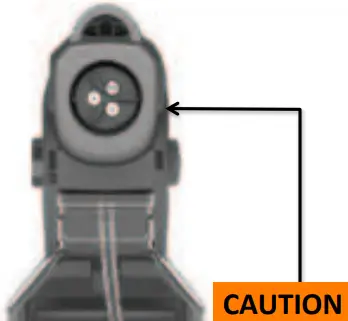
DO NOT TOUCH OR INSERT ANYTHING IN THE NOZZLE OF THE SPRAYER
WARNING: This product contains chemicals known to the State of California to cause cancer and birth defects or other reproductive harm.
WARNING: This machine contains an electrostatic device that may interfere with sensitive medical devices such as pacemakers, defibrillators, or similar devices. DO NOT operate this machine or stand within 10 feet if you use such medical devices. Contact your physician prior to operation if you are unsure if this machine will interfere with your medical device.
WARNING: Always have the machine serviced by a professional, qualified representative. Never attempt to service the machine or access its internal components.
General Safety Rules - For All Battery Operated Sprayers
WARNING: Read and understand all instructions. Failure to follow all instructions listed below may result in electric shock, fire and/or serious personal injury.
SAVE THESE INSTRUCTIONS
- Keep your work area clean and well lit.
- Do not operate cordless sprayer in explosive atmospheres, such as in the presence of flammable liquids, gases, or dust. Cordless Sprayers create sparks, which may ignite the dust or fumes.
- Keep bystanders, children, and visitors away while operating a cordless sprayer. Distractions can cause you to lose control.
ELECTRICAL SAFETY
- CAUTION: To avoid electrical shock do not touch or insert any foreign objects into the nozzle.
- A cordless sprayer with integral batteries or a separate battery pack must be recharged only with the specified charger for the battery. A charger that may be suitable for one type of battery may create a risk of fire when used with another battery.
- Use battery operated sprayer only with the specifically designated battery pack. Use of any other batteries may create a risk of fire.
PERSONAL SAFETY
- Stay alert, watch what you are doing and use common sense when operating a cordless sprayer. Do not use cordless sprayer while tired or under the influence of drugs, alcohol, or medication.
- A moment of inattention while operating cordless sprayer may result in serious personal injury,
- Avoid accidental starting. Be sure switch is in the locked or OFF position before inserting battery pack
- Carrying sprayer with your finger on the switch or inserting the battery pack into a tool with the switch ON invites accidents.
- Do not overreach. Keep proper footing and balance at all times. Proper footing and balance enables better control of the tool in unexpected situations.
- Use safety equipment. Always comply with any requirements for protective clothing, goggles, gloves, facial masks, or respirator required by the .
Formulations.
Most water based chemicals are suited for machine.
.
- Do not use oil base liquids.
- Store formulation in its original labeled container.
- Ensure that formulation is applied only in strict compliance with the formulation label as well as local, state, and federal regulations.
- Do not use oil-base or flammable formulations with this machine.
TOOL USE AND CARE
- Do not use a machine that is broken or damaged in any way.
- Do not alter the machine by adding or removing parts.
- Do not restrict the motor air inlet area.
- Do not tamper with the output nozzle.
- Do not allow the machine to operate unattended.
- Do not stand in water or hold over water while operating machine.
- Do not use outdoors when it’s raining.
- Do not use cordless sprayer if switch does not turn it on or off. A cordless sprayer that cannot be controlled with the switch is dangerous and must be repaired.
- Disconnect battery pack from cordless sprayer or place the switch in the locked or OFF position before making any adjustments, refilling the tank or storing the cordless sprayer. Such preventative safety measures reduce the risk of starting the cordless sprayer accidentally.
- Store idle cordless sprayer out of reach of children and other untrained persons. Cordless sprayers are dangerous in the hands of untrained users.
- When battery pack is not in use, keep it away from other metal objects like: paper clips, coins, keys, nails, screws, or other small metal objects that can make a connection from one terminal to another. Shorting the battery terminals together may cause sparks, burns, or a fire.
- To clean the sprayer use soap, water and a damp cloth to wipe clean. To clean internal components run water through the sprayer for 3 minutes.
Important Safety Instructions for Battery Packs
Your cordless sprayer uses a 16.8 volt Lithium Ion battery pack. The battery pack is not fully charged out of the carton. Before using the battery pack and charger, read the safety instructions below. Then follow charging procedures outlined.
CAUTION: The battery used in this device may present a risk of fire or chemical burn if mistreated. Do not disassemble, store in extreme heat or cold.
Keep away from children. Do not disassemble. Do not dispose of in fire.
Do not attempt to disassemble the battery or remove any component projecting from the battery terminals. The battery and charger have no user serviceable parts. Fire or injury may result from tampering prior to disposal, protect exposed terminals with heavy insulating tape to prevent shorting.
DANGER: Electrocution hazard. Never attempt to open the battery pack for any reason. If battery pack case is cracked or damaged, do not insert into charger. Electric shock or electrocution may result.
WARNING: Fire hazard. Do not store or carry battery so that metal objects can contact exposed battery terminals. For example, do not place battery in aprons, pockets, toolboxes, product kit boxes, drawers, etc., with loose nails, screws, keys, etc.
CAUTION: Battery pack must be securely attached to the cordless sprayer. If battery pack is detached, personal injury may result.
Do not incinerate the battery pack even if it is severely damaged or is completely worn out. The battery pack can explode in a fire.
Charge the battery packs only with the original charger.
DO NOT splash or immerse in water or other liquids.
Do not store or use the tool and battery pack in locations where the temperature may reach or exceed 105°F (40)° (such as outside sheds or metal buildings in summer).
Damaged battery packs should be recycled.
Transporting batteries can possibly cause fires if the battery terminals inadvertently come in contact with conductive materials such as keys, coins, hand tools and the like.
The US Department of Transportation Hazardous Material Regulations (HMR) prohibits transporting batteries in commerce or on airplanes (i.e., packed in suitcases and carry-on luggage) UNLESS they are properly protected from short circuits. When transporting individual batteries, make sure that the battery terminals are protected and well insulated from materials that could contact them and cause a short circuit.
Important Safety Instructions for Battery Chargers
SAVE THESE INSTRUCTIONS: This manual contains important safety instructions for battery chargers. Before using charger, read all instructions and cautionary markings on charger, battery pack, and product using battery pack.
DANGER: Electrocution hazard. 120 volts are present at charging terminals. Do not probe with conductive objects.
WARNING: Shock hazard. Do not allow any liquid to get inside charger.
CAUTION: Burn hazard. To reduce the risk of injury, charge only Whynter Innovations rechargeable batteries. Other types of batteries may burst causing personal injury and damage.
CAUTION: Under certain conditions, with the charger plugged in to the power supply, the exposed charging contacts inside the charger can be shorted by foreign material. Foreign materials of a conductive nature such as, but not limited to, steel wool, aluminum foil, or any buildup of metallic particles should be kept away from charger cavities. Always unplug the charger from the power supply when there is no battery pack in the cavity. Unplug charger before attempting to clean.
DO NOT attempt to charge the battery pack with any chargers other than the one noted in this manual. The charger and battery pack are specifically designed to work together.
These chargers are not intended for any uses other than charging Whynter Innovations rechargeable batteries. Any other uses may result in risk of fire, electric shock or electrocution. Do not expose charger to rain or snow.
Pull by plug rather than cord when disconnecting charger. This will reduce risk of damage to electric plug and cord.
Make sure that cord is located so that it will not be stepped on, tripped over, or otherwise subjected to damage or stress.
Do not use an extension cord unless it is absolutely necessary. Use of improper extension cord could result in risk of fire, electric shock, or electrocution.
An extension cord must have adequate wire size (AWG or American Wire Gauge) for safety. The smaller the gauge number of the wire, the greater the capacity of the cable, that is 16 gauge has more capacity than 18 gauge. When using more than one extension to make up the total length, be sure each individual extension contains at least the minimum wire size.
Recommended Minimum Wire Size for Extension Cords:
Total Length of Cord
25 ft., 50 ft., 75 ft., 100 ft., 125 ft., 150 ft., 175 ft.,
7.6 m, 15.2 m, 22.9 m, 30.5 m, 38.1 m, 45.7 m, 53.3 m,
Wire Size AWG
18, 18, 16, 16, 14, 14, 12
Do not place any object on top of charger or place the charger on a soft surface that might block the ventilation slots and result in excessive internal heat. Place the charger in a position away from any heat source. The charger is ventilated through slots in the top and the bottom of the housing.
Do not operate charger with damaged cord or plug — have them replaced immediately.
Do not operate charger if it has received a sharp blow, been dropped, or otherwise damaged in any way.
Disconnect the charger from the outlet before attempting any cleaning. This will reduce the risk of electric shock. Removing the battery pack will not reduce this risk.
NEVER attempt to connect 2 chargers together.
The charger is designed to operate on standard household electrical power (120 Volts)or (240) with proper country plug
Operation Instructions
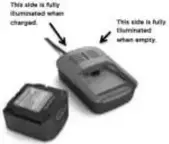
1. To start the use of the Whynter Cordless Electrostatic Sprayer first charge your battery by inserting the Whynter 16.8 volt battery into the charger and plugging the charger into a wall socket.
NOZZLE WRENCH BATTERY CHARGER
TANK CAP
2. Next fill the tank (1.0) by first removing it from the unit by rotating the tank locking collar(1.2) and pulling the tank release ring (1.1). The tank can now be removed. Note: you must hold on to the tank when you pull the tank release ring or the tank will fall to the floor.
3. Fill the tank with the desired liquid.
4. Insert the tank into the sprayer and rotate the tank locking collar (1.2) until you hear the click of the tank release ring (1.1) snap into place.
5. Insert the charged battery into the battery socket and lock in place.
6. Pull the trigger and spray on your desired surface.
To insure maximized electrostatic performance always keep you hand firmly wrapped around the handle in contact with the grounding strap
Nozzle Instructions
To Adjust the Nozzle
- Remove the battery from the unit.
- Insert the nozzle wrench into the front end of the unit.
- Rotate wrench until the tabs on the nozzle and the slots on the wrench are lined up.
- When the wrench slots and the nozzle tabs are lined up, the wrench will be completely inserted into the front end, rotate the wrench clockwise to adjust to a different size spray. The largest particle tip has a line cut through it, rotate clockwise until you hear a click to get the medium particle and rotate clockwise again until it clicks again to get the smallest particle.
- Remove the wrench when complete.
To Remove the Nozzle
- Remove the battery from the unit.
- Insert the nozzle wrench into the front of the unit.
- Rotate wrench until the tabs on the nozzle line up with the slots in the wrench.
- When the tabs and slots are lined up the wrench will be completely inserted into the front end.
- To remove, rotate the wrench in the counter clockwise direction until the nozzle comes loose (1/4 rotation).
- Remove the wrench when complete.
To Insert Nozzle
- Remove the battery from the unit.
- Insert the nozzle into the wrench, lining up the tabs on the nozzle and the slots on the wrench.
- Insert the wrench with nozzle into the front end of the unit.
- Push in and rotate the wrench ¼ turn counter clockwise. When you hear a click the nozzle is in position.
- Remove the wrench when complete.
Cleaning Electric static sprayers
All users follow safe cleaning practices to protect themselves from harmful exposure when cleaning the sprayer.
It is recommended that user should purchase a second tank to wash out cordless electric static sprayers to prevent residual solution build up. Disconnect storage tank from sprayer use the black threaded cap that’s is provided inside caring case. Disconnect storage tank from sprayer use the locking threaded cap to secure tank and solution when not in use.
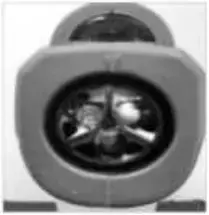
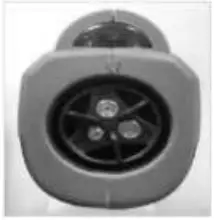
Cleaning Nozzle
If your nozzles becomes plugged soak in hot soapy water and blow out with pressurized air to remove blockage.
Example below dirty nozzle #1 and clean nozzle #2. Nozzle #1 have not been properly cleaned after being use. When not properly cleaned, the sprayer nozzles residual chemical deposits build up. Deposit build up results in decreased bar pressure and decreased spray patterns

#1 Nozzle (Dirty) #2 Nozzle (Clean)
To reduce the chance of blockage we recommend that after every few days of use spray a tank of water through the unit to rinse out any residual chemical build up that may have occurred.
How To:

Charge Battery
1. Rotate coller to unlock icon position.

2. Pull locking ring to remove.
3. Lift unit off the tank.
Remove Tank / Fill
1. Align tank grooves into slide rail, lower machine onto tank.
2. listen for a “click”.

3. Rotate coller to lock icon position.
Connect Tank
Rotate the nozzle clockwise to change the size of the particles.
The Largest Nozzle has a “line” Through it.
Adjust Nozzle
Optimum Sprayer Distance is 24 inches.
Spray
After use, spray a tank of water to rinse.
Clean Up
This WHYNTER Electrostatic Sprayer is warranted, to the original owner for one year from the date of purchase against defects in material and workmanship under normal use and service. When making a warranty claim, please have the original bill or invoice of purchase with purchase date available. Should your WHYNTER Electrostatic Sprayer prove defective within one year from the date of purchase, return the defective part or unit, freight prepaid (within two months of purchase; after two months to one year, customer will be responsible for shipping cost to Whynter’s service department), along with an explanation of the claim to Whynter LLC. A return authorization number issued by Whynter is required for all warranty claims and returns. Please package the WHYNTER Electrostatic Sprayer carefully in its original packaging material to avoid damage in transit. The original box and packaging material should be retained, as Whynter is not responsible for the cost of replacement packaging. Under this warranty, Whynter will repair or replace any parts found defective at our discretion. This warranty is not transferable. After the expiration of the warranty, the cost of labor and parts will be the responsibility of the original owner of the unit.
THIS WARRANTY DOES NOT COVER:
- Acts of God, such as fire, flood, hurricanes, earthquakes and tornadoes.
- Improper power supply such as power surge, low voltage, defective household wiring or inadequate fuses.
- Use in commercial or industrial applications
- Damage, accidental or otherwise, to the WHYNTER Electrostatic Sprayer while in the possession of a consumer not caused by a defect in material or workmanship;
- Damage caused by consumer misuse, tampering, or failure to follow the care and special handling provisions in the instructions.
- Damage to the finish of the case, or other appearance parts caused by wear.
- Damage caused by repairs or alterations to the product by anyone other than authorized by the manufacturer.
- Removal, Replacement Packaging, Freight and Insurance cost for the warranty service.
DISCLAIMER OF IMPLIED WARRANTIES; LIMITATION OF REMEDIES CUSTOMER’S SOLE AND EXCLUSIVE REMEDY UNDER THIS LIMITED WARRANTY SHALL BE PRODUCT REPAIR OR REPLACEMENT AS PROVIDED HEREIN. CLAIMS BASED ON IMPLIED WARRANTIES, INCLUDING WARRANTIES OF MERCHANTABILITY OR FITNESS FOR A PARTICULAR PURPOSE, ARE LIMITED TO ONE YEAR OR THE SHORTEST PERIOD ALLOWED BY LAW, BUT NOT LESS THAN ONE YEAR. WHYNTER SHALL NOT BE LIABLE FOR CONSEQUENTIAL OR INCIDENTAL DAMAGES SUCH AS PROPERTY DAMAGE AND INCIDENTAL EXPENSES RESULTING FROM ANY BREACH OF THIS WRITTEN LIMITED WARRANTY OR ANY IMPLIED WARRANTY. SOME STATES AND PROVINCES DO NOT AL-LOW THE EXCLUSION OR LIMITATION OF INCIDENTAL OR CONSEQUENTIAL DAMAGES, OR LIMITATIONS ON THE DURATION OF IMPLIED WARRAN TIES, SO THESE LIMITATIONS OR EXCLUSIONS MAY NOT APPLY TO YOU. THIS WRIT-TEN WARRANTY GIVES YOU SPECIFIC LEGAL RIGHTS. YOU MAY ALSO HAVE OTHER RIGHTS THAT VARY FROM STATE TO STATE.
Please retain the original proof of purchase in order to obtain warranty services. Warranty begins from the original date of purchase.
To obtain service or information, contact Whynter via email at
Asia Pacific : [email protected]
North America: [email protected]
Product contents and specifications may change without notice.
Copyright© 2020 Whynter LLC