![]()
USER MANUAL BID 02
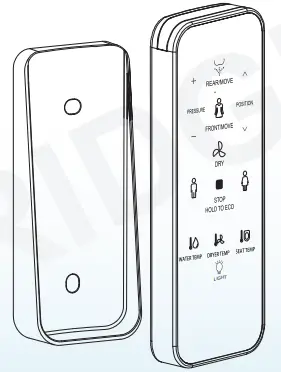
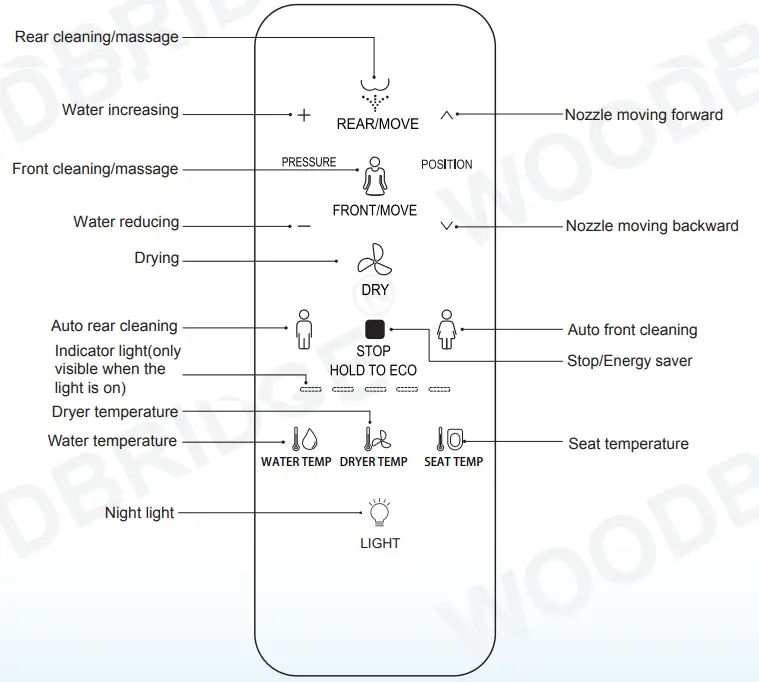
Remote Control Illustration
Thank you for choosing our product. Please read the instructions carefully before installation and keep it available for future maintenance or reference.
Customer Service Phone: 562-229-0088. (Monday – Friday 9 AM – 5 PM Pacific Time) Or Email: [email protected]
Installation Preparation
Remote control installation
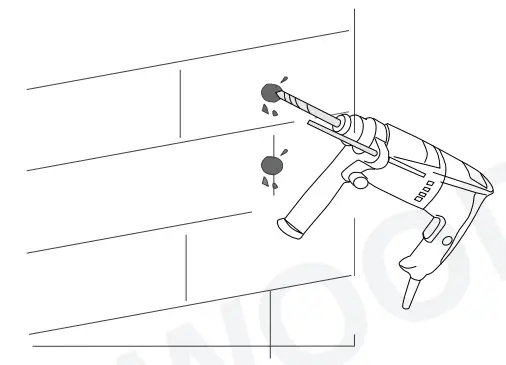
Remote control hanger installation
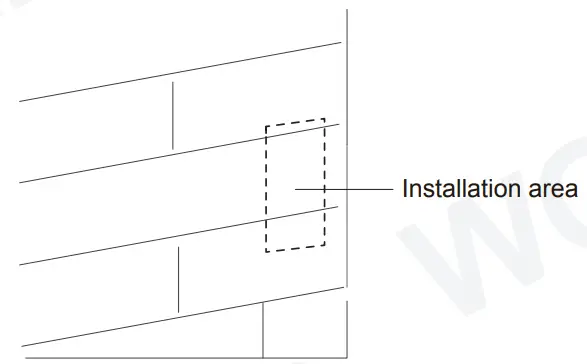
- Place the remote control hanger upright on the pre-installed area of the wall and mark the location of the two mounting holes on the wall with a marker.
Drill a hole in the marked position on the wall with a drill bit of 6 mm in diameter, with a depth of 35 mm.
(When determining the installation location, note that when the person sits on the seat to ensure that the user can catch the remote control.)

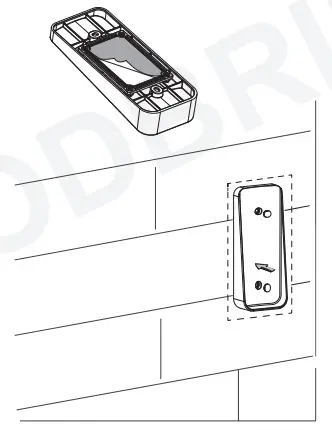
- Put the expansion tube into the wall hole and the hanger is tight against the wall.
Align the hole in the hanger with the expansion tube and tighten the screw, and then cover the silicone gasket.
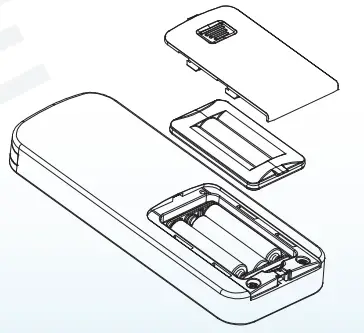
- Put batteries into remote control and cover remote control.

- Put remote control to the hanger.
Notice: Don’t install and use the product in damp places such as the shower room.
Don’t place the product in a place where it is easily exposed to water.
Remote control installation
Remote control hanger installation(Only for the hanger matching with fixing board and foam gasket.)
- Clean and dry the pre-installed area of the remote control rack on the wall. (When determining the installation location, make sure that the user can reach the remote control when he sits on the seat.)
- Remove the adhesive tape on the back of the hanger and place it tightly against the wall, then cover the silicone gasket.
- Put batteries into a remote control and cover the remote control.
- Put remote control to the hanger.
Notice: Don’t install and use the product in damp places such as the shower room.
Don’t place the product in a place where it is easily exposed to water.
Usage Instruction
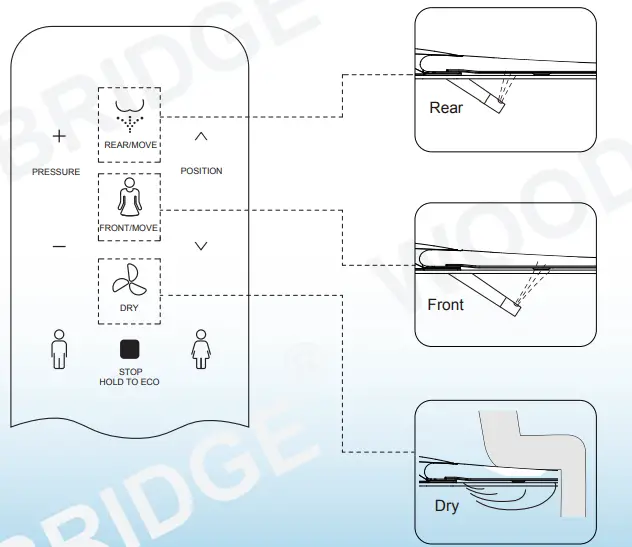
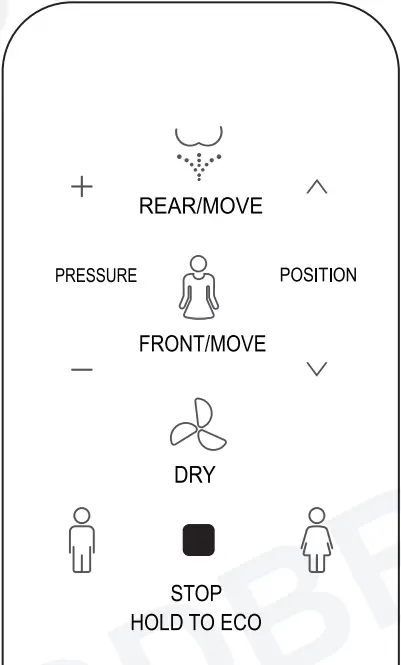
Rear/Front cleaning
- Press the “Rear cleaning/massage” button, the indicator light is on showing current water temperature level, it starts rear cleaning; Press again the “Rear cleaning/massage” button to shift to massage to massage cleaning (nozzle moves forward and backward to expand cleaning area). The cleaning will last for a circle and stop automatically, while it will stop immediately if the user presses the “STOP” button
- Press the “Front cleaning/massage” button, the indicator light is on showing current water temperature level, it starts front cleaning; Press again the “Front cleaning/massage” button to shift to massage cleaning (nozzle moves forward and backward to expand cleaning area). The cleaning will last for a circle and stop automatically, while it will stop immediately if the user presses the “STOP” button.
Drying Operation
- Press the “Dry” button, the indicator light is on showing the current wind temperature level, it starts drying; it will stop drying automatically after a circle or the user leaves the seat.
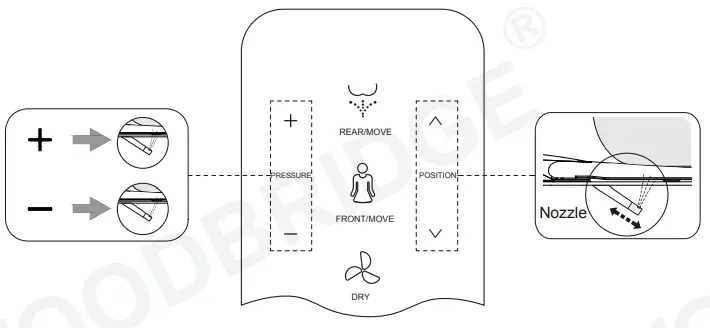
Water volume adjustment
- Press the “+” or “- ” button when it is under the function of rear cleaning or front cleaning, the indicator light will be on showing current water volume level, adjust water volume by levels.
Spray nozzle position adjustment
- Press “∧” or “∨” button when it is under the function of rear cleaning or front cleaning, the indicator light will be on showing the current nozzle position, adjust the nozzle position by 5 levels.

Energy saver
Keep pressing the “STOP” button for more than 3S to enter energy-saving mode, the indicator light will be off and the energy-saving light will be on. Keep pressing the “STOP” button again for more than 3S to exit energy-saving mode, the indicator light will be on and the energy-saving light will be off.
Energy saving
Under energy-saving mode, seat temperature is low(level 1) to achieve energy saving. (Note: If the seat temperature before energy saving is neutral, keep the neutral after energy saving)
Remark
The energy-saving mode will be suspended and goes to function mode if someone uses the seat in the middle of energy saving. The seat starts to heat immediately (without closing the seat temperature), and the energy-saving mode is restored after the human body leaves the seat.
Auto function
- The automatic function of factory default setting is middle level for water volume, nozzle position, water temperature, air temperature, seat temperature.
- A short press on the remote control button “
 “, “ ” can achieve male hip wash and female bidet wash, fully automatic and convenient use. The user can firstly set the water volume, nozzle position, water temperature gear position, and air temperature gear position. After the setting is completed, press the corresponding automatic key 3s to save the setting. The next time you use it, you can call the saved key by pressing the corresponding automatic key. Set the automatic function to enable automatic cleaning and drying in the whole process.
 - The Auto function mode will be off if the user presses other buttons during the operation of auto functions and shift to operate the functions of the buttons.
|
Auto rear cleaning
Auto front cleaning |
Tips: Certain models don’t have a drying function.
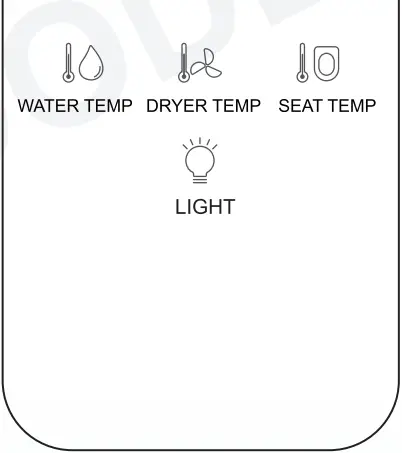
Temperature adjustment
- Water temperature adjustment
Short press the “WATER TEMP” button to adjust the water temperature. The indicator will show the water temperature level if it’s on. When the indicator is off, the water level is 0. Short press this button to adjust the water temperature level from 0 to 5 in the cycle. (Note: the water temperature is set at 10±2.5℃ in level 0, that is, when the inlet water temperature is higher than 10℃, the water won’t be heated, while when the inlet water temperature is lower than 10℃, the water will be heated to about 10℃.) - Dryer temperature adjustment
Short press the “DRYER TEMP” button to adjust the dryer temperature. The indicator will show the dryer temperature level if it’s on. When the indicator is off, the wind level is 0. Short press this button to adjust the dryer temperature level from 0 to 5 in the cycle. - Seat temperature adjustment
Short press the “SEAT TEMP” button to adjust the seat temperature.
The indicator will show the seat temperature level if it’s on. When the indicator is off, the seat level is 0.
Short press this button to adjust seat temperature level from 0 to 5 in the cycle.

Night light (Only for toilets with night light function)
- Short press “Night light” button to turn on/turn off night light, long press “Night light” button to enter into an intelligent mode ( Night light will be on or off by detecting the lightness of surroundings). If the product is on intelligent mode, short press the “Night light” button to exit intelligent mode.

Other Operations
User Code
- The user code needs to be set to avoid disturbance from remote controls when more than one smart toilet is used in the house. Turn on the toilet for setting while turning off others. Press user code combination buttons (Press the “STOP” button first and then press the “REAR” button) to enter user code setting mode, the indicator lights will be on and keep flashing.
- (RF remote control) The Remote control will generate matching user code automatically, press user code combination buttons again to exit setting mode, and the setting is completed. When the main unit is powered off to restart or change remote control batteries, the user code won’t be cleared and no need to reset.
- (IR remote control) Press water volume “+”“-” buttons to select user code. The indicator shows the corresponding user code. Press the user code combination buttons again to save settings and exit. The buzzer beeps and it’s set successfully. When the main unit is powered off to restart or batteries are removed from the remote control, the user code will be cleared and need to be reset. After entering the setting mode, if there’s no operation for 10s, the remote control will exit the setting mode automatically and return to previous states.
Quit mode
Long press the “SEAT TEMP” button to turn on/off quit mode.
Auto deodorization
Press the “Stop” button first and meanwhile press the “FRONT” button to start or close the auto deodorizing function; While the auto deodorization function is on when it’s detected that the user is seated, it’ll start deodorizing and stops when the user leaves above 3s. The auto deodorization function will turn off automatically during drying. (This function only
applies to products with auto deodorization function. This function is set to on by default.)
Remark:
- The buzzer will sound “BEEP” when the user presses one button which means the main unit receives the signal and conduct the operation accordingly. If the buzzer doesn’t sound, it means the main unit doesn’t receive the signal, please adjust the remote control direction and repress the button.
- In case of power cut during the wand’s spray operation, the wand cannot go back to the place, please wait until the power is reset. In case of a power cut for a long period, please push the wand softly back by hand. Do not push hard, to avoid damage to the wand and electrical machine.
- The body should touch the seat and the buzzer rings “CLICK”, which means functions of front cleaning, rear cleaning and drying are in operation. The nozzle will continue to spray for 1-2 seconds after the user stands up during spray operation, so please press the “STOP” button before standing up.
Customer Service Phone: 562-229-0088. (Monday – Friday 9 AM – 5 PM Pacific Time) Or Email: [email protected]