Learn how to setup your XuanPad M8-F Mini Projector and access the features such as photo, music and movie playback. You can plug the projector into a laptop or smart device and this guide shows you how to do that.
Sections in this Manual
- Important Safety Considerations
- Installation
- Cleaning
- Notes on Fire and Electric Shock
- Moving
- High-Temperature Warning
- Basic Configuration
- Projector Overview
- Projector Connections
- Connecting to a Mobile Device
- Connecting to the DVD Player
- Connecting to the External Storage Device
- Playing the PHOTO
- Playing the MUSIC
- Playing a MOVIE
- SETTINGS
- Product Features
- Troubleshooting
![]()

Important Safety Considerations
 |
 |
| Do not install the projector in sites with improper ventilation. | Do not install the projector in hot and humid sites. |
 |
 |
| Do not block the ventilation holes (intake or exhaust). | Do not install the projector in dust and smoke sites. |
 |
 |
| Do not install the projector near the temperature and smoke transducer. It may cause a sensor failure. | Do not install the projector in sites with direct blowing of warm and cool air-condition wind. Otherwise it may cause the project failure. |
Installation
- Please use the projector in a dark room for best results.
- Please use the projector with caution to avoid dropping or shocking, which may damage the projector.
- Use the power cord with caution to avoid unduly bending. Damaged power cord may cause electric shock.
Cleaning
- Unplug the power cord from the projector.
- Use a wet cloth to clean the cabinet regularly. Neutral detergent may be used for serious smudge. Do not use strong detergent or solvent such as alcohol or diluent.
- Use an air brush or lens paper to clean the lens and be careful not to scratch or abrade them.
- Please clean the ventilation opening and the loudspeaker regularly with a cleaner. The projector will be overheated with blocked dust, causing the failure.
- Please use the projector with a soft brush. Do not use rigid accessories, such as a crevice cleaning tool, to avoid damage to the projector.
Notes on Fire and Electric Shock
- Make sure of adequate ventilation and blocked outlet to avoid heat accumulation within the projector.
- Prevent foreign objects from falling into the projector, such as paper clips and paper scraps, do not attempt to retrieve any such object. Do not insert any metal object, such as an iron wire or a screwdriver, into the projector. Make sure to immediately turn off the power and ask qualified professional maintenance personnel to remove any object falling into the projector.
- Do not place any liquid on the projector.
Moving
Please use soft package materials to protect the lens when moving the projector. Also, do not impose severe mechanical vibration on the projector.
High-Temperature Warning
During and after the projection, the temperature near the outlet will rise, therefore touching may cause burns. Do not peep at the lens, or it may cause severe eye injury.
Basic Configuration
- 1 x Mini Projector
- 1 x Power Cable
- 1 x HDMI Cable
- 1 x AV Signal Cable
- 1 x Remote Control (battery not included)
- 1 x User Manual

If there is any part missing, please contact XuanPad Support Team.
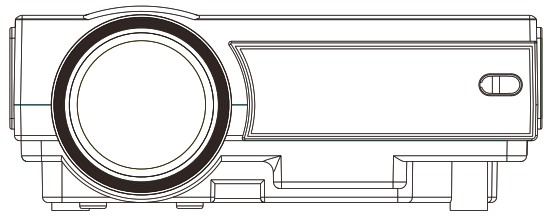
Projector Overview


Projector Connections
- Connect the power cord;
- Short press the power button to turn on the projector until the LED indicator on
the projector shows solid Red. Please wait for 10 seconds after pressing. If the projector is turned on successfully, the LED indicator shows solid Yellow; - Adjust the focus ring and keystone to get the best image performance;
- Short press the ”


Tips:
- After you plug the power cord into the inlet, turn on the projector until the LED indicator on the projector shows solid Red. If the projector is turned on and working properly, the LED indicator shows solid Yellow;
- Never look into the projector lens when the lamp is on. This can damage your eyes and is especially dangerous for children;
- Install 2 pieces of AAA batteries into the remote before using it.
Connecting to a Mobile Device


For iSO System (wired connection)
Step 1: Turn on your mobile device and the projector;
Step 2: Connect the HDMI port to your projector;
Step 3: Connect the other end with Lightning port to your mobile device;

For example, you can prepare an HDMI adapter with an HDMI port for connecting to the projector, a USB port for charging and a Lightning port for connecting to your mobile device as below

Step 4: Press the ” ![]()
Step 5: Select “HDMI” by pressing the ” ![]()
![]()

Tips:
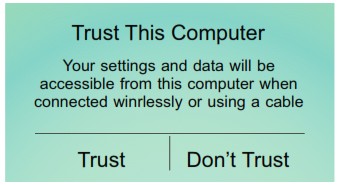
- Select Trust when there may be a pop-up window on your mobile device, then you can project any files on the mobile device;
- When it shows the screen with some QR codes, butterfly icon and so on after selecting, please do not scan any QR code and just wait for a moment;
- Never directly insert your Lightning cable to the USB port on the projector;
- Please connect a power cable for HDMI adapter. (external electric supply socket is recommended);
- Please read the instructions of the HDMI adapter carefully before connecting.

For Android System (wired connection)
Step 1: Turn on your Bluetooth on your mobile device;
Step 2: Connect the HDMI port to your projector;

Step 3: Press the ” ![]()
Step 4: Select “HDMI” by pressing the ” ![]()
![]()
Step 5: Scan the QR code on screen through your browser and download it;
Step 6: Connect the other end with Type-C/ Micro USB port to your mobile device. Then follow the prompts on your phone.
Tips:
- Select Trust when there may be a pop-up window on your mobile device, then you can project any files on the mobile device;
- If it is failed to connect, please unplug and reinsert the cord on your phone;
- Please read the instructions of the HDMI adapter carefully before connecting;
- Please connect a power cable for HDMI adapter. (external electric supply socket is recommended);
- Never directly insert your Type-C/ Micro USB cable to the USB port on the projector.
For Android System (wireless connection)
Step 1: Connect the HDMI port to your projector;

Step 2: Press the ” ![]()
Step 3: Select “HDMI” by pressing the ” ![]()
![]()
Step 4: Turn on the Wi-Fi Switch in your Android device. Successfully connected Wi-Fi on Android device is not a must unless the live streaming content is needed;

Step 5: Activate Multi-Screen function in your Android device and search for the projector.
HUAWEI
More connections-Wireless projection


Samsung
Swipe up the screen of your Samsung device, then tap “Smart view” and search for the projector.

Xiaomi
Swipe up the screen of your Xiaomi device, then tap “Connection & sharing-Cast” and search for the projector.

Tips:
- The fluency of screen mirroring with wireless connection will be affected by the network environment. A bandwidth of 100 Mbit or more is recommended when using screen mirroring;
- Make sure your mobile device is closed to the projector when using wireless connection. A distance within 1 meter is recommended;
- Some mobile devices may not support screen mirroring due to the compatibility.
For iSO System (wireless connection)
Step 1: Connect the HDMI port to your projector;
Step 2:Press the ” ![]()
Step 3:Select “HDMI” by pressing the ” ![]()
![]()
Step 4:Go to the settings of your iOS mobile device and connect it via WiFi. Please ignore the exclamation mark before it;

Step 5: Swipe up the screen of your iOS mobile device, then tap Screen Mirroring/ AirPlay Mirroring and search for the projector.

Tips:
- The fluency of screen mirroring with wireless connection will be affected by the network environment. A bandwidth of 100 Mbit or more is recommended when using screen mirroring;
- Make sure your mobile device is closed to the projector when using wireless connection. A distance within 1 meter is recommended;
- Some mobile devices may not support screen mirroring due to the compatibility.
Connecting to a Computer
Option 1: Connect the projector to your computer by using the HDMI cable in the package. An HDMI connection is recommended for projecting movies, videos, and other files which need to be HD.
Step 1: Turn on your computer and the projector;
Step 2: Connect the HDMI cable to your computer’s HDMI port;
Step 3: Connect the other end to any available HDMI port on your projector;
Step 4: Press the ” ![]()
Step 5: Select “HDMI” by pressing the ” ![]()
![]()

Option 2: Connect the projector to your computer by using a VGA computer cable in the package.
Step 1: Turn on your computer and the projector;
Step 2: Connect the VGA cable to your computer’s VGA port;
Step 3: Connect the other end to any available VGA port on your projector;
Step 4: Press the ” ![]()
Step 5: Select “VGA” by pressing the Up/ Down then press ” OK ” button for confirm.

Notes:
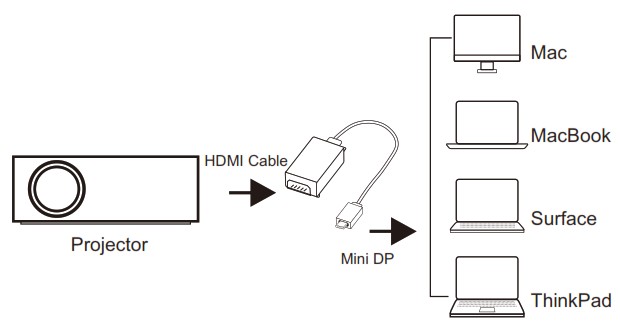
- To connect a Mac/ Surface that includes only a Mini DisplayPort, Thunderbolt port, or Mini-DVI port, you need to obtain an adapter that allows you to connect to the projector’s HDMI or VGA port. Contact Apple/ Microsoft for compatible adapter or get from any store by yourself. For example, here is a Mini DP cable which can be used as a reference (insert on end of the HDMI cable in the package to the projector and the other end to the HDMI connector of the Mini DP port when using);
- You need to select the project option when connecting your computer to the projector at the first use.

• For Windows7 and higher system, pressing the Windows logo key + P key at the same time invokes a display-switch toolbar with various display options shown below:

PC screen only – This option displays the contents of your computer screen on the computer only. This is a great option to choose when your presentation hasn’t yet started or if you want to use the computer for another reason and don’t want the contents of the screen displayed through the projector for all to see.
Duplicate – This option simultaneously displays the contents of the computer screen on the computer screen and through the projector. This is a great choice when your back will be toward the projector’s screen while giving a presentation. This way you can watch the computer screen while the audience watches the projector screen and you won’t have to continually turn your back to the audience during the presentation.
Extend – This option splits the image between the computer and projector. This way you can display one thing on your computer screen and something else on the projector screen. This is great when using PowerPoint so the presentation is displayed on the projector while your presentation notes are displayed on your computer screen in front of you.
Projector Only (Second Screen Only) – As its name implies, this option will display the content of your presentation on the projector, but show a blank screen on your computer. Although not a popular choice, this is a good option when you are running your presentation from your laptop on battery power. Turning off the laptop screen can help preserve battery life.
Connecting to the DVD Player
Option 1: Connect the projector to your DVD player by using the HDMI cable in the package.
Step 1: Turn on your DVD player and the projector;
Step 2: Connect the HDMI cable to your computer’s HDMI port;
Step 3: Connect the other end to any available HDMI port on your projector;
Step 4: Press the ” ![]()
Step 5: Select “HDMI” by pressing the ” ![]()
![]()
Option 2: Connect the projector to your DVD player by using the AV cable in the package.
Step 1: Turn on your DVD player and the projector;
Step 2: Connect the colorful Female connectors to your DVD player’s RCA cable;
Step 3: Connect the yellow Male connector to the AV In port on the projector;
Step 4: Press the ” s ” button to enter the interface of Input Source;
Step 5: Select “AV” by pressing the ” ![]()
![]()

Connecting to the External Storage Device
Step 1: Insert USB drive;
Step 2: Press the ” ![]()
Step 3: Select “DMP” by pressing the ” ![]()
![]()
Playing the PHOTO
Step 1: Select PHOTO in the main interface by pressing the ” ![]()
![]()
![]()
![]()

Step 2: Select the disk C or USB, then press the ” OK ” button to enter the disk;

Step 3: Select the photo or click the folder to enter the next directory till you find the photo you would like to play in the directory;
Step 4: Press the ” OK ” button on the projector or remote to select photo and press ” ![]()

Play/ Pause: plays or pauses the current photo.
Prev: Previous, goes back to the previous photo.
Next: Goes to the next photo. Stop: Exits from the current photo.
Repeat: Has the options of Repeat 1, RepeatAll and RepeatNONE. Press the ” OK ” button to switch among these options. RepeatAll loops to play all the photos in your playlist.
Repeat NONE: plays the current video once, then exits from the current video; Repeat 1 loops to play the current video all the time.
Playing the MUSIC
MUSIC: After you tick some music file(s) under the MUSIC category, go to the MUSIC category. Press the ” OK ” button when selecting the MUSIC icon in the interface of the photo playing, it will play the music file(s) you ticked for photo background. Plist: A list of photo files that can be played from the folder. Info: Shows the information about the current photo including resolution, size, date and time;
Tips: It will show a bottom bar with different settings when playing the music. Press the Down button or the Back button to hide it. Press the ” OK ” button to show it again.

Step 1: Select MUSIC in the main interface by pressing the ” ![]()
![]()
![]()
![]()

Step 2: Select the disk C or USB, then press the ” OK ” button to enter the disk;

Step 3: Select the music file or click the folder to enter the next directory till you find the music you would like to play in the directory.

Play/ Pause: Plays or pauses the current music.
FB: Fast Backward, rewinds the music back quickly while playing it. The rewinding speed ranges from 2X to 16X.
FF: Fast Forward, pushes the music to move forward quickly while playing it. The forward speed ranges from 2X to 16X.
Prev: Previous, goes back to the previous music.
Next: Goes to the next music.
Stop: Exits from the current music.
Rep: Has the options of Repeat 1, RepeatAll and RepeatNONE. Press the ” OK ” button to switch among these options. RepeatAll loops to play all the music in your playlist. RepeatNONE plays the current video once, then exits from the current video; Repeat 1 loops to play the current video all the time.
Set A/ Set B/ None: Selects Set A by pressing the ” OK ” button to set a time point and select Set B by pressing the ” OK ” button to set another time point, then it will loop to play the music fragment between these points. Select None to get back to the normal playing mode. Mute: Mutes or unmutes the current music. Plist: A list of music files that can be played from the current folder. Info: Shows the information about the current music including Bit Rate, Artist, Size, and so on.
Tips:
It will show a bottom bar with different settings when playing the music. Press the Down button or the Back button to hide it. Press the ” OK ” button to show it again.

Playing a MOVIE
Step 1: Select MOVIE in the main interface by pressing the ” ![]()
![]()
![]()
![]()

Step 2: Select the disk C or USB, then press the ” OK ” button to enter the disk;

Step 3: Select the MOVIE or click the folder to enter the next directory till you find the photo you would like to play in the directory;
Step 4: Press the ” OK ” button on the projector or remote to select photo and press ” ![]()

Play/Pause: Plays or pauses the current video.
FB: Fast Backward, rewinds the video back quickly while playing it. The rewinding speed ranges from 2X to 32X.
FF: Fast Forward, pushes the video to move forward quickly while playing it. The forward speed ranges from 2X to 32X.
Prev: Previous, goes back to the previous video.
Next: Goes to the next video.
Stop: Exits from the current video.
Rep: Has the options of Repeat 1, RepeatAll and RepeatNONE. Press the ” OK ” button to switch among these options. RepeatAll loops to play all the videos in your playlist.
RepeatNONE plays the current video once, then exits from the current video; Repeat 1 loops to play the current video all the time.
Set A/ Set B/ None: Selects Set A by pressing the ” OK ” button to set a time point and select Set B by pressing ” OK ” button to set another time point when playing the video, then it will loop to play the video fragment between these points. Select None to return to normal playing mode.
PList: A list of video files that can be played from the current folder.
Info: Shows the information about the current video including resolution, size and so on.
SlowF: Plays the video in slow motion with a speed being range from 2X to 16X.
StepF: Steps forward the video frame by frame by pressing the ” OK ” button.

SETTINGS
| Set Language | Press “SETTING” and press ” |
| Rotate | Press “SETTING” and press “Rotate”. Press ” |
| OSD Duration | 5 Sec, 10 Sec, 15 Sec and Off. |
| Restore Factory Default | Reset the projector. |

| Picture Mode Medium | Contrast, Brightness, Color, Sharpness and Tint |
| Color Temperature Medium | Red, Green and Blue |
| Aspect Ratio Auto | 4:3, 16:9 and Auto |
| Noise Reduction Middle | Off, Low, Middle, High and Default |
| Reduce Display Size 100% Default | 75% to 100% |

| Sound Mode Medium | Standard, MUSIC, MOVIE, Sports and User |
| Surround Sound SRS TruSurround | Balance the sound of the left and right channel of the speaker |
| Balance | |
| Auto Volume | OFF, SRS TruSurround, Surround |
Product Features
| Projection Tech | LCD TFT Projection System |
| Contrast Ratio | 2000:01:00 |
| Display Colors | 16.7M |
| Lamp Color Temperature | 9000K |
| Lamp Life Time | 55000 hrs |
| Power Supply | AC IN: ~100V-240V 50/60HZ |
| Projector Consumption | 50W |
| Lens | Multichip Composite Coating Optical Lens |
| AV Input | AV |
| Signal Format | The Global Standard |
| Correction | Optical ±15 Degree |
| A Single Continuous Use Time | «24hour |
| Projection Size | 28-210inch |
| Projector Weight | 0.91Kg |
| Noise and Light Leaking | Low Noise, Low Light Leaking |
| Dimension | 198 x 153 x 68.5 mm |
| Ceiling Mount Size | M6 |
| Audio Frequency | 2W+2W |
| Signal Ports | Video Input (1.OVp-p +/-5%) V G A I n p u t ( 8 0 0 x 6 0 0 @ 6 0 H z , 1024×[email protected]) HDMI Input (480i 480p 576i 720p 1080i 1080p) |
| USB TF Cad Format | Video Format: MPEG1 、MPEG2、MPEG4、RM 、AVIRMVB、MOV、 MKV、DIVX、VOB、JPEG(only unsupported 640*480) Music Format: WMA、Mp3、M4A(AAC) Photo Format: HPEG、BMP、NG |
Troubleshooting
Problems listed below might occur during the operation of your projector. Please refer to the possible factors which might cause the issue to do troubleshooting. Any questions during use, please feel free to contact with AuKing customer service team. Email address of customer service:
- Why is the display of the projector available but without audio?
• The projector or the connected device (PC, TV, etc.) is muted.
• Dolby sound is not supported, exit to play again.
• The audio format is not supported by the projector.
• VGA connection can only transmit analog signal of video not audio. An external speaker is required when the device is connected via VGA cable.
• Encryption applied to the videos or media player which holds the video. Try more videos to define this possibility.
• Try YouTube if your player is Netflix. The problem will happens when playing Netflix because of copyright. - Why is the audio of the projector available but without display?
• The video format is not supported by the projector.
• Encryption applied to the videos or media player which holds the video.
• If the lamp of the projector is off with only audio playing, the lamp is defective. Please contact seller for a replacement.
• Try another HDMI cable if you select the HD input source.
• Try YouTube if your player is Netflix. The problem will happens when playing Netflix because of copyright. - Why does the projection screen show No Signal?
• Make sure all cables are plugged correctly and firmly.
• Make sure you select the right input source. For example, if you insert a USB drive, please select “DMP” in the interface of Input Source. If you connect with phone, please select “HDMI” in the interface of Input Source. - How can i do if the Image is blurry or out of shape?
• Adjust the focus and keystone ring by moving it leftward/rightward till it shows the best images.
• Place projector on a flat surface horizontally or vertically. An inclination of any angle may result in blurry displays or uneven colors.
• Darker environment suggested achieving the best projecting performance.
• The eligible distance of 1.16m-5m/ 37inch-150inch between the projector and projecting screen/ wall.
• Projecting wall or screen is clean white if possible. - How can i do if the Image is up side down?
• Press ” s ” button and choose “DMP” source. Enter “SETTING” and press ” OK ” 2 times. Enter “Rotate”. Press ”
- How can i do if the projection screen is not square or allied horizontally?
• Make sure the projector is placed on a flat surface with projector light in the middle of the screen.
• Make sure the projector screen is placed horizontally. - How can i do if there is color distortion?
• Make sure the video source has a fine resolution.
• Adjust the colors: enter Picture Mode / Color Temperature, then select different modes and adjust the value accordingly. - How can i do if the remote is unresponsive?
• Make sure the batteries are installed correctly and the power is enough.
• Please make sure the IR receiver is not covered. - How should i do if there are small dots on display?
• Tap the projector slightly to shake off the dust which may be caused during installing or shipping.
• Clean the lens with clean non-woven fabrics. - How should i do if there is expanding dark spot or smoke when using the projector?
• Check if the fan noise increases or the fan stops working. Unplug the projector and contact XuanPad Team for assistance.
• Make sure the outlet and projector power adapter are not wet or humid which will cause sparks or smoke on outlet when power on the projector. - Why does the projector is shut off during playing?
• Make sure the power plug is working and firmly fitted into the outlet.
• If the LED indicator on the projector is light up, but the fan doesn’t work, please contact AuKing Team for assistance.
• Overheat on the projector will activate built-in power-off protection panel. Restart the projector when it gets cooler. - Can this projector support 3D effect?
• The projector supports 3D video source, and 3D viewing performance is achievable with Red-Blue 3D Glasses; but please understand the experience will not be better than in the theater and we do not recommend it if you have a higher expectation about 3D effect. - Why doesn’t anything work in the main interface especially with external storage connected?
• Correct input source must be selected when you use the USB disk or SD card; otherwise, No Signal will be shown on the screen. - Why doesn’t the projector’s lamp light up or power on?
• Please contact AuKing for assistance when this occurs. - How can i change the language?
• Press ” s ” button and choose “DMP” source. Enter “SETTING” and press ” - How can i connect my smart phone to the projector?
• HDMI adapter is needed to delivery display from smart phones. Adapters vary depending on smart phones. Please do not forget to connect a power cable for • HDMI adapter. (external electric supply socket is recommended) - What kind of screws do i need for mounting this projector?
• M4 screw - What Kind of cable do i need when connecting TV BOX, TV, Firestick and DVD Player to the projector?
• HDMI cable for all devices mentioned above. for some TV without HDMI port, VGA cable will work. Certain DVD players require the AV cable connection. - Why does the projector show “No Signal” when connecting with phone?
• Make sure the projector connects with phone via HDMI adapter not USB cable.
• Please connect the power supply (5V/1A) to ensure the adapter works properly.
• Please read the instructions of the HDMI adapter carefully before connecting.
• Please watch the video on how to connect the phone and computer mentioned on the homepage of the manual. - How should I do if there is loud noise when using the projector?
• Contact XuanPad Team for assistance.